Page is loading ...

0
GEAppliances
JTP95
The electrical output of the
microwave oven in this cooking
center is 900 watts.
(IEC- 705 Test Procedure)
Part No. 164D3333P099 Pub.No. 49-8863 72-97C6

IMPORTANTSAFETYINFORMATION.
READALLINSTRUCTIONSBEFOREUSING.
WARNING!
Foryour safety, the information in this manual must be followed to minimize the risk of fire or
explosion, electric shock, or to prevent property damage, personal injury, or loss of life.
PRECAUTIONSTOAVOIDPOSSIBLEEXPOSURETOEXCESSIVE
MICROWAVEENERGY
iiiiiiiiiii_iii
Do not attempt to operate this oven with
the door open since open-door operation
can result in harmflfl exposure to
microwave enerDT. R is importantnot to
defeat or tamper with thesafety interlocks.
Do not place any object between the oven
flont face and the door or allow soil or
cleaner residue to accumulate on sealing
surfaces.
The oven should not be a(!justed or
repaired by anyone except properly
qualified sel_4ce personnel.
Do not operate the oven if it isdamaged. It
is particularly important that the oven door
close properly and that there is no damage
to the:
[Z] door (bent)
[] hinges and latches (broken or
loosened)
I-j] door seals and sealing surfaces.
IMPORTANTSAFETYNOTICE
TheCalifornia Safe Drinking Water and Toxic Enforcement Act requires the Governor of California to
publish a list of substances known to the state to cause birth defects or other reproductive harm, and
requires businesses to warn customers of potential exposure to such substances.
Thefiberglass insulation in self-clean ovens gives off a very small amount of carbon monoxide during
the cleaning cycle. Exposure can be minimized by venting with an open window or using a ventilation
fan or hood.
2
SAFETYPRECAUTIONS
When using electrical appliances, basic safety precautions should be followed, including the following:
WARNING--To reduce therisk ofburns,
electric shock,fire, injury topersons or
exposure toexcessive microwave energy:
.....Use this appliance only for itsintended use
as described in this manual. Do not use
corrosive chemicals or vapors in this
appliance. This cooking center isspecifically
designed m heat or cook food, and is not
intended for laborato U or indusuial use.
Be sure your appliance isproperly installed
and grounded by a qualified technician in
accordance with the provided Installation
Instructions.
iiiiiiiiiiii_iii
iiiiiiiiiiii_iii
iiiiiiiiiiii_iii
Have the installer showyou the location of
the circuit breaker or fuse. Mark it for easy
reference.
Be sure the cooking center issecurely
installed in a cabinet that isfirmly attached
to the house structure. Weight on the oven
door could cause the oven to tip and result
in inju U. Never allow anyone to climb, sit,
or hang on the oven door.
This appliance must be connected to a
grounded, metallic, permanent wiring
system, or an equipment _ounding
conductor should be run with the circuit
conductors and connected to the
equipment grounding terminal or lead
on the appliance.

.....Do not store this appliance outdoors.
Do not use this product near water-for
example, in a wet basement, or near a
swimming pool.
.....This appliance should be seI_Ticed only by
qualitied se_Tice personnel. Contact nearest
authorized se_ice facility for examination,
repair or a(!jusunent. Do not repair or
replace any part of this appliance unless
specitically recommended in this manual.
All other sei_4cing should be referred to
a qualitied technician.
.....Before performing any sel_4ce, disconnect
the cooking center power supply at the
household distribution panel by removing
the fuse or switching off the circuit breaker.
.....Do not operate this appliance ifit has a
damaged cord or plug, it it is not working
properly, or itit has been damaged or
dropped.
Do not leave children alone-children
should not be left alone or unattended in
an area where appliance is in use. They
should never be allowed to sit or stand on
any part of the appliance.
.....Don't allow anyone m climb, stand or
hang on the door. They could damage
the cooking center and cause severe
personal injuU.
CAUTION:Items of interest to children
should not be stored in cabinets above an
oven; children climbing on the oven to
reach items could be seriously injured.
Teach children not to play with the controls
or any other part of the cooking center.
.....Wear proper clothing. Loose fitting or
hanging garments should never be worn
while using the appliance. Flammable
material could be ignited it brought in
contact with hot heating elements and may
cause severe burns.
.....Use only diT pot holders-moist or damp
pot holders on hot surthces may result in
burns flom steam. Do not let pot holders
touch hot heating elements. Do not use a
towel or other bulky cloth. Such cloths can
catch fire on a hot element.
Ahvays keep dish towels, dish cloths, pot
holders, and other linens a safe distance
fiom your oven.
Ahvays keep wooden spoons and plastic
utensils and canned food a safe distance
away fiom your oven.
Ahvays keep combustible wall coverings,
curtains or drapes a safe distance fiom
your oven.
.....Do not store flammable material in an oven
or near the cooking center.
.....Do not cover or block any openings on the
appliance.
For your safety, never use your appliance
for warming or heating the room.
Do not leave paper products, cooking
utensils, or food in the oven when not
in use.
.....Do not store or use combustible materials,
gasoline or other flammable vapors and
liquids in the vicinity of this or any other
appliance.
Do not let cooking grease or other
flammable materials accumulate in or
near the cooking center.
.....Do not touch heating elements or interior
surface of the oven. These surfaces may be
hot enough m burn even though they are
dark in color. During and after use, do not
much, or let clothing or other flammable
materials contact any interior area of the
oven; allow sufficient time for cooling first.
Potentially hot surfaces include oven vent
openings, surfaces near the openings, and
crevices around the oven door.
REMEMBER:The inside surface of the oven
may be hot when the door is opened.
.....Do not use water on grease fires. Never pick
up a flaming pan. Smother flaming pan on
surface unit by covering pan completely
with well-fitting lid, cookie sheet or fiat uay.
Flaming _ease outside a pan can be put out
by covering with baking soda or, it available,
a multi-purpose dU chemical or foam-type
fire extinguisher.
3

IMPORTANTSAFETYINFORMATION.
READALLINSTRUCTIONSBEFOREUSING.
WARNING!
WHENCOOKINGPORK...
Whencookingpork,follow the directionsexactlyandalwayscookthemeat to aninternaltemperatureof at
least 170OF.Thisassuresthat, in theremotepossibility that trichinamay bepresentin themeat,it will be killed
and themeat wifl be safe to eat.
4
MICROWAVEOVEN
Read and foflow the specific "Precautions to Avoid Possible Exposure ToExcessive Microwave
Energy" section in this manual.
Toreduce therisk of fire in the ovencavity:
....Do not over-cook food. Carefl]lly attend
appliance if paper, plastic or other
combustible materials are placed inside
the oven to facilitate cooking.
.....Remove wire twist-ties from paper or
plastic containers before placing bags
in oven.
.....Do not use your microwave oven to diy
newspapers.
.....Do not pop popcorn in your microwave
oven unless in a special microwave
popcorn accesso U or unless you use
popcorn labeled for use in microwave
ovens.
.....Do not over-cook potatoes. They could
dehydrate and catch fire, causing damage
to your oven.
.....Do not operate the oven while empty to
avoid damage m the oven and the danger
of fire. Ifby accident the oven should run
empty a minute or two, no harm is done.
However, Uym avoid operating the oven
empty at any time-it saves energy and
prolongs the life of the oven.
.....Do not use the oven for storage purposes.
Do not leave paper products, cooking
utensils or food in the oven when not
in use.
.....ffmaterials inside the oven should i_fite,
keep oven door closed, turn oven off, and
disconnect the power cord, or shut off
power at the fuse or circuit breaker panel.
Ifthe door is opened, the fire may spread.
.....This microwave oven is not approved or
tested for marine use.
.....Some products such as whole eggs and
sealed containers-for example, closed
,jars-will explode and should not be
heated in this microwave oven. Such use of
the microwave oven could result in in,juU.
.....Do not operate the microwave oven
without the turntable and support in place.
.....Avoid heating baby food in glass jars, even
with the lid off. Make sure all infant food is
thoroughly cooked. Stir food to distribute
the heat evenly. Be careful to prevent
scalding when warming formula or breast
milk. The container may feel cooler than
the milk really is. Ahvays test the milk
before feeding the baby.
.....Do not boil eggs in a microwave oven.
Pressure will build up inside the egg
yolk and will cause it to burst, possibly
resulting in in,juU.
.....Foods with unbroken outer "skin" such as
potatoes, sausages, tomatoes, apples,
chicken livers and other giblets, and egg
yolks should be pierced to allow steam to
escape during cooking.
Don't deflost flozen beverages in narrow-
necked bottles (especially carbonated
beverages). Even if the container is
opened, pressure can build up. This can
cause the container to burst, possibly
resulting in in,juU.
Hot foods and steam can cause burns.
Be careful when opening any containers
of hot food, including popcorn bags,
cooking pouches and boxes. To prevent
possible inju U, direct steam away flom
hands and face.
.....As with any appliance, close supei_4sion is
necessa U when used by children.

casseroles, cooking dishes, measuring cups, custard cups, pottery or china dinnerware which does
not have metallic trim or glaze with a metallic sheen can be used. Some cookware is labeled
"suitable for microwaving. "
.....ffyou are not sure it a dish is microwave-
safe, use this test: Place in the oven both
the dish you are testing and a glass
measuring cup filled with 1 cup of water-
set the measuring cup either in or next to
the dish. Microwave 1 minute at high.
If the dish heats, it should not be used
for microwaving.
If the dish remains cool and only the water
in the cup heats, then the dish is microwave-
safe.
.....ffyou use a meat thermometer while
cooking, make sure it is safe for use in
microwave ovens.
.....Do not use recycled paper products.
Recycled paper towels, napkins and waxed
paper can contain metal flecks which may
cause arcing or ignite. Paper products
containing nylon or nylon filaments should
be avoided, as they may also ignite.
.....Some styrofoam trays (like those that meat
is packaged on) have a thin strip of metal
embedded in the bottom. When
microwaved, the metal can burn the floor
of the oven or ignite a paper towel.
.....Not all plastic wrap is suitable for use in
microwave ovens. Check the package for
proper use.
.....Paper towels, waxed paper and plastic
wrap can be used to cover dishes in order
to retain moisture and prevent spattering.
Be sure to vent plastic wrap so steam
can escape.
.....Oversized food or oversized metal
cookware should not be used in a
microwave oven. Electrical shock or
fire could occur.
.....While paper plates may be used for timed
cooking and defiosting, do not use them
with Aura Sensor cooking. Use microwave-
safe plates or bowls for reheating. Cover
with plastic wrap.
.....Cookware may become hot because
of heat transferred flom the heated
food. Pot holders may be needed to
handle the cookware.
.......Boilable" cooking pouches and tightly
closed plastic bags should be slit, pierced
or vented as directed by package. If they
are not, plastic could burst during or
immediately after cooking, possibly
resulting in inju U. Also, plastic storage
containers should be at least partially
uncovered because they form a tight seal.
When cooking with containers tightly
covered with plastic wrap, remove
covering carefully and direct steam
away fiom hands and face.
.....Use foil only as dhected in this manual. TV
dinners may be microwaved in foil uays less
than 3/4" high; remove the top foil cover
and return the tr W to the box. When using
foil in the microwave oven, keep the foil at
least 1 inch aww fiom the sides of the oven.
.....Plastic cookware-Plastic cookware
designed for microwave cooking isvei7
useful, but should be used carefully.
Even microwave-safe plastic may not
be as tolerant of ove>cooking conditions
as are glass or ceramic materials and
may soften or char it subjected to short
periods of ove>cooking. In longer
exposures m ove>cooking, the food
and cookware could ignite.
Follow theseguidelines:
[Z] Use microwave-safe plastics only and
use them in strict compliance with the
cookware manufacturer's
recommendations.
Do not microwave empty containers.
f-_ Do not permit children to use
plastic cookware without complete
supei_,ision.
5

IMPORTANTSAFETYINFORMATION.
READALLINSTRUCTIONSBEFOREUSING.
WARNING!
ARCING
Ifyou see arcing, press the CLEAR/OFFpad and correct the problem.
Arcing isthe microwave termfor sparks in the
oven.Arcing iscaused by:
Metal or foil touching the side of the oven.
.....Foil not molded to food (upturned edges
act like antennas).
.....Metal, such as twist-ties, poulu T pins, or
goM-rimmed dishes, in the microwave.
.....Recycled paper towels containing small
metal pieces being used in the microwave.
SUPERHEATEDWATER
Microwaved water and other liquids do not always bubble when they reach the boiling point.
They can actually get super heated and not bubble at all.
Super heated liquid will bubble up out of the
cup when it is moved or when something like
a spoon or tea bag is put into it.
To prevent this fiom happening and causing
i_ju U, do not heat aW liquid for more than 2
minutes per cup.
Atter heating, let the cup stand in the
microwave for 30 seconds before m(Mng it or
putting awthing into it.
Spontaneousboiling
Under certain special circumstances, liquids
may start to boil during or shortly after removal
from the microwave oven.
To prevent burns from splashing liquid, we
recommend the following: before removing
the container fiom the oven:
....Allow the container to stand in the oven for
30 to 40 seconds after the oven has shut off.
.....Do not boil liquids in narrow-necked
containers such as soft drink bottles, wine
flasks and especially narrow-necked coffee
cups. Even if the container is opened,
excessive steam can build up and cause it
to burst or overflow.
ALLTHESETHINGSARENORMALWITHYOURMICROWAVE
.....Steam or vapor escaping from around
the door.
.....Light reflection around the door or the
outer case.
.....Dimming of the oven light and change
in the blower sound may occur while
operating at power levels other than high.
.....The microwave fan may operate with both
ovens off. It iscooling the conuol and will
turn itself off.
.....Some TV-radio interference might be
noticed while using your microwave oven.
It's similar to the interference caused by
other small appliances and does not
indicate a problem with your oven.
.....A dull thumping sound while the oven
is operating.
6

escapes can cause burns to hands, face
and/or eyes.
Do not heat unopened food containers.
Pressure could build up and the container
could burst, causing an injm T.
Keep the oven vent unobstructed.
Keep the oven flee from grease buildup.
Keep the cooking center clean and flee of
accumulations of grease or spillovers,
which may i_fite.
Never leave the oven door open when you
are not watching the cooking center.
Place the oven shelf in the desired position
while the oven is cool. If shelves must be
handled when hot, do not let pot holder
contact the heating elements.
When using cooking or roasting bags in the
oven, follow the manufacturer's directions.
Pulling out the shell to the stop-lock isa
cor]venience in lilting heaxTfoods. It is also
a precaution against burns fiom touching
hot surfaces of the door or oven walls.
Do not use the oven to dITnewspapers. It
overheated, they can catch on fire.
Do not use the oven for a storage area.
Items stored in an oven can ignite.
Do not leave paper products, cooking
utensils or food in the oven when not in use.
After broiling, always take the broiler pan
out of the oven and clean it. Leftover
grease in the broiler pan can catch fire next
time you use tire pan.
Clean only parts listed in this Use and
Care Manual.
Do not use aluminum foil to line oven
bottoms, except as suggested in this
manual, hnproper installation of
aluminum foil may result in a risk of
electric shock or fire.
.....Do not clean the door gasket. The door
gasket is essential for a good seal. Care
should be taken not m rub, damage or
move the gasket.
.....Do not use oven cleaners. No commercial
oven cleaner or oven liner protective
coating of any kind should be used in or
around any part of the oven. Residue fiom
oven cleaners will damage the inside of the
oven when the sell-clean cycle isused.
Before sell-cleaning tire oven, remove
the probe, broiler pan, grid and other
cookware.
Be sure to wipe up excess spillage before
starting a sell-cleaning cycle.
ff the sell-cleaning mode mallunctions,
turn the oven off and disconnect tire
power supply. Have it sei_4ced by a
qualified technician.
Listen for a fan-- a fan noise should be
heard sometime during tire cleaning
cycle. It not, call for sei_Tice before sell:
cleaning again.
Roadandfollow thisSafotl/Informationcarofully
SAVETHESEINSTRUCTIONS

Safety Information
SafetyPrecautions ...... 2,3
Microwave Oven....... 2, 4-6
Self-CleaningLowerOven... 7
Congratulations!
YouAre Now PartoftheGEFamily.
Welcome to the GE flintily. We're proud of our qualib7 products and we are
committed to providing dependable service. You'll see it in this easy-to-use Owner's
Manual and you'll hear it in the fliendly voices of our customer sewice department.
Operating instructions
Usingthe Microwave Oven9-16
Microwave ControlPanel ..... 9
Auto SensorControls .. 14-16
LowerOvenControlPanel... 17
Usingthe LowerOven... t7-32
Usingthe Probe....... 25,28
LowerOvenThermostat .... 30
Careand Cleaning
Self-CleaninQLowerOven31,32
Microwave Or'on......... 33
Shelves ................. 34
BroilerPanand Grid ..... 35
Probe ................. 35
OvenLight Bulb .......... 36
Best of all, you'll experience fl_ese values each rime you use your cooking center.
That's important, because your new cooking cenmr xs411be part of your flintily for
ma W years. And we hope you will be part of ours for a long time to come.
We thankyou for buying GE. We appreciate your purchase, and hope you x,_411
continue to rely on us whenever you need qualib_appliances foryour home.
GE& You,A ServicePartnership.
IMPORTANT!
Itisimportantthatwe,themanufacturer,knowthelocationofyourcookingcenter
,shoulda needoccurforadjustments.Yoursupplierisresponsibleforregistering
youastheownerPleasecheckwithyoursuppliertobesurehehasdoneso.
Thisappliancemustberegistered.Pleasebecertainthatit is.
Fill out and return the Consumer Product Registration Card that is
packed with this product. If you cannot find it, please send in the
&lplicam card prinmd in the back of this manual.
Ifyoumove,orifyouarenottheor/ginalpurchaserpleasewritetous,stating
modelands_rialnumbers.Writeto;GEAppMnces,RangeProductService,
AppMncePark,Louisville,KY40225
FORYOURRECORDS
Write themodel and serial numbershere:
#
Troubleshooting Tips
BeforeYouCa//
ForService............ 37-40
#
You can find them on a label inside the upper oven on the left side.
Staple sales slip or cancelled check here.
Proof of the original purchase date is needed to obtain sel_4ce under
the wamm V.
Customer Service
ProductRegistration ...... 47
Warranty ................ 43
ServiceTelephone
Numbers ......... BackCover
8
READTHISMANUAL
Inside you will find ma W helpflfl hints on how to use and maintain
your cooking center properly.Just a little preventive care on your
part can save you a great deal of time and money over the life of your
cooking cenmr.
You'll find ma W answers to common problems in the Before YouCall
For,Servicesecdon.If you review our chm'tof Troubleshootingtips
first, you may not need to call for sel_ice at all.
IFYOUNEEDSERVICE
If you do need ser_4ce, you can relax knowing help is only a phone
call away. A list of toll-fl'ee customer ser_4ce nmnbers is included in
the back section of this manual. Or you can always call the (;E
Answer Center ®at 800.626.2000, 24 hours a day, 7 days a week.

Usingthe microwave ovencontrols.
Throughout this manual, features and appearance may vary from your model.
MICROWAVE OVEN
@
[
[
]
AUTO SENSOR CONTROLS
LEVEL] r2_ _ _ Y2_ r2_ f ..c._.
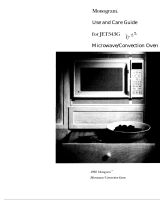
Microwave OvenControl Features and Settings
Display
Displays the time during cooking flmctions,
the power level being used, the Auto Codes,
the Auto Defrost food weights, the cooking
mode and instructions. The display is blank _!_
when the microwave oven is not in use.
NOTE"Thetimeonthemicrowavedisplayisshownin
minutesandseconds(1,30isoneminute,30seconds),On
theloweroven,timeisshowninhoursandminutes(1,30is
onehour,30minutes),
AUTO SENSORCONTROLS
The top row of pads lists specific items you
inW choose m heat or cook.
REHEAT
Use when foods need a quick warm up. @
CANNEDVEGETABLES
Use when cooking canned vegetables.
FROZENVEGETABLES
Use when cooking frozen vegetables.
FRESHVEGETABLES
Use when cooking fi'esh vegetables.
POTATOES
Use when cooking whole potatoes. _[_
FISHFILLETS
Use when cooking fish fllets.
CHICKENPIECES
Use when cooking chicken pieces.
MORE/LESS
Press to add or subtract time fi'Oln the
automatic time set by the sensor.
POPCORN
Press to pop popcorn.
ADD 30 SEC
Each time you press this pad die set time is
increased 30 seconds.
POWERLEVEL
Press to choose the power level you want to
set. Watch the displ W while pressing this
pad to select the power level you want to set.
You ,dll also see a defi'ost level. This setting
,_11allow you to choose your ox_a defi'ost
time by using the number pads.
CLEAR/OFF
Press once to interrupt or change a
fimction. Press twice to clear the displ W.
Number Pads
Press these pads to set the exact amount of
time you want to cook fbr.For example; if
you press the 1,2 and 5 pads, you hm_eset 1
minute and 25 seconds.
START
After all selections are made, press this pad
to start the oven. The STARTpad must be
pressed to mm on any fimction.
KITCHEN TIMERMIN/SEC
Press to set the timer up to 99 minutes
and 99 seconds. Press the number pads to
set the time. Press START.Press CLEAR/OFF
t_ice to clear the display. Does not trim on
microwave energy. This timer cannot be
used while the microwave is being used.
Use the lower oven timer.
AUTO DEFROST1LB/I OZ
Use to set the exact weight of tim foods you
need to defrost.
CONTROLLOCKOU_Thecontrolcanbelockedsothe
touchpadscannotbeactivatedwhenpressedPressSTART
3timestoactivatethecontrollockoutfeature,Toturnthis
featureoff pressCLEAR/OFF3 times, 9

Usingthemicrowave ovencontroland timer.
Themicrowave oven fan operates during microwave cooking and is also used to cool the control. Heat from the
lower oven, along with heat from the microwave oven, may also cause the fan to operate. The fan may operate
with both ovens off and will turn itself off.
i _ i _ i _ ii i iii i_ _ i_i
ToSet the Timer
The timer sei_es fi_ree flulctions; a
kitchen timer, sets a delay start time and
sets a hold or standing time.
You may pro_'mn the microwm_e timer
to time cooking or other household
acti_4ties fbr up to 99 minutes and 99
seconds. The timer does not mm on
microwave energy.
Press the KITCHENTIMERMIN/SEC
pad.
Press the number pads to set the
time. For exmnple, to enter 2
minutes and 45 seconds, press
2, 4 and 5 in that order.
Ifyou make a mistake, press the ClEAR/OFF
pad once, then press the KITCHENTIMER
MIN/SECpad to begin again.
Press the STARTpad.
You will see the countdo_l in the display.
The CLEAR/OFFpad can be pressed once
to stop the countdo_,_l and a second time
m clear the display.
When time is up, the oven control signals.
The display shows Enjoyyour mea! and
then goes 1)lank.
NOTE:Theminute/secondtimerisindependent
ofall theotherfunctionsandit doesnotcontrol
theoven.
Using a Holding Time
The KITCHENTIMERMIN/SECpad can
also be used to set a holding time between
microwave cooking flmcdons.
The time can range from one second up
to 99 minutes and 99 seconds. A holding
or standing time may be found in some
recipes or cookbooks.
POWER LEVEL
A
Power Level
ByusingPOWERLEVELyoucanchangethe
powerlevelforcookinganddefrosting.Most
cookingusesPowerLevelHighbutyoumay
choosethelevelyouprefer
To cook bya power level:
Press the POWERLEVELpad from 1 to
6 times depending on the level you
require. See the Power Level Chart.
Press the number pads to set tim
lengfll of cooking time.
[_] Press tim STARTpad.
Power Level Chart
Press Power Level %Power
Once HIGH 100%
Twice DEFROST 30%
3 times MEDIUMHIGH 70%
4 times MEDIUM 55%
5 times MEDIUMLOW 30%
5 times LOW 10%
iiIii
/0
Add 30 Seconds
The ADD30SECONDSpad provktes a
convenient way to extend cooking time
by 30 seconds while the oven timer is
counting down. It _dll add 30 seconds
to the time shown each time tim pad
is pressed.

Usingthe timedmicrowave featuresforcooking.
Do not operate the microwave oven without the turntable and support in place.
NOTE"Foods that spoil easily-such as milk, eggs, fish, stuffings, poultry and pork-should not be allowed to sit for
more than 1hour before or after cooking. Room temperature promotes thegrowth of harmful bacteria.
_iii_ii _I__iiili!_iiilli
How to Set an Immediate Start and Automatic Stop
Themicrowaveovenwillturnonimmediatelyand
cookfora specificlengthoftime,
[_] Press the number pads to set the
length of cooking time.
[] Press the START pad.
[ KITCHEN ]
[ TIMER j
i/
i_ _ i ii iii
i ii_ _ _ _(ii i_ iii iiI i_ i _
_ _ii_il _ ii ii i/ i_ i i_ _i
How to Set a Delayed Start and Automatic Stop
Youcansetthemicrowavecontroltodelaystart
theoventocookforaspecificlengthoftime,
I-_ Pressthe KITCHENTIMERMIN/SEC
pad.
Press the number pads to set the
desired amount of delayed time.
[_ Press the POWERLEVELpad to select
the desired power level.
[]
%
Press the number pads to set the
desired length of cooking time.
Press the STARTpad. The control
_ill signal and the display _411show
Enjoyyour meal when the pro_'mn
is complete.
[_] Press the CtEAR/OFFpad once to
stop dm flmction or twice to clear
the display.
NOTE:
; DelayStartcannotbeprogrammedwithany
AutoSensorControlfunction,
Iftheovendoorisopenedduringthedelayed
portionof theprogram,thetimerwillcontinue
tocountdown,Thedoormustbeclosedbefore
thecookingportionoftheprogramcanbegin,
11

Usingthe timedmicrowave featuresfordefrosting.
Do not operate the microwave oven without the turntable and support in place.
NOTE..Foods that spoil easily-such as milk, eggs, fish, stuffings, poultry and pork-should not be allowed to sit for
more than 1hour before or after defrosting. Room temperature promotes the growth of harmful bacteria.
How to Set Your Own Defrost Time
Eventhoughyournewcontrolisequippedwith
AUTODEFROS,youalsohavetheoptionof
settingyourowndefrosttime,
[] Press the POWERLEVELpad _vice.
The display will show DEFROST.
[] Press the number pads to set the
defrost time. For exmnple: Press 5, 0,
0to set 5minutes.
[_] Press d_e STARTpad.
NOTE:
Foodsfrozeninpaperorplasticcanbe
defrostedin thepackage,Tightlyclosed
packagesshouldbesilt,piercedorventedafter
foodshavepartiallydefrosted,Plasticstorage
containersshouldbepartiallyuncovered
Prepackagedfrozendinnerscanbedefrosted
andmicrowaved,If foodsareina foilcontainer,
transferthemtoamicrowave-safedish,
Forevendefrosting,somefoodsneedto
be brokenapart orseparatedduring the
defrosting time,
POWERALEVEL l
POWER LEVEL
A.
How to Set a Timed Combination Defrost and Cooking Time
Press the POWERLEVELpad t_ice.
Press the number pads to set the
defl'ost time.
[] Press the POWERLEVELpad to set the
power level you desire.
[_] Press the number pads to set the
length of cooking time.
[_] Press the STARTpad.
YoucanpressthePOWERLEVELpadduring
cookingtoseewhichfunctionisinprocess,
12

l POWER LEVEL J
A.
KITCHEN 1
TIMER
MIN/SEC
i!
_ii_ ii_ _i_ _ _ _i_!iiiii _i
ii iiiiii iiiiii iiiiii ii
How to Set a Timed Combination Defros_ Hold and Cooking Time
_-_ Press the POWERLEVELpad undl the
display shows DEFROST.
[] Press the mmfl)er pads to set the
length of deffosdng time.
[] Press the KITCHEN TIMER MIN/SEC
pad.
[_] Press the number pads to set the
length of hoMing time.
[_] Press the POWERLEVELpad to set the
power level you desire.
[_] Press the number pads to set the
length of cooking time.
[] Press the STARTpad.
YoucanpressthePOWERLEVELpadduring
cookingtoseewhichfunctionisinprocess,
Timed Defrosting Chart
Food Defrost Time (rain. per pound) Comments
Fish Fillets 6 to 8 minutes Turn the fillets over and rearrange halfway through the
defrosting time.
Shrimp 8 to 10 minutes Break apart halfway through the defrosting time. Remove
defrosted shrimp.
Scallops 14 to 16 minures Break apart halfway through defrosting time. Remove
defrosted scallops.
Chops 8 to 10 minutes Separate, turn over and rearrange halfway through
defrosting time.
Chicken 8 to 10 minutes Separate halfway through defrosting time.
pieces
73

Usingthemicrowave autosensorcontrols.
Do not operate the microwave oven without the turntable and support in place.
How to Set Your Microwave Using the Auto Sensor Controls
The Auto Sensor Controls allow you to
cook most of your f:avorite fbods without
hax_ng to select cooking times and power
levels. Byusing the Aura Sensor Conu'ols,
REHEAT,AUTODEFROSTand POPCORN
pads, your microwave does all the work
for you.
The Auto Sensor Conu'ols work by
detecdng a build-up of steam on the
sensor. As fbods cook smam is produced.
When the steam is demcted by the sensor,
the oven automadcally calculates the
remaining cooking time. This method
takes all the guesswork out of cooking.
When the fbods have cooked, tt_econtrol
automatically shuts offthe oven.
[-]] Press tim desiredAuto Sensor ff)od
pad.
Press the STARTpad.
Keep the microwave oven door closed.
Do not open t|_e microwave oven door
while AUTOis displayed. Steam escaping
from the oven can affect cooking
pei{brmance. If the door is opened, close
the door and press the START pad
immediately.
NOTE:
WhenusingtheAutoSensorControlstheoven
doorshouldnotbeopenedforlongerthanone
minute.Openingthedoormaycauseinaccurate
cookingresults.Theovendoormaybeopened
tostir,turnoraddfoodswhencookingtime
beginstocountdowninthedisplay
Theroom temperatureshouldnot be above
95°£ when using theAuto SensorControls,
DonotusetheAutoSemorControlsforfoods
thatarelessthan4ounces.Foodslessthan
4ouncesshouldbecookedbypowerand
timeonly.
WhenusingtheAutoSensorControls,make
suretheglasstrayintheovenisdrytoassure
thebestcookingresults.
Forpropercookingresults,besuretocover
foodscompletelywith ventedplasticwrap
(exceptpotatoes).Donotcoverpotatoes.Place
foodsinacasseroledishwithaproperlyfitting
lidthatdoesnotseal.DONOTuseplastic
snap-onlids,
[_] When cooking is finished press tim
CLEAR/OFFpad twice.
Auto Sensor Cooking Chart
Food Pad Amount Comments
CANNED VEGETABLES 10 ounces Vegetables should be at room temperature. When the remaining
cooking time appears in the display, open the door and stir the food.
FROZEN VEGETABLES 10 to 28 ounces Cover the vegetables with plastic wrap or a lid that is vented on one
corner. Do not use vegetables frozen with butter or sauce.
FRESH VEGETABLES 1/2 to 2 Ibs. Cover the vegetables with a lid or plastic wrap that is vented on
before peeling, one corner.
trimming, etc.
POTATOES 1 to 4 Whole potatoes must be pierced several times before cooking. Place
8 to 9 ounce whole potatoes on a microwave-safe dish. Do not cover potatoes.
potatoes
FiSH FILLETS 1/2 to 2 Ibs. Place fish fillets in a single layer in a microwave-safe dish. Cover
the dish with plastic wrap that is vented on one corner. When time
appears in the display, rearrange fillets.
CHICKEN PIECES 1/2 to 3 Ibs. Cover chicken pieces with plastic wrap that is vented on one corner.
When time appears inthe display, rearrange chicken pieces.
14

i !iiiii iii ili( iiill
Using Auto Sensor Popcorn
_] Set the desired weight of the
prepackaged microwmTe popcorn
using the chart below.
Press the POPCORN pad: Weight
Once 3.5oz.
Twice 3.0oz.
3times 1.75oz.
CAUTION:IFprepackagedpopcomisofa
differentweight,donotusethepopcornsetting,or
inadequatepoppingora FiremayoccurFollowthe
manufacturer'sdirections.
[] After makingyour selection, press
the STARTpad.
NOTE:
Useprepackaged,roomtemperature
microwavepopcorn.Followthemanufacturer's
directions.
Poponlyonebagata time.
Afterpopping,openthebagcarefully;popcorn
andsteamareextremelyhal
Donotreheatunpoppedkernelsorreuse
thebag.
Neverleavethemicrowaveunattendedwhen
poppingpopcorn.
Using Auto Sensor Reheat
Use Auto Sensor Reheat when foods
need a quick wann-up. The reheat
feature reheats one to three servings of
previously cooked fbods. To use this
feature:
[7] Press the REHEATpad.
Press the STARTpad.
The sensor will detect the steam from
the foods and adjust the power level
and heating time for you.
NOTE:
Donotreheatbreadandpastrypreducts.Use
manualpowerandtime.
Donot reheatmw or uncookedFooc_
YoucannotuseAutoSensorReheatif the
microwaveovencavityiswarm.Thedisplay
wit letyouknowif thecavityistoowarm
ForthesensortoworkproperlyYoucanstiff
timecookinthemicrowavebychoosingyour
owncookingtimeinsteadoFusingAuto
SensorReheat
Donotreheatbeverages,
DonotreheatFrozen Foods,
ForbestresultswhenusingAuto Sensor
Reheatfollowtheserecommendations:
Followthedirectionsgivenintherecipes.Use
thepropercontainer
Foodsshouldalwaysbecoveredlooselybut
completelyUsea casserolelid whichdoesnot
sealorventedplasticwrap.DONOTUSEANY
SNAPCLOSINGLIDS.
Whencoveringdisheswithplasticwrap,
securelymoldthewraparoundthesidesofthe
dishandthenventonecornerorside.Bones
shouldnotpiercethroughthewrap.Large
dishesmayneedtwooverlappingpiecesof
ventedplasticwrap.
CAUTION:Steambuildsunderplasticwrap
andlids.Usecautionwhenremovingthem
Fromthecontainers.It isbesttoremovethe
wraporlidFromthesideawayFromyoutoFirst
releasethesteam.
All Foodsmustbepreviouslycookedandmust
beatroomtemperatureorrefrigerator
temperature.
Foodsweighinglessthan4ouncesandmore
than32ouncesshouldbereheatedbypower
andtimeonly
Foodsshouldhavea coveredstanding time of
3 to 5 minutes,
15

Usingthemicrowave autosensorcontrols.
Do not operate the microwave oven without the turntable and support in place.
i i ¸i
Using the More/Less Pad
After using Auto Sensor Cooking a few
times, you may decide you would prefer
your fbods cooked for more or less time.
The prepro_'ammed Auto Sensor
cooking time can be adjusted using the
MORE/tESSpad. If you are satisfied with
the cooking results using only the Auto
Sensor Controls you will not need m use
the MORE/tESSpad.
To use tt_e MORE/tESSpad:
[] Press the desiredAuto Sensor
fbod pad.
[] Press the MORE/tESSpad once %r
more cooking time or twice ff)r less
cooking time.
Using Auto Sensor Defrost
TheAUTODEFROSTpadallowsyoutodefrost
meat,poultryandseafoodbyweightusingthe
autosensorofyourmicrowaveoven.Whenyou
settheexactweightof thefoodsthesensor
automaticallysetsjusttherightdefrosttimeand
changesthepowerlevelsduringdefrostingto
giveevenresults.
After auto defrosting, meat needs to
stand in order to let tl_e inside defrost.
You may take the lot(1 out of the oven
during riffs standing time.
You must set dm weight of fbods by
pounds and ounces.
%
Press 1LB to set the pound weight.
Each time tl_epad is pressed the
weight increases by 1pound.
Press 10Z to set the ounces
you need.
Duringautodefrosting,thecontrolwillbeepto
letyouknowwhentoturnfoods.
Conversion Chart forAutoSensor Defrost
Ounces Hundredths of a Pound
0 0-.05
1-2 .06-.15
3-4 .16-.25
5 .26-.35
6-7 .36-.45
Ounces Hundredths of a Pound
8 .46-.55
9-10 .56-.65
11-12 .66-.75
13 .76-.85
14-15 .86-.95
16
General Information On Auto Sensor Defrost
The shape and size of food _411determine
the maximum weight the oven can
accommodate. The recommended
maximum weight is:
4Ibs,formeats
; 6Ibs.forpoultry
;; 3Ibs.forseafood
The standing time or power level lllay be
pro_'ammed after the AUTODEFROST
pad is pressed. Set a standing time or
power level and then press the START
pad. After the Auto Defrost fimction is
finished the standing time or power level
will mltomatically follow.
For successfifl defrosting, mea_s should
be packaged properly for freezing. Freeze
meats, poult_ 7 and fish in packages with
only 1 or 2 layers of food. To aid in
separating layers, place two pieces of wax
paper between layers. Package in heax,):
(buy plastic wraps, bags or freezer paper.
Meats packaged in _'oce_), stores are
labeled with weight in pounds and
hundredths of a pound. You will need to
convert this weight into ounces.
Place roasts and whole pouluy on a
microwm_e-sa[e rack in a microwm_e-safe
dish in the oven. Check food for warm
spots halfi,vaythrough defrosting, and
shield these areas with small pieces of fbil.

Usingthe lower ovencontrols.
Throughout this manual, features and appearance may vary from your model.
CONVECTION OVEN
@ r
v _
BAKE
j
Lower OvenControl,Clockand TimerFeaturesand Settings
Display
Shows dm time of day, oven temperature,
whether the oven is in the bake, broil or self:
cleaning mode and the times set for the
timer on automatic oven operations.
NOTE."Thetimeonthemicrowavedisplayisshownin
minutesandseconds(1:30isoneminute,30seconds).On
theloweroven,timeisshowninhoursandminutes(1.30is
onehour,30minutes).
0
$
ff "F- anda numberorletter"flashin thedisplayand
theovencontrolsignals,thisindicatesa function
errorcode.PresstheCLEAR/OFFpad,Allowtheovento
coolforonehourPuttheovenbackintooperation.If the
functionerrorcoderepeats,disconnectthepowertothe
ovenandcallforservice. V
ffa flashingtimeofdayisin thedisplay,you have
experiencedapowerfailure.Resettheclock
ffyour oven was set fora timed ovenoperation when
the power outage occurred, the clock andall
programmedfunctionsmustbe reset
Thetimeofdaywill flashin thedisplaywhenthe
ovenisfirstturnedon.
O BROIL HI/LO Pad
Press this pad to select the broil fimction.
O BAKE Pad
Press dfis pad to select die bake fimction.
O CONVECTIONBAKE Pad
Press this pad to select baking with the
convection flmction.
o CONVECTIONROASTPad
Press this pad to select roasting _ith the
convection flmction.
Number Pads
Use to set any flmction requMng numt)ers
such as the tilne of day on dm clock, the tilner,
the oven telnperamre, the internal foo(t
telnperature, the start time and length of
operation fbr timed baking and self:cleaning.
CLEAR/OFFPad
Press this pad to cancel ALLoven operations
except the clock and timer.
PROBEPad
Press this pad when using the probe to cook
fbod. (For use in the lower oven only.)
SELFCLEANPad
Press this pad to select the self:cleaning
flmction. See the Usingthe self-cleaninglower
oven section.
O TARTPad
Must be pressed to start any cooking or
cleaning flmction.
o KITCHEN TIMERON/OFFPad
Press this pad to select the timer feature.
O OVENLIGHTPad
Press this pad to turn the oven light on or off:
o CLOCKPad
Press this pad before setting the clock.
o DELAYSTARTPad
Use along widl COOKINGTIMEor SELFCLEAN
pads to set the oven to start and stop
automatically at a time you set.
O
COOKING TIME Pad
Press d_ispad and dmn press die number pads
to set dm amount of time you want your fbod
to cook. The oven will shut offwhen the / 7
cooking time has nm out.

Special featuresofyour lower ovencontrol.
Yournew touch pad control has additional features that you may choose to use. The following are the features and
how you may activate them.
Thespecial feature modes can only be activated while the display is showing the time of day clock. They remain in
the control's memory until the steps are repeated.
When the display shows your choice, press the STARTpad. Thespecial features will remain in memory after a
power failure.
i¸
12Hour Shut-Off
Withthisfeature,dTouldyouforgetandleavethe
ovenon,thecontrolwill automatical_turnoffthe
ovenafter 12hoursduringbakingfunctionsor
after3 hoursduringabroilfunction,
If you _dsh to turn off this featnre, ff_llow
the steps below.
[--]-] Press tt_e BAKE and BROIL Hi!tO pads
at tt_e same time fbr 3 seconds until
the display shows SE
[]
@
Press the DEL4YSTARTpad. The
display will show/2 shdn (12 hour
shut,off). Press tt_e DELAYSNRT
pad again and the display will show
no short(no shut<_ff).
Press rt_e STARTpad to activate tt_e
no shut-offand lem,e the control set
in this special features mode.
I HI/LO
Fahrenheit or Centigrade Temperature Selection
YourovencontrolissettousetheFahrenheit
temperatureselectionsbutyoumaychangethis
tousetheCentigradeselections,
Press the BAKEand BROILHI/tO pads
at the same time far 3 seconds until
the display shows SE
Press the BROILHI/tOpad. The
display will show F (Fahrenheit).
[_] Press tim BROILHI/tO pad again. The
display will show C (Centi_'ade).
[_] Press file STARTpad.
Control Lockout
Yourcontrolwillallowyoutolockdownthetouch
padssotheycannotbeactivatedwhenpressed,
_] Press the BAKEand BROILHi/tO pads
at the stone time for 3 seconds until
the display shows SE
Press the SELFCLEANpad. The
display will show LO0 OFF.
Press the SELFCLEANpad again.
The display will show LOGON.
_-] Press the STARTpad to activate
the control lockout feature and
leave the control set in this special
Damres lnode.
When this feature is on and the touch
pads are pressed the control will beep
and the display _411show LOC.
NOTE:Thecontrollockoutmodewill notaffect
theCLOCK,KITCHENTIMERON/OFFandOVEN
LIGHTON/OFFtouchpads,
18

iii iiiiiiillI
Tones at the End of a Timed Cycle
At theendofatimedcycle,3shortbeepswill
soundfollowedbyonebeepevery6secondsuntil
theCLEAR/OFFpadispressedThiscontinuous6
secondbeepmaybecanceled
To cancel the 6 second beep:
_Z] Press the BAKE and BROILHI/LOpads
at dm stone time fbr 3 seconds until
the display shows S£
[]
Press the MTCHENTIMERON/OFF
pad. The display shows CONBEEP
(continuous beep). Press the
KITCHENTIMERON/OFFpad
again. The display shows BEEP.
(This cancels the one beep evepy
6 seconds.)
[_] Press the STARTpad.
LXE
12 Hour, 24 Hour or Clock Black-Out
Yourcontrolissettousea 12hourclock,
If you wouM prefer to hmTea 24 hour
militaI T time clock or black-out the clock
display, follow the steps below.
_Z] Press the BAKEand BROILHI/LOpads
at the stone time fbr 3 seconds until
the displ W shows SF.
Press the CLOCKpad once. The
display will show 12hr. If dfis is
the choice you want, press the
START pad.
Press the CLOCKpad again to
change to dm 24 hour militapy
time clock. The display will show
24 hr. If this is the choice you want,
press the START pad.
Press the CLOCKpad again to black-
out the clock display. The display
will show OFF.If this is tim choice
you want, press tim START pad.
NOTE:If theclockisintheblack-outmodeyou
will notbeabletousetheDelayStartfunction,
19

Special featuresofyour lower ovencontrol.
Cook and Hold
Yournewcontrolhasacookandholdfeaturethat []
keepscookedfoodswarmforupto3hoursaftd
thecookingfunctionisfinishe_
To acdvate dfis feature, ff)llow dm stops
below.
171Pressa_thethes.n,eBAKEtimea"_tfo,"BROIL3secon_ls.I/W,,,,tilp._s 12]
the display showsSF
Press the COOKINGTIMEpad.
The display will show Hid OFF
Press the COOKINGTIMEpad again
to activate the feature. The display
will show Hid ON.
Press the STARTpad to activate
the cook and hold feature and
leave the control set in this special
features mode.
Using Convection Conversion
ByusingtheConvectionConversionfeatureyou
canautomaticallyconverttheoventemperature
fromregularbakingtoConvectionBake
temperatures,
To convert the oven temperature foI"
convection baking, fbllow the steps below.
Press and hold the CONVECTION
BAKEpad for 4 to 5 seconds.
Using the number pads, enter
the temperature recommended
in the recipe.
V3] Press tim STARTpad.
The display shows the converted
(reduced) temperature. For
example, if you entered a recipe
temperature of 350°F., the displ W
will show 325°£when it is converted.
Press d_e CLEAR/OFFpad when
baking is finished.
NOTE:Conversionmustbeseteachtimeyou
wanttouseit, Itisnotheldinmemor7
20
/