Page is loading ...

Monogam.
b--2z
Use
md
Cme
Guide
for
ZEK~36GP
ZEK73W
Built-In Convection
Wall
men
1992
Monogam.TM
27” Se~Chaning Convection
&en
m100
Rev. 1

Introduction
Your new Monogram built-in convection oven makes an eloquent statement
of style, convenience and kitchen planning flexibility. Whether you chose it
for its purity of design, time-saving convection cooking capability,
assiduous attention to detail—or for all of these reasons—you’ll find that
your Monogram built-in oven’s superior blend of form and function will
delight you for years to come.
The
ZEK736GP and ZEK737GP Monogram built-in convection ovens were
designed to provide the flexibility to blend in with your kitchen
cabinetry.
Their sleek design can be beautifully integrated in the kitchen.
The information on the following pages will help you operate and maintain
your built-in oven properly.
If you have any other questions—please call the
GE Answer Center” 800.626.2000.
Contenti
Aluminum Foil .....................22, 28
Appliance Registration .................3
Baking . . . . . . . . . . . . . . . . . . . . . . . . . . . . . . . . . . . 18–22
Broiling .................................27–29
Broiling Guide ............................29
Care and Cleaning
Broiler Pan and Grid ............34
Cleaning Guide ....................36
Oven
Door............................35
Oven Shelves .......................35
Probe ....................................36
Clock and Timer
.......................8, 9
Control Panel ................................7
Convection Cooking .............12–18
Convection Baking ........13–15
Convection Roasting . . . . . . 16–18
Special Roasting Rack .........16
Features . . . . . . . . . . . . . . . . . . . . . . . . . ................6
Light, Bulb Replacement ......11, 34
Model and Serial
Number.............3
Multi-Shelf Baking .....................13
Offset Shelf . . . . . . . . . . . . . . . . . . . . . . . . . . . . . . . . .
10
Preheating ...................................21
Problem Solver ...........................37
Roasting . . . . . . . . . . . . . . . . . . . . . . . . . . . . ....23–26
Roasting Guide ...........................26
Roasting with Probe
..............24–26
Safety Instructions ....................4, 5
Self-Cleaning Instructions ....30–33
Shelves ................10,
11,
13,
21,
35
Thermostat Adjustment ..............11
Timed Baking .......................19,
20
Warranty . . . . . . . . . . . . . . . . . . . . . . . . . . . . . ........39
Questions?
Call GE Answer
Center@
800.626.2000
2

Before using your oven, read this book carefully.
It is intended to help you operate and maintain your new oven properly.
Keep it handy for answers to your questions.
If you don’t understand something or need more help, write (include your
phone number):
Consumer Affairs
GE Appliances
Appliance Park
Louisville, KY 40225
Write down the model and serial numbers.
You’ll find them on a label on the front of the oven behind the oven door.
These numbers are also on the Consumer Product Ownership Registration
Card that came with your oven. Before sending in this card, please write
these numbers here:
Model Number
Use these numbers in any
correspondence or service calls
Serial Number
concerning your oven.
If you received a damaged oven...
Immediately contact the dealer (or builder) that sold you the
oven.
Save time and money. Before you request service...
Check the Problem Solver in the back of this book. It lists causes of minor
operating problems that you can correct yourself.
If you need service...
To obtain service, see the
Consumer Services page in the
back of this book.
We’re proud of our service and
want you to be pleased. If for some
reason you are not happy with the
service you receive, here are three
steps to follow for further help.
FIRST, contact the people who
serviced your appliance. Explain
why you are not pleased. In most
cases, this will solve the problem.
NEXT, if you are still not pleased,
write all the details—including
your phone number—to:
Manager, Consumer Relations
GE Appliances
Appliance Park
Louisville, KY 40225
FINALLY, if your problem is still
not resolved, write:
Major Appliance Consumer
Action Panel
20 North
Wacker
Drive
Chicago, IL 60606
3

WORTANT
SAFETY
~STRUCTIONS
Read
W
instructions before using this appliance.
IMPORTANT SAFETY NOTICE
●
Never wear loose-fitting or hanging garments
The California Safe Drinking Water and Toxic
whtie
using the appliance. Be careful when
Enforcement Act requires the Governor of
reaching for items stored in cabinets over the
California to publish a list of substances known to
oven. Flammable material could be ignited if
the state to cause birth defects or other reproductive
brought in contact with hot heating elements and
harm, and requires businesses to warn customers of
may cause severe burns.
potential exposure to such substances.
●
Use
only dry pot holders—moist or
The fiberglass insulation in self-clean ovens gives
damp pot holders on hot surfaces
off a very small amount of carbon monoxide during
may result in burns from steam.
the cleaning cycle. Exposure can
be
minimized by
Do not let pot holders touch hot heating elements,
venting
with an
open
window or
using
a ventilation
Do not use a towel or other bulky cloth.
fan
or~ood.
‘
●
For your safety, never use your appliance for
When using electrical appliances, basic
warming or heating the
room.
safety precautions should be followed, including
the
following:
c
DO NOT STORE OR USE COMBUSTIBLE
MATERIALS. GASOLINE OR OTHER
FLAMMABLE VAPORS AND LIQUIDS IN
* Have the installer show you the location
of the circuit breaker or fuse. Mark it for
easy reference.
●
Use this appliance
ordy
for its intended use as
described in this manual.
* Be sure your appliance is properly installed and
grounded by a qualified technician in accordance
with the provided installation instructions.
●
Don’t attempt to repair or replace any part of
your oven unless it is specifically recommended
in this book. All other servicing should be
referred to a qualified technician.
●
Before
performing any service, DISCONNECT
THE OVEN POWER SUPPLY AT THE
HOUSEHOLD DISTRIBUTION PANEL BY
REMOVING THE FUSE
OR
SWITCHING OFF
THE CIRCUIT
BREA~R.
●
Do not leave children
alon=hildren
should
not be left alone or unattended in an area where an
appliance is in use. They
should
never be allowed
to
sit or stand on any part of the appliance.
●
Don’t allow anyone to climb, stand or hang on
the door. They could damage the
oven
or cause
severe personal injury.
“
CAUTION:
ITEMS
OF INTEREST TO
CHILDREN SHOULD NOT BE STORED IN
CABINETS ABOVE AN OVEN. CHILDREN
CLIMBING ON THE OVEN TO REACH
ITEMS COULD BE
SERIOUSLY
mJuRED+
THE VICINITY OF THIS OR ANY OTHER
APPLIANCE.
●
Do not let cooking grease or other flammable
materials accumulate in or near the oven.
e
d
‘9
c
Do not use water on grease fires.
Flame in oven can be smothered by
completely closing door and
touching the
CLEAWOFF
pad or use a dry
chemical or foam-type extinguisher.
●
Do not touch heating elements or interior
surface of oven. These surfaces maybe hot
enough to burn even though they
are
dark in color.
During and
after
use, do not touch, or let clothing
or other flammable materials contact surface units,
areas nearby surface units or any interior area of
the oven;
allow
sufficient time for cooling first.
Potentially hot surfaces include the oven vent
opening, surfaces near the opening, crevices
around the oven door, the edges of the door
window, and metal trim parts above the door.
Remember: The inside surface of the oven may
be hot when the door is opened.
●
When cooking pork, follow the directions
exactly and always cook the meat to an internal
temperature of at least
170°F.
This assures that, in
the remote possibility that trichina may be present
in the meat, it will be killed and the meat will be
safe to eat.
4

Oven
SeW-Cleaning Oven
c
Stand away from oven when opening the door.
●
Do not clean the door gasket.
me
door gasket is
Hot
air or steam which escapes can cause
essential for a good seal.
Care
should be taken not
burns to hands, face
andor
eyes.
to rub, damage or move the gasket.
●
Don’t heat unopened food containers in the
●
Do not use oven cleaners. No commercial
oven. Pressure could build up and the
oven cleaner or oven liner protective coating of
container could burs~ causing an injury.
my
kind should
be
used in or
around
any part
●
Keep oven
vent
ducts unobstructed.
of the oven.
~
Keep oven free from grease
●
Before self-cleaning the
oven,
remove broiler
buildup.
pan, grid and other cookware.
●
Place oven shelf in desired position while
●
Be sure to wipe up excess spillage before starting
oven is cool. If shelves must be handled when
the self-cleaning operation.
hot, do not let pot holder contact heating units
●
U
the self-cleaning mode malfunctions, turn off
in
the oven.
and disconnect the power supply. Have serviced
●
Pulling out shelf to the shelf stop is a
by a qualified technician.
convenience in lifting heavy foods. It is also a
precaution against burns from touching hot
;urfaces
of the door or oven walls.
-
SAVE
T~SE
●
When
using
cooking or roasting bags in
oven?
follow the manufacturer’s directions.
mSTRUCTIONS
●
Do not use your oven to dry newspapers. If
overheated, they can catch fire.
●
Do not use oven for a storage area. Items stored
in an oven can ignite.
●
Do not leave paper producti, cooking
utenstis,
or food in the oven
when
not in use.
●
Do not use aluminum
foil
to line the oven
bottom, except as suggested in this book.
Improper installation of these liners may result in
a risk of electric shock or fire.

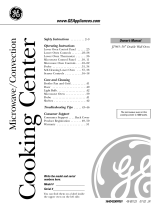
FEATURES OF YOUR
O~N
—
\
Feature Index
1 Oven Door Gasket
2 Convection Fan and Heating
Element (operates during
convection cooking)
3 Model and Serial Number Location
4 Oven Broil Unit
5 Oven Vent
6 Automatic Oven Door Latch
7 Oven Control, Clock and Timer
8 Oven Vent Grille
9 Oven Interior Light
6
Explained
on page
5,30,35
12
3
27,36
5
31,32
8,9
30
11,34
Explained
Feature Index
on
page
10 Probe Outlet
11 Oven Shelf Supports
12 Oven Shelves
(number of shelves may vary)
13 Bake Unit
14 Removable Oven Door
with Window
16, 17,
25,26
12
11, 12
10,36
35
15 Broiler Pan and Grid,
16,23,
Roasting Rack and Stand
34,35
16 Probe
16, 17,24,
25,26,36
17 Cookie Sheets (2 large, 1 small)
When using all three cookie sheets
at once, place the smaller one on
the offset shelf.
12,22

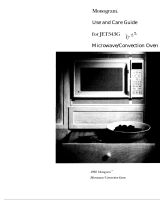
FEATURES OF YOUR OVEN CONTROL
1.
2.
3.
4.
5.
6.
7.
8.
9.
CONVECTION BAKE. Press this pad to select
baking with convection.
BAKE. Press this pad to select bake function.
TfME DISPLAY.
Shows the time of day, the times
set for the timer or automatic oven operation.
OVEN OR PROBE TEMPERATURE AND
BROIL DISPLAY. Shows the oven temperature,
probe temperature or broil setting.
FUNCTION INDICATORS. Lights up to
show whether oven is in bake, broil, convection
bake, self-clean mode, set mode, or probe is
selected.
INCREASE. Short taps to this pad increase
time or temperature by small amounts. Press
and hold pad to increase time or temperature by
larger amounts.
COOK TIME. Use this pad for Timed Bake,
Timed Convection Bake and Timed Convection
Roast operations.
TIMER ON/OFF. Press this pad to select timer
function. The timer does not control oven
operations. The timer can time up to 9 hours and
55 minutes.
To set timer, first press the TIMER ON/OFF pad.
Then press the INCREASE or DECREASE pad
to change the time.
To cancel the timer, press the TIMER ON/OFF
pad.
PROBE. Press this pad when using the probe to
cook food.
10.
11.
12.
13.
14.
15.
16.
17.
OVEN LIGHT. Press this pad to turn the
oven light on or off.
CLEAWOFF. Press this pad to cancel all oven
operations except Clock and Timer.
CLEAN. Press this pad to select the self-cleaning
function. See the Self-Cleaning Instructions.
CLOCK. To set the clock, first press the
CLOCK pad. Then press the INCREASE or
DECREASE pad to set the time of day. Press
the CLOCK pad to start.
STOP TIME. Use this pad along with
COOK TIME or CLEAN pad to set the oven to
start and stop automatically at a time you select.
DECREASE. Short taps to this pad decrease
time or temperature by small amounts. Press and
hold pad to decrease time or temperature by
larger amounts.
PROGRAM STATUS. Words light up in the
display to indicate what is in time display.
Programmed information can be displayed at
any time by pressing the pad of the operation you
want to see. For example, you can display the
current time of day while the timer is counting
down by pressing the CLOCK pad.
BROIL.
Press this pad to select the broil function.
18. CONVECTION ROAST. Press this
Dad
to select
.
roasting with convection.
If “F-” and a number flash on display and the
control beeps, this indicates function error code.
Press the CLEAWOFF pad. Allow oven to cool
for one hour. Put oven back into operation. If
function error code repeats, disconnect power to
the oven and call for service.
7

OVEN CONTROL, CLOCK AND
TMER
Clock To Set the Clock
The clock must be set for the
m
1.
Press the
automatic oven timing functions to
CLOCK
CLOCK pad.
work properly. The time of day
cannot be changed during a Timed
Bake or CLEAN cycle.
❑
2. Press the
A
INCREASE or
DECREASE pad to
set the time of day.
3. Press the CLOCK pad to start.
Timer To Set the Timer
The timer is a minute timer; it does
m
1. Press the TIMER
not control oven operations. The
TIMER
ON/OFF pad.
maximum setting on the timer is
ON/OFF
9
hours and 55 minutes.
2. Press the INCREASE or
DECREASE pad to set the
amount of time on timer.
The timer will start automatically
within a few seconds of releasing
the INCREASE or DECREASE pad.
The timer, as you are setting it,
will display hours and minutes.
“HR” will be in the display.
During the countdown, when the
timer reaches the last minute, the
display will change to seconds
only and a single beep will sound.
To Reset Timer
If “TIMER” is showing, press the
INCREASE or DECREASE PAD
until desired time is reached. If
“TIMER” is not showing, touch
TIMER ON/OFF pad first, then
follow the instructions above to set
the timer.
To Cancel Timer
Power Outage?
Press the TIMER ON/OFF pad
After a power outage, when power
until the word “TIMER” quits
is restored, the display will flash
flashing on the display (about
and time shown will no longer be
4 seconds).
correct-for example, after a
5-minute power interruption the
clock will be 5 minutes slow.
All other functions that were in
operation when the power went out
will have to be programmed again.
End of Cycle Tones
The End of Cycle tone is a series of three beeps
followed by one beep every six seconds. If you would
like to remove the signal that beeps every six seconds,
press and hold the
CLEAWOFF pad for 10 seconds.
To return the signal that beeps every six seconds,
press and hold the
CLEAWOFF pad for 10 seconds.

Display Messages
Programmed information can be
displayed at any time by pressing
the pad of the operation you want
to see. For example, you can
display the current time of day
while the timer is counting down
by pressing the CLOCK pad. Press
the TIMER ON/OFF pad to return
to the timer display.
To check the start time for delayed
If “door” appears on the display,
Bake or Self-Clean, press and hold
LOCK flashes, and the oven
BAKE or CLEAN pad for 3
control beeps, you set the
self-
seconds. The display will show the
clean cycle and did not shut the
bake or
clean
start time for as long
oven door.
as you press the pad. When you
release the pad, the display will
return to the time of day or timer.
INCREASE and DECREASE Pad Speed
You can change the speed of the INCREASE and
DECREASE pads.
While the oven is off and the time of day shows in
❑
A
the display, press and hold the INCREASE and
DECREASE pads and the TIMER ON/OFF pad at the
same time for about 2 or 3 seconds.
A number from 1 to 5 will replace
“0:00”
in the
display. 1 is the slowest and 5 is the fastest. Use the
❑
v
INCREASE or DECREASE pad to change the
number, then press the CLEAWOFF pad to return to the
time of day display.
Child Lockout Feature
Your built-in oven has a provision for locking the
control panel to prevent the oven from being turned
on accidentally.
~
To lock the control panel, press and hold the
INCREASE and DECREASE pad and the STOP
TIME pad at the same time for 2 seconds. The word
“OFF” will appear and then disappear in the display
and the control panel will be locked. During lockout,
the word “OFF” will appear momentarily each time a
cooking function pad is pressed.
To unlock the control panel, repeat the above
procedure. The word “OFF” will appear in the display
and then disappear after two seconds.
9

US~G
YOUR OVEN
Before Using Your Oven
1. Look at the controls. Be sure you understand
how to set them properly. Read over the directions
for the Oven Controls so you understand how to
use them.
2. Check the inside of the oven. Look at the shelves.
Take a practice run at removing and replacing them
properly, to give sure, sturdy support.
3. Read over information and tips that follow.
4. Keep this book handy so you can refer to it,
especially during the first weeks of using your
new oven.
Oven Shelves
The shelves are designed with stop-locks so that when
placed correctly on the shelf supports, they will stop
before coming completely from the oven, and will not
tilt when removing food from or placing food on
*
them.
To remove the shelf from the oven, pull it forward to
the stop-locks and lift the front of the shelf. Be certain
that the shelf is cool before touching it.
To replace the shelf in the oven, tilt the shelf up at
the front and slide the curved extension of the shelf
under stop-lock on shelf support. Then slide the shelf
all the way into the oven.
II
When placing cookware on a shelf, pull the shelf out
to the “stop” position. Place the cookware on the
shelf, then slide the shelf back into the oven. This will
eliminate reaching into the hot oven.
Offset Shelf
The offset shelf provides more
cooking space between itself
and the shelf above it. This
allows more flexibility when
placing foods in the oven. See the
Multi-Shelf Baking section.
The offset shelf can be placed at
any shelf position.
To remove the shelf, pull it
forward to the stop-locks and lift
the front of the shelf.
To replace the shelf, tilt the shelf
up at the front and slide the curved
extension of the shelf under
stop-
locks on shelf supports. Then slide
the shelf all the way into the oven.

Shelf Positions
The oven has four shelf supports identified in this
illustration as A (bottom), B, C and D (top).
See the Multi-Shelf baking section for shelf
placement suggestions.
Oven Light
The light comes on automatically when the door
is opened.
m
OVEN
Use the pad on the control panel to turn the light on
LIGHT
and off when the door is closed.
Adjusting Oven Thermostat
When cooking food for the first time in your new
oven, use time given on recipes as a guide. Oven
thermostats, over a period of years, may “drift” from
the factory setting and the differences in timing
between an old and a new oven of 5 to 10 minutes are
not unusual. Your oven has been set correctly at the
factory and is more likely to be accurate than the oven
which it replaced.
If you think the oven should be hotter or cooler, you
can adjust it yourself. To decide how much to change
the temperature, set the oven temperature
25°F.
higher
or lower than the temperature in your recipe, then
bake. The results of this “test” should give you an
idea of how much the temperature should be changed.
The thermostat adjustment for Bake does not
affect Convection Bake or Convection Roast. To
adjust these, press the CONVECTION
BA~
or
the CONVECTION ROAST pad instead of the
BA~
pad when following the steps under To Adjust
Temperature in the right hand column of this page.
To Adjust Temperature:
~
1. Press the
BA~
pad.
BAKE
,
2. Select an oven temperature between
500°F.
and
550°F.
3. Immediately, before “ON” appears, press and hold
the
BA~
pad for about 4 seconds. The time
display will change to the oven adjustment display.
❑
4. The oven temperature can be adjusted up
A
to
(+)
35°F.
hotter or (–)
35°F.
cooler.
Use the INCREASE or DECREASE
pad to select the desired change in the
red display.
m
5. When you have made the
CLEAR
adjustment, press the CLEAWOFF
OFF
pad to go back to the time of day
display. Use your oven as you
would normally.
NOTE: This adjustment will not affect Broil or
Clean temperatures. It will be retained in memory
after a power failure.
11

COWECTION
COO~NG
What is Convection?
In a convection
Because food is heated faster in a convection
oven, a fan circulates
oven when using the convection modes, many types
hot air over, under and
of food can be cooked at lower temperatures than
around the food. This those suggested for regular ovens. Do remember
circulating hot air is
that recipe books often give times and temperatures
evenly distributed for cooking in regular ovens. Convection ovens make
throughout the oven it possible to reduce the temperature by
25°F.
For
cavity. As a result,
more information on adapting recipes, see the
foods are evenly
cooke
Convection Cookbook.
and browned— often
The convection oven fan shuts off when the oven door
in less time with
convection heat.
is opened. DO NOT leave the door open for long
periods of time while using Convection Bake or you
may shorten the life of the convection heating element.
When should you use Convection Bake or Convection Roast?
To help you understand the difference between
convection bake and roast and traditional bake and
roast, here are some general guidelines.
In convection bake, heat comes from the heating
element in the rear of the oven. The convection fan
circulates the heated air evenly, over and around the
food. Preheating is not necessary with foods having
a bake time of over 15 minutes.
In regular or traditional baking, the bottom
heating element heats the air in the oven which then
cooks the food.
Convection Bake
● Ideal for evenly browned baked foods cooked
on all 3 shelves.
● Good for large quantities of baked foods.
● Good results with cookies, biscuits, muffins,
brownies, cupcakes, cream puffs, sweet rolls, angel
food cake and bread.
Traditional Bake
● Foods such as layer cakes have a more level top
crust when not baked with convection heat.
In convection roast, heat comes from the top
heating element. The convection fan circulates the
heated air evenly over and around the food. Meat
and poultry are browned an all sides as if they were
cooked on a rotisserie. Using the roasting rack
provided, heated air will be circulated over, under and
around the food being roasted. The heated air seals in
juices quickly for a moist and tender product while, at
the same time, creating a rich golden brown exterior.
Convection Roast
● Large tender cuts of meat, uncovered.
● Roasting pans with low sides to allow air movement
around food.
fiaditional
Roast
● Less tender cuts of meat because these need to cook
a long time in liquid to become tender.
● Cooking bag
● Foil tent
● Covered dish
Cookware for Convection Cooking
Before using your convection oven, check to see
if your cookware leaves room for air circulation in
the oven. If you are baking with several pans, leave
space between them. Also, be sure the pans do not
touch each other or the walls of the oven.
Metal and Glass
Any type of cookware will work in your convection
oven. However, metal pans heat the fastest and are
recommended for convection baking.
● Darkened or matte-finished pans will bake faster
than shiny pans.
● Glass or ceramic pans cook more slowly.
Paper and Plastic
Heat-resistant paper and plastic containers that are
recommended for use in regular ovens can be used in
convection ovens. Plastic cookware that is
heat-
resistant to temperatures of
400°F.
can also be used.
When baking cookies, you will get the best results
if you use a flat cookie sheet instead of a pan with
low sides.
For recipes like oven-baked chicken, you should
use a pan with low sides. Hot air cannot circulate well
around food in a pan with high sides.
12

CO~CTION
BA~G
Adapting Recipes For Convection Baking
Use the temperature called for in your recipe.
Use pan size recommended in the recipe.
You may find that you need to reduce it by
25°F.,
depending on the type of food you are cooking.
For more information on adapting recipes, see the
Convection Cookbook.
Preheating is not necessary with foods having a bake
time of over 15 minutes.
Check foods for doneness at the minimum
suggested cooking time.
Multi-Shelf Baking
Because heated air is circulated evenly throughout the
For two-shelf baking, place the offset shelf in the
oven, foods can be baked with excellent results on
bottom (A) shelf position. Place the straight shelf in
two or three shelves at a time. Multi-shelf
baking
may
the third
(C)
shelf position.
increase cook times slightly for some foods but
~he
-
overall result is time saved. Cookies, muffins,
biscuits, and other
quickbreads
give very good results
with multi-shelf baking.
When baking on three
r
—
shelves, divide the oven
/
into thirds by placing the
~
offset shelf in the third (C)
shelf position and straight
shelves in first (A) and
fourth (D) shelf position.
fL
I
offset shelf
and then, using two pot holders, pull the shelf out by
holding the sides of it. The offset shelf is low and you
could be burned if you place your hand in the middle
of the shelf and pull all the way out.
When baking four cake
layers, four pies or four
loaves of bread, stagger
r
r
pan placement on two
shelves (as shown) for
best browning.
L
q
CAUTION: When you
E
are using the offset shelf
in the lowest position (A), you
offset shelf
will need to use caution pulling the shelf out. We
recommend that you pull the shelf out several inches
I
How to Set Your Oven for Convection Baking
To avoid possible burns, place the shelves in the
correct position before you turn the oven on.
-
1.
Press the
CONVEC~ON
BA~
pad.
I
BAKE
I
2. Press the INCREASE or DECREASE pad.
The last oven set temperature appears in the
display. Continue pressing until the desired
temperature is displayed.
When the oven starts to heat, the word “ON” and
the.changing
temperature, starting at
100°F.,
will
be displayed. When the oven reaches the
temperature you set, a tone will sound.
m
3. Press the CLEAWOFF pad when
CLEAR
baking is finished.
OFF
NOTE: You will hear a fan while cooking with this
feature. The fan will stop when the door is opened,
but the heat will not turn off.
To change the oven temperature during the
Convection Bake cycle, press the CONVECTION
BA=
pad and then the INCREASE or
DECREASE pad to get the new temperature.
13

TMED
CONVECTION
BAmNG
How to Convection Time Bake
Your oven can be set to turn on and off automatically.
NOTE: Before beginning, make sure the oven clock
shows the correct time of day.
m
To set the clock, first press the
CLOCK
CLOCK pad. Press the INCREASE or
DECREASE pad until correct time of
day is displayed. Press the CLOCK
pad to start.
How to Set Immediate Start and Automatic Stop Convection Bake
The oven turns on right away, cooks for a preset
length of time, and turns off automatically at the
preset Stop Time.
To avoid possible burns, place the oven shelves in
the correct position before you turn the oven on.
m
1. Press the CONVECTION
CONVECTION
BAKE pad.
BAKE
L
1
n
2. Press the INCREASE or
A
DECREASE pad until desired
temperature is displayed.
1
I
m
3. Press the COOK TIME pad.
COOK
TIME
4. Press the INCREASE pad until the desired length
of baking time appears in the display. The
minimum Cook Time you can set is ten minutes.
The words “TIMED
CONV BAKE” and “COOK
TIME” will be displayed along with the oven
temperature that you set and the cook time that you
entered. When the oven starts to heat, the word
“ON” and the changing temperature, starting at
100°F.,
will be displayed. When the oven reaches
the temperature you set, a tone will sound. The
oven will continue to cook for the programmed
amount of time, then shut off automatically.
1
5. At the end of Timed Convection
CLEAR
Bake, the display will show
“OHR:OO
OFF
COOK
TIME” and the oven
will
turn
off. Press the
CLEAWOFF
pad to
clear the display.
6. Remove food from the oven. Remember, foods
that are left in the oven continue cooking after
controls are off.
NOTE:
● You will hear a fan while cooking with this feature.
The fan will stop when the door is opened, but the
heat will not turn off.
● Foods that spoil easily such as milk, eggs, fish,
stuffings, poultry and pork should not be allowed
to sit out for more than one hour before or after
cooking. Room temperature promotes the growth
of harmful bacteria. Be sure that oven light is off
because heat from the bulb will speed harmful
bacteria growth.
14

How to Set Delay Start and Automatic Stop Convection Bake
Quick Reminder
1. Press the CONVECTION BAKE pad.
2. Press the INCREASE or DECREASE pad to
select oven temperature.
3. Press the COOK TIME pad.
4. Press the INCREASE or DECREASE pad to
set the length of cooking time.
5. Press the STOP TIME pad.
6. Press the INCREASE or DECREASE pad
until desired stop time appears in display.
Delay Start and Automatic Stop is setting the
oven control to turn the oven on and bake until a
specific time.
For example: Let’s say it’s
2:00
and dinner time is
shortly after
7:00.
The recipe suggests 3 hours baking
time at
325°F.
Here’s how:
To avoid possible burns, place the shelves in the
correct position before you program the oven.
m
1. Press the CONVECTION
CONVECTION
BAKE pad.
BAKE
~1
2. Press the INCREASE or DECREASE
A
,
,
COOK
TIME
pad until “325°” is displayed.
3. Press the COOK TIME pad.
4. Press the INCREASE pad until
“3HR:OO”
appears
in the display. Cook Time of 3 hours now appears
in display.
1
5. Press the STOP TIME pad.
STOP
“SET STOP TIME” and the
TIME
earliest Stop Time you can set
appear on the display. In this
example,
“5:00”
and “COOK
STOP TIME” appear in the display.
The control automatically sets Stop Time by
adding the Cook Time to the time of day. In this
example, the time of day is
2:00
and the Cook
Time is 3 hours. Adding 3 hours to the time of
day equals
5:00.
6. Change Stop Time from
5:00
to
7:00
by pressing
the INCREASE pad until
“7:00”
appears in the
display. The words “DELAY TIMED
CONV
BAKE” and “STOP TIME” appear in the display.
At
4:00,
the oven will turn on automatically.
When the oven starts to heat, the word “ON”
and the changing temperature, starting at
100°F.,
will be displayed. The oven will cook for the
programmed 3 hours and shut off automatically
at
7:00.
7. At the end of Timed Convection Bake, the display
will show
“OHR:OO
COOK TIME” and the oven
will turn off. Press the
CLEAWOFF pad to clear
the display.
8. Remove food from the oven. Remember, even
though oven shuts off automatically, foods continue
cooking after controls are off.
NOTE:
● You will hear a fan while cooking with this feature.
The fan will stop when the door is opened, but the
heat will not turn off.
● Foods that spoil easily such as milk, eggs, fish,
stuffings, poultry and pork should not be allowed to
sit out for more than one hour before or after
cooking. Room temperature promotes the growth of
harmful bacteria. Be sure that the oven light is off
because heat from the bulb will speed harmful
bacteria growth.
15

CO~CTION
ROASTmG
Meats cooked in a convection oven are dark brown
on the outside and tender and juicy on the inside.
In most cases, cooking time will be less when using
the Convection Roast feature. Sometimes cooking
time is reduced by 10 minutes per hour.
To make sure the meat is cooked the way you want
it, we recommend using the temperature probe
provided with the oven.
The special roasting rack and pan allow heated air
to circulate over and under the meat. This allows the
meat to brown on all sides.
Adapting Recipes for Convection Roasting
Use the temperature called for in
Check foods for doneness at the
For more information on
your recipe.
minimum suggested time.
adapting recipes, see the
Cooking time may be reduced.
Use the special roasting rack with
Convection Cookbook.
Preheating is not necessary.
the broiler pan and grid.
Convection Roasting Rack
Roasts or poultry should be cooked on the lowest
shelf position (A) on the offset shelf.
When you are convection roasting you will use the
broiler pan and grid and the special roasting rack. The
pan is used to catch grease spills and the grid is used
to prevent grease spatters. The rack holds the meat.
This rack allows the heated air to circulate under the
meat and increase browning on the underside of the
meat or poultry.
1.
Place the offset shelf in the lowest shelf position (A).
CAUTION: When you are using the offset shelf in
the lowest position (A), you will need to use caution
when pulling the rack out. We recommend that you
pull the shelf out several inches and then, using two
pot holders, pull the shelf out by holding the sides of
it. The shelf is low and you could be burned if you
place your hand in the middle of the shelf and pull all
the way out.
2. Place the broiler pan and grid on the roasting stand.
Place the roasting rack on the stand.
3. Place the meat on the special roasting rack.
roasting
rack
1
.
See the Roasting with the Probe section to insert the
probe correctly.
16

How to Set Your Oven for Convection Roasting When Using the Temperature Probe
The display will flash “Probe” and beep if the probe is
inserted into the outlet but the oven is not
programmed for the probe.
1. Place the offset shelf
in the lowest position
(A). Insert the probe
into meat.
2. Plug the probe into
the outlet on the oven
wall.
M&e sure it is
pushed all the way in.
Close the oven door.
m
3. Press the PROBE pad.
PROBE
❑
4. Press the INCREASE or DECREASE
A
pad until desired internal probe
temperature is displayed.
m
5. Press the CONVECTION
CONVECTION
ROAST pad.
ROAST
m
7. When internal temperature of meat
CLEAR
reaches the number you have set, the
OFF
probe and the oven turn off and the
oven control signals. To stop signal,
press the CLEAWOFF pad. Use hot
pads to remove the probe from the
food. Do not use tongs to pull on
it—they might damage it.
CAUTION: To prevent possible burns, do not
unplug the probe from the oven outlet until the oven
has cooled. Do not store the probe in the oven.
NOTE:
● You will hear a fan while cooting with this feature.
The fan will stop when the door
fi opened, but the
heat will not turn off.
● If you remove the food before the temperature is
reached, the oven beeps and the display flashes
until the probe is removed.
To change oven temperature during
the Convection Roast cycle, press the
CONVECTION ROAST pad and then press
the INCREASE or DECREASE pad to get the
new desired temperature.
6. Press the INCREASE or DECREASE pad.
The last oven set temperature appears in the
display. Continue pressing until the desired
temperature is displayed.
When the oven starts to heat, the words
“CONV
ON” and the roasting temperature you set will be
on the display.
After a few seconds, the words “LO PROBE” will
replace the roasting temperature in the display.
After the internal temperature of the meat reaches
100 F., the changing internal temperature will be
shown in the display.
17

ROAST~G
GU~E
~pe
Meat
Tender cuts; rib, high quality
sirloin tip, rump or top round*
Lamb leg or bone-in shoulder*
Ved
shoulder, leg or loin*
Pork loin, rib or shoulder*
Ham, precooked
Poultry
Chicken or Duck
Chicken pieces
Turkey
Oven
Temperature
325°
325°
325°
325°
325°
325°
350°
325°
Doneness
Rare:
Medium:
Well Done:
Rare:
Medium:
Well Done:
Well Done:
Well Done:
To Warm:
Well Done:
Well Done:
Well Done:
Approximate Roasting Time
in Minutes
per Pound
3 to 5
lbs.
6 to 8
Ibs.
2633
18-22
35-39
22-29
4W5
30-35
21-25
20-23
25–30
2428
3&35
28-33
3545
3040
3545
3040
17–20 minutes per pound (any weight)
3 to 5
lbs.
Over 5
lbs.
3540
30-35
3540
10 to 15
lbs.
Over 15
Ibs.
18-25
15-20
Internal
Temperature
‘F.
140°–1500t
150°–1600
170°–1850
140°–1500t
150°–1600
170°–1850
170°–1800
170°–1800
115°–1200
185°–1900
185°–1900
In thigh:
185°–1900
*For boneless rolled roasts over 6 inches thick, add 5 to 10 minutes per pound to times given above.
7The
U. S. Department of Agriculture says “Rare beef is popular, but you should know that cooking it to only
140°F.
means some
food poisoning organisms may
sumive.”
(Source: Safe Food Book.—Your
Ktchen
Guide. USDA Rev. June 1985.)
BA~G
Your oven temperature is controlled very accurately using an oven
control system. We recommend that you operate the oven for a number
of weeks to become familiar with your new oven’s performance. If you
think an adjustment is necessary, see Adjusting Oven Thermostat section
in this book.
How to Set Your Oven for Baking
To avoid possible burns, place
the shelves in the correct position
before you turn the oven.
~
1.
Mess
tk
BAKE
BA~
pad.
n
2. Press the
A
INCREASE or
DECREASE pad.
The last oven set temperature
appears in the display. Continue
pressing until the desired
temperature is displayed.
When the oven starts to heat, the
word “ON” and the changing
temperature, starting at
100°F.,
will be displayed. When the
oven reaches the temperature
you set, a tone will sound.
~
3. Press the
I
I
CLEAR
J
CLEAWOFF pad
OFF
when baking is
finished and then
remove food
from oven.
To change oven temperature
during the
BA~
cycle, press
the
BA~
pad and then the
INCREASE or DECREASE pad
to get the new temperature.
18

TMED
BA~NG
How to Time Bake
Your oven can be set to turn on and off automatically.
NOTE: Before beginning, make sure the oven clock
shows the correct time of day.
m
CLOCK
To set the clock, first press the
CLOCK pad. Press the INCREASE
or DECREASE pad until correct time
of day is displayed. Press the CLOCK
pad to start.
How to Set Immediate Start and Automatic Stop
The oven will turn on immediately and cook for a
4. Press the INCREASE or DECREASE pad until
selected length of time. At the end of Cook Time the
desired length of baking time is displayed.
oven will turn off automatically.
The words “TIMED BAKE” and “COOK TIME”
To avoid possible burns, place the shelves in the
will be displayed along with the oven temperature
correct position before you turn the oven on.
that you set and the cook time that you entered.
m
1. Press the BAKE pad.
When the oven starts to heat, the word “ON” and
the changing temperature, starting at
100°F.,
will be
BAKE
displayed. When the oven reaches the temperature
vou
set. a tone will sound. The oven will continue
n
2. Press the INCREASE or
A
DECREASE pad until desired
temperature is displayed.
I
I
m
3. Press the COOK TIME pad.
COOK
TIME
~o
cook’ for the programmed amount of time, then
shut off automatically.
5. Remove food from the oven. Remember, foods
that are left in the oven continue cooking after
controls are off.
NOTE: Foods that spoil easily such as milk, eggs,
fish, stuffings, poultry and pork should not be allowed
to sit out for more than one hour before or after
cooking. Room temperature promotes the growth of
harmful bacteria. Be sure that oven light is off
because heat from the bulb will speed harmful
bacteria growth.
(continued next page)
19

T-D
BAmG
(continued)
How to Set Delay Start and Automatic Stop
Quick Reminder
1. Press the BAKE pad.
2. Press the INCREASE or DECREASE pad to
select oven temperature.
3. Press the COOK TIME pad.
4. Press the INCREASE or DECREASE pad to
set the length of cooking time.
5. Press the STOP TIME pad.
6. Press the INCREASE or DECREASE pad
until desired stop time appears in display.
Delay Start and Automatic Stop is setting the
oven control to turn the oven on and bake until a
specific time.
For example: Let’s say it’s
2:00
and dinner time is
shortly after
7:00.
The-recipe suggests 3 hours baking
time at
325°F.
Here’s how:
To avoid possible burns, place the shelves in the
correct position before you program the oven.
m
1. Press the BAKE pad.
BAKE
I
I
n
2. Press the INCREASE or DECREASE
A
pad until “325°” is displayed.
m
5. Press the STOP TIME pad. “SET
STOP
STOP TIME” and the earliest Stop
TIME
Time you can set appear on the
display. In this example,
“5:00”
and
“STOP TIME” appear on the display.
The control automatically sets Stop Time by
adding the Cook Time to the time of day. In this
example, the time of day is
2:00
and the Cook
Time is 3 hours. Adding 3 hours to the time of
day equals
5:00.
6. Change Stop Time from
5:00
to
7:00
by
pressing the INCREASE pad until
“7:00”
and
Stop Time appear in the display. The words
“DELAY TIMED BAKE” appear in the display.
At
4:00,
the oven will turn on automatically.
When the oven starts to heat, the word “ON”
and the changing temperature, starting at
100°F.,
will be displayed. The oven will cook for the
programmed 3 hours and shut off automatically
at
7:00.
7. Remove food from the oven. Remember, even
though oven shuts off automatically, foods continue
cooking after controls are off.
NOTE: Foods that spoil easily such as milk, eggs,
fish, stuffings, poultry and pork should not be allowed
to sit out for more than one hour before or after
cooking. Room temperature promotes the growth of
harmful bacteria. Be sure that the oven light is off
because heat from the bulb will speed harmful
bacteria growth.
m
3. Press the COOK TIME pad.
COOK
TIME
4. Press the INCREASE pad until
“3HR:OO”
appears
in the display. Cook Time of 3 hours now appears
in display.
20
/