Page is loading ...

166
PO
(166PO) AP641 ELECTRIC PUMP ENGLISH 4.875” X 7.25” 05/24/2019
READ AND SAVE THESE INSTRUCTIONS
Page 1
166
PO
READ AND SAVE THESE INSTRUCTIONS
Page 2
(166PO) AP641 ELECTRIC PUMP ENGLISH 4.875” X 7.25” 05/24/2019
FIG (1)
FIG (4)
Charging the pump using a standard automobile 12 Volt DC power source:
1. The pump must be charged for 1 hour with 12 Volt DC power source.
2. Plug the 12 Volt DC power cord into the air pump power receptacle
(FIG. 5)
.
3. Attach the DC power cord plug into a standard 12 Volt DC automobile cigarette
lighter or 12V DC accessory outlet
(FIG. 5)
.
4. Slide the switch to “
” position to charge/recharge the batteries
(FIG. 3)
.
5. Charge: Charge the pump for 1 hour with 12 Volt DC power source.
6. When the pump is charged, immediately remove the power cord.
NOTE:
Red LED light: charging/recharging mode. Green LED light: fully charged.
If the LED light does not light up, make sure the switch is in the “
” position.
INFLATION
When inflating large items such as inflatable boats and large air mattresses, no
accessory nozzle (FIG. 6) may be needed. The air pumps inflation connector may
fit directly into the inflation valve. If a nozzle is needed, use the air pump nozzle
most appropriately sized for the product, then follow the instructions below:
Inflation using the 12 Volt DC power cord:
1. Plug the 12 Volt DC power cord into the air pump power receptacle
(FIG. 5)
.
2. Attach the DC power cord plug into a standard 12 Volt DC automobile cigarette lighter or
accessory outlet
(FIG. 5)
.
3. Attach the air pump inflation connector with nozzle if appropriate to the inflation valve on the item to be
inflated
(FIG. 7)
.
4. Slide the switch to “
” position to operate the air pump
(FIG. 8)
. Inflate item to desired level.
5. When the item is inflated, slide the switch to “
” position to turn off the air pump
(FIG. 3)
. Immediately unplug air
pump and cords when air pump is not in use.
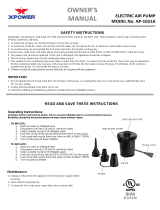
PARTS DESCRIPTION:
1. PUMP
2. INFLATION CONNECTOR
3. DEFLATION CONNECTOR
4. SWITCH
5. DETACHABLE 12V DC
POWER CORD
6. AC ADAPTER
7. NOZZLES
8. SWITCH OPERATION DETAIL
9. VENT HOLES / SLOTS
OPERATING INSTRUCTIONS
General
•
Pump must be charged before use and is not designed for inflation directly from household AC power sources.
•
If necessary, the initial charge can be made using the DC power cord plugged into an automobile cigarette lighter or 12V DC
accessory receptacle for one hour. After the first charge, it may be used for inflation (without cords) and recharged using
either the AC adapter or Fast-charged (1 hour only) using the 12 Volt DC power cord. See specific instructions below.
•
The “
” position turns the pump OFF and is also the RECHARGE mode position.
•
The batteries are permanently sealed in the pump and cannot be removed or replaced. As the pump weakens from use,
recharge the batteries. Do not wait until they are fully discharged.
•
Do not dispose of air pump and its batteries in fire. Check your local regulations for proper disposal instructions.
•
Keep away from heat or direct sunlight.
MAINTENANCE INSTRUCTIONS:
No specific air pump maintenance is required. Air pump has no user serviceable parts.
MOVING AND STORAGE INSTRUCTIONS:
Move the product, air pump and accessories to the power source location. Make sure the power cords are free of twist, kink and
knot. Fold the power cords loosely, and return pump, DC power cord, AC adapter and nozzles to package when not in use.
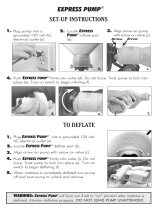
CHARGE/RECHARGE INSTRUCTIONS
Charging the pump using household 110-120 AC voltage:
1. The pump must be charged for 4 hours or overnight with household 110-120 AC voltage.
2. Plug the AC adapter power cord into the air pump power receptacle
(FIG. 1)
.
3. Plug the other end of the AC adapter power cord into a household 110-120 Volt AC electrical outlet
(FIG. 2)
.
4. Slide the switch to “
” position to charge/recharge the batteries
(FIG. 3)
.
5. When the pump is fully charged, remove the power cord
(FIG. 4)
.
Inflation using the air pump when fully charged (without power cord):
1. Attach the air pump inflation connector with nozzle if appropriate to the inflation valve
on the item to be inflated.
2. Slide the switch to “
” position to operate the air pump
(FIG. 9).
Inflate item to
desired level.
3. When the item is inflated, slide the switch to “
” position to turn off the air pump.
DEFLATION
Deflation using the DC power cord:
1. Follow steps 1 & 2 under DC power inflation instructions.
2. Attach the air pump deflation connector with nozzle if appropriate
to the deflation valve on the item to be deflated
(FIG. 10)
.
3. Slide the switch to “
” position to operate the air pump.
Deflate item to desired level.
4. When the item is deflated, slide the switch to “
” position to turn
off the air pump
(FIG. 3)
. Immediately unplug air pump and remove
the cord when air pump is not in use.
Deflation using the air pump when fully charged (without power cord):
1. Attach the air pump deflation connector with nozzle if appropriate into the deflation valve on the item to be deflated.
2. Slide the switch to “
” position to operate the air pump. Deflate item to desired level.
3. When the item is deflated, slide the switch to “
” position to turn off the air pump.
FIG (9)
READ AND FOLLOW ALL INSTRUCTIONS BEFORE USING THIS PRODUCT
INTEX
®
OWNER'S MANUAL
Quick-Fill™ Electric Air Pump, Model AP641
12 Volt DC 8A; Rechargeable Battery
FIG (3)
220~240V
110~120V
FIG (2)
√
FIG (5)
FIG (10)
166-*PO-R0-2005
FIG (6)
FIG (8)FIG (7)
©2019 Intex Marketing Ltd. - Intex Development Co. Ltd. - Intex Recreation Corp. All rights reserved/Tous droits réservés/Todos los derechos
reservados/Alle Rechte vorbehalten. Printed in China/Imprimé en Chine/Impreso en China/Gedruckt in China.
®™ Trademarks used in some countries of the world under license from/®™ Marques utilisées dans certains pays sous licence de/Marcas registradas
utilizadas en algunos países del mundo bajo licencia de/Warenzeichen verwendet in einigen Ländern der Welt in Lizenz von/
Intex Marketing Ltd. to/à/a/
an Intex Development Co. Ltd., G.P.O Box 28829, Hong Kong & Intex Recreation Corp., P.O. Box 1440, Long Beach, CA 90801
• Distributed in the
European Union by/Distribué dans l’Union Européenne par/Distribuido en la unión Europea por/Vertrieb in der Europäischen Union durch/
Intex Trading B.V.,
Venneveld 9, 4705 RR Roosendaal – The Netherlands
Consumer Service 1-800-234-6839
www.intexcorp.com
•
Adult Use Only.
•
Household use only.
•
Do not drop unit into water or expose unit to rain or water.
•
Do not direct air stream at face or body.
•
Do not operate for more than 10 minutes at a time. Unplug and let cool at least 30 minutes.
•
Unplug unit when not in use.
•
Do not obstruct vent holes or open source.
•
Do not insert objects into inflation or deflation connectors.
FOLLOW THESE RULES AND ALL INSTRUCTIONS TO AVOID PROPERTY DAMAGE, ELECTRIC SHOCK, BURNS
OR OTHER INJURY.
WARNING
•
To reduce the risk of electric shock, do not expose to rain. Store indoors. CAUTION: This product has more than one connection to
the source of supply. To reduce the risk of electrical shock, disconnect all such connections before servicing.
CAUTION
Inflate and deflate
with batteries.
Inflate and deflate
with DC power.
Inflation OFF and recharge mode ON with AC or DC power.
8
9
1
2
5
6
7
3
4
NAMES OF PARTS
OR
/