NXP MC33812 User guide

Category
Engine
Type
User guide
© Freescale Semiconductor, Inc., 2009. All rights reserved.
Freescale Semiconductor
User’s Guide
Document Number: KT33812ECUUG
Rev. 3.0, 11/2009
Small Engine Reference Design User Manual
Featuring the MC33812 and MC9S12P128
Figure 1. KIT33812ECUEVME Evaluation Board
Table of Contents
1 Introduction . . . . . . . . . . . . . . . . . . . . . . . . . . . . . . . . . . . . . . . . . . . . . . . . . . . . . . . . . . . . . . . . . . . . . . . . . . . . . . . . . . 2
2 Getting Started . . . . . . . . . . . . . . . . . . . . . . . . . . . . . . . . . . . . . . . . . . . . . . . . . . . . . . . . . . . . . . . . . . . . . . . . . . . . . . . 3
3 System Setup . . . . . . . . . . . . . . . . . . . . . . . . . . . . . . . . . . . . . . . . . . . . . . . . . . . . . . . . . . . . . . . . . . . . . . . . . . . . . . . . 8
4 Application Development. . . . . . . . . . . . . . . . . . . . . . . . . . . . . . . . . . . . . . . . . . . . . . . . . . . . . . . . . . . . . . . . . . . . . . . 15
5 System Overview . . . . . . . . . . . . . . . . . . . . . . . . . . . . . . . . . . . . . . . . . . . . . . . . . . . . . . . . . . . . . . . . . . . . . . . . . . . . 26
6 Application Overview. . . . . . . . . . . . . . . . . . . . . . . . . . . . . . . . . . . . . . . . . . . . . . . . . . . . . . . . . . . . . . . . . . . . . . . . . . 27
7 Schematic . . . . . . . . . . . . . . . . . . . . . . . . . . . . . . . . . . . . . . . . . . . . . . . . . . . . . . . . . . . . . . . . . . . . . . . . . . . . . . . . . . .30
8 System Block Diagram . . . . . . . . . . . . . . . . . . . . . . . . . . . . . . . . . . . . . . . . . . . . . . . . . . . . . . . . . . . . . . . . . . . . . . . . .36
9 Bill of Materials . . . . . . . . . . . . . . . . . . . . . . . . . . . . . . . . . . . . . . . . . . . . . . . . . . . . . . . . . . . . . . . . . . . . . . . . . . . . . . .37
10 Appendix A: Hardware Reference Manual . . . . . . . . . . . . . . . . . . . . . . . . . . . . . . . . . . . . . . . . . . . . . . . . . . . . . . . . . 40
11 Appendix B: Software Reference Manual . . . . . . . . . . . . . . . . . . . . . . . . . . . . . . . . . . . . . . . . . . . . . . . . . . . . . . . . . . 55
12 Appendix C: Calibration. . . . . . . . . . . . . . . . . . . . . . . . . . . . . . . . . . . . . . . . . . . . . . . . . . . . . . . . . . . . . . . . . . . . . . . . 61
13 Appendix D: References . . . . . . . . . . . . . . . . . . . . . . . . . . . . . . . . . . . . . . . . . . . . . . . . . . . . . . . . . . . . . . . . . . . . . . . 62
Small Engine Reference Design User Manual, Rev. 3.0
2 Freescale Semiconductor
Introduction
1 Introduction
Welcome to the Freescale Small Engine Reference Design Kit. This product was designed to be a
complete solution for the electronic control of a small engine. Small engines are defined as a one or two
cylinder engine for use in anything from a motorbike to a lawn mower to a generator. While the decision
was made to address a one-cylinder engine specifically, this design is extremely useful for a two-cylinder
engine with little or no modification. Freescale's concept of creating an engine control kit is intended to
enable a market ranging from garage hobbyist to seasoned Tier 1 Powertrain Engineer using Freescale
products.
Through the use of this kit, you can create an engine controller specific to a small engine application.
Engine control is a discipline that requires intimate knowledge and experience in Chemical, Mechanical,
and Electrical Engineering. For those familiar with mechanical control of an engine through a carburetor,
the use of this reference design kit can help to advance your knowledge in the electrical area and provide
a jump-start for a successful adoption of electrical engine controls to meet new emissions standards.
Providing a kit such as this is intended to make semiconductor products from Freescale easier to use.
The user is responsible for providing all input signals, output loads as well as the completed system
design and development. This kit should serve as a starting point for the development of an application
specific engine controller for a small engine. Example software and documentation are provided to assist
in successful design and implementation. It is recommended to have the following skills and experience:
embedded C-language programming, analog and digital circuit design and schematic analysis,
microcontroller programming, fuel injection system debugging and calibration, and engine test
environment experience. Additionally, there is further benefit to experience using the CodeWarrior
Development Studio and the Freescale S12(X) microcontroller Units (MCUs). The User Reference
Manual provides exercises and references to additional information to reduce the learning curve for
inexperienced users.
Freescale's goal is to enable the small engine market. To clarify this point, the hardware included in this
kit can readily be configured and reprogrammed to run an engine. However, it lacks the application
specific hardening (EMC, ESD, and environmental areas for example) and implementation optimization
that make it a production ready module for any specific application. Further, the free example application
software provided is a starting point capable of running an engine. It does not apply any advanced control
strategy capable of addressing the pollution concerns and regulations facing the small engine industry.
To do this would become application specific to an engine and could not be and should not be
implemented by a semiconductor supplier as it is deeply outside their area of expertise. The example
application software does show how to use the key functionality in the Freescale products that the kit is
based on, which speeds up the development process by showing a working example.
The contents of this kit will save many months of work, even for experienced powertrain engineers just
looking to evaluate Freescale products. A system has been created based on a one-cylinder closed-loop
engine controller using integrated technology while being cost-effective for the small engine market.
Example software is provided that can be customized to run an actual engine that has electronic fuel
injection. Documentation is provided to aid in going through the process of developing an application.
Finally, information on modifying the design to support the adaptation of the small engine reference
design to your application goals.
Small Engine Reference Design User Manual, Rev. 3.0
Freescale Semiconductor 3
Getting Started
2 Getting Started
2.1 Exploring the Contents of KIT33812ECUEVME
Included in this kit are the essential components to develop an engine control application for small
engines. Development is centered on the use of a Windows based PC and the Electronic Control Unit
(ECU) contained in this kit.
Figure 2 shows a picture of the key kit contents. The key components of the
kit are: ECU, wire harness, documentation DVD, Freescale CodeWarrior for the S12(X) (contained on
DVD), USB BDM Tool, and USB cable. Please refer to the packing list for any additional components that
may be included in the kit. If contents are missing, use the included warranty card or contact your local
Freescale Support Team.
Figure 2. Contents of Kit KIT33812ECUEVME
Your Engine
Software Development on PC
USB Connection to ECU
Wire harness for
connection to EFI
System
Documentation DVD
Including CodeWarrior
and example application
code
Small Engine ECU
Small Engine Reference Design User Manual, Rev. 3.0
4 Freescale Semiconductor
Getting Started
2.2 Electronic Control Unit (ECU)
This is the Small Engine Reference Design hardware. It is a one-cylinder engine controller based on the
Freescale MC9S12P128 microcontroller, MC33812 Small Engine Integrated Circuit, and MC33880
Configurable Octal Serial Switch. The unit will run from a 12
V battery and control engine loads such as
a fuel injector, inductive ignition coil, relays, incandescent lamps, and LEDs. The ECU also takes inputs
from switches and sensors, such as Engine Stop switch, manifold air pressure, engine temperature, and
variable reluctance sensors. Application software will be run on this unit containing your engine control
strategy. While the unit is not designed to be a production module specific to any engine, it is intended to
have the same look and feel. This resulted the small, business card sized form factor and minimal
provision for expansion.
Figure 3. ECU Included in KIT33812ECUEVME
Small Engine Reference Design User Manual, Rev. 3.0
Freescale Semiconductor 5
Getting Started
2.3 ECU Wire Harness
To provide a physical connection to the electronic fuel injection system, a wired connection to the controls
and sensors of the system is required. As a starting point, a basic wire harness is included in the kit along
with the components to fully populate the connectors. The basic wire harness allows power to be applied
to the module and a minimal set of loads. Later in this manual, there is documentation that will discuss
the process of interfacing the signals of the engine to the ECU. Addition connectors can be easily
obtained through known electronic component supplies. Exact part numbers are made available in the
bill of materials (BOM) for the ECU.
Figure 4. ECU Wiring Harness
2.4 Documentation DVD/CD
The documentation media contains electronic copies of all relevant information for creating and using this
kit, including this User Manual. Documentation includes various support tools, such as spreadsheet tools,
and design files including schematics and Gerber output files. These can be accessed through the
graphical application that is automatically launched or by using Windows Explorer as a more direct
navigation of the contents. As information may be updated, always reference www.freescale.com for the
latest relevant information.
Figure 5. Small Engine Reference Design Documentation DVD/CD
Small Engine Reference Design User Manual, Rev. 3.0
6 Freescale Semiconductor
Getting Started
2.5 Freescale CodeWarrior for the S12(X)
All software for the ECU is developed using this application, which is included on the DVD. This is done
as a convenience as it is a large program to download. It is recommended to check for the latest version
and updates at www.freescale.com. Example software is tested using the 5.0 release of the S12(X)
product. This version does not require any updates or patches at the time development, however it is
recommended to maintain this software through updates as available. The CodeWarrior Development
Studio is an integrated development environment that provides a common interface for working with the
various tools needed for building software. It comes in various levels of product for various types of
MCUs. The example software allows the use of the Special Edition Product which is free for use. As your
application grows and further features of the product are required, upgraded licenses can be purchased
to meet your needs. The primary function of the CodeWarrior application is to compile software, program
the ECU, and then control the execution of the software through the integrated debugger.
Figure 6. Screen shot of Freescale CodeWarrior for the S12(X)
Small Engine Reference Design User Manual, Rev. 3.0
Freescale Semiconductor 7
Getting Started
2.6 USB BDM Tool
Connection from the Windows PC to the ECU is performed by the USB to BDM Tool. This tool is powered
through USB and interfaces with the CodeWarrior application. The link to the ECU is through a 6 pin
ribbon cable that goes from the USB BDM Tool to the Background Debug Module (BDM) header on the
ECU. Through the BDM connection, the CodeWarrior application can use the BDM tool to communicate,
program, and control the S12 microcontroller on the ECU. While tool gets its power from the USB port
on the PC, it does not power the ECU. This separation is important as it provides a level of isolation from
the engine system to the development PC. Initial kits may include the P&E Multilink as the USB to BDM
Tool. Normal production kits will make use of the TBDML. It is important to know which tool you are using
so that the proper connection is selected when using CodeWarrior.
Figure 7. Example USB BDM Tool for Connection to PC
2.7 Additional Recommended Hardware
In addition to this kit, various pieces of equipment are recommended to perform application development
work for software validation and testing. These are commonly found in most electronics labs:
•12 V, 10 A DC power supply
100 MHz (minimum) 4 channel oscilloscope
Soldering iron
Grounded electrostatic matt
Windows XP (required) PC
•12 V relays
Potentiometers
Switches.
Having all of these items will allow testing and debugging of the system.
Small Engine Reference Design User Manual, Rev. 3.0
8 Freescale Semiconductor
System Setup
3 System Setup
Now that the contents of the small engine reference design have been described, the focus will shift to
the complete development system. This includes the contents of this kit and the fuel injected engine as
a system. At a high level, system setup contains the following steps:
Definition of interface between ECU and Engine
Creation of simulated engine environment
Installation and verification of software development environment
Engine load and sensor validation
Migration plan towards real engine hardware
To accomplish these steps, several exercises will be described to help take you through this critical
phase. These exercises include, getting started with Freescale CodeWarrior, and creating a known
reference system. Additionally, suggestions for further training will be provided based on using Freescale
products and the system level setup.
Figure 2 shows the components of this kit and a placeholder for
your engine. This system incorporates the interface from the PC to the actual engine. The user must
provide the engine loads for electronic fuel injection including fuel injector, inductive ignition coil, relays,
and other relevant components. Signals from VRS, MAP, switches, and other inputs must also be
provided along with the actual engine itself.
3.1 Definition of interface between ECU and Engine
The first step in using this kit is to determine how it will connect to your engine system. As mentioned, the
engine must be fuel injected. If you are converting an engine from mechanical (carburetor) to electronic
control, this must be done before or in parallel with using this kit. The ECU is designed around a
one-cylinder engine, however, it can be adapted to work with a two-cylinder engine. The requirements for
two-cylinder operation are: a) ignition coil must be a dual output or twin coil, b) wasted-spark strategy is
acceptable for application. This means that a twin coil, capable of driving two separate spark plugs from
a single input, can be used to fire every engine revolution (in a four-stroke engine) to produce two spark
events, one in the desired cylinder and one in the second (wasted) cylinder. If this can be tolerated in the
system, fuel control can be provided individually to each cylinder through the INJOUT and ROUT1
signals.
To aid in the connection from the ECU to the engine, a worksheet is provided. Using Load Worksheet.xls,
available on the documentation DVD, connection to the engine can be defined. This Excel spreadsheet
contains the full list of connections and suggested functionality for each pin of the ECU. Matching up the
various controls, sensors, and inputs on the engine to the ECU should take into account voltage ranges
and current capabilities. If there is doubt to the connection, use the schematic and Hardware Design
Reference Manual found in Appendix A to for in-depth analysis of the circuits behind each ECU level pin.
The design goal of a cost-efficient design does not allow for a system to include all possible system
configurations. The signals available reflect essential controls for one-cylinder, closed-loop engine
control, highlighting the integration of the MC33812 Small Engine IC. Essential functionality should be
considered first, such as the direct controls for fuel and spark. System controls such as the fuel pump or
voltage regulator should be secondary concern as they can be externally controlled and do not require
precise timing execution.
Small Engine Reference Design User Manual, Rev. 3.0
Freescale Semiconductor 9
System Setup
By filling in the information under the “Target Engine System” column, see yellow highlight in Engine Load
Worksheet - Target System Identification Column in Yellow, each connection to the ECU can be defined.
In the actual worksheet, signals of the ECU are color coded to identify similar functionality. From this
completed worksheet, the wire harness from the engine to the ECU can be made. Materials for the AMP
brand connectors of the ECU are included to get this process started.
Exercise 1: Complete the Load Worksheet for your target engine system.
1. Open “Load Worksheet.xls” and bring the “Instructions” sheet to the front by clicking on this tab.
2. Collect information such as wiring diagrams and schematics for the engine system to be run.
3. Use the engine system information to define how each signal of the ECU is going to be connected to the engine.
This includes a definition of an existing pin on a connector, wire color and type, and the functionality associated
with the system. This table will also be useful for configuring the software.
4. Repeat this exercise for creating a simulated engine environment.
Creation of simulated engine environment
Before the simulated environment can be created, the ECU must have a viable power source. As the ECU
is designed to work in a real engine system, it is required to have a 12
V power source. A power supply
capable of generating 12
V at 1.0 A is a good starting point for the ECU alone. Depending on the loads
that will be connected to the ECU, a much larger power supply may be required with high current. A good
starting point for working with a full featured system is a 12
V, 10 A power supply. While the total system
loads may be greater, 10
A is generally large enough since the high current loads of ignition and injectors
are not typically on simultaneously.
Engine Load Worksheet - Target System Identification Column in Yellow
KIT33812ECUEVME Reference Design Target Engine System
Connector Pin Signal
Name
Signal
Type
Voltage
Range
Recommended
Functionality
Connector
Pin
Wire Color Functional
Description
1VPWRPower
Input
13.6V System power
from 12V battery
2 ISO9141 Input /
Output
0-Vbat Bi-directional com-
munication pin for
diagnostics
3 COIL 0-Vbat Spark control of
digital ignition sys-
tem
4 GND 0V Module level
ground reference,
return path of Vbat
5 GND 0V Module level
ground reference,
return path of Vbat
6 TPMD 0-Vbat H-bridge control
for 4-phase step-
per motor for idle
speed air speed
control
Small Engine Reference Design User Manual, Rev. 3.0
10 Freescale Semiconductor
System Setup
The best and safest way to begin developing an application for engine control is to work with a simulated
engine system. This reduces risk and development time by not having to focus on fuel related safety
concerns when trying to solve complex applications issues that arise. Developing with a simulated engine
system engine begins by selecting components that are similar or identical to the actual components on
the engine. For many of the loads, these can be the exact same components. In some cases, loads can
be replaced by a lesser expensive relay or a light. Relays work well for high power loads with dynamic
operating frequencies such as ignition and injectors. In those cases, the sound of the relay actuation is
beneficial to validate behavior during low speed testing. Other loads work better with lights or LEDs.
These are more simple loads that are simply controlled as on or off for long periods of time. Some loads
will require the actual load to test, such as an idle speed motor.
Perhaps the most challenging part of the system to simulate is engine position. Two core technologies
are used to sense engine position: variable reluctance sensors (VRS) and Hall Effect sensors. The
majority of production engines use a VRS for engine position. The advantage with the VRS is cost, while
a Hall Effect sensor provides a cleaner output signal. Both types are supported on the ECU. The default
configuration is for VRS. Use the schematic to identify the components to remove and populate for using
a Hall Effect sensor.
With respect to creating a simulated engine environment, engine position is the fundamental element.
Simulating the rotation of the engine can be done in two ways, virtual and physical simulation. A virtual
simulation involves a digital re-creation of the spinning crankshaft signal. This is best done by reproducing
a Hall Effect Sensor type of output, but there are options for a VRS. Using a different ECU, such as a
basic development board for a Freescale MCU, software can be written to create a the missing tooth
output pattern that is produced by a rotating engine using a Hall Effect Sensor. Such programs have
already been written for varying degrees of Freescale MCUs. The TOOTHGEN function is a part of a
library of functions for the MPC55xx products that have the eTPU peripheral.(ref1) Using a development
tool for such a product can allow the creation of a simulated engine position signal. For a VRS, options
for a virtual simulation include a combination of PC software with simple custom hardware. Do it yourself
(DIY) web sites, such as those for the Mega Squirt products, provide detailed instructions for building your
own circuit and provide PC software that can control the generation of the VRS signal based on a
simulated signal. (ref2)
While the concept of a virtual simulated engine position signal is very attractive, it lacks fundamental
characteristics that come with actual crankshaft of an engine. Since a virtual signal is typically generated
by a digital computer, it usually does not account for the real world imperfections of an engine.
Specifically, the timing pulses produced by a virtual signal are perfect. While this is a good on paper or
visually on a screen, the imperfections in the motion due to production tolerance and jerk associated with
cylinder compression lead to a rotation pattern that is not perfect. As a step in the right direction, a
physical simulated engine position signal can be used. This type of setup can take advantage of VRS or
Hall Effect Sensors and produce a signal that has more realistic characteristics to a real engine. A simple
and effective way to make a physical simulation is to mount an engine flywheel containing the position
teeth to a small electric motor. This creates a tool known as a spin bench. Using an electric motor and the
actual flywheel allows simple control of the engine speed while adding real world conditions for changes
in the actual time between position teeth. While the strong variations related to compression and
combustion are not present, the spin bench does allow transitions to and from a stopped engine and
provide teeth that are representative of the actual engine that the application is being developed for.
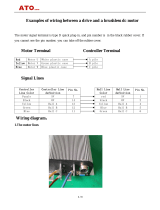
Figure 8 shows an example of a spin bench using a production flywheel and VRS from a small motorbike.
Small Engine Reference Design User Manual, Rev. 3.0
Freescale Semiconductor 11
System Setup
Figure 8. Spin Bench Example for Creating a
Physical Simulated Engine Position Signal
Exercise 2: Creating a reference platform for a simulated engine environment
1. Open Load Worksheet.xls and bring the “Reference System Load Worksheet” to the front.
2. Obtain components listed. Generic component specifications are listed.
3. Additionally, a simulation for engine position will be required. Create this using any of the examples described in
this section. Verify the simulated engine position signal is being properly generated. For this reference platform
to work, a 12 minus 1 signal must be generated. This means 12 equally spaced teeth with one missing tooth
representing a gap. See Figure 9 for oscilloscope trace of 12 minus 1 signal.
4. Create a wire harness to connect reference components to the ECU. Include specifications of wire color and pin
number as applicable. This will aid in debugging and later development.
5. Connect the wire harness to the ECU.
6. Place the Engine Stop Switch in the active position, which is a short to ground.
7. Apply power. Verify connections are correct by noting that power supply is drawing less than 500mA of current
and no components of the ECU are generating large amounts of heat. If any component is hot, remove power
and verify connections.
8. Verify that no relays should be active. This should be audible when power is applied if a relay was activated. If
relay activates on power on, verify Engine Stop Switch position and relay connections.
Small Engine Reference Design User Manual, Rev. 3.0
12 Freescale Semiconductor
System Setup
9. Move Engine Stop Switch to passive (12 V) position. This should activate the ROUT1 relay for 3 seconds then
deactivate the relay. Audibly this will be heard by two clicks. If connections are good and relay is not actuating,
verify signal on P1-9 (ISO9141) is low (0 V). If this is not low, then ECU does not have application code and will
require programming.
10. Start engine position simulation through Hall Effect or VRS. Keep RPM to about 500RPM. Relay connected to
COIL should be turning on and off each rotation and be audibly heard. This indicates that a good engine position
signal is getting to the MCU and it is able to process and control the loads.
Figure 9. Graphical Representation of 12 Minus 1 Tooth Pattern on Oscilloscope
Installation and Verification of Software Development Environment
All application software for the ECU is developed using the Freescale CodeWarrior for S12(X) integrated
development environment (IDE). Version 5.0 is the latest at creation of this manual and is included on the
DVD included with the KIT33812ECUEVME. To install CodeWarrior, save then launch the installation
application from a temporary location on a Windows based PC or directly launch the installation
application. No specific instructions are recommended beyond the default settings shown in the on
screen menus. If other versions of the CodeWarrior product are on the PC, this will not overwrite any
information as each version is a separate product and installation. For step by step confirmation of the
installation process and a quick tutorial on getting started, refer to the CodeWarrior Quickstart Guide
included on the Documentation DVD/CD. Further information relative to CodeWarrior can be found at
www.freescale.com/training. This link has a search feature allowing refinement of high level training
topics. Two training topics that will aid in the use of this kit are learning C programming
(http://www.freescale.com/webapp/sps/site/training_information.jsp?code=TP_C_PROGRAMMING&fsr
ch=1) and the Virtual lab for the S12XE
(http://www.freescale.com/webapp/sps/site/virtual_lab_information.jsp?code=VLAB_EVB9S12XEP100
&fsrch=1). Additional resources for working with CodeWarrior include the various user manuals that are
installed with CodeWarrior.
Missing Tooth
VRS Tooth Signal
(12 minus 1)
Missing Tooth
Hall Effect Tooth
Signal (12 minus 1)
Small Engine Reference Design User Manual, Rev. 3.0
Freescale Semiconductor 13
System Setup
Once you have installed the CodeWarrior application and become familiar with its operation through the
virtual lab, the software development environment can be validated.
Software Development Environment Validation Exercise
1. Create a new project in CodeWarrior for the MC9S12P128 MCU using the Project Wizard that appears when
CodeWarrior is launched. Create the project using default settings but be sure to include the
USB BDM tool
included with your kit
as the target connection.
2. Once you have the project created, verify the integrity of the empty software project by doing a build.
3. Once successful, connect the ECU to your 12 V power source using your simulated load harness.
4. Next, connect the PC to the USB BDM tool. Installation will be required if this is the first connection to the PC,
follow on screen menu and install driver automatically.
5. Connect the BDM ribbon cable to the BDM header on the ECU, note the location of Pin 1 as the red wire on the
cable and number 1 near the header.
6. Press the debug control in CodeWarrior to download the empty software project to the ECU. Follow the on
screen menus to connect and program the ECU, as performed in the Virtual Lab for the S12XE.
7. Press the “GO” arrow and allow execution for a few seconds before pressing “HALT”. The source window should
show the processor stuck in an infinite FOR loop. This verifies that the ECU is working and the software
environment has been created allowing programming and development.
As a final piece towards a complete development environment, a build of the example software will verify
if all of the tools discussed this far are working on your system.
System Setup Validation Exercise
1. Save the example application software by copying the folder “Example Scooter Application” from the DVD. This
is a CodeWarrior project that contains a working application that runs a 50cc scooter engine
2. Open “My _Engine_Project.mcp” in the saved folder through CodeWarrior.
3. Build the project.
4. Program the ECU by providing power and clicking debugger per previous exercise.
5. Run the application using the green “GO” button.
6. Stimulate the application by running the engine position simulation and using the Engine Stop Switch. Operation
should be identical to simulated engine environment test performed above.
Note: When using the TBDML as a BDM tool, the BDM communication speed must be manually changed
when the MCU switches between internal and external oscillator settings. The example application
switches from internal to external oscillator and it is necessary to change the BDM speed to 8MHz as
shown in
Figure 10. This setting is found in the TBDML HCS12 drop down menu in the debugger
window. If you do not have this drop down menu, you do not have the proper connection selected in
Codewarrior.
Small Engine Reference Design User Manual, Rev. 3.0
14 Freescale Semiconductor
System Setup
Figure 10. Changing the BDM Communication Setting for TBDML
7. Verify control signals for VRS, COIL, and INJOUT match those shown in Figure 11 using an oscilloscope.
Figure 11. Control Signals for Reference System Validation Exercise
Congratulations! This is a significant step towards creating your own engine controller. A safe and
effective development environment has been created allowing you to create your own application for
small engines. As the next sections progress, the focus will be mainly on the C-language source code
used in the example application. It is recommended to be experienced in the C programming language
to continue.
VRS Input
Fuel on
INJOUT
Spark on
COIL
Small Engine Reference Design User Manual, Rev. 3.0
Freescale Semiconductor 15
Application Development
4 Application Development
There are three paths that can be taken using the Small Engine Reference Design for application
development: 1) Ground up custom code can be written. 2) The example applications can be modified.
3) A ground up application can be written using the low level drivers and operating system used in the
example applications. If a ground up software project is selected, it may be beneficial to use various
aspects of the example application for working with the S12 MCU and the other various components in
the design. The example application will also be a benefit when using the low level drivers as it serves as
an example for using these pieces of code. At the very least, customizing of the example application will
be required. This section will focus on customizing the example application to a specific engine.
4.1 Example Application Architecture Overview
The example application is designed to run a one or two cylinder engine using a hybrid operating system.
A hybrid operating system is important to engine control as all engine control events are based on the
rotation (angle domain) of the engine and user control processing and data collection must be performed
periodically (time domain). Additionally, the example application reduces complexity through a hardware
abstraction layer (HAL). Through the HAL, software complexity is reduced by using application level
signal names instead of native control names for the MCU. The combination of these two software
techniques produces an example that is configurable through a single header file and reduces user
implemented code to three main functions.
User functions are split into three main activities. In Data_Management(), all data is collected and
processed in the system. This includes analog and digital information and any filter functions that are to
be performed. Engine_Management() is called to calculate raw fuel and spark parameters for running the
engine. This includes table look up of hard data values based on current engine RPM and load as well
as factoring in fuel and spark modifiers. In User_Management(), the engine control strategy is run. It
includes interpretations of user control inputs and control strategies for loads. The primary goal of the
User Management function is to handle user controls, determine fuel modifiers, and calculate engine
load. Each of these functions are performed at various rates and configured through the Application
Definitions.h header file. These functions do not directly control the engine fuel and spark events. These
are performed by low level functions that react to the rotation of the engine through the engine position
data. The low level engine control events use the latest parameters passed to fuel and spark controllers
by the user functions. Additional information is provided in Software Reference Manual found in Appendix
B.
4.2 Configuring the Application
The first step in working with the example software is to configure the code to be generated through the
Application Definitions.h file. In this file are definitions used to conditionally compile code based on the
user defined system. This is done to create an application that only uses the memory required for the
specific application, demonstrate flexible software design through conditional compiling, and create a
framework for a custom implementation using various types of hardware. The file is designed to be simple
and allow decisions to which definitions to select by using the completed Load Worksheet, discussed
earlier, and knowledge of the application.
While the software provides a signal abstraction layer, configuration of the low level software must be
performed through an application header file, “Application Definitions.h”. This file defines what signals are
used in system and provides parameters that lead to conditionally compiled code. Example of configuring
the software is provided in the demo application. The header file gives you detailed description on how
to choose what options you want in your system. Configuring the system through the application header
file is done by modifying system parameters by adding or removing specific lines through the comment
Small Engine Reference Design User Manual, Rev. 3.0
16 Freescale Semiconductor
Application Development
directive of the C programming language. The following examples goes through various definitions found
in the application header file and show possibilities for configuration. It is important to keep in mind the
limitations of the hardware as the software incorporates functionality beyond what is found on the
reference design hardware.
Example: Configuring the number of cylinders.
//How many cylinders? Choose one.
#define ONE_CYLINDER
//#define TWO_CYLINDER
To change this application from one cylinder to two cylinders, modify the lines as follows:
//How many cylinders? Choose one.
//#define ONE_CYLINDER
#define TWO_CYLINDER
Other configuration of the application header file will require modifying parameters that are numerical in
nature. Each value must be customized to your application. Default values are provided but may not be
relevant.
Example: Configuring maximum RPM of engine.
//Set the maximum RPM for engine rotation
#define RPM_MAX 10000
This parameter can be modified to reduce the maximum RPM from 10 KRPM to 500 RPM as follows:
//Set the maximum RPM for engine rotation
#define RPM_MAX 500
For system signals that are configurable, multiple definitions are required. Only if the signal is used do
any of the associated parameters need to be defined.
Example: Removing definition of an analog signal.
//Oxygen Sensor(O2)
//Define the signal for the system to enable functionality.
#define O2
//Define for O2 filter algorithm selection. Only average is
//available.
//Leave undefined for using raw data only.
#define AVERAGE_FILTER_O2
//Data collection periodic rate can be from 1 - 255ms.
#define O2_DATA_COLECTION_RATE 16
/* O2 data buffer size */
#define O2_BUFFER_SIZE 16
In this example, if the Oxygen Sensor is not used, then all pound defines should be changed to comments
as follows:
//Oxygen Sensor(O2)
//Define the signal for the system to enable functionality.
//#define O2
//Define for O2 filter algorithm selection. Only average is
//available.
//Leave undefined for using raw data only.
//#define AVERAGE_FILTER_O2
//Data collection periodic rate can be from 1 - 255ms.
//#define O2_DATA_COLECTION_RATE 16
/* O2 data buffer size */
//#define O2_BUFFER_SIZE 16
Small Engine Reference Design User Manual, Rev. 3.0
Freescale Semiconductor 17
Application Development
One additional configuration is provided outside the Application Definitions.h file. This is the configuration
of the time domain scheduler of the operating system. Configuration of the timing for the tasks is done in
the Tasks.h file. As seen in
Figure 12, the various tasks are configured by placing function calls in the
desired task time. While this is an easy way to implement a variety of time based tasks, this simple
scheduler does not guarantee task execution time. It is recommended to perform timing analysis using
simulation and instrumented software as a part of the application development process.
Figure 12. Definition of Tasks in Tasks.h File
To configure the task timing, edit the definitions shown in Figure 12 using the exact syntax found in the
file.
Example: Modifying Task Times
Small Engine Reference Design User Manual, Rev. 3.0
18 Freescale Semiconductor
Application Development
In this example, the default task scheduler found in the example application will be modified to show how
to slow down the execution of User_Management() and add a custom function to be run every 1ms called
Heartbeat().
1. Open the example application using CodeWarrior.
2. Open the file “Tasks.h”.
3. Find the definition section containing the 10 ms tasks.
4. Select the line containing the function call “User_Management()”. Cut this line from the code.
5. Place the User Management task by copying it into the space for 100 ms tasks.
6. In the 1.0 ms task section add a line containing the function call “Heartbeat()” and follow syntax shown for other
tasks
When complete the code shown in Figure 12 should look exactly like the code shown in Figure 13 below.
Figure 13. Modifications of Tasks.h from Example Exercise
Small Engine Reference Design User Manual, Rev. 3.0
Freescale Semiconductor 19
Application Development
4.2.1 Fuel and Spark Data Tables
As a means to input data used for fuel and spark values, an Application Map Tool based on a spreadsheet
is provided. This tool provides the essential functionality for translating fuel and spark data tables into
content that can be placed into the example software. Specific engine management data can be placed
into the tool using engineering units. This table is then converted to microcontroller units in a C-source
friendly format. Map table sizes can be adjusted to meet application requirements. The Application Map
tool is identified as “Map Tool.xls”. Additionally, reference for an example map is provided in “Scooter
Map.xls”. This provides an example of a completed map as used in the example application.
4.2.2 Modifying Table Sizes
As a first step, the table size should be customized to accommodate the performance and data
requirements. This is accomplished by adjusting the number of load points and RPM points in the table.
In the empty map provided (Map Tool.xls), this is done by changing number of and content of the load
row (green) and the RPM column (yellow) values. Both the number of load and RPM values directly
impact the size of the table and speed at which the table look up is performed.
While more data points gives you better tuning ability, it will increase the size of the application and
increase the worst case time to perform the table look up. Another factor used for sizing the tables is
available data. If a legacy map is used then the simplest starting point is to directly reuse this map. If a
new map is to be created by empirical data through testing, a smaller map is the best starting point.
Fuel and spark maps are independent of each other and the load and RPM points must be customized
for both sets of data. Using the “Fuel Engineering Units (ms)” and the “Spark Engineering Units (BTDC)”
worksheets, enter the desired number of points and values for each point for the load row and RPM
column. Load is input as a percentage from 0 to 100% in ascending order, left to right. RPM is input from
0 to your max RPM in ascending order, top to bottom.
When determining your max RPM, you should consider the performance of the engine as well as the
resolution of the software. For the example application software, a fundamental timing unit is 1.6
μs. This
means that the highest resolution between RPM measurements is 1.6us. However, RPM, or engine
speed, is determined from the tooth period measurements on the engine's flywheel. This means is that
while the engine is rotating at a given RPM, the measurement taken is at a fraction of this rate.
For example, at 6000 RPM, an engine completes one rotation every 10 ms. The engine controller
monitors position of the engine through the teeth on the flywheel. Each engine will have a specific number
of teeth. For this example the engine has 12 teeth. The result is that the engine controller will measure
the time between two teeth at 6000
RPM as 833 μs. Looking at our fundamental timing unit, the software
will provide a measurement of 520 (really 520.8 but quantization results in 520).
At 6000 RPM, there is not much sensitivity due to the 1.6 μs timing unit as there is a count of 520.
However, as the RPM and number of teeth increases so does the sensitivity. This concept is important to
understand and also is relevant for low RPM conditions as well. At low RPM maximum time that can be
measured is 104.5
ms. For the 12 tooth engine example, this would correspond to 47 RPM.
4.2.3 Configuring Data Translation
Before entering any data, the parameters used to translate engineering units to MCU units must be
properly set. This must be done on two worksheets: “Fuel MCU Units (Tics & Counts)” and “Spark MCU
Units (BTDC & Tics).” At the top of these two worksheets are five parameters that each must customized
to each engine system.
Small Engine Reference Design User Manual, Rev. 3.0
20 Freescale Semiconductor
Application Development
Use the Min. Load value to change what the minimum voltage reading is for load. For a throttle position
based load, this is typically the closed throttle position. For a MAP sensor based load, this is the voltage
produced by the MAP sensor at a minimum operating pressure.
Figure 14.
In the Max Load field, change the value to what the maximum voltage reading is for load. The same
concepts apply as for Min. Load only this is at a minimum condition.
Figure 15.
For the ADC ref field, input what the reference voltage is for the analog measurement. The Small Engine
Reference Design uses 5.0 V as the reference and this should not be changed.
  • Page 1 1
  • Page 2 2
  • Page 3 3
  • Page 4 4
  • Page 5 5
  • Page 6 6
  • Page 7 7
  • Page 8 8
  • Page 9 9
  • Page 10 10
  • Page 11 11
  • Page 12 12
  • Page 13 13
  • Page 14 14
  • Page 15 15
  • Page 16 16
  • Page 17 17
  • Page 18 18
  • Page 19 19
  • Page 20 20
  • Page 21 21
  • Page 22 22
  • Page 23 23
  • Page 24 24
  • Page 25 25
  • Page 26 26
  • Page 27 27
  • Page 28 28
  • Page 29 29
  • Page 30 30
  • Page 31 31
  • Page 32 32
  • Page 33 33
  • Page 34 34
  • Page 35 35
  • Page 36 36
  • Page 37 37
  • Page 38 38
  • Page 39 39
  • Page 40 40
  • Page 41 41
  • Page 42 42
  • Page 43 43
  • Page 44 44
  • Page 45 45
  • Page 46 46
  • Page 47 47
  • Page 48 48
  • Page 49 49
  • Page 50 50
  • Page 51 51
  • Page 52 52
  • Page 53 53
  • Page 54 54
  • Page 55 55
  • Page 56 56
  • Page 57 57
  • Page 58 58
  • Page 59 59
  • Page 60 60
  • Page 61 61
  • Page 62 62
  • Page 63 63

NXP MC33812 User guide

Category
Engine
Type
User guide

Ask a question and I''ll find the answer in the document

Finding information in a document is now easier with AI