Philips gc 6018 provapor User manual
- Category
- Irons
- Type
- User manual

Provapor
GC6268, GC6265, GC6263, GC6259, GC6257, GC6068,
GC6065, GC6063, GC6059, GC6057, GC6029, GC6021,
GC6018
Page is loading ...

3
G I
H
J
K
E
L
D
C
B
A
F
M
N
O
Page is loading ...


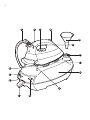
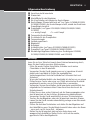
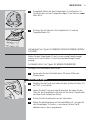
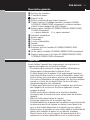
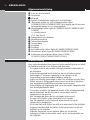
General description
A Cap of the steam tank
B Steam tank
C Iron stand
D On/off switch with built-in pilot light
E 'Steam tank heating up' pilot light (types GC6268/GC6265/
GC6068/GC6065 only).The pilot light goes out when the appliance
is ready for steam ironing
F Steam control (types GC6268/GC6265/GC6068/GC6065/
GC6029 only).
q = moderate steam
R = maximum steam
G Temperature pilot light
H Steam activator button
I Temperature dial
J Supply hose
K Soleplate
L Mains cord
M Anti-calc funnel (types GC6268/GC6068/GC6029 only)
N Shot of steam (types GC6268/GC6068/GC6029 only)
O Back rest for iron (types GC6268/GC6265/GC6263/GCGC6068/
GC6065/GC6063 only)
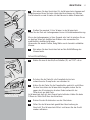
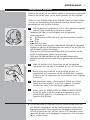
Important
For optimal safety,read these instructions carefully and look at the
illustrations before you start using the appliance.
- Do not put perfume,vinegar, starch,descaling agents or other
chemicals in the steam tank.
- Never use the appliance if it is damaged in any way.Regularly check if
the mains cord and the supply hose are still undamaged and safe.
- If the mains cord is damaged,it must be replaced by Philips,a service
centre authorised by Philips or similarly qualified persons in order to
avoid a hazard.
- Do not use any other cap on the steam tank than the cap that has
been supplied with the appliance,as this cap also functions as a safety
valve.
- Check if the voltage indicated on the bottom of the steam tank
corresponds to the mains voltage in your home before you connect
the appliance.
- Only connect the appliance to an earthed wall socket.
- Never immerse the iron or the steam tank in water.
- Never leave the iron unattended when it is connected to the mains.
- When you have finished ironing and even when you leave the iron
for a short while,unplug the iron and put it on the iron stand.
-Always place the steam tank on a stable, level and horizontal surface.
Do not put the steam tank on the soft part of the ironing board.
-Always place the iron on the iron stand.Do not put the hot iron on
the supply hose or the mains cord.
ENGLISH6

- The iron stand and the soleplate of the iron can become extremely
hot and may cause burns if touched.If you want to move the steam
tank,do not touch the iron stand.
- Do not allow the cord to come into contact with the soleplate when
it is hot.
- Infirm persons should not be allowed to use the appliance without
supervision. Keep an eye on children to make sure that they do not
play with the appliance.
- If steam escapes from under the steam tank cap when the appliance
is heating up,switch the appliance off and contact a service centre
authorised by Philips.
- Do not remove the cap from the steam tank when the steam tank is
under pressure.Follow the instructions under 'Fast refill' before
removing the cap.
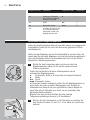
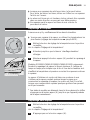
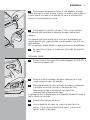
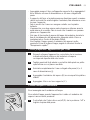
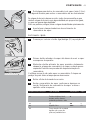
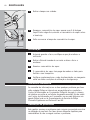
Preparing the appliance for use
1 Check if the voltage indicated on the bottom of the steam tank
corresponds to the mains voltage in your home before you
connect the appliance.
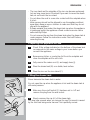
2 Remove any sticker or protective foil from the soleplate and
clean the soleplate with a soft cloth.
3 Fully unwind the mains cord (L) and supply hose (J).
4 Place the steam tank (B) on a stable,level surface.
5 Place the iron on the iron stand (C).
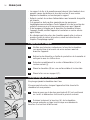
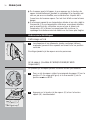
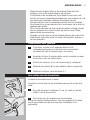
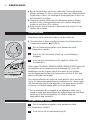
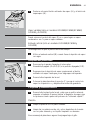
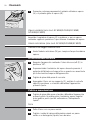
Filling the steam tank
Never immerse the steam tank in water.
Do not open the cap when the appliance is hot and the steam tank is
still under pressure.
C
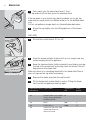
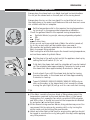
1 Make sure the on/off switch (D) has been set to 'off' and
remove the plug from the wall socket.
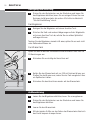
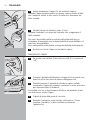
C
2 Slowly unscrew the cap (A) of the steam tank.
You may hear a sound when you remove the cap.This sound is caused
by the cold tank being under vacuum.This is perfectly normal.
ENGLISH 7

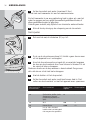
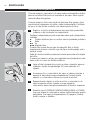
C
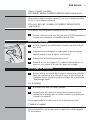
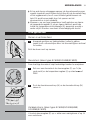
3 Pour water into the steam tank (max.1 litre).
Use tap water to fill the tank up to the maximum level.
If the tap water in your area is very hard, we advise you to mix tap
water with an equal portion of distilled water, or to use distilled water
only.
Do not use perfume,vinegar,starch or chemically descaled water.
4 Screw the cap tightly onto the filling aperture of the steam
tank.
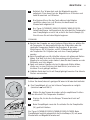
Fast refill
C
1 First set the on/off switch (D) to 'off'.
C
2 Press the steam activator button until you no longer hear any
steam escaping from the appliance.
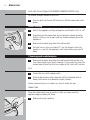
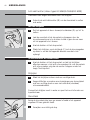
3 Keep the steam activator button pressed in and slowly unscrew
the cap of the steam tank by turning it anti-clockwise.This will
depressurise the steam tank.
Make sure there is no remaining steam left in the steam tank.Place a
piece of rug over the cap while unscrewing.
4 Remove the mains plug from the wall socket.
5 Fill the steam tank as described in section 'Filling the steam
tank' and let the appliance heat up again.
ENGLISH8
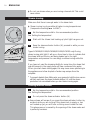
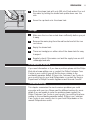
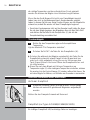
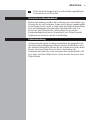
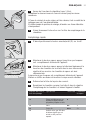
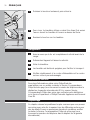
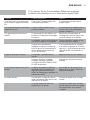
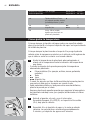
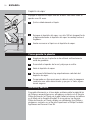
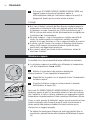
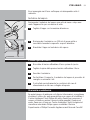
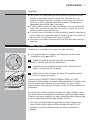
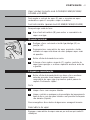
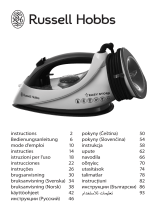
Steam
control
-
q
R
Temperature
dial
1
2
3
Type of fabric
Synthetic fabrics, e.g.acetate,
acrylic,viscose, polyamide,
polyester,and silk
Wool
Cotton,linen
Please note:Z in the table
means that the article
cannot be ironed.
Label with ironing
instructions
B
C
D
Z

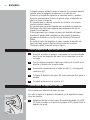
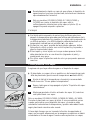
Setting the temperature
Always place the steam tank on a stable, level and horizontal surface
Do not put the steam tank on the soft part of the ironing board.
Always place the iron on the iron stand.Do not put the hot iron on
the supply hose or the mains cord.Make sure the cord does not come
into contact with the hot soleplate.
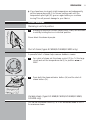
C
1 Set the temperature dial to the required ironing temperature
by turning it to the appropriate temperature indication.
- Check the garment label for the required ironing temperature:
- 1 Synthetic fabrics (e.g.acrylic,viscose,polyamide, polyester)
- 1 Silk
- 2 Wool
- 3 Cotton,linen
- When you do not know what kind of fabric the article is made of,
try to iron a spot which will be invisible when you wear it.
- Silk,woollen and synthetic materials:iron the reverse side of the
fabric to prevent shiny patches.
- Start ironing the articles that require the lowest ironing temperature,
such as those made of synthetic fibres.
C
2 Put the plug in the wall socket and let the appliance heat up by
setting the on/off switch (D) to 'on'.
3 Cold start:the steam tank and the soleplate will now be heated
up.The soleplate takes approximately 2 minutes to heat up and
the steam tank takes approximately 8 minutes to heat up.
4 Quick reheat:if you refill the steam tank during the ironing
process,the water in the steam tank will take approximately
6 minutes to heat up.
5 Types GC6268/GC6265/GC6068/GC6065/GC6029 only:as
soon as the water in the steam tank is hot enough for steam
ironing,the pilot light (E) will go out.You can now start ironing.
Tips
◗ If the fabric consists of various kinds of fibres,always select the
temperature required by the most delicate fibre,i.e.the lowest
temperature.For example:if an article consists of 60% polyester
and 40% cotton,it should be ironed at the temperature indicated
for polyester (1) and without steam.
◗ When steam ironing woollen fabrics,shiny patches may occur.You
can prevent this by using a dry pressing cloth or by turning the
article inside out and ironing the reverse side.
◗ Velvet and other fabrics that tend to acquire shiny patches should
be ironed in one direction only (along with the nap) while applying
very little pressure.
ENGLISH 9

◗ Do not use steam when you are ironing coloured silk.This could
cause stains.
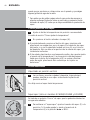
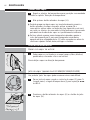
Steam ironing
Make sure that there is enough water in the steam tank.
C
◗ Steam ironing is only possible at higher ironing temperatures
(temperature settings 2 to MAX).
1 Set the temperature dial to the recommended position.
See 'Setting the temperature'.
2 Wait until the 'steam tank heating up' pilot light has gone out.
C
3 Keep the steam activator button (H) pressed in while you are
steam ironing.
Types GC6268/GC6265/GC6068/GC6065/GC6029 only:During
steam ironing,pilot light G will go on from time to time to indicate that
the steam tank and the iron are being heated up to the right
temperature and pressure.You can simply continue ironing while this
happens.
If you have not used the steaming facility for some time,the steam that
was still present in the supply hose will have condensed into water.
When you start steam ironing again,this may cause some spluttering in
the appliance and a few droplets of water may escape from the
soleplate.
B
To prevent droplets from falling onto your garments,hold the iron over an
old cloth and press the steam activator button (H) until the steam
production has normalised before you start steam ironing again.
Ironing without steam
1 Set the temperature dial to the recommended position.
See 'Setting the temperature'.
2 Do not press the steam activator button (H).
◗ Some steam will escape if you press the steam activator button by
accident while you are ironing.If the steam tank is empty or has
not heated up yet,you will hear a clicking sound inside the tank.
This phenomenon is caused by the opening of the steam valve and
is perfectly harmless.
ENGLISH10

◗ If you have been ironing at a high temperature and subsequently
set the temperature dial (I) to a lower setting,wait until the
temperature pilot light (G) goes on again before you continue
ironing.This will prevent damage to your fabrics.
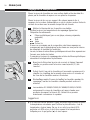
Other features
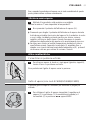
Steaming in vertical position
C
1 Hanging curtains and clothes (jackets,suits,coats) can be steam
ironed by holding the iron in vertical position.
Never direct the steam at people.
Shot of steam (types GC6268/GC6068/GC6029 only)
A powerful 'shot' of steam helps remove stubborn creases.
C
1 For a shot of steam:set the steam control (F) to R (the large
cloud) and set the temperature dial (l) to position 3 or
MAX.
C
2 Press both the steam activator button (H) and the shot-of-
steam button (N).
Variable steam (types GC6268/GC6265/GC6068/GC6065/
GC6029 only)
You can set the steam control (F) to q for moderate steam or to R
for maximum steam.
ENGLISH 11

Anti-calc funnel (types GC6268/GC6068/GC6029 only)
To ensure a longer lifetime of the iron.
1 Use the anti-calc funnel (M) when you fill the steam tank with
water.
After ironing
C
1 Switch the appliance off by setting the on/off switch (D) to 'off'.
2 Depressurise the steam tank by pressing the steam activator
button until you no longer hear any steam escaping from the
appliance.
3 Remove the mains plug from the wall socket.
4 Put the iron on the iron stand (C),set the steam control to
position q and let the appliance cool down before you put it
away.
Cleaning and maintenance
1 Remove the mains plug from the wall socket and let the iron
cool down before you start cleaning it.If you want to clean the
steam tank,follow the first four steps of the 'Fast refill' section.
Iron
1 Clean the iron with a damp cloth.
2 Wipe scale and any other deposits off the soleplate with a
damp cloth and a non-abrasive (liquid) cleaner.
Never immerse the iron in water nor rinse it under the tap.
Steam tank
Rinse the steam tank once a month or after you have used the
appliance approximately 10 times.
C
1 Remove the cap carefully.
ENGLISH12

C
2 Rinse the steam tank with only 500 ml of fresh water.Pour out
the water by holding the steam tank upside down over the
sink.
3 Screw the cap back onto the steam tank.
Storage
1 Make sure the iron has cooled down sufficiently before you put
it away.
2 Remove the mains plug from the wall socket and let the iron
cool down.
3 Empty the steam tank.
4 There are handgrips on either side of the steam tank for easy
transport.
5 Regularly check if the mains cord and the supply hose are still
undamaged and safe.
Guarantee & service
If you need information or if you have a problem,please visit the Philips
Web site at www.philips.com or contact the Philips Customer Care
Centre in your country (you will find its phone number in the
worldwide guarantee leaflet).If there is no Customer Care Centre in
your country, turn to your local Philips dealer or contact the Service
Department of Philips Domestic Appliances and Personal Care BV.
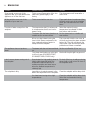
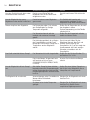
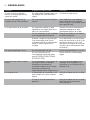
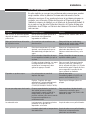
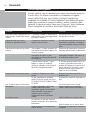
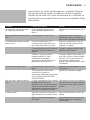
Troubleshooting
This chapter summarises the most common problems you could
encounter with your iron.Please read the different sections for more
details.If you are unable to solve the problem,please contact the
Philips Customer Care Centre in your country (you will find its phone
number in the worldwide guarantee leaflet).If there is no Customer
Care Centre in your country, turn to your local Philips dealer or the
nearest Philips service centre.
ENGLISH 13

Solution
This phenomenon will cease after a
short while.
These particles are harmless and they
will stop coming out of the soleplate
when you have used the iron a few
times.
Select the required ironing
temperature as indicated in these
instructions and the table.
Put the steam tank on a stable and
even surface.
This is normal. Hold the iron over an
old cloth and press the steam activator
button (H).The cloth will absorb the
drops.After a few seconds the steam
production will have normalised.
Set the on/off switch (D) to 'on'.
Wait until the pilot light has gone out.
To check if the iron is really producing
steam,hold a (cold) mirror in front of
the soleplate vents.
Clean the soleplate with a damp cloth.
Clean the soleplate with a damp cloth.
Select the recommended ironing
temperature.
Possible cause(s)
This is normal. Some parts of the iron
have been greased lightly in the
factory.
This is normal with a new iron.
The temperature dial (I) has been set
to a temperature that is too low for
steam ironing.
The steam tank has been placed on an
unstable and/or uneven surface.
When you start steam ironing,the
hose is cold.Steam condenses in the
hose, causing droplets of water to
escape from the soleplate.
The steam tank has not been switched
on.
The 'steam tank heating up' pilot light
is still on (types GC6268/GC6265/
GC6068/GC6065/GC6029 only).
Superheated (i.e. high-quality) steam is
hardly visible,especially when the
temperature dial has been set to
maximum position and even less so
when the ambient temperature is
relatively high.
Impurities or chemicals present in the
water have deposited on the soleplate.
You have been ironing at too high
temperatures.
Problem
Some smoke comes out of the
appliance after you have switched the
appliance on for the first time.
White particles come out of the
soleplate of your new iron.
Droplets of water escape from the
soleplate.
The appliance does not produce
steam.
I don't see any steam coming out of
the soleplate.
The soleplate is dirty.
ENGLISH14
Page is loading ...
Page is loading ...
Page is loading ...
Page is loading ...
Page is loading ...
Page is loading ...
Page is loading ...
Page is loading ...
Page is loading ...
Page is loading ...
Page is loading ...
Page is loading ...
Page is loading ...
Page is loading ...
Page is loading ...
Page is loading ...
Page is loading ...
Page is loading ...
Page is loading ...
Page is loading ...

- Plaats het hete strijkijzer altijd op de strijkmat.Plaats het hete
strijkijzer nooit op de toevoerslang of het netsnoer.
- De strijkmat en de zoolplaat van het strijkijzer kunnen zeer heet
worden en kunnen bij aanraking brandwonden veroorzaken.Als u de
stoomtank wilt verplaatsen,raak dan de strijkmat niet aan.
-Voorkom dat het snoer in aanraking komt met de hete zoolplaat.
- Houd toezicht op jonge kinderen om te voorkomen dat ze met het
apparaat gaan spelen.
- Als er stoom vanonder de dop van de stoomtank ontsnapt,schakel
dan het apparaat uit en neem contact op met een door Philips
geautoriseerd servicecentrum.
-Verwijder nooit de dop van de stoomtank wanneer die onder druk
staat.Volg de instructies onder het kopje 'Snel bijvullen' wanneer u
de dop verwijdert.
Klaarmaken voor gebruik
1 Controleer voordat u het apparaat aansluit of de
voltageaanduiding aan de onderkant van de stoomtank
overeenkomt met de netspanning in uw woning.
2 Verwijder stickers of beschermfolie van de zoolplaat en maak
hem schoon met een zachte doek.
3 Wikkel het netsnoer (L) en de toevoerslang (J) volledig af.
4 Plaats de stoomtank (B) op een stabiele,vlakke ondergrond.
5 Plaats het strijkijzer op de strijkmat (C).
Het vullen van de stoomtank.
Dompel de stoomtank nooit in water.
Verwijder nooit de dop van de stoomtank wanneer die onder druk
staat.
C
1 Zorg dat de aan/uit schakelaar (D) op 'uit' staat en haal de
stekker uit het stopcontact.
C
2 Schroef de dop (A) langzaam van de stoomtank.
Er kan een geluid ontstaan wanneer u de dop verwijdert. Dit geluid
wordt veroorzaakt doordat de koude tank luchtledig is.Dit is
gebruikelijk.
NEDERLANDS 35

C
3 Vul de stoomtank met water (maximaal 1 liter).
Vul de tank met kraanwater tot aan het maximumniveau.
Als het kraanwater in uw woongebied erg hard is,raden wij u aan het
water te mengen met een gelijke hoeveelheid gedistilleerd water, of
alleen gedistilleerd water te gebruiken.
Gebruik geen reukstof,azijn,stijfsel of een chemische waterontharder.
4 Schroef de dop stevig op de vulopening van de stoomtank.
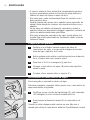
Snel bijvullen
C
1 Zet eerst de aan/uit schakelaar (D) op 'uit'.
C
2 Druk op de stoomtoevoerknop (H) totdat u geen stoom meer
uit het apparaat hoort ontsnappen.
3 Houd de stoomtoevoerknop ingedrukt en verwijder langzaam
de dop van de stoomtank door hem linksom te draaien.Dit zal
de overdruk laten ontsnappen.
Plaats een doek over de dop wanneer u deze losdraait.Zorg ervoor
dat u alle stoom uit de tank laat ontsnappen.
4 Haal de stekker uit het stopcontact.
5 Vul de stoomtank met water zoals beschreven staat in 'Het
vullen van de stoomtank' en laat het apparaat weer opwarmen.
NEDERLANDS36
Stoomregelaar
-
q
R
Temperatuur-
regelaar
1
2
3
Soort materiaal
Synthetische stoffen (zoals
acetaat,acryl, viscose,
polyamide,polyester) en
zijde.
Wol
Katoen,linnen
Let op:Z in de tabel
betekent dat het kledingstuk
niet mag worden gestreken.
Label met strijk-
voorschriften.
B
C
D
Z
Page is loading ...
Page is loading ...

◗ Er kan wat stoom ontsnappen wanneer de stoomtoevoerknop per
ongeluk ingedrukt wordt tijdens het strijken.Als de stoomtank leeg
of niet opgewarmd is,hoort u een klikkend geluid binnenin de
tank.Dit wordt veroorzaakt door het openen van het
stoomventiel en is niet schadelijk.
◗ Wanneer u op een hoge temperatuur heeft gestreken en daarna
de temperatuurregelaar (I) op een lagere stand zet,wacht dan
totdat het temperatuurcontrolelampje (G) aanspringt voordat u
verder strijkt.Hierdoor voorkomt u beschadiging van de stof.
Overige functies
Stomen in verticale stand
C
1 Hangende gordijnen en kledingstukken (colberts,pakken,
jassen) kunt u stoomstrijken door het stoomstrijkijzer verticaal
te houden.
Richt de stoom nooit op mensen.
Stoomstoot (alleen types GC6268/GC6068/GC6029)
Deze krachtige stoomstoot helpt hardnekkige kreuken te verwijderen.
C
1 Zet voor een stoomstoot de stoomregelaar (F) op R (de
grote wolk) en de temperatuurregelaar (I) op stand 3 of
MAX.
C
2 Druk de stoomtoevoerknop (H) en de stoomstootknop (N)
samen in.
Variabele stoom (alleen types GC6268/GC6265/6068/
GC62065/GC6029)
U kunt de stoomregelaar (F) op q zetten voor weinig stoom of op R
voor veel stoom.
NEDERLANDS 39
Page is loading ...
Page is loading ...
Page is loading ...
Page is loading ...
Page is loading ...
Page is loading ...
Page is loading ...
Page is loading ...
Page is loading ...
Page is loading ...
Page is loading ...
Page is loading ...
Page is loading ...
Page is loading ...
Page is loading ...
Page is loading ...
Page is loading ...
Page is loading ...
Page is loading ...
Page is loading ...
Page is loading ...
Page is loading ...
Page is loading ...
Page is loading ...
Page is loading ...
Page is loading ...
Page is loading ...
Page is loading ...
Page is loading ...
Page is loading ...

www.philips.com
4239 000 52874
u
-
 1
1
-
 2
2
-
 3
3
-
 4
4
-
 5
5
-
 6
6
-
 7
7
-
 8
8
-
 9
9
-
 10
10
-
 11
11
-
 12
12
-
 13
13
-
 14
14
-
 15
15
-
 16
16
-
 17
17
-
 18
18
-
 19
19
-
 20
20
-
 21
21
-
 22
22
-
 23
23
-
 24
24
-
 25
25
-
 26
26
-
 27
27
-
 28
28
-
 29
29
-
 30
30
-
 31
31
-
 32
32
-
 33
33
-
 34
34
-
 35
35
-
 36
36
-
 37
37
-
 38
38
-
 39
39
-
 40
40
-
 41
41
-
 42
42
-
 43
43
-
 44
44
-
 45
45
-
 46
46
-
 47
47
-
 48
48
-
 49
49
-
 50
50
-
 51
51
-
 52
52
-
 53
53
-
 54
54
-
 55
55
-
 56
56
-
 57
57
-
 58
58
-
 59
59
-
 60
60
-
 61
61
-
 62
62
-
 63
63
-
 64
64
-
 65
65
-
 66
66
-
 67
67
-
 68
68
-
 69
69
-
 70
70


Philips gc 6018 provapor User manual
- Category
- Irons
- Type
- User manual
Ask a question and I''ll find the answer in the document
Finding information in a document is now easier with AI
in other languages
- italiano: Philips gc 6018 provapor Manuale utente
- français: Philips gc 6018 provapor Manuel utilisateur
- español: Philips gc 6018 provapor Manual de usuario
- Deutsch: Philips gc 6018 provapor Benutzerhandbuch
- Nederlands: Philips gc 6018 provapor Handleiding
- português: Philips gc 6018 provapor Manual do usuário
Related papers
-
Philips GC6006 Owner's manual
-
Philips GC6048 User manual
-
Philips GC6315/01 User manual
-
Philips GC135/08 User manual
-
-
Philips GC130/01 User manual
-
Philips gc 8080 08 User manual
-
-
-
Other documents
-
Russell Hobbs 20551-56 User manual
-
 Russell Hobbs 18617-56 User manual
-
 Russell Hobbs 19330-56 User manual
-
Clatronic DBS 3461 User manual
-
 Russell Hobbs 18618-56 User manual
-
 Russell Hobbs 23300-56 User manual
-
SEVERIN BA3299 Datasheet
-
SEVERIN BA 3299 Datasheet
-
BOMANN DBS 6034 CB User manual
-
Camry CR 5027 Operating instructions


