Gigabyte GV-NX66256DP2 User manual
- Category
- Graphics cards
- Type
- User manual
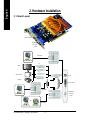
Gigabyte GV-NX66256DP2 is an advanced graphics accelerator powered by the NVIDIA® GeForce™ 6600 GPU, designed to deliver exceptional visual performance for gaming, video editing, and demanding multimedia applications. Featuring 256MB of DDRII memory, support for DirectX 9.0c, and NVIDIA® SLITM technology, it offers stunning graphics and smooth gameplay. With a variety of connectivity options including D-Sub, DVI-I, AV/S-Video, and HDTV output, the GV-NX66256DP2 provides flexibility for connecting to various displays.
Gigabyte GV-NX66256DP2 is an advanced graphics accelerator powered by the NVIDIA® GeForce™ 6600 GPU, designed to deliver exceptional visual performance for gaming, video editing, and demanding multimedia applications. Featuring 256MB of DDRII memory, support for DirectX 9.0c, and NVIDIA® SLITM technology, it offers stunning graphics and smooth gameplay. With a variety of connectivity options including D-Sub, DVI-I, AV/S-Video, and HDTV output, the GV-NX66256DP2 provides flexibility for connecting to various displays.


-
 1
1
-
 2
2
-
 3
3
-
 4
4
-
 5
5
-
 6
6
-
 7
7
-
 8
8
-
 9
9
-
 10
10
-
 11
11
-
 12
12
-
 13
13
-
 14
14
-
 15
15
-
 16
16
-
 17
17
-
 18
18
-
 19
19
-
 20
20
-
 21
21
-
 22
22
-
 23
23
-
 24
24
-
 25
25
-
 26
26
-
 27
27
-
 28
28
-
 29
29
-
 30
30
-
 31
31
-
 32
32
-
 33
33
-
 34
34
-
 35
35
-
 36
36


Gigabyte GV-NX66256DP2 User manual
- Category
- Graphics cards
- Type
- User manual
Gigabyte GV-NX66256DP2 is an advanced graphics accelerator powered by the NVIDIA® GeForce™ 6600 GPU, designed to deliver exceptional visual performance for gaming, video editing, and demanding multimedia applications. Featuring 256MB of DDRII memory, support for DirectX 9.0c, and NVIDIA® SLITM technology, it offers stunning graphics and smooth gameplay. With a variety of connectivity options including D-Sub, DVI-I, AV/S-Video, and HDTV output, the GV-NX66256DP2 provides flexibility for connecting to various displays.
Ask a question and I''ll find the answer in the document
Finding information in a document is now easier with AI
Related papers
-
Gigabyte GV-NX66128DP-SI Owner's manual
-
Gigabyte GV-NX66T256DE Owner's manual
-
-
Gigabyte GV-N66T128D User manual
-
Gigabyte GV-N66L128DP Owner's manual
-
-
Gigabyte GV-N595U-GT User manual
-
Gigabyte GV-N56X128D-P User manual
-
Gigabyte GV-N57128D User manual
-
Other documents
-
Point of View VGA-440-A1-1024-C Datasheet
-
-
Nvidia GeForce Series User manual
-
-
-
-
Emprex NVIDIA GeForce 6600GT User manual
-
Nvidia 5700 - ASUS V9570 Series GeForce FX AGP 256MB S-VId DVI VGA Video Card User manual
-
BFG Technologies GeForce GTX 295 User manual
-
BFG Tech GeForce GTX 295 User manual