Page is loading ...

GPS/WAAS
COLOR CHART PLOTTER
with FISH FINDER
GP-3700F
OPERATOR'S MANUAL
www.furuno.com
Model
(Product Name: GPS PLOTTER/SOUNDER)

7KHSDSHUXVHGLQWKLVPDQXDO
LVHOHPHQWDOFKORULQHIUHH
࣭)85812$XWKRUL]HG'LVWULEXWRU'HDOHU
$VKLKDUDFKR
1LVKLQRPL\D-$3$1
$ $35
3ULQWHGLQ-DSDQ
$OOULJKWVUHVHUYHG
& )(%
3XE1R 20(&
(70, *3)

i
IMPORTANT NOTICES
General
• This manual has been authored with simplified grammar, to meet the needs of international users.
• The operator of this equipment must read and follow the descriptions in this manual.
Wrong operation or maintenance can cancel the warranty or cause injury.
• Do not copy any part of this manual without written permission from FURUNO.
• If this manual is lost or worn, contact your dealer about replacement.
• The contents of this manual and equipment specifications can change without notice.
• The example screens (or illustrations) shown in this manual can be different from the screens you
see on your display. The screens you see depend on your system configuration and equipment
settings.
• Save this manual for future reference.
• Any modification of the equipment (including software) by persons not authorized by FURUNO will
cancel the warranty.
• The following concern acts as our importer in Europe, as defined in DECISION No 768/2008/EC.
- Name: FURUNO EUROPE B.V.
- Address: Ridderhaven 19B, 2984 BT Ridderkerk, The Netherlands
• All brand and product names are trademarks, registered trademarks or service marks of their
respective holders.
How to discard this product
Discard this product according to local regulations for the disposal of industrial waste. For disposal in
the USA, see the homepage of the Electronics Industries Alliance (http://www.eiae.org/) for the
correct method of disposal.
How to discard a used battery
Some FURUNO products have a battery(ies). To see if your product has a battery, see the chapter
on Maintenance. Follow the instructions below if a battery is used. Tape the + and - terminals of bat-
tery before disposal to prevent fire, heat generation caused by short circuit.
In the European Union
The crossed-out trash can symbol indicates that all types of batteries
must not be discarded in standard trash, or at a trash site. Take the
used batteries to a battery collection site according to your national
legislation and the Batteries Directive 2006/66/EU.
In the USA
The Mobius loop symbol (three chasing arrows) indicates that
Ni-Cd and lead-acid rechargeable batteries must be recycled.
Take the used batteries to a battery collection site according to
local laws.
In the other countries
There are no international standards for the battery recycle symbol. The number of symbols can in-
crease when the other countries make their own recycle symbols in the future.
Cd
Ni-Cd Pb

ii
SAFETY INSTRUCTIONS
WARNING
Do not open the equipment.
The equipment uses high voltage
that can cause electrical shock.
Refer any repair work to a qualified
technician.
If water leaks into the equipment
or something is dropped into the
equipment, immediately turn off
the power at the switchboard.
Fire or electrical shock can result.
If the equipment is giving off
smoke or fire, immediately turn off
the power at the switchboard.
Fire or electrical shock can result.
If you feel the equipment is acting
abnormally or giving off strange
noises, immediately turn off the
power at the switchboard and
contact a FURUNO service techni-
cian.
The operator must read the safety instructions before attempting to operate the equipment.
Indicates a potentially hazardous situation which, if not
avoided, could result in death or serious injury.
Indicates a potentially hazardous situation which, if not
avoided, could result in minor or moderate injury.
WARNING
Do not disassemble or modify the
equipment.
Fire, electrical shock or serious injury
can result.
Make sure no rain or water splash
leaks into the equipment.
Fire or electrical shock can result if
water leaks into the equipment.
Do not place liquid-filled contain-
ers on or near the equipment.
Fire or electrical shock can result if a
liquid spills into the equipment.
Do not operate the equipment with
wet hands.
Electrical shock can result.
Use the proper fuse.
Use of the wrong fuse can cause fire
or electrical shock.
WARNING
CAUTION
Warning, Caution Prohibitive Action Mandatory Action
WARNING
WARNING

SAFETY INSTRUCTIONS
iii
CAUTION
Do no turn on the equipment with
the transducer out of water.
The transducer can be damaged.
The picture is not refreshed when
picture advancement is stopped.
Maneuvering the vessel in this
condition can result in a dangerous
situation.
Adjust the gain correctly.
Incorrect gain can give a wrong depth
indication, which could result in a
dangerous situation.
A warning label is attached to the display
unit. Do not remove the label. If the label is
missing or damaged, contact a FURUNO
agent or dealer about replacement.
Name: Warning Label (1)
Type: 86-003-1011-3
Code No.: 100-236-233-10
Warning Label
Do not depend on one navigation
device for the navigation of the
vessel.
Always check your position against
all available aids to navigation, for the
safety of vessel and crew.
Do not disconnect the power cable
while the system is powered.
Damage to the equipment can result.
Do not bend cables in cold
weather (0°C(32°F) or less).
The cables will break.
The TFT LCD is constructed using the latest LCD techniques, and displays 99.99% of
its pixels. The remaining 0.01% of the pixels may drop out or blink, however this is not
an indication of malfunction.
WARNING
To avoid electrical shock, do not
remove cover. No user-serviceable
parts inside.
CAUTION
About the TFT LCD

iv
TABLE OF CONTENTS
FOREWORD ...................................................................................................................ix
SYSTEM CONFIGURATION ..........................................................................................xi
1. OPERATIONAL OVERVIEW .................................................................................1-1
1.1 Controls...................................................................................................................... 1-1
1.1.1 Display unit..................................................................................................... 1-1
1.1.2 Trackball control unit RCU-030 (option).........................................................1-3
1.2 How to Turn the Power On/Off................................................................................... 1-3
1.3 How to Adjust the Brilliance of the Display and Panel ............................................... 1-4
1.4 How to Select and Set a Display................................................................................ 1-5
1.4.1 How to select a display .................................................................................. 1-5
1.4.2 How to change a display’s setting..................................................................1-5
1.4.3 How to skip a display ..................................................................................... 1-7
1.4.4 How to set the navigation/destination information.......................................... 1-8
1.4.5 How to switch the active screen.....................................................................1-9
1.5 Menu Overview ..........................................................................................................1-9
1.6 MOB Operations ......................................................................................................1-11
1.7 Function Keys .......................................................................................................... 1-12
1.7.1 How to operate a function key...................................................................... 1-12
1.7.2 How to set up a function key........................................................................1-12
1.8 Demo Mode.............................................................................................................. 1-14
1.9 How to Install Charts................................................................................................1-15
2. PLOTTER DISPLAY OVERVIEW ..........................................................................2-1
2.1 Plotter Display............................................................................................................2-1
2.1.1 Plotter display layout...................................................................................... 2-1
2.1.2 NAV information box ......................................................................................2-2
2.1.3 Compass display............................................................................................2-3
2.1.4 Satellite status/location display ...................................................................... 2-4
2.1.5 Tide graph display..........................................................................................2-5
2.2 How to Use the Cursor............................................................................................... 2-6
2.3 How to Change the Chart Scale (Zoom In, Zoom Out).............................................. 2-6
2.4 Orientation Mode........................................................................................................2-7
2.5 How to Shift the Display.............................................................................................2-8
2.6 How to Measure the Range and Bearing Between Two Points ................................. 2-9
2.7 How to Change the Cursor Configuration ................................................................ 2-10
2.8 Chart Icons............................................................................................................... 2-12
3. TRACK ...................................................................................................................3-1
3.1 How to Show/Hide Track............................................................................................ 3-1
3.1.1 How to show/hide own ship track................................................................... 3-1
3.1.2 How to show/hide other ship’s tracks and symbols........................................ 3-3
3.1.3 How to show/hide the current vector..............................................................3-3
3.1.4 How to show/hide drift vector.........................................................................3-4
3.2 How to Record Own Ship’s Track .............................................................................. 3-4
3.2.1 How to stop/restart recording of track ............................................................ 3-4
3.2.2 How to show track while track plotting is stopped.......................................... 3-5
3.2.3 How to connect track after restarting plotting.................................................3-5
3.3 How to Change Track Color....................................................................................... 3-6
3.3.1 How to change track color for own ship ......................................................... 3-6
3.3.2 How to automatically change track color for own ship
with water temperature...................................................................................3-6

TABLE OF CONTENTS
v
3.3.3 How to automatically change track color for own ship with depth ..................3-8
3.3.4 How to change track color for other ship........................................................3-9
3.4 How to Change Track Line Type................................................................................3-9
3.4.1 How to change track line type for own ship....................................................3-9
3.4.2 How to change track line type for other ship ................................................3-10
3.5 How to Select Track Plotting Method, Interval..........................................................3-10
3.5.1 How to select the track plotting method for own ship ...................................3-10
3.5.2 How to set the track plotting intervals for own ship ......................................3-10
3.5.3 How to set the track plotting intervals for other ship.....................................3-11
3.6 How to Erase Own Ship Track .................................................................................3-11
3.7 How to Edit Own Ship Track.....................................................................................3-13
3.8 How to Display Own Ship Information......................................................................3-14
3.8.1 Simple information........................................................................................3-14
3.8.2 Detailed information .....................................................................................3-15
3.9 How to Display Other Ship Information ....................................................................3-15
3.10 How to Change the Size of the Target Number........................................................3-17
3.11 How to Erase Other Ship Track................................................................................3-18
4. MARKS, LINES......................................................................................................4-1
4.1 How to Set Default Mark Appearance ........................................................................4-1
4.1.1 How to set mark color.....................................................................................4-1
4.1.2 How to set mark size ......................................................................................4-2
4.1.3 How to set line type ........................................................................................4-2
4.1.4 How to set fish type for marks ........................................................................4-3
4.2 How to Enter Marks....................................................................................................4-3
4.2.1 How to enter marks at own ship position........................................................4-3
4.2.2 How to enter marks at the cursor position......................................................4-4
4.2.3 How to enter marks by manually entering latitude and longitude position .....4-4
4.3 How to Enter Lines .....................................................................................................4-5
4.4 How to Erase Marks, Lines.........................................................................................4-6
4.5 How to Edit Marks, Lines............................................................................................4-7
4.6 How to Undo or Redo Mark/line Operation.................................................................4-8
4.7 How to Show Mark Information ..................................................................................4-9
4.8 Mark Filter.................................................................................................................4-10
5. WAYPOINTS..........................................................................................................5-1
5.1 How to Enter Waypoints.............................................................................................5-1
5.1.1 How to enter waypoints at own ship position .................................................5-1
5.1.2 How to enter waypoints at the cursor position................................................5-1
5.1.3 How to enter waypoints by manually entering
latitude and longitude position........................................................................5-2
5.1.4 How to enter waypoints by range and bearing...............................................5-4
5.1.5 How to enter waypoints by Loran A or Loran C LOPs....................................5-5
5.1.6 How to enter waypoints by Decca LOPs ........................................................5-6
5.2 How to Edit Waypoints ...............................................................................................5-7
5.3 How to Erase a Waypoint...........................................................................................5-8
5.4 How to Search Waypoints ..........................................................................................5-8
5.5 How to Set Speed to Use in TTG Calculation ............................................................5-9
5.6 How to Display Waypoint Information.........................................................................5-9
5.7 How to Change Waypoint Mark Size........................................................................5-10
5.8 How to Mark Radar Target Position .........................................................................5-10
6. ROUTES ................................................................................................................6-1
6.1 How to Create Routes ................................................................................................6-1
6.1.1 How to create routes with existing waypoints.................................................6-1
6.1.2 How to create track-based routes using own ship position ............................6-3

TABLE OF CONTENTS
vi
6.1.3 How to create routes with selected tracks......................................................6-4
6.2 How to Edit Routes ....................................................................................................6-5
6.2.1 How to insert waypoints ................................................................................. 6-5
6.2.2 How to delete waypoints from routes.............................................................6-6
6.3 How to Delete Routes ................................................................................................6-6
6.4 How to Search Routes ............................................................................................... 6-6
6.5 How to Set the Speed to Use in TTG Calculation...................................................... 6-7
7. DESTINATION .......................................................................................................7-1
7.1 How to Go to a Quick Point........................................................................................ 7-1
7.2 How to Set a Waypoint as Destination....................................................................... 7-4
7.3 How to Follow Routes ................................................................................................ 7-6
7.4 How to Stop Navigation..............................................................................................7-8
8. ALARMS ................................................................................................................8-1
8.1 How to Turn the Audio Alarm On/Off .........................................................................8-2
8.2 Arrival, Anchor Watch Alarm ...................................................................................... 8-3
8.3 Route Alarm ...............................................................................................................8-4
8.4 XTE, Border Alarm.....................................................................................................8-4
8.5 Intrusion Point Alarm..................................................................................................8-5
8.6 Ship Speed Alarm ......................................................................................................8-5
8.7 Trip Range Alarm....................................................................................................... 8-6
8.8 Water Temperature Alarm.......................................................................................... 8-6
8.9 Shear Alarm ...............................................................................................................8-7
8.10 Depth Alarm ...............................................................................................................8-8
9. OTHER FUNCTIONS .............................................................................................9-1
9.1 [COAST LINE SETTING] Menu ................................................................................. 9-1
9.1.1 [COAST LINE DETAIL SETTING] menu........................................................9-1
9.1.2 How to display depth contour in detail ........................................................... 9-4
9.2 [PLOTTER DISPLAY SETTING] Menu...................................................................... 9-5
9.2.1 How to set TD display ....................................................................................9-5
9.2.2 How to set range for plotter display................................................................ 9-8
9.3 [DISPLAY FORMAT] Menu........................................................................................ 9-8
9.4 [NAVIGATOR SETUP] Menu...................................................................................9-15
9.5 [INPUT/OUTPUT PORT SETTING] Menu...............................................................9-18
9.5.1 How to set the output 1, 2 or 3..................................................................... 9-18
9.5.2 How to set the Ethernet................................................................................ 9-20
9.5.3 How to set the FA-30 ................................................................................... 9-21
9.5.4 How to display the information for NMEA2000 equipment...........................9-22
9.5.5 How to set the NMEA2000 PGN..................................................................9-22
9.6 [TEST & MEMORY CLEAR] Menu .......................................................................... 9-23
9.6.1 How to set or change the password.............................................................9-23
9.6.2 How to disable the password ....................................................................... 9-24
9.6.3 How to set the trackball sensitivity ............................................................... 9-24
9.7 LINE MONITOR .......................................................................................................9-25
10. HOW TO RECORD, PLAY BACK DATA ............................................................10-1
10.1 Data Recording ........................................................................................................ 10-1
10.2 Internal Memory ....................................................................................................... 10-1
10.2.1 How to save the data to the internal memory...............................................10-1
10.2.2 How to display the data stored in the internal memory ................................10-3
10.2.3 How to play back data from the internal memory.........................................10-4
10.2.4 How to delete data from the internal memory .............................................. 10-5
10.3 USB Flash Memory Operations ...............................................................................10-5
10.3.1 How to insert a USB flash memory ..............................................................10-5

TABLE OF CONTENTS
vii
10.3.2 How to safely remove a USB flash memory.................................................10-6
10.3.3 How to save the data to a USB flash memory..............................................10-6
10.3.4 How to play back the data from the USB flash memory...............................10-7
10.3.5 How to transfer the data from the USB flash memory..................................10-8
10.4 Backup Data.............................................................................................................10-9
10.4.1 How to backup the data automatically..........................................................10-9
10.4.2 How to backup the data manually ..............................................................10-10
10.4.3 How to load the backup data......................................................................10-11
10.5 Screenshot (Screen Capture).................................................................................10-12
10.6 How to Load the Data from Other Equipment ........................................................10-13
11. ECHO SOUNDER ................................................................................................11-1
11.1 How the Echo Sounder Operates.............................................................................11-1
11.2 Echo Sounder Displays ............................................................................................11-1
11.2.1 Single frequency display (50 kHz or 200 kHz) .............................................11-2
11.2.2 Dual frequency display .................................................................................11-3
11.2.3 Marker zoom display (50 kHz or 200 kHz) ...................................................11-3
11.2.4 Bottom zoom display (50 kHz or 200 kHz) ...................................................11-4
11.2.5 Bottom lock display (50 kHz or 200 kHz) .....................................................11-4
11.2.6 Bottom discrimination display (50 kHz or 200 kHz)......................................11-5
11.2.7 A-scope display (50 kHz, 200 kHz or dual frequency) .................................11-5
11.2.8 Mix display....................................................................................................11-6
11.2.9 Plotter/echo sounder display ........................................................................11-7
11.3 Automatic Echo Sounder Operation.........................................................................11-8
11.3.1 How to select an automatic echo sounder mode .........................................11-8
11.3.2 How to offset the base range or the gain .....................................................11-8
11.4 Manual Echo Sounder Operation .............................................................................11-9
11.4.1 How to activate the manual echo sounder mode .........................................11-9
11.4.2 How to select the display range .................................................................11-10
11.4.3 How to shift the display range ....................................................................11-10
11.4.4 How to adjust the gain................................................................................11-11
11.5 How to Measure Depth, Time Between Locations .................................................11-12
11.6 How to Enter a Mark on the Display.......................................................................11-13
11.7 How to Reduce Interference...................................................................................11-13
11.8 How to Reduce Low Level Noise............................................................................11-14
11.9 How to Erase Weak Echoes...................................................................................11-14
11.10How to Highlight Echoes in White Color ................................................................11-15
11.10.1White marker ..............................................................................................11-15
11.10.2White line....................................................................................................11-16
11.11Display Colors........................................................................................................11-16
11.12How to Customize Display Colors..........................................................................11-17
11.13Picture Advance Speed .........................................................................................11-18
11.14How to Review Past Picture ..................................................................................11-18
11.14.1How to set up to display past picture..........................................................11-18
11.14.2How to review past picture .........................................................................11-19
11.15ACCU-FISH
™
........................................................................................................11-20
11.15.1How to set up ACCU-FISH
™
......................................................................11-20
11.15.2How to correct measured fish size .............................................................11-21
11.15.3How to select the display mode to show fish information...........................11-21
11.15.4How to select the unit for fish length ..........................................................11-22
11.16Bottom Discrimination Display ...............................................................................11-22
11.17Alarms....................................................................................................................11-24
11.17.1Fish alarm (normal) ....................................................................................11-24
11.17.2Fish alarm (bottom lock).............................................................................11-25
11.17.3Fish alarm (fish size) ..................................................................................11-26
11.17.4Bottom discrimination alarm .......................................................................11-26

TABLE OF CONTENTS
viii
11.18[ECHO SOUNDER SYSTEM SETTING] Menu.....................................................11-27
11.19Zero Line Rejection ............................................................................................... 11-28
11.20Echo Sounder Range Setting Menu......................................................................11-29
11.21Interpreting the Display..........................................................................................11-30
12. AIS OPERATIONS...............................................................................................12-1
12.1 AIS Symbols............................................................................................................. 12-1
12.2 How to Activate/Sleep Targets.................................................................................12-2
12.3 AIS Tracks................................................................................................................12-3
12.3.1 How to show/hide AIS tracks ....................................................................... 12-3
12.3.2 How to change the AIS symbol/track color or track line type....................... 12-3
12.3.3 How to stop/restart recording of AIS track ................................................... 12-3
12.4 AIS Target Data .......................................................................................................12-4
12.4.1 How to display the individual AIS target data............................................... 12-4
12.4.2 How to display the AIS list............................................................................12-5
12.5 AIS Alarm................................................................................................................. 12-6
12.5.1 How to automatically activate targets........................................................... 12-6
12.5.2 How to activate the AIS proximity alarm ...................................................... 12-6
12.5.3 How to set the CPA/TCPA alarm ................................................................. 12-7
12.5.4 How to set the lost alarm.............................................................................. 12-7
12.5.5 How to set the external AIS alarm................................................................ 12-8
13. MAINTENANCE, TROUBLESHOOTING.............................................................13-1
13.1 Maintenance.............................................................................................................13-1
13.2 Replacement of Fuse...............................................................................................13-2
13.3 Consumable Parts....................................................................................................13-2
13.4 Trackball Maintenance............................................................................................. 13-2
13.5 Troubleshooting .......................................................................................................13-3
13.6 Unit Information........................................................................................................ 13-5
13.7 Operation/Alarm Log................................................................................................ 13-6
13.8 Diagnostics...............................................................................................................13-7
13.8.1 Memory I/O test............................................................................................ 13-7
13.8.2 Keyboard test............................................................................................... 13-8
13.8.3 Test pattern.................................................................................................. 13-8
13.9 How to Clear the Memory ........................................................................................13-9
13.9.1 How to restore the settings .......................................................................... 13-9
13.9.2 How to delete all screenshot data................................................................ 13-9
13.9.3 How to delete user data ............................................................................. 13-10
APPENDIX 1 MENU TREE .......................................................................................AP-1
APPENDIX 2 ICONS ...............................................................................................AP-11
APPENDIX 3 TIME DIFFERENCES........................................................................AP-12
APPENDIX 4 WHAT IS SBAS? ..............................................................................AP-13
APPENDIX 5 ALARM LIST.....................................................................................AP-14
SPECIFICATIONS .....................................................................................................SP-1
INDEX..........................................................................................................................IN-1

ix
FOREWORD
Congratulation on your choice of the FURUNO GPS PLOTTER/SOUNDER GP-3700F. We are
confident you will see why the FURUNO name has become synonymous with quality and reliabil-
ity.
Since 1948, FURUNO Electric Company has enjoyed an enviable reputation for innovative and
dependable marine electronics equipment. This dedication to excellence is furthered by our ex-
tensive global network of agents and dealers.
The equipment is designed and constructed to meet the rigorous demands of the marine environ-
ment. However, no machine can perform its intended function unless installed, operated and
maintained properly. Please carefully read and follow the recommended procedures for operation
and maintenance.
Features
The GP-3700F is a fully integrated GPS receiver, color video plotter, and color video fish finder.
The system consists of a display unit, antenna unit, and transducer.
The main features of the GP-3700F are as follows:
• Combination displays (plotter, navigation data, compass, echo sounder) in various split screen
configurations.
• Easily sort and display marks according to the sort conditions.
• Simple drift calculation provides a graphic presentation of surface water flow.
• Alarms: Arrival, anchor watch, XTE, border, speed, trip, AIS, CPA/TCPA, temperature, shear,
depth, fish, fish size, bottom discrimination.
• Capture function records the fish finder screenshot in conjunction with marks.
• Fish finder picture scrollback to view past echoes.
• Display AIS targets and TT targets.
• Undo and Redo functions.
• Bottom discrimination (bottom composition evaluator), ACCU-FISH
™
(fish size estimator).
Software used in this product
This equipment uses the following open source software.
• Ubiquitous QuickBoot Copyright
©
2015 Ubiquitous Corp. All rights reserved.
• Portions of this software are copyright
©
2016 The Free Type Project (www.freetype.org). All
rights reserved.
• This product includes software to be licensed under the GNU General Public License (GPL) ver-
sion 2.0, GNU Lesser General Public Software License (LGPL) version 2.0, Apache, BSD and
others. The program(s) is/are free software(s), and you can copy it and/or redistribute it and/or
modify it under the terms of the GPL version 2.0 or LGPL version 2.0 as published by the Free
Software Foundation. Please access to the following URL if you need source codes: https://
www.furuno.co.jp/en/contact/cnt_oss_e01.html.

FOREWORD
x
Interference relief measures
When another ship says it is receiving interference from your fish finder, change its working fre-
quency or lower the transmission sound pressure level for the following equipment in the order
shown.
1) Wideband fish finder
2) Fish finder with multiple frequencies
3) Fish finder with single frequency
About future use
Functions labeled as “future use” are currently unavailable.
Program No.
1451468-02.**
** denotes minor modifications.
CE declaration
With regards to CE declarations, please refer to our website (www.furuno.com), for further infor-
mation about RoHS conformity declarations.

xi
SYSTEM CONFIGURATION
Environmental category
Units Category
Antenna Unit Exposed to the weather
Transducer Submerged or in continuous
contact with sea water
: Standard supply
: Optional or local supply
*
1
: Use when the display unit has
no beacon receiver.
*
2
: Use when the internal beacon
receiver is installed in the
display unit.
Other Units Protected from the weather
Speed/Temperature Sensor
ST-02MSB, ST-02PSB
Temperature Sensor
T-04MSB
520-5PSD, 520-5MSD, 520-PLD,
525-5PWD, 525T-PWD, 50B-6,
50B-6B, 200B-5S, 50/200-1T,
525T-BSD, 525T-LTD/12,
525T-LTD/20, 525STID-MSD,
525STID-PWD, SS60-SLTD/12,
SS60-SLTD/20, 526TID-HDD
*
3
: Required for 1 kW transducer
(50B-6, 50B-6B, 200B-5S
and 50/200-1T).
Display Unit
GP-3700F
Antenna Unit
GPA-020S
*1
Antenna Unit
GPA-021S
*2
Event Switch 1
Event Switch 2
External Monitor
USB Flash
Memory
NMEA0183 Equipment
(Radar)
NMEA0183 Equipment
(Autopilot FAP-330)
Ethernet HUB
HUB-101
Radar
AIS Receiver
24 VDC
Trackball Control Unit RCU-030
Matching Box
MB-1100
*3
Transducer
*4
NMEA2000 (CAN bus) Backbone
*6
NMEA2000 Equipment
(Autopilot
NAVpilot-700 series
*5
)
NMEA2000 Equipment
(Satellite Compass
TM
SC-30)
Rectifier
RU-3423
12-24 VDC
100/110/220/230 VAC
1
ø
, 50/60Hz
*4
: Optional transducer
*
5
: When connected to a NAVpilot-700 series which is
set to NAV mode, only one of either GP-3700 or
GP-3700F can be connected.
*
6
: Turn the GP-3700F power off before connecting
to the NMEA2000 network.

SYSTEM CONFIGURATION
xii
This page is intentionally left blank.

1-1
1. OPERATIONAL OVERVIEW
1.1 Controls
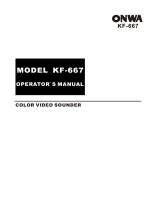
1.1.1 Display unit
When you correctly execute an operation, the display unit generates a beep. Invalid
operation causes the unit to emit two beeps. If you do not need the key beep, deacti-
vate the beep sound (see section 9.3).
13
11
10
2
1
3
4
5
6
7
8
9
12
14
15
16
19
20
18
17
21
GOTO
DISP
CANCEL
CENTER
WPT
SAVE
MOB
ZOOM
IN
TM/RM
MENU
1
4
7
2
3
5
䖪
8
T
9
D
6
MARK
COLOR
0
TRACK
COLOR
22
23
24
25 26
F1
F2
UNDO
SHIFT
RANGE
GAIN
B
R
I
L
L
MODE
ZOOM
OUT
PUSH
TO
ENTER
MARK
/NUM
PLOT
INTVL
CURSOR
ON/OFF
CURSOR
SEL

1. OPERATIONAL OVERVIEW
1-2
No. Key, control Description
1
POWER/BRILL
• Short press at power-off: Turns the power on.
• Short press at power-on: Opens the [BRILL] window.
• Long press while powered: Turns the power off.
2 MOB Marks a man overboard position at own ship position or cursor po-
sition.
3 WPT Opens the [WAYPOINTS LIST] window.
4 GOTO Sets, releases destination.
5 DISP • Cycles through displays (basic screen: plotter, echo sounder).
• Returns to the basic screen with menu or window open.
6 TM/RM Alternately selects true motion (TM) and relative motion (RM) dis-
plays.
TM: The own ship mark moves along with own ship position.
RM: The chart moves along with own ship position. The relative po-
sition for own ship mark on the screen is fixed.
7 MODE Changes the orientation mode.
8 ZOOM IN, ZOOM OUT Zooms the chart display range in or out.
9 ENTER knob • Rotate: Changes numeric data, selects menu items.
• Push: Confirms alphanumeric data entry or an operation.
• Push (default setting): Shows the past picture on the echo
sounder display with the single frequency.
10 CANCEL • Silences the audio alarm.
• Erases marks and waypoints.
• Clears alphanumeric data.
11 MENU • Opens/closes the main menu.
• With the menu open, goes back one layer in selected menu.
• Closes the window.
12 Numeric keys 0 to 9 • Enters numeric data.
• 1 to 8: Enters corresponding mark labeled on the key.
• Selects menu items.
• 0: Measures range and bearing between two points.
• 9: Enters the same mark as the last entered one then connects
them. This function is not available when no mark is entered
since power-on.
13 MARK/NUM Selects mark input format, mark symbol or numeric.
14 PLOT INTVL Starts, stops plotting of own ship track.
15 MARK COLOR Opens the [CHANGE MARK COLOR] window.
16 TRACK COLOR Opens the [CHANGE TRACK COLOR] window.
17 S, T, W, X
(CursorPad)
• Moves the cursor.
• Selects menu items.
18 CENTER • Cursor shown: Moves cursor to the screen center.
• Cursor not shown: Moves own ship position to the screen center
or the position one-third from the bottom of the screen depending
on the orientation mode.
• Confirms alphanumeric data entry or an operation on the menu.
19 CURSOR ON/OFF • Turns on/off the cursor.
• Switches + to - and vice versa.
• Switches N to S, E to W and vice versa.
• Long press: Switches control between split screen displays other
than compass display.
20 CURSOR SEL Selects cursor configuration among circle, parallel or diamond.
21 Trackball Moves the cursor.
22 UNDO Undoes previous mark/line input, edit or deletion operation.
23 F1, F2 Activates assigned program.

1. OPERATIONAL OVERVIEW
1-3
1.1.2 Trackball control unit RCU-030 (option)
The optional trackball control unit RCU-030 can be used to control most features of
this equipment.
1.2 How to Turn the Power On/Off
Note: Turn the NMEA2000 network power on before turning the GP-3700F power on.
Press the POWER/BRILL key at the top corner of the display unit to turn on the power.
The unit then starts up in the sequence shown below.
24 SHIFT • Opens the [FISH FINDER SHIFT] window (in manual echo
sounder display).
• Executes assigned program.
25 RANGE • Opens the [BTM DISP RNG U (or L)/LIM] window (in automatic
echo sounder display) or the [FISH FINDER RANGE] window (in
manual echo sounder display).
• Executes assigned program.
26 GAIN • Opens the [AUTO GAIN OFFSET (HF) (or LF)] window (in auto-
matic echo sounder display) or the [FISH FINDER GAIN (HF) (or
LF)] window (in manual echo sounder display).
• Executes assigned program.
No. Description
1 Trackball: Moves the cursor.
2 Left button: Confirms alphanumeric data entry or an operation.
3 Scrollwheel:
• Rotate upward: Zooms in the chart display range.
• Rotate downward: Zooms out the chart display range.
• Push with cursor shown: Moves cursor to the screen center in
the plotter display.
• Push with cursor not shown: Moves own ship position to the
screen center or the position one-third from the bottom of the
screen depending on the orientation mode in the plotter display.
4 Right button:
• Displays/erases the cursor.
• Switches + to - and vice versa.
• Switches N to S, E to W and vice versa.
• Long press: Switches control between split screen displays oth-
er than compass display.
No. Key, control Description
1
2
3
4
GPS PLOTTER / SOUNDER
GP-3700F
GPS PLOTTER / SOUNDER
GP-3700F
GPS PLOTTER / SOUNDER
GP-3700F
XX: Program version number
P
I
C : OK BEACON ROM:OK FISH FINDER ROM:OK
GPS
: OK BEACON R
A
M:OK FISH FINDER R
A
M:OK
PROGRAM: 1451468-XX.XX BEACON : 2051544-XX.XX
PWR
: 1451470-XX.XX ES : 1451472-XX.XX
GPS
: 48504650XX
PROGRAM NUMBER
Attention
Recorded charts are for reference
only. Use latest paper charts for
navigation.
FURUNO ELECTRIC CO., LTD.
PRESS ANY KEY.
The tide info. shown here is for refer-
ence only. Always use official tide
charts for navigation.

1. OPERATIONAL OVERVIEW
1-4
The start-up screen disappears then the last-used screen (e.g. plotter display) ap-
pears.
Your position is displayed approx. 90 seconds after the power on. Until your position
is found, the message "NO FIX" is displayed at the bottom of the plotter display. After
your position is found, the indication "2D" or "3D" appears depending on the position
fix status.
To turn off the power, press and hold the POWER/BRILL key. The message "HOLD-
ING THE POWER KEY WILL TURN THE GP-3700 OFF. POWER OFF IN 3 s." ap-
pears then the countdown until power-off is started. Press and hold the POWER/
BRILL key until the indication "0 s" appears. The message "GP-3700 SHUTTING
DOWN. PLEASE WAIT." appears then the power is turned off.
Note: Turn off the main power after the display goes blank.
DGPS beacon receiver
The GP-3700F is available in two specifications, with DGPS beacon receiver and no
DGPS beacon receiver. Only the beacon receiver equipped GP-3700F has DGPS ca-
pability. To get DGPS capability, install the optional internal DGPS beacon receiver
(name: Beacon Receiver Set, type: OP14-80, code no.: 000-029-392).
1.3 How to Adjust the Brilliance of the Display and
Panel
The brilliance of the display and panel dimmer can be adjusted from the [BRILL] win-
dow.
1. Press the POWER/BRILL key to show the [BRILL] window.
Note: The [BRILL] window closes automatically when there is no operation for five
seconds.
2. To adjust the display brilliance, press W or X, or rotate the ENTER knob (setting
range: 1 to 8).
3. To adjust the panel brilliance, press S or T, or push the ENTER knob (setting
range: 1 to 8).
4. Press the MENU key to close the window.
Note: The brilliance of an external monitor cannot be adjusted from the display unit.
Adjust it from the external monitor.
Indication Meaning Indication Meaning
GP-2D 2D GPS position fix GP-S2D 2D GPS+SBAS position fix
GP-3D 3D GPS position fix GP-S3D 3D GPS+SBAS position fix
GP-D2D 2D DGPS position fix NO FIX No position fix
GP-D3D 3D DGPS position fix

1. OPERATIONAL OVERVIEW
1-5
1.4 How to Select and Set a Display
There are two base screens; plotter and echo sounder. You can display combination
data with these two modes. See chapter 2 for plotter, chapter 11 for echo sounder.
1.4.1 How to select a display
Press the DISP key consecutively to cycle through all the active displays. Displays
other than display 1 can be skipped. See section 1.4.3.
1.4.2 How to change a display’s setting
Five basic screens are pre-prepared. You can change the configuration of each
screen to meet your operational needs, as shown in the procedure below. For menu
operation, see section 1.5.
1. Press the MENU key to open the main menu.
2. Select [0. SYSTEM SETTING].
3. Select [4. DISPLAY SETTING].

1. OPERATIONAL OVERVIEW
1-6
4. Select [1. DISPLAY 1 SETTING].
5. Select [SPLIT PATTERN].
6. Select the split pattern from [LIST OF SPLIT PATTERNS]. The following steps are
for [VERT SPLIT 1:1] (vertical split 1:1).
7. Select [LEFT] in [DISPLAY SCREEN].
Note: The items in the list differ according to the split pattern selected at step 6.
8. Select the display screen from [LIST OF DISPLAY SCREENS].
Note: The plotter or compass can be selected as the upper display screen only in
the horizontal split screen configuration ([HOR SPLIT 1:1]).
9. Set the right display screen in the same manner.
10. Select [SELECT INFO.] in [NAV/DEST INFO].
Split pattern
Display screen
Navigation/destination
information
List of split patterns
List of display screens
/