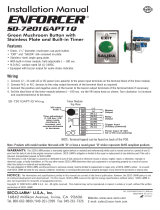
ENFORCER Plaques de sortie de bouton poussoir
10 SECO-LARM U.S.A., Inc.
LED - Mode d’attente ‘Vert,’ Porte ouverte ‘Rouge’
LED – Mode d’attente ‘Éteinte’, Porte ouverte ‘Rouge’
Relais de module minuterie
O/P N.O.
Alimentation de module
minuterie I/P (–)
1
Inutilisé
Relais de module minuterie
O/P N.F.
Alimentation de module
minuterie I/P (–)
1
Relais de module minuterie
O/P N.O.
gend du bornier se trouve sur le dos de la
carte de circuit.
1
Utiliser inclus résistance lors de la connexion à 24VCC.
La LED supplémentaire sur le SD
GSTQ fonctionnes comme d'indicateur d’état. Il peut commuter entre
'éteinte' et 'allumé' (rouge ou vert) ou il peut commuter entre 'rouge' et 'verte'. Comme un indicateur d'état,
cela pourrait indiquer
que le verrouillage est entré dans l'état de déverrouillage temporisé après que le bouton
a été pressé. Sur les portes avec une position de la porte de sortie de contrôle, LED d'état peut indiquer que
la porte est déverrouillée ou que la porte est ouverte, retourner en mode d'attente seulement après que la
porte a été fermée et/ou reverrouillé.
1. Suivre les instructions de c
âblage pour SD-7202GC-PTQ (voir la page 3).
2. Décider sur le rôle de la LED d’état (voir ci-dessus):
a. Pour LED d’état éteinte en mode d’attente (LED du bouton poussoir allumé), allumer lorsque le bouton
est enfoncé (avec LED du bouton poussoir éteindre), puis retourner en mode d’attente lorsque le retard
de la minuterie se termine (voir la Fig. 7):
i. Brancher le fil rouge (pour LED rouge) ou le fil vert (pour LED vert) de la LED d’état à la borne du
relais sortie N.O. du module minuterie (l’autre fil de couleur ne sera pas utilisée).
ii. Brancher le fil noir de la LED d’état au l’entrée de alimentation negatif (–) du module minuterie.
b. Pour LED d’état (et LED du bouton poussoir) normalement allumé en mode d’attente, avec LED d’état
changeant de couleurs lorsque le bouton est enfonc
é, puis retourner en mode d’attente lorsque le retard
de la minuterie se termine (voir la Fig. 8):
i. Brancher un fil rouge (ou vert) de la LED d’état à la borne du relais sortie N.O. du module minuterie.
ii. Brancher l’autre fil de colour de la LED d’état à la borne du relais sortie N.F. du module minuterie.
iii. Brancher le fil noir de la LED d’état au l’entrée de alimentation negatif (–) du module minuterie.
Note importante:
A. Lorsque vous utilisez une alimentation 24VCC, une résistance (inclus) doit être branché
en ligne avec la fil noir de la LED d’état.
B. Câblage suggérés supposent une seule alimentation (voir la Fig. 10). Borne de sortie N.F.
de relais du module minuterie doit être connecté au borne positive (+) de l'entrée
d'alimentation du dispositif commandé, et le borne de sortie COM du module minuterie
doit être connecté au borne positive (+) de la source d'alimentation.
3. Régler le module miniterie entre 1~180 s via le potentiomètre (voir la Fig.6). Tourner à droite pour
augmenter, et à gauche pour diminuer. Tester pour assurer la minuterie est bien régler.
avertisseur
Relais sortie
(3A@24VCC)
déclenchement
(précâblé à l’usine)
12 ou 24VCC (non-
polaire)
……… inutilisé
inutilisé
négatif (–)
1
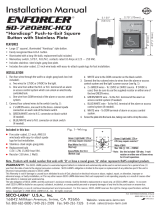
ENFORCER Pushbutton Request-to-Exit Plates
SECO-LARM U.S.A., Inc. 3
1. Run four wires through the wall to a single-gang back-box
as follows:
a. Two wires from a 12VDC or 24VDC power source for
the pushbutton light.
b. One wire from either the NO or NC terminal of a device
such as an alarm or access control system which can
unlock an electrically-controlled lock.
c. One wire from the COM terminal of that device.
2. Connect the included colored wires to the switch
(see Fig. 5):
a. To power the pushbutton’s LED, connect 1 GREEN wire to each of the brass-colored spade
connectors on the sides of the black switch.
b. Connect GREEN/WHITE wire to the N.C. connector on the black switch (if needed).
c. Connect BLUE/WHITE wire to the N.O. connector on the black switch (if needed).
d. Connect WHITE wire to the COM connector
on the black switch.
3. Connect the colored wires to wires from the alarm or access control system and the light’s power
source (see Fig. 5):
a. 2x GREEN wires – To a 12 or 24 VDC source. The polarity of the LED must be observed.
b. GREEN/WHITE wire – To the N.C. terminal of the alarm or access control system (if needed).
c. BLUE/WHITE wire – To the N.O. terminal of the alarm or access control system (if needed).
d. WHITE wire – To the COM terminal of the alarm or access control system.
4. Screw the plate onto the back-box, taking care not to crimp the wires.
Users and installers of this product are responsible for ensuring that the installation and configuration of this
product complies with all national, state, and local laws and codes related to locking and egress devices.
LARM will not be held responsi
ble for the use of this product in violation of any current laws or codes.
Buzzer
Output
Relay Output
(3A@24VDC)
Trigger Input
(Factory prewired)
Power Input 12 or 24
VDC (non-polarized)
Terminal legend can be found on back of PCB.
trimpot clockwise to increase,
counterclockwise to decrease.
Adjustment
Trimpot
1. To power the pushbutton’s LED, connect 1 GREEN
wire to each of the brass-colored spade connectors on
the sides of the black switch and bulb assembly (see
Fig. 5 above) and connect the other side of each
GREEN wire to a 12 or 24 VDC source. The polarity of
the LED must be observed.
2. Connect 12 or 24 VDC (non-
polarized) to the power input
terminals of the timer module (see Fig. 6).
3. Connect an N.O. or N.C. device, such as an
electromagnetic lock or alarm, to the relay output
terminal block as desired (3A@24VDC max.).
4. Connect buzzer to the buzzer output terminal if desired.
5. Set the time of the timer module between 1~180 sec
the trimpot. Turn clockwise to increase and
counterclockwise to decrease. Test to ensure the timer
is set correctly.
(–)
(
+
)
*The polarity of the LED must be observed.
(Lug closest to plate)
(Lug farthest from plate)
Max. 10A@125~250 VAC
(12VDC or 24VDC)


