Page is loading ...

HP Series
Installation and
Operation Manual
Includes installation, operation
maintenance and troubleshooting
information for your HP Series
humidifier
1507183-B| 25 OCT 2010
Important:
Read and save these instructions. This guide to be left with equipment owner.

Thank you for choosing Nortec.
Proprietary Notice
This document and the information disclosed herein are proprietary data of WALTER MEIER LTD. Neither this
document nor the information contained herein shall be reproduced, used, or disclosed to others without the
written authorization of WALTER MEIER LTD., except to the extent required for installation or maintenance of
recipient’s equipment. All references to the Nortec name should be taken as referring to WALTER MEIER LTD.
Liability Notice
Nortec does not accept any liability for installations of humidity equipment installed by unqualified personnel or
the use of parts/components/equipment that are not authorized or approved by Nortec.
Copyright Notice
Copyright 2010, WALTER MEIER LTD. All rights reserved.
INSTALLATION DATE (MM/DD/YYYY)
MODEL #
SERIAL #
CYLINDER #
INSTALLATION DATE (MM/DD/YYYY)
MODEL #
SERIAL #
CYLINDER #

Contents
2 Introduction To be updated upon
2 About HP
2 Receiving and Unpacking Equipment
3 Absorption Distances
3 Components To be updated upon compl
e
6 Water Quality
6 Multiple Zones
8 Installation
8 Pre-Installation
10 Construction of a Wet Duct Section
11 Pump Module
11 Installing the Pump
14 Installation of the HP HVAC Manifolds
18 Installation of the Piping Between Valve
Block and Manifolds
19 Check Valve
19 Installation of the Needle Valve
20 Installation of the Valve Block
22 High Pressure Piping
22 Low Pressure Piping
22 Valve Controller Installation
23 Wiring of the System
25 Pump Controller Wiring Notes
27 Mist Eliminator Installation
34 Startup, Operation, and
Maintenance
35 Commissioning and Startup
37 HP HVAC Start-up Checklist
38 Operation
39 Maintenance
42 Danfoss Stainless Steel Axial
Piston Pump
42 Electrical Motor Service
43 Inlet Water Filters
43 High and Low Pressure Lines and
Hoses
43 Atomization Nozzles
44 Mist Eliminator Maintenance
44 End of Season Shutdown
45 Decommissioning / Freeze
Protecting
45 Inlet Water Pressure Switch
46 Troubleshooting
50 Spare Parts
60 Wiring & Installation
Diagrams

1 | HP Series Installation Manual
CAUTION: Servicing
Disconnect main power before any servicing.
The plumbing and electrical compartments contain high voltage components and
wiring. Access should be limited to authorized personnel only.
During and following operation of the humidifier, the steam and components in
contact with the steam such as the blower pack, steam lines, steam distributors,
and condensate lines can become hot and can burn if touched.
Walter Meier does not accept any liability for installations of humidity equipment
installed by unqualified personnel or the use of parts/components/equipment
that are not authorized or approved by Walter Meier.
CAUTION: Electrical
All electrical work should be done according to local and national electrical code.
Electrical connection to be performed by a licensed electrician.
CAUTION: Plumbing
Plumbing to be performed by a licensed plumber.
Drain water from humidifier can be very hot. Do not drain to public sink.
All plumbing work should be done according to local plumbing code.
CAUTION: Installation
Do not mount on hot surfaces.
Do not mount in area where freezing can occur.
Do not mount on vibrating surface.
Do not mount on floor.
LiveSteam produces steam at atmospheric pressure no devices which could block
steam output should be connected to the steam outlet.
Steam lines must be installed so that no restriction can produce backpressure in
the humidifier.
Regardless of selecting on/off or modulating control method, Nortec humidifiers
must have a closed circuit across its on/off security loop control terminal to
operate. Nortec highly recommends the use of a duct high limit humidistat.

HP Series Installation Manual | 2
Introduction
HP HVAC (Adiabatic Humidification System)
Congratulations on the purchase of your NORTEC HP HVAC humidification system. This system
was designed to be efficient and reliable, and is manufactured from high quality materials to
provide long trouble free operation. In order for the system to operate as intended it must be
installed properly.
This guide details the design, installation, commissioning, operation, and troubleshooting of the
HP HVAC system. Please take the time to familiarize yourself with this guide before beginning to
ensure that the system is installed the way it was designed. This ensures a long and trouble
free life of the humidifier.
About HP (Adiabatic Humidification System)
The HP (High Pressure) HVAC system is designed to be installed inside an AHU or duct system to
humidify air to a desired relative humidity. Proper humidity levels have been shown to be
important for health and comfort of occupants. Maintaining proper humidity is also important
for many industrial and manufacturing processes.
The HP system uses a series of nozzles to spray a very fine mist of water droplets into an air
stream. During this process the air absorbs moisture increasing its relative humidity levels. As
the water droplets evaporate, they absorb some energy in the form of heat from the air. This
loss of heat causes the air temperature to drop, resulting in a phenomenon known as adiabatic
cooling.
The HP HVAC adiabatic system has 2 effects:
The relative humidity of the air increases (humidification)
The temperature of the air falls (adiabatic cooling)
Humidification of the air is the main goal of the HP HVAC system. The cooling of the air is
secondary and is frequently beneficial since it is ‘free’ cooling. In cases where air-cooling is un-
desired, preheating of the air is required.
In general a HP system has the following advantages over other humidification technologies:
Low frequency of maintenance, since there are few moving or expendable parts.
Replacing components is quick and requires minimal system disassembly.
A ‘free’ air-cooling benefit from water extracting latent heat from the air.
Receiving and Unpacking Equipment
Check packing slip to ensure ALL material has been delivered.
All material shortages are to be reported to Nortec within 48 hours from receipt of goods.
Nortec assumes no responsibility for any material shortages beyond this period.
Inspect shipping boxes for damage and note on shipping waybill accordingly.

3 | HP Series Installation Manual
After unpacking, inspect equipment for damage and if damage is found, notify the shipper
promptly.
All Nortec products are shipped on an F.O.B. factory basis. Any and all damage, breakage or
loss claims are to be made directly to the shipping company.
Absorption Distances
An important consideration in the planning of a HP HVAC system is the absorption distance, or
the distance it takes for the droplets to evaporate inside the HVAC system. The absorption
distance is relative to the air velocity, temperature, atmospheric pressure, and the amount of
water in the incoming air. In applications where space is limited, such as in an air-handler,
precautions should be taken to prevent the wetting of sensitive components downstream.
Components
Nortec Supplied
Nortec will supply the following components:
1 High pressure pump skid
2 Valve controller
3 Valve block assembly
4 Nozzle manifolds
5 In-duct plumbing
6 Mist eliminator (optional)
7 Air proving switch (optional)
8 High limit humidistat (optional)
9 Humidistat (optional)
10 Reverse osmosis system (optional)
Field Supplied
The Installer is responsible for supplying the following:
1 Electrical disconnects
2 All electrical wiring
3 Piping from the RO system to pump module
4 High pressure piping between pump and manifolds
5 Flex hose
6 P-traps
7 Drain funnels
8 Wet duct section (drain pans, wall sections, sealants, fasteners)
9 Pump skid vibration dampening
10 Electricity, water, and airflow

HP Series Installation Manual | 4
Figure 1: Typical Installation with Medium Pump

5 | HP Series Installation Manual
Figure 2: Typical Installation with Large Pump

HP Series Installation Manual | 6
Water Quality
Water used with the HP HVAC system must be very pure. Dissolved solids, and impurities
contained in the water will precipitate out when the water evaporates, causing dust and
minerals to be deposited into ducts, and/or the humidified space. Dusting can have adverse
effects on filters, fans, heating and cooling coils, human health, and may promote corrosion and
bacteria growth in ducts.
For this reason only Reverse Osmosis (RO) or De-Ionized (DI) water can be used with a HP HVAC
humidification system. DI water is very aggressive, in applications where DI water is used all
components (including wet section of ducting and drains) must be constructed from stainless
steel.
To ensure that the HP HVAC nozzles do not become blocked or damaged over time, the
following conditions should also be met:
Conductivity: 20 micromhos or less
Ph: 6.2 – 7.5.
Multiple Zones
Oftentimes a single pump package will be used to serve different ducts or zones. In this case
each duct will have its own set of manifolds, valve controller and valve block making it fully
independent of the other zones. The pump should be sized to handle the full flow capacity of all
zones combined to ensure reliable operation.
Care must be taken when laying out the piping between the pump and the valve blocks at each
zone to prevent vibration transmission or water hammering effects. The piping should be
securely supported using appropriate cushion clamps (by others) and long straight runs should
be avoided.

7 | HP Series Installation Manual
Installation

HP Series Installation Manual | 8
Pre-Installation
Prior to beginning installation of the HP HVAC system, the required tools should be obtained,
and all contractor-supplied parts (indicated as parts “By Others” throughout this manual) should
be gathered.
Required Tools
In order to assemble an HP HVAC system the following tools and supplies are required:
1 Hammer
2 Socket Set, common imperial and sizes
3 Box-end wrenches – various sizes
4 Pipe Bender
5 Screwdriver Set, including standard flathead and Phillips
6 Caulking
7 Caulking Gun
8 Metal Snips
9 Hacksaw
10 Plumbing Tape
Required Components
The following components must also be supplied to complete the installation:
Electrical Disconnect Switches
Disconnect switches must be supplied to isolate the humidifier for maintenance and in the case
of emergency. If the control panel and disconnect is to be located outdoors, NEMA rated
disconnect switches should be used per national and local codes.
Sizing High Pressure Stainless Steel Tubing
Stainless steel piping must be supplied for distances between the HP pump module and the HP
manifolds. These distances should be kept to a minimum to minimize pressure losses and
maximize system performance, however it is important to avoid over-sizing the lines. For most
installations a 1/2” line is appropriate. Stainless Steel Pipe Fittings
Stainless steel compression fittings are required for all high-pressure line connections. When
using swage type fittings to connect feed lines together, use fittings of the same material as the
feel lines. Never use a brass compression fitting on a stainless steel tube, as the brass will not
properly hold the harder stainless steel pipe.
Follow manufacturers instructions when installing fittings.
Recommended tube material: 304L stainless steel tube, ½” Outside Diameter, 0.049” Wall
thickness
Recommended fittings: 316 stainless steel, ½”, double ferrule compression connections.

9 | HP Series Installation Manual
Reinforced Flexible Hose
The HP pump module features a modern high precision pump. Despite this some degree of
vibration is unavoidable when the system is operating. Vibration effects can be further
amplified by long lengths of solid piping and can be transmitted over distances. To avoid this
reinforced flexible hose is recommended between the pump outlet and the feed piping, as well
as between the feed piping and the valve block. The lengths of reinforce flexible hose used at
these points should be at least 2ft (61 cm). This will dampen vibrations transmitted from the
pump and air-handler / ducting.
Reinforced flexible hose should be selected to withstand pressures of 1200 psi or greater to
provide a safety factor for any water hammer effects or pump over-pressurization.
Care must be taken when using reinforced flexible hose. It must not be allowed to sag unduly,
vibrate excessively, be bent around a radius of less than 2” (50 mm), or come into contact with
sharp edges. Always leave some extra line when going around corners and making bends.
Avoid twisting and kinking the lines while un-spooling and installing. When supporting the hose,
keep in mind that thermoplastic hose has a tendency to return to position it was supplied in.
Pipe Supports and Fasteners
The installer must also supply support for feed piping. When selecting brackets, pipe strapping,
and various other supports, ensure that local and national plumbing codes are followed. The
use of heavy-duty vibration control clamps is strongly recommended. For long runs, ensure that
there is no more than 5 feet between supports.
Various fasteners may be required to complete the installation of the HP HVAC system. These
should be sized to adequately support any anticipated loads. Follow local codes for installing
pipe hangers and bolts.
Recommended supports: Stauff® Cushion Clamps or equivalent
Primary Wiring for Pump Module
Appropriate primary wiring is required for connection to the pumps. Refer to the specification
labels on the pump and valve controllers for voltages and currents. Follow local and national
codes for wiring.
Vibration Isolation
The pump skid will generate some degree of vibrations by its nature. It is recommended that
the pump skid be installed on a vibration-damping mat or vibration isolators to reduce
vibrations and noise.

HP Series Installation Manual | 10
Construction of a Wet Duct Section
General
The section of ductwork that the HP HVAC manifolds are installed to be in needs to be capable
of handling excess water that is not absorbed by the air. Nortec requires that a wet section be
installed in the duct. The wet section should be as long as expected wetting distance. In most
cases Nortec recommends the wet section extend 1.5 feet upstream and 6 feet downstream of
the HP manifolds.
A wet duct section consists of; a double walled plenum, drain pan, and drains. All material used
in the wet section should be made of stainless steel. All seams should be sealed properly with
caulking to prevent leaks.
Double Walled Plenum
A stainless steel liner should be secured to the existing wall. The objective of this is to cover any
exposed insulation, seams, and any existing ducting materials that may not be corrosion
resistant or suited for constant exposure to water. The liner should cover both sides and ceiling
of the plenum. All seams should be caulked and sealed to prevent leakage.
Drain Pan
A stainless steel drain pan should be installed on the floor of the duct. This pan should slope
downwards in the direction of airflow from the HP manifolds to end of the wet section. The
drain pan should terminate with a drain connected to a “P” trap. The “P” trap should be at least
2 inches taller (center to center) that the duct static pressure, and should drain to an open
funnel drain.
For systems up to 750 lb/s per hour a 1” diameter drain should be used. For larger systems a
2” diameter drain, or multiple 1” diameter drains should be used.
HP HVAC systems must NOT drain onto a roof. Building damage could result. Any drain lines
routed outdoors must be insulated and heat traced to protect from freezing.
Ensure that all traps are primed by filling them with water.
Mist Elimination
In some cases, the HP HVAC system will need to be installed in tight spaces or where water
sensitive equipment is present a short distance downstream. In these cases a mist eliminator
is required. The mist eliminator will be located immediately after the drain in the wet section. A
second drain will be then installed immediately after the mist eliminator.
Air Handler Installations
In many cases the HP HVAC system is installed in an air handler upstream of the cooling coil.
Many air handlers include a wet section around the cooling cool as a standard offering. These
cooling coils also function as natural mist eliminators and thus an additional mist eliminator
may not be required. Consult the air handler manufacturer for further information.

11 | HP Series Installation Manual
The above is not true for a heating coil; most heating coils are not designed to be wetted. If
installing upstream of a heating coil a mist eliminator must be used.
Pump Module
The pump module location should be selected with the following guidelines in mind:
Available Power: The pump should be located close to its supply power source.
Available Water: The pump should be located close to its RO or DI water source.
Proximity to Manifolds: The pump should be located as close as possible to the manifolds to
minimize pressure losses in the lines. See Table 4 Piping Pressure Losses for more information.
Available Drain: To prevent damage to other equipment in the event that the pump module
should leak, it is recommended that the pump module be located near a floor drain.
Proper Ventilation: The pump will generate heat during operation. Covered pump modules
include cooling fans, while uncovered pump modules typically rely on natural airflow in the room
for cooling. Ensure that the pump module is located in an area where it can receive a
reasonable amount of airflow. Avoid installing other equipment on top of or in front of the pump
module.
Occupants: The pump will generate some noise and vibration during operation. The pump
should be located somewhere in a place noise and vibrations will not disturb occupants of the
building. Installing the pump module on vibration isolators is recommended to minimize
vibrations. Optional pump covers are available for large pump skids to minimize noise.
Installing the Pump
Move the pump to the location selected and secure it to the floor.
Confirm that primary power source matches the specification label on the pump. It is strongly
recommended that the pump module have a dedicated power supply to prevent brownouts
when the pump module starts. Install a manual disconnect switch for the pump module.
Install connection to the reverse osmosis / de-ionized water supply. Ensure that supply water
pressure from the RO or DI water system is at least 25 psi (1.7 bar) at the inlet to the pump
skid. Never exceed 60 psig inlet pressure (Danfoss Stainless Steel Pump) or 90 psig (Giant
Brass Pumps). The water system capacity must be a minimum of 120% of the humidification
system capacity.
Running the pump on any voltage other than what is listed on the spec label can
serious equipment damage and may ignite a fire.

HP Series Installation Manual | 12
Figure 3: Medium Pump Module Installation Drawing

13 | HP Series Installation Manual
Figure 4: Large Pump Module Installation Drawing

HP Series Installation Manual | 14
Only reverse osmosis or de-ionized water can be used with the HP HVAC system.
Connect the primary electrical supply to the pump. Refer to the wiring diagram located in this
manual.
Installation of the HP HVAC Manifolds
The HP HVAC system uses vertical manifolds with that spray into the airstream. These
manifolds are supported at both the top and the bottom by horizontal mounting rails. Since
each system is sized and built to a certain duct size, some test fitting will be necessary to
properly install the rails.
If a wet section has not yet been constructed in the duct or air-handler, it should be constructed
before the humidifier installation has started.
If the duct is greater than 8 feet in width, install mounting rail extensions (P/N 1510135) onto
the mounting rails.
Assemble all vibration clamps on the mounting rails as detailed in the following figure. There
should be an equal number of clamps on both of the supplied mounting rails. Leave the clamps
loosely installed for now, to allow for movement and the installation of the HP manifolds.
Figure 5: Vibration Clamps
Securely fasten the gusset to vibration pad and duct walls with the supplied screws. (2 screws
per gusset).
Figure 6: Gusset

15 | HP Series Installation Manual
Secure the mounting rails to the gussets using the supplied fasteners. (1 – 3 fasteners per
gusset).
Figure 7: Mounting Rail Installation
Install the manifolds onto the mounting rails using the previously installed mounting rail clamps.
The manifolds should be equally spaced in the duct. There should be at least 6” from the top
of the duct to the mounting rails. Mounting rails should be installed on the upstream side of the
manifolds.
Figure 8: Rail and Clamp

HP Series Installation Manual | 16
Install the air break end caps onto the one end of the HP manifolds.
Figure 9: Endcap
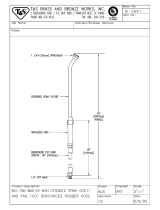
Install the manifold fittings to the bottom end of the HP manifolds.
Figure 10: HP HVAC Manifold and Plumbing Installation

17 | HP Series Installation Manual
ZONE VALVE
ASSEMBLY
4” Min
6” Min
4” Min 4” Min4” Min
6” Min
Figure 11: Manifold Minimum Spacing
Figure 12: Nozzle Aiming
/