
DSG Retail Limited is responsible for after sales service.
If you have a query about the product please contact our product support line 0844 561 6263 (Currys) and 08700 118 117 (Pixmania).
Stainless Steel Microwave
Instruction Manual
L17MSS10

Important Safety Instructions
2
Please Read Carefully and
Keep for Future Reference
l If the door or door seals are damaged,
the oven must not be operated until it has
been repaired by a
qualified technician
.
l If smoke is observed, switch off or unplug
the appliance and keep the door closed in
order to contain any flames.
l If the supply cord is damaged, it must be
replaced by a service agent or similar
qualified technician.
l If you have a pacemaker, please contact
your doctor before using a microwave
oven.
Microwave use
l This microwave is not intended for
commercial use.
l It should never be used for drying clothes
or other non-food purposes.
l The microwave should not be left
unattended when in use.
l Do not leave the appliance unattended
during use.
l Only allow children to use the oven
without supervision when adequate
instructions have been given so that the
child is able to use the oven in a safe
way and understands the hazards of
improper use; DO NOT assume that
because a child has mastered one
cooking skill he/she can cook everything
without close supervision. The microwave
MUST NOT be treated nor use like a toy.
Containers
l Pressure will build up in sealed containers
and can cause them to explode. Therefore
do not use the following in your
microwave:
Sealed containers
· Capped bottles
· Vacuum containers
· Sealed jars
· Hard-boiled egg
· Nuts
l Always pierce the skin of fruit and
vegetables, such as potatoes.
Delayed boiling
Liquids heated in a microwave can boil up
when removing them from the microwave.
Take the following precautions :
l
Always stir liquids, before & after
cooking
l Allow them to stand
l Use containers that are wider at the top
than the bottom
Preparing Food for babies
Extra care must be taken when preparing
food or drink for babies and small children.
l
Always test the food or liquid
temperature before giving it to
baby.
l When using a baby bottle, ensure the teat
is removed before heating.
l When warming milk, ensure the bottle is
shaken.
First aid
Treat scalding by:
1 Quickly placing the scald
under cold running water
for at least 10 minutes.
2 Cover with a clean dry
dressing. Do not use
creams, oils or lotions.
Fire
In the event of fire:
1 Keep the oven door
closed.
2 Turn off the power.
3 Unplug from mains.
Safety
l Take care when cooking food with a high
sugar or fat content, such as Christmas
pudding or fruitcake. The sugar or fat can
overheat and in some cases catch fire.
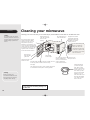
Cleaning
The oven should be cleaned regularly and
food deposits removed. Failure to maintain
the oven in a clean condition can affect the
life of the appliance and possibly result in a
hazardous situation.
(See cleaning your microwave )
· Eggs in their shells
l The temperature of accessible surfaces
may be high when the appliance is
operating.
l To prevent high moisture content gather
inside the oven cavity, open the door
immediately after the cooking function
has stopped to allow steam to escape.
Caution
During cooking, outer surface will become
hot, do not touch outer casing of appliance.
Care should be taken not to store any items
on top of your microwave oven.
!
Maintenance of your Microwave
It is hazardous for anyone other than a
qualified technician to carry out any
service or repair operation which involves
the removal of a cover which gives
protection against exposure to microwave
energy.
Cooking use
As the power of different microwave ovens
can vary considerably, care must be taken
when first using this appliance as it may
cook faster than your old unit.
l Only use utensils that are suitable for
microwave use. Refer to the section on the
correct utensils to use in this appliance.
l
l
l
l
l Care should be taken so metal objects are
not left in the microwave
These include :
¨ Metal cooking utensils
¨ Metal plates or trays
¨ Wire twist ties
¨ Crockery with metal trims
¨ Meat thermometer
Care should be taken when using paper,
plastic, wooden or other combustible
materials in the oven as they can catch
fire
Oil & fat for deep frying should not
heated in the microwave
Only use cling film designed for
microwave use & take extra care when
removing the film to avoid steam burns
Only heat popcorn that has been
designed for microwave use.
This appliance is not intended for
use by persons (including children)
with reduced physical, sensory or
mental capabilities, or lack of
experience and knowledge, unless
they have been given supervision
or instruction concerning use of the
appliances by a person responsible
for their safety.
Children should be supervised to
ensure that they do not play with
the appliance.
If the supply cord is damaged it must
be replaced by the manufacturer, its
service agent, or similarly qualified
persons in order to avoid a hazard.

3
Electrical Information
Electrical Information
Before using this appliance ensure that the voltage of your electricity supply is suitable for that indicated on the rating plate of the
appliance. The ultimate disconnection from the power source is the mains plug. Always make sure it is easily accessible to be
unplugged in the event of an emergency.
Earthing Instructions
WARNING: THIS APPLIANCE MUSE BE EARTHED.
• This appliance is equipped with a cord having an earthed plug.
• The plug must be plugged into an appropriate outlet that is installed and earthed in accordance with all local
standard and requirements.
Warning!
• Improper connection of the appliance-earthing conductor can result in a risk of an electric shock.
• Check with a qualified electrician or service representative if you are in doubt whether the appliance is properly
earthed.
• Never modify the plug provided with the appliance.
• If the plug does not fit properly in the mains socket, have a qualified electrician to install a proper mains socket.

Contents
4
Contents
Unpacking and getting ready page 5
Introducing microwave cooking page 7
Setting the child lock page 12
Using the microwave page 13
Speedy Cooking page 15
Auto Menu page 16
Setting the Clock page 18
Program set in Advance page 19
Inquiring Function page 21
Using aluminium foil in your microwave page 25
Questions and answers page 26
Specification page 28
Two-Stage cooking page 20
Defrosting page 22
Cleaning your microwave page 24

5
Unpacking and getting ready
1
After unpacking your oven, check that it has not been damaged whilst in
the box. Make sure there are no dents, that the door closes properly.
A dented or damaged oven could allow microwave energy to escape.
Make sure that you have taken all the packaging from inside the oven.
2
Choose a flat work surface for your microwave away from heat sources
such as radiators or fires, and away from anywhere that is very cold.
You should allow a 10cm space all around the oven and
30cm above so that warm air can escape from the
vents during cooking – it is not designed to be built in.
3
Plug your oven into a standard household electrical socket.
Avoid using a socket that also has an adaptor and other equipment
plugged in.
4
Put the turntable ring inside the oven and place the glass turntable on
top of the ring. The turntable is shaped to sit securely on the spindle.
You must always use the turntable and ring whenever you use the
microwave.
10 cm10 cm
30 cm
This microwave oven is
designed for home use. It
should not be used for
commercial catering.
Unpacking

6
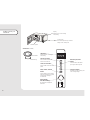
Getting to know your
microwave
Control panel
The oven beeps when you choose a
setting on the control panel
Turntable spindle
Display
Shows the clock and cooking
time/setting
Glass turntable
Turntable ring
Accessories: (included)
Clock/Pre-Set button
Use this button to set clock and
preset
Microwave button
Use this button to select the
function of microwave
Timer/Weight/
Auto Menu setting
For setting time, weight and
auto menu
Stop/Clear button
This button will stop cooking and
clear cooking settings.
Start/+30Sec./Confirm
button
Use this button once to instantly
begin 30 seconds of microwave
cooking, keep pressing to
increase time.
LED display
Shows the clock or cooking
time/setting
Defrost by Wt./Time
button
Use this button to set defrost
by weight & defrost by time

7
Introducing microwave
cooking
Introducing microwave cooking
Always remember the basic safeguards you would follow when using any
cooking equipment or handling hot food.
This page gives some of the basic guidelines for microwave cooking.
If you are unfamiliar with using a microwave, there is more information
at the back of this instruction booklet.
Cooking with a microwave
Cooking with a microwave is much faster than
conventional cooking and, whilst you should make
sure that food is fully cooked, you should be careful
not to overcook it.
If you are cooking a number of individual foods at the
same time, such as baked potatoes or small cakes,
arrange them evenly on the turntable so that they cook
evenly. Never stack food in your microwave.
Meat and poultry which is cooked for 15 minutes
or more will brown lightly in it is own fat.
Anything cooked for a shorter time can be brushed
with a browning sauce to give an appetising colour.
Microwave energy can heat unevenly so stirring to
distribute heat is very important. Always stir from the
outside towards the centre.
Turn larger foods such as meat roasts and poultry
during cooking so that the top and bottom cook
evenly. It is also a good idea to turn chops and
chicken pieces, especially if they contain the bone.
Strips of aluminium foil can be used to cover the
thinner pieces of food to stop them overcooking
before the thicker parts of the food have had a
chance to cook. Use the foil sparingly and wrap
around the food or container carefully to stop it
touching the inside of the oven which could cause
sparks.
You should always have your microwave checked
if it is dropped or damaged.

8
Introducing microwave
cooking
Safety
Never use scratched,
cracked or damaged
glass in a microwave.
Damaged glass can
explode.
Safety
Never use equipment
made of metal, except
foil in your microwave
oven.
The microwave energy
can not pass through the
metal so it bounces off
and sparks against the
inside of the oven.
Stop the microwave straight
away if any equipment does
cause sparks.
Remember that some crockery
has a metal trim around the
edge. Even this trim can cause
sparks.
Microwave ovens cook food using microwave energy that is
similar to naturally occurring radio waves. Normally, these
"waves" would fade as they disappeared into the atmosphere
but in a microwave oven they are concentrated onto food
causing it to heat up.
Microwave energy can not pass through metal – so it can not
escape from inside your microwave oven – but it can pass
through materials like glass, porcelain, plastic and paper.
These are the things used to make
microwave-safe
cooking
equipment.
Microwave-safe cooking equipment will still get hot as the
food it contains heats up.
Checking your cooking utensils
Most heat-resistant, non-metallic cooking utensils are safe to use in your
microwave. If you are not sure you can use a utensil in your microwave,
follow this simple test:
2 Turn the microwave oven on for 30 seconds only.
3 At the end of the time, carefully check to see if the water has
warmed up. If the water has not warmed up but the utensil has, the
utensil is not microwave-safe and should not be used in the oven.
The microwave energy focuses on the moisture in the
food causing lots of tiny vibrations. The vibrations get so
great that the moisture – and the food – heat up.
1 Put the utensil into the oven next to a cup of water – use a cup
that you know is microwave-safe. Close the door

9
Introducing microwave
cooking
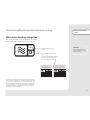
700W is the output power of
the oven.
D is the heating category for your
oven.
Check the cooking times for category
D on the food's packaging to see
how long it should be cooked for.
More about getting the most from microwave cooking
Microwave heating categories
Your oven has been tested and labelled to meet the government's
voluntary agreement on the reheating of pre-cooked food.
The heating characteristics and output power levels of microwave
ovens are usually calculated using a relatively large portion of food
(a 1000 gram load, IEC 705) but many packs of pre-cooked food
are sold in smaller packs, often about 350 grams. The government,
in partnership with food companies and microwave manufacturers,
have set up a system of heating categories to help you choose the
reheating time for pre-cooked food.
700W
D
To Microwave:
Remove outer packaging.
Pierce film lid SEVERAL TIMES.
Place on a microwaveable plate. Heat on
full power. Turn halfway through heating.
To Microwave from Frozen:
Remove outer
packaging. Pierce film lid SEVERAL TIMES.
Place on a microwaveable plate. Heat on
full power. Turn halfway through heating.
Remember
Always check that the food is
evenly cooked and piping hot
before you serve it.

10
Introducing microwave
cooking
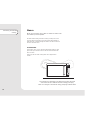
Steam
When you microwave food, steam is created as water in the
food heats up and evaporates.
The steam formed during microwave cooking is entirely safe. It has
to escape from the microwave to prevent pressure from building up
inside the oven. It does this through the vents on the back of the oven
and from around the door.
Condensation
As the steam cools, you may find the condensation gathers in small
pools inside your microwave and on the work surface beneath the
door and vents.
Always dry the oven after cooking foods with a high moisture
content.
Your microwave is designed to let steam escape from the vents
and around the door without microwave energy escaping.
There is no danger of microwave energy escaping with the steam.

11
Checking your microwave
Check your microwave is working after unpacking and whenever
you think it might not be working properly.
1
Put the turntable ring inside the oven and place the glass turntable on
top of the ring. The turntable is shaped to sit securely on the spindle.
You must always use the turntable and ring whenever you use the
microwave.
Place a cup of water on the turntable. Make sure the cup is
microwave-safe – it should not have any decorative metal trim.
Pull handle to open the door.
2
Close the oven door.
3
4
Press the "Start/+30Sec./Confirm" button once.
The oven light comes on during cooking.
5
When cooking finishes, the water should be hot - be careful when you take the
cup out of the oven.
Press the "Stop/Clear" button.
Press the "Stop/Clear" button to clear any settings that have already been made.
Safety
For your safety, the
microwave stops if the oven
door is opened during
cooking. Close the door to
continue the cooking cycle.
Hint
You can stop cooking at
any time so that you can;
check the food, turn the food
over, stir it or leave the food to
stand.
Introducing microwave
cooking

12
Setting the child lock
Hint
Your oven has a safety
feature that prevents children
from using your oven. Once
the child lock is set, you will
be unable to use any functions,
and no cooking can take
place. However, your child can
still open the oven door.
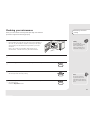
Setting the Child Lock
1
2
To unlock: In locked state, press "Stop/Clear" for 3 seconds, there will be a long
"beep" denoting that the lock is released.
To lock: In waiting state, press "Stop/Clear" for 3 seconds, there will be a long "beep"
denoting entering the children-lock state and screen will display the locked indicator.
The child lock is a safety feature which when set will lock all of the buttons on your
microwave. This prevents your microwave being used accidentally, though your
microwave door will still open.

13
Using the microwave
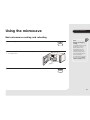
Using the microwave
Basic microwave cooking and reheating
1
Press the "Stop/Clear" button.
2
Make sure the glass turntable and the turntable ring
are inside the oven.
3
Press the "Microwave" key once, and "P100" display.
Hint:
Starting and stopping
cooking
It is possible to check cooking
progress at any time, by
opening the door and
inspecting the food. This
interrupts the emission of
microwave energy and the
oven stops working until the
door is closed again.
To resume cooking, close the
door, and press the "Start/
+30Sec./Confirm" button.

14
Using the microwave
4
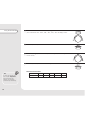
Press "Microwave" for times or turn "Timer/Weight/Auto Menu" to select the microwave
power from100% to 10%. "P100", "P80", "P50", "P30", "P10" will display in order.
Microwave Power Chart
Microwave Power
80% 50% 30% 10%100%
P80 P50 P30 P10P100
5
Press "Start/+30Sec./Confirm" to confirm.
6
Turn "Timer/Weight/Auto Menu" to adjust the cooking time. (The time setting should
be 0:05- 95:00.)
7
Press "Start/+30Sec./Confirm" to start cooking.
Display
Hint
If you do not open the oven
door or press "Stop/Clear"
when cooking time has
elapsed, your microwave
power will stop automatically.

15
Microwave cooking
1
Put the turntable ring inside the oven and place the glass turntable on
top of the ring. The turntable is shaped to sit securely on the spindle.
You must always use the turntable and ring whenever you use the
microwave.
Close the oven door.
2
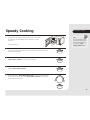
In waiting state, press "start/+30sec./confirm" key to cook with 100% power level
for 30 seconds. Each press on the same key can increase 30 seconds. The maximum
cooking time is 95 minutes.
3
During the microwave cooking and time defrost process, press
"Start/+30Sec./Confirm" to increase the cooking time.
4
Under the states of auto menu and weight defrost, cooking time cannot be increased by
pressing "Start/+30Sec./Confirm"
5
In waiting states, turn "Timer/Weight/Auto Menu" left to choose the cooking time
directly. After choosing the time, press "Start/+30Sec./Confirm" to start cooking.
The microwave power is 100%.
Hint
The quick start feature allows
you to set 30 seconds intervals
of HIGH power cooking with
the touch of the "Start/
+30Sec./Confirm" button.
Speedy Cooking

16
Microwave cooking
Auto Menu
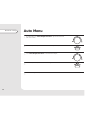
1
2
Press "Start/+30Sec./Confirm" to confirm the menu you choose;
3
Turn "Timer/Weight/Auto Menu" to choose the food weight;
4
Press "Start/+30Sec./Confirm" to start cooking;
In waiting states, turn "Timer/Weight/Auto Menu" right to choose the menu
from "A-1" to "A-8";
5
After the cooking is finished, the microwave will sound five times.

17
Microwave cooking
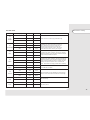
Menu Weight(g)
A-1
AUTO
REHEAT
A-3
FISH
A-2
VEGETABLE
A-5
PASTA
A-4
MEAT
A-7
PIZZA
A-6
POTATO
A-8
SOUP
200
400
600
200
300
400
250
350
450
250
350
450
50(with water 450 ml)
100(with water 800 ml)
200
400
600
200
400
200
400
200
400
600
200
300
400
250
350
450
250
350
450
50
100
200
400
600
200
400
200
400
The menu chart:
Vegetables can be boiled or steamed. Cover
vegetables with boiling water before operation or
add 2 tablespoons of water per 100g and cover
with microwave safe cling film and pierce the
cling film before operation. Caution - take care to
avoid steam burns when removing the cling film.
The times provided are guidelines only - make sure fish is
cooked through before consuming. Turn fish over half way
through the cooking cycle. Thick pieces of food will require
longer cooking times than thin pieces.
The times provided are guidelines only - make sure meat is
cooked through before consuming. Turn meat over half way
through the cooking cycle. Thick pieces of food will require
longer cooking times than thin pieces. Cut meat into small
equally sized pieces and place onto a microwave safe
plate. Ensure meat is thoroughly cooked before consuming.
- Add 450ml cold water
- Add 800ml cold water
Place soup in microwave safe dish cover with cling
film, then pierce.
For reheat only.
Comment
Make sure food is thoroughly heated through.
For best results, once the potatoes are cooked wrap
them in tin foil for at least 5 minutes to cook through.
2:40
5:20
8:00
4:00
5:00
6:00
6:00
7:10
8:20
5:20
6:35
7:50
18:00
21:00
6:50
10:00
13:00
1:40
3:00
2:20
4:20
Display Time

18
Microwave cooking
1
2
3
4
5
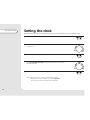
Press "Clock/Pre-Set", the hour figure will flash;
Turn "Timer/Weight/Auto Menu" to adjust the hour figures, the input time should
be within 0--23.
Press "Clock/Pre-Set", the minute figures will flash.
Turn "Timer/Weight/Auto Menu" to adjust the minute figures, the input time
should be within 0--59.
Press "Clock/Pre-Set" to finish clock setting. ":" will flash.
When the microwave oven is connected to the mains, the oven will display "0:00" and will sound once.
Note: 1) If the clock is not set, it would not function when powered.
2) During the process of clock setting, if you press "Stop/Clear",
the oven will go back to the previous status automatically.
Setting the clock

19
Microwave cooking
1
2
Input the cooking program. Two stages can be set at most.
Defrosting should not be set in preset function.
3
Press "Clock/Pre-set" button and the hour figures will flash.
4
Turn "Timer/Weight/Auto Menu" to adjust the hour figures, the input time should
be within 0--23.
Set the clock first. (Consult the instruction of clock setting.)
5
Press "Clock/Pre-Set", the minute figures will flash.
6
Turn "Timer/Weight/Auto Menu" to adjust the minute figures, the input time should
be within 0--59.
7
Press "Start/+30Sec./Confirm" to finish setting. ":" will light, buzzer will ring twice
when the time arrives, then cooking will start automatically.
Program set in Advance
Example: if you want to cook with 80% microwave power for 7 minutes.
a. Press "Microwave" once;
b. Turn "Timer/Weight/Auto Menu" to choose 80% microwave power till "P80" display;
c. Press "Start/+30Sec./Confirm" to confirm;
d. Turn "Timer/Weight/Auto Menu" to adjust the cooking time of 7 minutes;
After the above steps, please do not press "Start/+30Sec./Confirm". Then do as following:
Note: Clock must be set first; otherwise, the pre-set function will not work.

20
Microwave cooking
Hint
During two stage
cooking the oven door can be
opened and food checked.
Close the oven door and press
Start and the cooking stage
will continue.
If you wish to clear the
programme press " Stop/
Clear " twice.
1
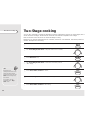
Two-Stage cooking
You can set a maximum of 2 stages for Two-Stage Cooking. If defrosting is among one of the stages, then it
will be set as the first stage. The microwave will sound once after the completion of each stage.
Note: Auto menu cannot be set as one of the Two-Stage Cooking.
Example: if you want to defrost the food for 5 minutes, and then to cook with 80% microwave power for 7
minutes. The steps are as following:
Press "Wt./Time Defrost " twice, the screen will display "dEF2";
2
Turn "Timer/Weight/Auto Menu" to adjust the defrost time of 5 minutes;
3
Press "Microwave" once;
4
Turn "Timer/Weight/Auto Menu" to choose 80% microwave power till
"P80" display;
5
Press "Start/+30Sec./Confirm" to confirm;
6
Turn "Timer/Weight/Auto Menu" to adjust the cooking time of 7 minutes;
7
Press "Start/+30Sec./Confirm" to start cooking.
Page is loading ...
Page is loading ...
Page is loading ...
Page is loading ...
Page is loading ...
Page is loading ...
Page is loading ...
Page is loading ...
-
 1
1
-
 2
2
-
 3
3
-
 4
4
-
 5
5
-
 6
6
-
 7
7
-
 8
8
-
 9
9
-
 10
10
-
 11
11
-
 12
12
-
 13
13
-
 14
14
-
 15
15
-
 16
16
-
 17
17
-
 18
18
-
 19
19
-
 20
20
-
 21
21
-
 22
22
-
 23
23
-
 24
24
-
 25
25
-
 26
26
-
 27
27
-
 28
28


Ask a question and I''ll find the answer in the document
Finding information in a document is now easier with AI
Related papers
Other documents
-
Belling SJS171 User manual
-
Kenwood KEN CJSS32 Operating instructions
-
Hitachi STIF25B Operating instructions
-
Kenwood K30CSS14 User manual
-
Sandstrom S23MGW13 User manual
-
Sharp SMC1655BS Owner's manual
-
-
Hotpoint-Ariston MWH 2824 X UK Owner's manual
-
Omega OMW34X User manual
-