Page is loading ...

Product Code:
Product Name:
www.rolaproducts.com
Cequent Towing Products - Plymouth, MI
Technical Service: (888) 521-0510
59403N Rev B 9-29-06
59403
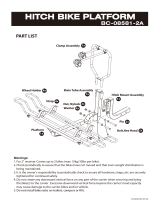
3 Place Bike Carrier - Folding
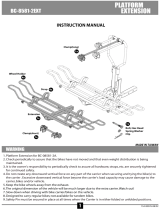
ASSEMBLY INSTRUCTIONS:
The shank for your (3) place bike carrier is pre-assembled to be used with a 2” hitch.
For use with a 2” hitch:
1. Tighten both hex bolts to 75 ft-lb to secure the shank to the Collar Bracket. (See Diagram 1)
For use with a 1-1/4” hitch:
1. Remove the two hex bolts holding shank to collar bracket.
2. Remove the two spacer plates. The spacer plates are not required for the 1-1/4” hitch application.
3. Insert the 2” square end of shank into collar bracket. Line up the two ½” diameter holes in shank with the two holes
in collar bracket. Re-Install the two ½” bolts and tighten bolts to 75 ft-lb.
(See Diagram 2)
Handle Mechanism
Release
Pin
Collar
Bracket
“Slotted”
Hole
½” x 3-1/4” Hex Bolt
(2) Nylon Flat Washer
Locknut
Main Support
Tube
Diagram 3
Diagram 1
½” x 3” Hex Bolt
Locknut
(2) Places
Tighten Bolts
Collar Bracket
Lock
Drop of Oil
2” Shank
Please read all instructions carefully before assembly, installation and/or use of this product.
Diagram 2
1. Use key to unlock lock on Collar Bracket.
2. Pull spring loaded release pin on side of Main Support tube,
remove handle mechanism, and rotate bike Support Arms
into the UP position. Re-insert the handle mechanism. Pull
out the spring loaded release pin and push handle all the
way down. Let the spring loaded pin go so that it fully
engages the handle mechanism.
3. Attach Main Support tube to Collar Bracket in orientation
shown (see Diagram 3). Line up the hole near end of main
support tube with the slotted hole in collar bracket and install
one (1) ½” x 3-1/4” lg. hex bolt, two (2) nylon flat washers,
and locknut as shown. Tighten locknut until it is snug
against the flat washers.
4. Lock Collar Bracket to Main Support tube so bike carrier is
in the upright position.
To attach Main Support tube to collar bracket:
1-1/4” Shank
½” Holes
½” x 3” Hex Bolt
Locknut
(2) Places
Tighten Bolts
5/8” Hole
Hitch pin
hole
Do not use first hole to secure bike
Rack to hitch.

Product Code:
Product Name:
www.rolaproducts.com
Cequent Towing Products - Plymouth, MI
Technical Service: (888) 521-0510
INSTRUCTIONS FOR FOLDING THE RACK:
1. Insert the key into the lock mechanism and turn to release the lock pin.
2. Pull support tube firmly upwards until lower pin slides to the top of its slot.
(See Diagram 6)
3. Lower the tube slowly back until support tube rests on the stop plate.
NOTE: Do not drop or let the support tube fall freely. Make sure that your
hands and fingers are clear of the hinging area during this operation.
4. To restore the rack to the upright position, do reverse procedure.
Remove the key from the lock and push the center of the cylinder in to
engage the lock pin. A notable click will indicate that the pin is locked.
5. Check periodically to insure you have a solid fit between the rack and the
mounting location
Diagram 6
LOADING INSTRUCTIONS:
1. Place the bike rack receiver into your receiver hitch. Fit rack as close to vehicle as possible.
2. For 2” hitch, secure rack with 5/8” hitch pin and clip.
For 1-1/4” hitch, secure rack with ½” pin and clip
(See Diagram 2 & 4)
Note: Must use the second or third hole 1-1/4” shank to secure bike rack to hitch.
1. The bikes are loaded onto the rack alternating each bike, with the anti-sway cradle being closest to the seat tube.
(See Diagram 5)
2. Secure the bikes by pulling the bungee straps over the top of the bike frame. The anti-sway straps wrap around the
seat tube prevent the bike from swaying.
3. Check the bungee straps periodically and after stopping to insure that they are still tight and that someone has not
released them. NOTE: Insure all locks are locked, that all pins are secured, and that all bungee straps are properly
attached prior to moving the vehicle. Failure to do so will void the warranty.
Diagram 4
Anti-Sway
Cradle
Diagram 5
59403N Rev B 9-29-06
Install 5/8” pin and clip for 2” hitch
Install ½” pin and clip for 1-1/4” hitch
3 Place Bike Carrier - Folding
59403
Please read all instructions carefully before assembly, installation and/or use of this product.

Product Code:
Product Name:
www.rolaproducts.com
Cequent Towing Products - Plymouth, MI
Technical Service: (888) 521-0510
IMPORTANT NOTES:
• This bicycle rack has been designed to carry three (3) bikes, as long as the maximum weight on the rack does
not exceed 45 kgs or 100 lb.
• This rack is designed for typical use and applications (on paved or smooth gravel roads). Do not use this rack
on a vehicle that will be driven on rough roads or where the rack (and bikes) will be subjected to significant or
constant jarring and/or shock, or any vehicle with very stiff springs that will transfer the load shocks directly to
the rack and the bikes.
• Proper fitting and installation of this carrier to your specific vehicle is critical, and is the owner’s sole
responsibility.
• Improper use of this product may result in damage to your rack, your vehicle, your bicycles, or even other
vehicles driving behind you (as a result of colliding with or trying to avoid fallen bicycles and/or the rack).
• ROLA™ racks are powder coated to help prevent rust. As with any metal equipment it is recommended that
you keep the rack clean and remove road salt and debris.
• When leaving them outside for extended periods of time the finish will lose its luster. It is recommended that
when not in use the rack is stored indoors.
• The rack won’t carry bikes with oblong frame tubes or unusually large frame sizes.
• Take care to add padding on any area of the bikes that touches another bike or any part of the vehicle.
Damage can and will happen (to your bikes and/or to the vehicle) if care is not taken during the loading and
transporting of your bikes, and padding used where necessary.
• Bicycle tires should be kept at least 6” away from the exhaust pipes of the vehicle. The high temperature
exhaust exiting from the exhaust pipes is hot enough to melt or damage tires. Keep all bike tires totally
away from the direct exhaust flow.
• Bikes fitted with large accessories (such as child carrying seat) will greatly increase the wind resistance
and therefore the pressure on the rack and all vehicle-mounting points. Reducing vehicle speed will reduce
the chance of any problems occurring because of this situation.
• After reading this manual, should you have any additional questions regarding the compatibility, fitting and/or
use of this rack, please call your nearest ROLA™ authorized retail dealer or Cequent Consumer Products
Customer Service.
WARNING:
• DO NOT USE THIS BIKE CARRIER ON A TRAILER OR 5
th
WHEEL R.V.
• Improper mounting will void the rack warranty.
• Damage to bicycles or rack due to ground clearance problems are not covered by warranty.
3 Place Bike Carrier - Folding
Please read all instructions carefully before assembly, installation and/or use of this product.
59403
59403N Rev B 9-29-06
/