Kodak EasyShare Z730 User manual

Category
Film cameras
Type
User manual

This manual is also suitable for

Kodak EasyShare
Z730 zoom digital camera
User’s guide
www.kodak.com
For interactive tutorials, www.kodak.com/go/howto
For help with your camera, www.kodak.com/go/z730support
Eastman Kodak Company
Rochester, New York 14650
© Eastman Kodak Company, 2005
All screen images are simulated.
Kodak and EasyShare are trademarks of Eastman Kodak Company.
P/N 4J3262
Product features
www.kodak.com/go/support
i
Top, front view
1 Zoom (Wide angle/Telephoto);
Magnify (when Reviewing pictures)
8 Speaker
2 Shutter button 9 USB Port ; A/V Out, for
television viewing
3 Flash status button 10 DC-In (5V)
4 Close-up/Landscape button 11 Lens
5 Exposure Bracketing/Burst button 12 Microphone
6 Flash unit 13 Light sensor
7 Viewfinder 14 Self Timer/Video light
3
2
5
1
4 6 7 8
1011121314 9
ii www.kodak.com/go/support
Product features
Back, bottom view
1 Camera screen (LCD) 11 Mode dial lock
2 Diopter dial 12 Joystick - move
OK - press in
3 Ready light 13 Mode dial
4 Viewfinder 14 Display/Info button
5 Delete button 15 Battery lock
6 Menu button 16 MMC/SD card slot
7 Review button 17 Battery compartment
8 Share button 18 Tripod socket
9 Jog dial 19 Dock connector for EasyShare camera dock
series 3 or printer dock series 3
10 Strap post
19
1
2
3 4 5 6 7 8 9
10
11
12
13
14
151617
18
www.kodak.com/go/support iii
Table of contents 1
1 Getting started ......................................................................................1
Installing the software first ............................................................................1
Charging the battery .....................................................................................1
Inserting the battery......................................................................................2
Setting the date and time.............................................................................. 2
Turning the camera on and off ......................................................................3
Checking camera status in capture mode.......................................................4
Storing pictures on an optional SD or MMC card............................................5
Using optional lenses ....................................................................................5
2 Taking pictures and videos ....................................................................6
Taking a picture ............................................................................................6
Taking a video .............................................................................................. 8
Reviewing the picture or video just taken.......................................................8
Using optical zoom .......................................................................................9
Using digital zoom ........................................................................................9
Camera modes............................................................................................ 10
Using P, A, S, M, and C modes....................................................................13
Using the jog dial to change P, A, S, M, or C mode settings .........................14
Using the flash............................................................................................15
Shooting close-up and landscape pictures....................................................18
Using exposure bracketing ..........................................................................19
Using burst .................................................................................................20
Changing picture-taking settings .................................................................21
Using setup to customize your camera......................................................... 27
Pre-tagging for album names ......................................................................29
iv www.kodak.com/go/support
Table of contents
3 Reviewing pictures and videos ............................................................31
Viewing single pictures and videos ..............................................................31
Viewing multiple pictures and videos...........................................................32
Playing a video............................................................................................32
Deleting pictures and videos........................................................................33
Magnifying pictures.....................................................................................33
Changing optional review settings...............................................................34
Protecting pictures and videos from deletion................................................34
Tagging pictures/videos for albums..............................................................35
Running a slide show ..................................................................................36
Displaying pictures and videos on a television..............................................37
Copying pictures and videos........................................................................37
Viewing picture/video information ...............................................................38
4 Installing the software ........................................................................39
Install the software .....................................................................................39
5 Sharing pictures and videos ................................................................40
When can I tag my pictures and videos? ......................................................40
Tagging pictures for printing........................................................................41
Tagging pictures and videos for emailing .....................................................42
Tagging pictures as favorites .......................................................................43
6 Transferring and printing pictures .......................................................46
Transferring pictures/videos with the USB cable ........................................... 46
Printing pictures..........................................................................................47
Table of contents
www.kodak.com/go/support
v
7 Troubleshooting ..................................................................................50
Camera problems........................................................................................50
Computer/connectivity problems..................................................................51
Picture quality problems..............................................................................52
Camera ready light status............................................................................53
8 Getting help ........................................................................................54
Helpful links................................................................................................54
Telephone customer support .......................................................................55
9 Appendix .............................................................................................56
Camera specifications .................................................................................56
Tips, safety, maintenance............................................................................59
Important battery information .....................................................................59
Storage capacities.......................................................................................61
Power-saving features.................................................................................62
Upgrading your software and firmware........................................................62
Warranty.....................................................................................................63
Regulatory compliance ................................................................................65
1 www.kodak.com/go/support
1 Getting started
Installing the software first
IMPORTANT:
Install the software from the Kodak EasyShare software CD before
connecting the camera (or dock) to the computer. Otherwise, the software
may install incorrectly. See the Start Here! guide or page 39.
Charging the battery
The rechargeable Li-Ion battery requires charging before first use.
1 Insert the battery into the charger.
2 Insert the plug that matches your electrical outlet.
3 Plug the charger into the outlet.
The indicator light turns red. When the indicator light turns green, remove the battery
and unplug the charger. Charging takes approximately 3 hours.
NOTE: You can also charge the battery using an optional Kodak EasyShare printer dock or camera dock.
Purchase these and other accessories at a dealer of Kodak products or visit
www.kodak.com/go/accessories.
1 2 3
Getting started
www.kodak.com/go/support
2
Inserting the battery
CAUTION:
Use only a Kodak EasyShare rechargeable Li-Ion battery.
1 Turn the Mode dial to Off.
2 On the bottom of the camera, slide the battery door
and lift to open.
3 Insert the battery as shown. Tilt the battery so the
battery lock is pushed to the side. Push the battery
into the battery compartment.
The battery lock holds the battery in place.
4 Close the battery door.
Setting the date and time
Setting the date & time, first time
The
Date and Time have been reset
message appears the first time you turn on the
camera or if the battery is removed for an extended time.
1 SET DATE & TIME is highlighted. Press the OK button.
2 Go to step 4 in Setting the date & time, anytime.
Battery
lock
3 www.kodak.com/go/support
Getting started
Setting the date & time, anytime
1 Turn on the camera. Press the Menu button.
2 Press to highlight Setup Menu , then press the OK button.
3 Press to highlight Date & Time , then press the OK button.
4 Press to adjust the date and time. Press to advance to the next
setting.
5 When finished, press the OK button.
6 Press the Menu button to exit the menu.
NOTE: Depending on your computer operating system, Kodak EasyShare software may update the camera
clock when you connect the camera. See EasyShare software Help for details.
Turning the camera on and off
While pressing the Mode dial lock, turn the Mode
dial from Off to Auto .
The Power ring glows green. The camera screen turns
on. The Ready light blinks green while the camera
performs a self-check, then turns off when the camera
is ready.
To turn off the camera, turn the Mode dial to Off.
Mode dial lock
Power ring
Getting started
www.kodak.com/go/support
4
Changing the camera screen in Auto mode
Checking camera status in capture mode
The icons that appear on the camera screen indicate the camera and picture settings.
If you want Then
To turn the camera
screen on or off
Press the Display/Info button:
Once to hide the icons.
Again to turn off the camera screen.
Again to turn on the camera screen
and icons.
The camera screen off
when you turn on the
camera in Auto mode
See Liveview (Auto), page 26.
Exposure compensation
Camera mode
Battery
Date stamp
Landscape/Close-up
Flash
Picture size
Pictures/time remaining
Image storage
ISO
White balance
Zoom:
digital
telephoto
wide
Album name
Exposure
metering
Burst
Compression
Aperture
Shutter speed
Flash compensation
AF mode
Focus zone
5 www.kodak.com/go/support
Getting started
Storing pictures on an optional SD or MMC card
Your camera has 32 MB of internal memory. You can purchase optional SD or MMC
cards for removable, reusable storage for your pictures and videos. We recommend
Kodak SD or MMC cards. See a dealer of Kodak products or
www.kodak.com/go/z730accessories.
CAUTION:
The card can only be inserted one way; forcing it may damage the
camera or card. Do not insert or remove a card when the green
ready light is blinking; doing so may damage your pictures, card,
or camera.
1 Turn off the camera, then open the card door.
2 Orient the card as shown on the camera body.
3 Push the card all the way into the slot.
4 Close the door.
To remove the card, turn off the camera. Push the
card in, then release it. When the card is partially
ejected, pull it out.
See page 61 for storage capacities.
NOTE: When using a card for the first time, we suggest you format it before taking pictures. (See page 29.)
We cannot guarantee compatibility with “high-speed” SD cards such as xSD or Ultra-2; these cards
are designed primarily for video or audio.
Using optional lenses
Expand your creativity with a selection of Kodak accessory lenses, offered in wide
angle, telephoto, and close-up. See a dealer of Kodak products or
www.kodak.com/go/z730accessories.
Notched
corner
www.kodak.com/go/support 6
2 Taking pictures and videos
Taking a picture
1 Turn the Mode dial to Auto . (See page 10 for other mode descriptions.)
The camera screen displays the mode name and description. To interrupt the
description, press any button. To redisplay the description, press the OK button.
2 Use the camera screen as a viewfinder, or press the
Display/Info button to turn off the camera screen
and use the viewfinder to frame your subject.
3 Press the Shutter button halfway to set the
exposure and focus.
4 When the ready light turns green, continue pressing
the Shutter button completely down to take the
picture.
If the ready light is steady or blinking red, release your
finger, recompose the scene, and return to Step 3.
When the ready light blinks green, the picture is being
saved; you can still take pictures.
NOTE: If you want the camera screen to be off when you turn on the camera, see Liveview (Auto), page 26.
Display/ buttonInfo
7 www.kodak.com/go/support
Taking pictures and videos
Using the diopter to sharpen the viewfinder
1 Look through the viewfinder.
2 Using your left thumb, turn the diopter dial until the
viewfinder image is sharp.
Using the auto-focus framing marks
When using the camera screen as a viewfinder, framing marks indicate where the
camera is focusing. For the best pictures, the camera attempts to focus on foreground
subjects, even if the subjects are not centered in the scene.
1 With the camera screen on, press the Shutter button halfway and hold.
When the framing marks turn green, focus is accomplished.
2 Press the Shutter button the rest of the way down to take the picture.
If the camera is not focusing on the desired subject (or if the framing marks disappear
and the Ready light blinks red), release your finger, recompose the scene, and return
to Step 1.
NOTE: Framing marks do not appear in Landscape or Video mode.
Diopter
dial
Center focus
Center wide focus
Side focus
Center and side focus
Left and right focus
Framing
marks
Taking pictures and videos
www.kodak.com/go/support
8
Taking a video
1 Turn the Mode dial to Video .
2 Use the viewfinder or camera screen to frame your subject.
3 Press the Shutter button completely down and release. To stop recording, press
and release the Shutter button again.
NOTE: If you prefer, press the Shutter button completely down and hold it for more than 2 seconds to begin
recording. To stop recording, release the Shutter button.
You can change optical zoom before (but not during) video recording.
Reviewing the picture or video just taken
After you take a picture or video, the camera screen displays a Quickview for
approximately 5 seconds. While the picture or video is displayed, you can:
Review: If you take no action, the picture/video is
saved.
Play (video): Press the OK button to play the
video. Press to adjust the volume.
Share: Press the Share button to tag a
picture/video for email or as a favorite, or to tag a
picture for print. (See page 40.)
Delete: Press the Delete button while the
picture/video and are displayed.
NOTE: Only the final picture of a burst series (see page 20) is
displayed during Quickview. If you select Delete, all pictures
in the burst series are deleted. To delete selectively, do so in
Review. (See page 33.)
OK
Delete
Share
9 www.kodak.com/go/support
Taking pictures and videos
Using optical zoom
Use optical zoom to get up to 4X closer to your subject. Optical zoom is effective
when the lens is no closer than 29.5 in. (75 cm) from the subject. You can change
optical zoom before (but not during) video recording.
1 Use the viewfinder or camera screen to frame your
subject.
2 Pull or push the Zoom button to zoom in (T) and
out (W).
If the camera screen is turned on, the zoom indicator
shows when you are in optical zoom range or in digital
zoom range.
3 Press the Shutter button halfway and hold to set
the exposure and focus, then press the rest of the
way down to take the picture. (When taking
videos, press and release the Shutter button.)
Using digital zoom
Use digital zoom in any still mode to get an additional 4X magnification beyond
optical zoom. Combined zoom settings are from 4.8X to 16X. You must turn on the
camera screen before activating digital zoom.
1 Press the Display/Info button to turn on the camera screen.
2 Pull the Zoom button to the optical zoom limit (4X). Release the button, then pull
it again.
The camera screen displays the zoomed image and the zoom indicator.
3 Press the Shutter button halfway and hold to set the exposure and focus, then
press the rest of the way down to take the picture.
NOTE: You cannot use digital zoom for video recording.
Zoom indicator
Digital zoom
Optical zoom
range
range
Taking pictures and videos
www.kodak.com/go/support
10
IMPORTANT:
You may notice a decrease in printed image quality when using digital
zoom. The blue slider on the zoom indicator pauses, then turns red when
the picture quality is approximately 1 MP. For an acceptable 4 x 6 in. (10 x
15 cm) print, ensure that the slider remains blue.
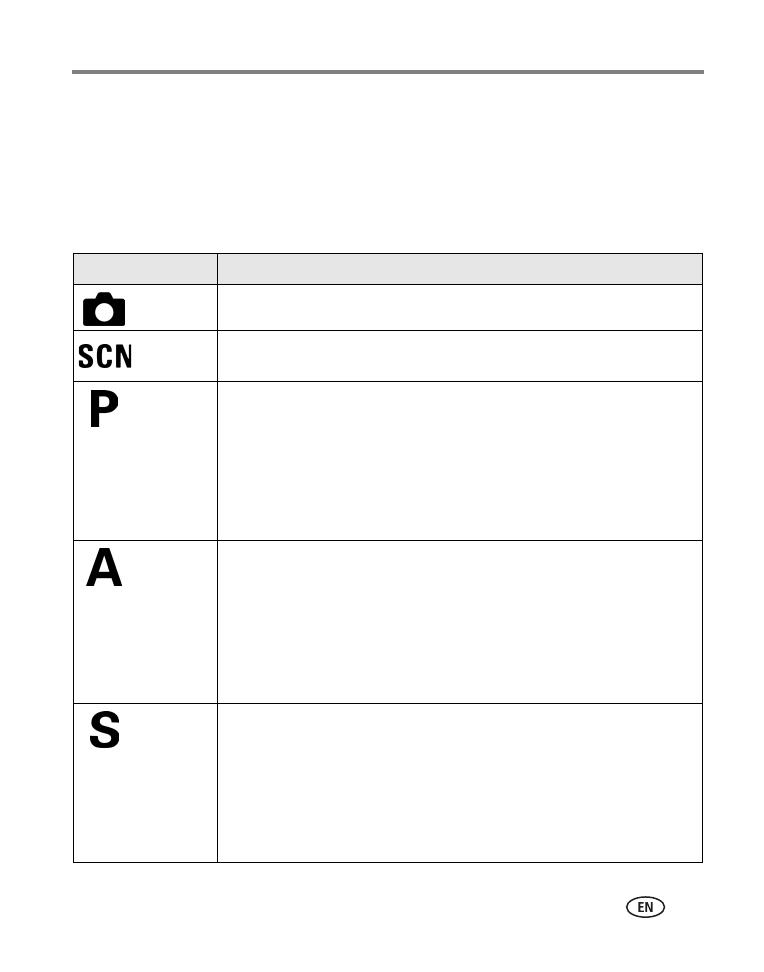
Camera modes
Use this mode For
Auto General picture-taking. Automatically sets exposure, focus, and flash.
Scene Point-and-shoot simplicity when taking pictures under 16 special
conditions. (See Scene modes, page 11.)
Program Controlling exposure compensation (how much light enters the camera)
and flash compensation. The camera automatically sets the shutter
speed and aperture (f-stop) based on the scene lighting. Program mode
offers the ease of auto shooting with full access to all menu options. Use
the jog dial to select settings. (See Using P, A, S, M, and C modes,
page 13 and Using the jog dial to change P, A, S, M, or C mode settings,
page 14.) Press the Menu button to change other settings.
Aperture
Priority
Controlling aperture, exposure compensation, flash compensation, and
ISO speed. Aperture priority mode is primarily used to control depth of
field (the range of sharpness).
NOTE: The aperture setting may be affected when using optical zoom.
Use the jog dial to select settings. (See Using P, A, S, M, and C modes,
page 13 and Using the jog dial to change P, A, S, M, or C mode settings,
page 14.) Press the Menu button to change other settings.
Shutter
Priority
Controlling the shutter speed, ISO speed, flash compensation, and
exposure compensation. The camera automatically sets the aperture for
proper exposure. Shutter priority mode is primarily used to prevent blur
when your subject is moving. Use the jog dial to select settings. (See
Using P, A, S, M, and C modes, page 13 and Using the jog dial to change
P, A, S, M, or C mode settings, page 14.) Press the Menu button to
change other settings. Use a tripod for slow shutter speeds.
11 www.kodak.com/go/support
Taking pictures and videos
Scene modes
1 Turn the Mode dial to Scene .
2 Press to display Scene mode descriptions.
3 Press the OK button to choose a Scene mode.
Manual Enjoying the highest level of creative control. You set the aperture,
shutter speed and ISO speed. Exposure compensation acts as an
exposure meter, recommending the proper combination of aperture and
shutter speed to produce an acceptable exposure. Use the jog dial to
select settings. (See Using P, A, S, M, and C modes, page 13 and Using
the jog dial to change P, A, S, M, or C mode settings, page 14.) Press the
Menu button to change other settings. To prevent camera shake, use a
tripod for slow shutter speeds.
Custom The “user-created” mode. For applying P, A, S, & M plus any Custom
settings (exposure compensation, flash compensation, ISO speed) which
are saved independently of other camera settings. Use the jog dial to
select settings. (See Using P, A, S, M, and C modes, page 13 and Using
the jog dial to change P, A, S, M, or C mode settings, page 14.) Press the
Menu button to choose a capture mode. (See Custom Exposure Mode,
page 21.) Press the Menu button to change other settings.
Favorites Viewing favorites. (To create and view favorites, see page 40- page 43.)
Video Capturing video with sound. (See page 8.)
Use this SCN mode For
Portrait Full-frame pictures of people and other subjects.
Sport Subjects that are in motion. Shutter speed is fast.
Use this mode For
Taking pictures and videos
www.kodak.com/go/support
12
Landscape Distant scenery. Flash does not fire. Auto-focus framing marks (page 7)
are not available in Landscape.
Close-up Subjects closer than 28 in. (70 cm).
Night
Portrait
Capturing subject and background at night. Place the camera on a flat,
steady surface or use a tripod. Due to slow shutter speeds, advise
people to stay still for a few seconds after flash fires.
Night
Landscape
Distant scenery at night. Place the camera on a flat, steady surface or
use a tripod.
Snow Bright snow scenes.
Beach Bright beach scenes.
Text Documents, from 3.9 - 23.7 in. (10-60 cm).
Fireworks Fireworks. Place the camera on a flat, steady surface or use a tripod.
Flower Close-ups of flowers in bright light.
Manner/
Museum
Quiet occasions. Flash and sound are disabled.
Self
Portrait
Close-ups of yourself, from 3.9 - 23.7 in. (10-60 cm).
Party People indoors.
Children Action pictures of children in bright light.
Backlight Subjects in shadow or “backlit” (when light is behind the subject).
Use this SCN mode For
13 www.kodak.com/go/support
Taking pictures and videos
Using P, A, S, M, and C modes
Aperture—also known as f-stop, controls the size of the lens opening. (This
determines the depth of field.) The highest and lowest aperture settings may be
affected by optical zoom.
Shutter speed—controls how long the shutter stays open. A shaking hand icon
warns of slow shutter speeds. (To prevent camera shake, use a tripod.)
Exposure Compensation—controls how much light enters the camera. Add or
subtract up to 2 EV in 0.3 EV steps. If the picture is too light, decrease the setting; if
it’s too dark, increase the setting.
Flash Compensation—controls the flash brightness (brighter: +0.5, +1.0; less
bright: -0.5, -1.0). You must be within flash range. Unavailable if flash setting is Off.
ISO—controls sensitivity of the camera sensor (80, 100, 200, 400, 800). Higher
settings are more sensitive to light, but may produce unwanted “noise” in a picture.
You can only use ISO 800 if you are in the 1.8 MP Picture Size setting. (See Picture
Size, page 22.)
Aperture (f) Depth of field
Larger f number
(smaller lens opening)
Makes both the foreground and the background sharp.
Good for landscapes and well-lit conditions.
Smaller f number
(larger lens opening)
Makes the foreground sharp and the background blurry.
Good for portraits and low-light conditions.
Aperture
Shutter speed
ISO
Exposure compensation
Flash compensation
  • Page 1 1
  • Page 2 2
  • Page 3 3
  • Page 4 4
  • Page 5 5
  • Page 6 6
  • Page 7 7
  • Page 8 8
  • Page 9 9
  • Page 10 10
  • Page 11 11
  • Page 12 12
  • Page 13 13
  • Page 14 14
  • Page 15 15
  • Page 16 16
  • Page 17 17
  • Page 18 18
  • Page 19 19
  • Page 20 20
  • Page 21 21
  • Page 22 22
  • Page 23 23
  • Page 24 24
  • Page 25 25
  • Page 26 26
  • Page 27 27
  • Page 28 28
  • Page 29 29
  • Page 30 30
  • Page 31 31
  • Page 32 32
  • Page 33 33
  • Page 34 34
  • Page 35 35
  • Page 36 36
  • Page 37 37
  • Page 38 38
  • Page 39 39
  • Page 40 40
  • Page 41 41
  • Page 42 42
  • Page 43 43
  • Page 44 44
  • Page 45 45
  • Page 46 46
  • Page 47 47
  • Page 48 48
  • Page 49 49
  • Page 50 50
  • Page 51 51
  • Page 52 52
  • Page 53 53
  • Page 54 54
  • Page 55 55
  • Page 56 56
  • Page 57 57
  • Page 58 58
  • Page 59 59
  • Page 60 60
  • Page 61 61
  • Page 62 62
  • Page 63 63
  • Page 64 64
  • Page 65 65
  • Page 66 66
  • Page 67 67
  • Page 68 68
  • Page 69 69
  • Page 70 70
  • Page 71 71
  • Page 72 72
  • Page 73 73
  • Page 74 74
  • Page 75 75
  • Page 76 76
  • Page 77 77
  • Page 78 78
  • Page 79 79

Kodak EasyShare Z730 User manual

Category
Film cameras
Type
User manual
This manual is also suitable for

Ask a question and I''ll find the answer in the document

Finding information in a document is now easier with AI