Page is loading ...

Tsunami Aerator Pump
Installation Instructions
SAVE THESE INSTRUCTIONS
Form Number 69391 Rev. A 10-03
3
®
DANGER
If Aerator is installed thru-hull, remove boat from water to service
this pump. Do not use this pump to remove gasoline or other
flammable liquids.
WARNING
Most of the aerator pump, plumbing and connections are below the
water level. Do not attempt to install, adjust, service or remove this
product while the boat is in the water. Failure to follow these instructions
could result in a large volume of water flooding and sinking your boat.
Any leak will allow water to enter the boat.
To prevent personal injury, always disconnect the power source when
installing or servicing any electrical product.
Use the fuse amperage rating specified for your model pump.
Refer to Specification and Accessories Charts to be sure you have
selected the proper components:
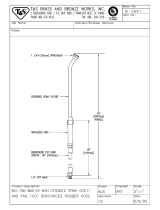
MOUNTING LOCATIONS
1. The aerator can be mounted directly through the transom, at least
2" (51mm) below the static water line. (Figure 1)
2. The aerator can also be remotely installed on a marine-plywood
mounting pad. This requires an Attwood Remote Bracket — see
Accessories Chart for size. (Figure 2)
IMPORTANT: To avoid airlock, do not allow dips or sharp bends in
outlet or inlet hoses.
DIRECT MOUNTING INSTRUCTIONS
See Accessories Chart for size / part number of Outlet Hose Connector.
1. With boat out of the water, select a suitable location at least 2"
(51mm) below the water line. Use a hole saw (See Specification
Chart for size — compare against aerator inlet) to drill a hole
through the transom. (Figure 1)
2. Apply polyurethane marine sealant (Boat-Life Lifeseal
®
or equivalent)
to the nut and to threaded side of the aerator flange.
3. Install the aerator inlet through the transom and assemble the nut.
Tighten the nut handtight. Use wrench to tighten 1/2 additional turn.
WARNING
DO NOT EXCEED these tightening specifications.
4. Install Attwood 90° Outlet Connector to the aerator outlet. Tighten
the fitting handtight, then 1/4 to 1/2 additional turn with wrench.
5. Use an Inlet Strainer to avoid clogging of the pump.
REMOTE MOUNTING INSTRUCTIONS
See Accessories Chart for sizes / part numbers of Thru-Hull, Bracket,
and Inlet Hose.
1. With boat out of water, install Thru-Hull Connector through the
transom. (Figure 2)
CAUTION: DO NOT drill through the bottom of the boat when installing
Remote Bracket.
2. Attach Remote Bracket to the mounting pad by drilling two 1/8"
(3mm)-diameter pilot holes and fastening with two #8 stainless
steel pan head screws. Position aerator on Bracket so pump outlet
is pointed straight up.
3. Complete outlet fitting and hose connection as described above.
4. Connect a length of reinforced, smooth bore Inlet Hose from the
Thru-Hull to the aerator Inlet Hose Connector. Use a hose clamp
at each end of the hose.
Figure 1
Inlet Strainer (optional)
Outlet
Connector
3/8" (10mm)Thread
1/8" (3mm) Min.
1 7/16" (37mm) Max.
Transom
Allow Clearance to
Access Hose Clamp
and Locking Tab
2" (51mm) Minimum
Figure 2
Remote Bracket
Inlet Hose
(NO DIPS IN HOSE)
Suitable Mounting Pad
Inlet Strainer
Outlet
Connector
Inlet Hose Connector
3/8" (10mm)
Thread
Thru-Hull
Connector
Transom
Allow Clearance to
Access Hose Clamp
and Locking Tab
2" (51mm)
Minimum
Specifications Chart
12-Volts DC
ABYC Specifications ISO Specifications
@13.6 VDC @12.0 VDC
(GPH = Gal. Per Hour) (LPH = Liters Per Hour)
0 ft. 3.3 ft 6.7 ft 0kPa 10kPa Max
Hole Head Head Head Head Head Head
Num. Series Size Fuse amps amps amps amps amps kPa@12v)
4640 500 1-1/8" 2.5A 500/1.8 440/1.8 265/1.8 1705/1.5 1420/1.5 10' 5"/30
4650 800 1-1/8" 4A 800/3.0 670/3.0 525/3.0 2900/2.6 2350/2.6 14'/35
4660 1200 1-3/8" 5A 1200/3.5 900/3.5 700/3.5 4320/3.4 3145/3.4 10' 5"/26
Accessories Chart
A. B. C. D. E. F. G. H.
3/4" O.D. Outlet Models
3/4"
Inlet 3/4" 3/4" O.D. Threaded S.S. Replacement
Part Hose Inlet Hose Thru Outlet Remote Inlet Spray Motor
Num. Series I.D. Connector Hull Connector Bracket Strainer Head Cartridge
4640 500 3/4" 3899 66547 3890, 90˚ 4122 4232 4125 4620
4650 800 3/4" 3899 66547 3890, 90˚ 4122 4232 4125 4622
1-3/8" O.D. Outlet Models
1-1/8" 1-3/8"
Inlet 1-1/8" O.D. Threaded S.S. Replacement
Part Hose Inlet Hose Thru Outlet Remote Inlet Spray Motor
Num. Series I.D. Connector Hull Connector Bracket Strainer Head Cartridge
4660 1200 1-1/8" 3902 66548 3902, 90° 4121 4234 4127 4624

©2003 Attwood Corporation
1016 N. Monroe Street, Lowell, MI 49331-0260 www.attwoodmarine.com
LIVEWELL CONNECTION INSTRUCTIONS
See Accessories Chart for sizes / part numbers of Outlet Hose and
Spray Head.
1. Connect outlet hose from the aerator outlet fitting to the Spray
Head. Use a hose clamp at each end of the hose. (Figure 3)
IMPORTANT: Route the hose as straight as possible with an upward
angle. Avoid dips or sharp bends that can create airlock and hinder
water flow.
2. An aerator pump can be connected to the bottom of a livewell to
recirculate water within the tank.
WIRING INSTRUCTIONS
The power source to the pump must be a 12-volt DC battery ONLY.
Protect circuit with fuse (see chart) and make all wire connections
above the highest possible water level, using marine grade wire
connectors only. Waterproof all connections with suitable materials.
(Figure 4)
CAUTION: Failure to make waterproof connections and fuse pump
properly will void the product warranty.
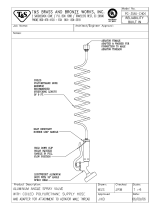
CARE AND MAINTENANCE
WARNING
If Aerator is installed thru-hull, BOAT MUST BE OUT OF THE
WATER to remove or replace aerator motor cartridge.
1. With boat out of water, occasionally remove Motor Cartridge and
check pump to be certain debris is not restricting or jamming the
impeller. Hold outlet with one hand and depress red locking tab
with other. Twist Motor Cartridge counter-clockwise and remove
from housing. (Figure 5)
2. Be sure “O ” ring is not damaged, nicked or worn. Lubricate the
“O ” ring area with vegetable oil to ease re-assembly.
3. To install new Motor Cartridge (H), see Accessories Chart for
part number. Motor must match housing color: 500 Series = RED,
800 = BLUE, 1200 = GRAY.
4. Align motor cartridge red tab with slot on aerator housing. Push in
and turn clockwise.
WARNING
To avoid leaking or sinking, the RED TAB MUST BE LOCKED AND
EXTENDING through aerator housing slot.
ATTWOOD AERATOR PUMPS LIMITED WARRANTY
This Attwood Aerator Pump carries a three (3) year warranty. See
product catalog or
www.attwoodmarine.com for details.
Aerator
Spray Head
Smooth-Bore
Reinforced Hose
Intake
Figure 3
(neg) (pos)
2-Terminal
On/Off Switch
Brown Wire
Black Wire
Fuse Holder
12 Volt DC
(Power Source)
72" (183cm) Max. Length
From (+) Terminal to Fuse
Figure 4
Motor Cartridge
"O" Ring
Unlock Lock
Red Tab
Red Tab
Must Be Extending Thru Slot
Figure 5
/