DeWalt DCD791B User manual

Category
Cordless combi drills
Type
User manual

This manual is also suitable for

If you have questions or comments, contact us.
Pour toute question ou tout commentaire, nous contacter.
Si tiene dudas o comentarios, contáctenos.
1-800-4-DeWALT
Instruction Manual
Guide D’utilisation
Manual de instrucciones
DCD791
20V Max* Brushless Cordless Compact 1/2" (13 mm) Drill/
Driver
Perceuse/visseuse, sans fil et sans balai, compacte de 13mm
(1/2po.), 20V max*
Taladro/Percutor compacto inalámbrico sin escobillas de 13 mm
(1/2") 20 V Màx
DCD796
20V Max* Brushless Cordless Compact 1/2" (13 mm) Drill/Driver/
Hammerdrill
Perceuse/visseuse/perceuse à percussion, sans fil et sans balai,
compacte de 13mm (1/2po.), 20V max**
Taladro/Percutor/Martillo perforador compacto inalámbrico sin
escobillas de 13 mm (1/2") 20 V Màx*
final page size: 8.5 x 5.5 in
ENGLISH
English (original instructions) 1
Français (traduction de la notice d’instructions originale) 13
Español (traducido de las instrucciones originales) 27
ENGLISH
1
English (original instructions)
Definitions: Safety Alert Symbols and Words
This instruction manual uses the following safety alert symbols and words to alert you to hazardous situations and your risk
of personal injury or property damage.
DANGER: Indicates an imminently hazardous situation which, if not avoided, will result in death or seriousinjury.
WARNING: Indicates a potentially hazardous situation which, if not avoided, could result in death or seriousinjury.
CAUTION: Indicates a potentially hazardous situation which, if not avoided, may result in minor or moderateinjury.
(Used without word) Indicates a safety related message.
NOTICE: Indicates a practice not related to personal injury which, if not avoided, may result in propertydamage.
WARNING! Read all safety warnings and all
instructions. Failure to follow the warnings and
instructions may result in electric shock, fire and/or
seriousinjury.
WARNING: To reduce the risk of injury, read the
instructionmanual.
If you have any questions or comments about this or
any
DeWALT
tool, call us toll free at:
1-800-4-
DeWALT
(1-800-433-9258).
1
Variable speed trigger switch
2
Forward/reverse control button
3
Torque adjustment collar
4
Gear shifter
5
Worklight
6
Keyless chuck
7
Belt hook (Optional accessory)
8
Mounting screw
9
Bit clip (Optional accessory)
10
Battery release button
11
Battery pack
12
Worklight switch
Fig. A
6 3 4
2
1
5
12
7
8
9
11
10
8
ENGLISH
2
GENERAL POWER TOOL SAFETY WARNINGS
WARNING! Read all safety warnings and all
instructions. Failure to follow the warnings and
instructions may result in electric shock, fire and/or
seriousinjury.
SAVE ALL WARNINGS AND
INSTRUCTIONS FOR FUTURE
REFERENCE
The term “power tool” in the warnings refers to your mains-
operated (corded) power tool or battery-operated (cordless)
powertool.
1) Work Area Safety
a ) Keep work area clean and well lit. Cluttered or dark
areas inviteaccidents.
b ) Do not operate power tools in explosive
atmospheres, such as in the presence of
flammable liquids, gases or dust. Power tools
create sparks which may ignite the dust orfumes.
c ) Keep children and bystanders away while
operating a power tool. Distractions can cause you
to losecontrol.
2) Electrical Safety
a ) Power tool plugs must match the outlet. Never
modify the plug in any way. Do not use any
adapter plugs with earthed (grounded) power
tools. Unmodified plugs and matching outlets will
reduce risk of electricshock.
b ) Avoid body contact with earthed or grounded
surfaces such as pipes, radiators, ranges and
refrigerators. There is an increased risk of electric
shock if your body is earthed orgrounded.
c ) Do not expose power tools to rain or wet
conditions. Water entering a power tool will increase
the risk of electricshock.
d ) Do not abuse the cord. Never use the cord for
carrying, pulling or unplugging the power tool.
Keep cord away from heat, oil, sharp edges or
moving parts. Damaged or entangled cords increase
the risk of electricshock.
e ) When operating a power tool outdoors, use an
extension cord suitable for outdoor use. Use of
a cord suitable for outdoor use reduces the risk of
electricshock.
f ) If operating a power tool in a damp location
is unavoidable, use a ground fault circuit
interrupter (GFCI) protected supply. Use of a GFCI
reduces the risk of electricshock.
3) Personal Safety
a ) Stay alert, watch what you are doing and use
common sense when operating a power tool. Do
not use a power tool while you are tired or under
the influence of drugs, alcohol or medication. A
moment of inattention while operating power tools
may result in serious personalinjury.
b ) Use personal protective equipment. Always wear
eye protection. Protective equipment such as dust
mask, non-skid safety shoes, hard hat, or hearing
protection used for appropriate conditions will reduce
personalinjuries.
c ) Prevent unintentional starting. Ensure the
switch is in the off position before connecting to
power source and/or battery pack, picking up or
carrying the tool. Carrying power tools with your
finger on the switch or energizing power tools that
have the switch on invitesaccidents.
d ) Remove any adjusting key or wrench before
turning the power tool on. A wrench or a key left
attached to a rotating part of the power tool may
result in personalinjury.
e ) Do not overreach. Keep proper footing and
balance at all times. This enables better control of
the power tool in unexpectedsituations.
f ) Dress properly. Do not wear loose clothing or
jewelry. Keep your hair, clothing and gloves
away from moving parts. Loose clothes, jewelry or
long hair can be caught in movingparts.
g ) If devices are provided for the connection of dust
extraction and collection facilities, ensure these
are connected and properly used. Use of dust
collection can reduce dust-relatedhazards.
4) Power Tool Use and Care
a ) Do not force the power tool. Use the correct
power tool for your application. The correct power
tool will do the job better and safer at the rate for
which it wasdesigned.
b ) Do not use the power tool if the switch does not
turn it on and off. Any power tool that cannot be
controlled with the switch is dangerous and must
berepaired.
c ) Disconnect the plug from the power source and/
or the battery pack from the power tool before
making any adjustments, changing accessories,
or storing power tools. Such preventive safety
measures reduce the risk of starting the power
toolaccidentally.
d ) Store idle power tools out of the reach of children
and do not allow persons unfamiliar with the
power tool or these instructions to operate the
power tool. Power tools are dangerous in the hands
of untrainedusers.
e ) Maintain power tools. Check for misalignment or
binding of moving parts, breakage of parts and
any other condition that may affect the power
tool’s operation. If damaged, have the power
tool repaired before use. Many accidents are
caused by poorly maintained powertools.
f ) Keep cutting tools sharp and clean. Properly
maintained cutting tools with sharp cutting edges are
less likely to bind and are easier tocontrol.
g ) Use the power tool, accessories and tool bits, etc.
in accordance with these instructions, taking
ENGLISH
3
into account the working conditions and the
work to be performed. Use of the power tool for
operations different from those intended could result
in a hazardoussituation.
5) Battery Tool Use and Care
a ) Recharge only with the charger specified by the
manufacturer. A charger that is suitable for one type
of battery pack may create a risk of fire when used
with another batterypack.
b ) Use power tools only with specifically designated
battery packs. Use of any other battery packs may
create a risk of injury andfire.
c ) When battery pack is not in use, keep it away
from other metal objects, like paper clips, coins,
keys, nails, screws, or other small metal objects,
that can make a connection from one terminal to
another. Shorting the battery terminals together may
cause burns or afire.
d ) Under abusive conditions, liquid may be ejected
from the battery; avoid contact. If contact
accidentally occurs, flush with water. If liquid
contacts eyes, additionally seek medical help.
Liquid ejected from the battery may cause irritation
orburns.
6) Service
a ) Have your power tool serviced by a qualified
repair person using only identical replacement
parts. This will ensure that the safety of the power
tool ismaintained.
Additional Safety Rules for Drill/Driver/
Hammerdrill
Wear ear protectors when impact drilling. Exposure to
noise can cause hearingloss.
Use auxiliary handle(s), if supplied with the tool. Loss
of control can cause personalinjury.
Hold power tool by insulated gripping surfaces,
when performing an operation where the cutting
accessory may contact hidden wiring. Cutting
accessory contacting a “live” wire may make exposed
metal parts of the power tool “live” and could give the
operator an electricshock.
Use clamps or other practical way to secure and
support the workpiece to a stable platform. Holding
the work by hand or against your body is unstable and
may lead to loss ofcontrol.
Wear safety goggles or other eye protection.
Hammering and drilling operations cause chips to fly.
Flying particles can cause permanent eyedamage.
Keep a firm grip on the tool at all times. Do not
attempt to operate this tool without holding it with both
hands. Operating this tool with one hand will result in
loss of control. Breaking through or encountering hard
materials such as re-bar may be hazardous aswell.
Accessories and tool may get hot during operation.
Wear gloves when handling them if performing heat
producing applications such as hammerdrilling and
drillingmetals.
Do not operate this tool for long periods of time.
Vibration caused by hammer action may be harmful to
your hands and arms. Use gloves to provide extra cushion
and limit exposure by taking frequent restperiods.
Air vents often cover moving parts and should be
avoided. Loose clothes, jewelry or long hair can be
caught in movingparts.
Additional Safety Information
WARNING: ALWAYS use safety glasses. Everyday
eyeglasses are NOT safety glasses. Also use face or
dust mask if cutting operation is dusty. ALWAYS WEAR
CERTIFIED SAFETYEQUIPMENT:
ANSI Z87.1 eye protection (CAN/CSA Z94.3),
ANSI S12.6 (S3.19) hearing protection,
NIOSH/OSHA/MSHA respiratoryprotection.
WARNING: Some dust created by power sanding,
sawing, grinding, drilling, and other construction
activities contains chemicals known to the State
of California to cause cancer, birth defects or
other reproductive harm. Some examples of these
chemicalsare:
lead from lead-based paints,
crystalline silica from bricks and cement and other
masonry products, and
arsenic and chromium from chemically-
treatedlumber.
Your risk from these exposures varies, depending on how
often you do this type of work. To reduce your exposure to
these chemicals: work in a well ventilated area, and work with
approved safety equipment, such as those dust masks that are
specially designed to filter out microscopicparticles.
Avoid prolonged contact with dust from power
sanding, sawing, grinding, drilling, and other
construction activities. Wear protective clothing and
wash exposed areas with soap and water. Allowing
dust to get into your mouth, eyes, or lay on the skin may
promote absorption of harmfulchemicals.
WARNING: Use of this tool can generate and/
or disperse dust, which may cause serious and
permanent respiratory or other injury. Always use
NIOSH/OSHA approved respiratory protection
appropriate for the dust exposure. Direct particles
away from face andbody.
WARNING: Always wear proper personal hearing
protection that conforms to ANSI S12.6 (S3.19)
during use. Under some conditions and duration
of use, noise from this product may contribute to
hearingloss.
CAUTION: When not in use, place tool on its side
on a stable surface where it will not cause a
tripping or falling hazard. Some tools with large
battery packs will stand upright on the battery pack
but may be easily knockedover.
ENGLISH
4
The label on your tool may include the following symbols. The
symbols and their definitions are asfollows:
V ......................... volts
Hz .......................hertz
min ..................... minutes
or DC ......direct current
...................... Class I Construction
(grounded)
…/min ..............per minute
BPM .................... beats per minute
IPM ..................... impacts per minute
RPM .................... revolutions per
minute
sfpm ................... surface feet per
minute
SPM .................... strokes per minute
A ......................... amperes
W ........................watts
or AC ...........alternating current
or AC/DC .... alternating or
direct current
...................... Class II
Construction
(double insulated)
n
o
.......................no load speed
n .........................rated speed
......................earthing terminal
.....................safety alert symbol
.....................visible radiation
..................... wear respiratory
protection
..................... wear eye
protection
..................... wear hearing
protection
..................... read all
documentation
BATTERIES AND CHARGERS
The battery pack is not fully charged out of the carton.
Before using the battery pack and charger, read the
safety instructions below and then follow charging
proceduresoutlined. When ordering replacement battery
packs, be sure to include the catalog number andvoltage.
Your tool uses a
DeWALT
charger. Be sure to read all safety
instructions before using your charger. Consult the chart
at the end of this manual for compatibility of chargers and
batterypacks.
READ ALL INSTRUCTIONS
Important Safety Instructions for All
Battery Packs
WARNING: Read all safety warnings and all
instructions for the battery pack, charger and
power tool. Failure to follow the warnings and
instructions may result in electric shock, fire and/
or seriousinjury.
Do not charge or use the battery pack in explosive
atmospheres, such as in the presence of flammable
liquids, gases or dust. Inserting or removing the battery
pack from the charger may ignite the dust orfumes.
NEVER force the battery pack into the charger. DO
NOT modify the battery pack in any way to fit into
a non-compatible charger as battery pack may
rupture causing serious personal injury. Consult
the chart at the end of this manual for compatibility of
batteries andchargers.
Charge the battery packs only in designated
DeWALT
chargers.
DO NOT splash or immerse in water or otherliquids.
Do not store or use the tool and battery pack in
locations where the temperature may reach or
exceed 104°F (40°C) (such as outside sheds or metal
buildings in summer). For best life store battery packs in
a cool, drylocation.
NOTE: Do not store the battery packs in a tool with
the trigger switch locked on. Never tape the trigger
switch in the ONposition.
Do not incinerate the battery pack even if it is
severely damaged or is completely worn out. The
battery pack can explode in a fire. Toxic fumes and
materials are created when lithium ion battery packs
areburned.
If battery contents come into contact with the skin,
immediately wash area with mild soap and water. If
battery liquid gets into the eye, rinse water over the open
eye for 15 minutes or until irritation ceases. If medical
attention is needed, the battery electrolyte is composed of
a mixture of liquid organic carbonates and lithiumsalts.
Contents of opened battery cells may cause
respiratory irritation. Provide fresh air. If symptoms
persist, seek medicalattention.
WARNING: Burn hazard. Battery liquid may be
flammable if exposed to spark orflame.
WARNING: Fire hazard. Never attempt to open the
battery pack for any reason. If the battery pack case
is cracked or damaged, do not insert into the charger.
Do not crush, drop or damage the battery pack. Do
not use a battery pack or charger that has received a
sharp blow, been dropped, run over or damaged in
any way (e.g., pierced with a nail, hit with a hammer,
stepped on). Damaged battery packs should be
returned to the service center forrecycling.
Transportation
WARNING: Fire hazard. Do not store or carry the
battery pack so that metal objects can contact
exposed battery terminals. For example, do
not place the battery pack in aprons, pockets, tool
boxes, product kit boxes, drawers, etc., with loose
nails, screws, keys, etc. Transporting batteries
can possibly cause fires if the battery terminals
inadvertently come in contact with conductive
materials such as keys, coins, hand tools and the
like. The US Department of Transportation Hazardous
Material Regulations (HMR) actually prohibit
transporting batteries in commerce or on airplanes in
carry-on baggage UNLESS they are properly protected
from short circuits. So when transporting individual
battery packs, make sure that the battery terminals
are protected and well insulated from materials that
could contact them and cause a shortcircuit.
Shipping the
DeWALT
FLEXVOLT™ Battery
The D
e
WALT FLEXVOLT™ battery has two modes: Use and
Shipping.
Use Mode: When the FLEXVOLT™ battery stands alone or is
in a D
e
WALT 20V Max* product, it will operate as a 20V Max*
battery. When the FLEXVOLT™ battery is in a 60V Max* or a
120V Max* (two 60V Max* batteries) product, it will operate
as a 60V Max* battery.
ENGLISH
5
Shipping Mode: When the
cap is attached to the
FLEXVOLT™ battery, the
battery is in Shipping Mode.
Strings of cells are
electrically disconnected within the pack resulting in three
batteries with a lower Watt hour (Wh) rating as compared to
one battery with a higher Watt hour rating. This increased
quantity of three batteries with the lower Watt hour rating
can exempt the pack from certain shipping regulations that
are imposed upon the higher Watt hourbatteries.
The battery label indicates two Watt hour ratings (see
example). Depending on how the battery is shipped, the
appropriate Watt hour rating must be used to determine
the applicable shipping requirements. If utilizing the
shipping cap, the pack will be considered 3 batteries at
the Watt hour rating indicated for “Shipping”. If shipping
without the cap or in a tool, the pack will be considered one
battery at the Watt hour rating indicated next to “Use”.
USE: 120 Wh Shipping: 3 x 40 Wh
Example of Use and Shipping Label Marking
For example, Shipping Wh rating might indicate 3 x 40 Wh,
meaning 3 batteries of 40 Watt hours each. The Use Wh
rating might indicate 120 Wh (1 battery implied).
Fuel Gauge Battery Packs (Fig. B)
Some
DeWALT
battery packs include a fuel gauge which
consists of three green LED lights that indicate the level of
charge remaining in the batterypack.
The fuel gauge is an indication of approximate levels of
charge remaining in the battery pack according to the
followingindicators:
75–100% charged
51–74% charged
< 50% charged
Pack needs to be charged
To actuate the fuel gauge, press and hold the fuel gauge
button. A combination of the three green LED lights will
illuminate designating the level of charge left. When the
level of charge in the battery is below the usable limit, the
fuel gauge will not illuminate and the battery will need to
berecharged.
Fig. B
NOTE: The fuel gauge is only an indication of the charge left
on the battery pack. It does not indicate tool functionality
and is subject to variation based on product components,
temperature and end-userapplication.
For more information regarding fuel gauge battery packs,
please contact call 1-800-4-
DeWALT
(1-800-433-9258) or
visit our website www.dewalt.com.
The RBRC® Seal
The RBRC® (Rechargeable Battery
Recycling Corporation) Seal on the nickel
cadmium, nickel metal hydride or lithium-
ion batteries (or battery packs) indicates
that the costs to recycle these batteries
(or battery packs) at the end of their useful life have already
been paid by
DeWALT
. In some areas, it is illegal to place
spent nickel cadmium, nickel metal hydride or lithium-ion
batteries in the trash or municipal solid waste stream and
the Call2Recycle® program provides an environmentally
consciousalternative.
Call 2 Recycle, Inc., in cooperation with
DeWALT
and other
battery users, has established the program in the United
States and Canada to facilitate the collection of spent nickel
cadmium, nickel metal hydride or lithium-ion batteries. Help
protect our environment and conserve natural resources by
returning the spent nickel cadmium, nickel metal hydride
or lithium-ion batteries to an authorized
DeWALT
service
center or to your local retailer for recycling. You may also
contact your local recycling center for information on
where to drop off the spent battery. RBRC® is a registered
trademark of Call 2 Recycle,Inc.
Important Safety Instructions for All
Battery Chargers
WARNING: Read all safety warnings and all
instructions for the battery pack, charger and
power tool. Failure to follow the warnings and
instructions may result in electric shock, fire and/
or seriousinjury.
DO NOT attempt to charge the battery pack with
any chargers other than the ones in this manual.
The charger and battery pack are specifically designed to
worktogether.
These chargers are not intended for any uses other
than charging
DeWALT
rechargeable batteries.
Any other uses may result in risk of fire, electric shock
orelectrocution.
Do not expose the charger to rain orsnow.
Pull by the plug rather than the cord when
disconnecting the charger. This will reduce the risk of
damage to the electric plug andcord.
Make sure that the cord is located so that it will not
be stepped on, tripped over or otherwise subjected
to damage orstress.
Do not use an extension cord unless it is absolutely
necessary. Use of improper extension cord could result in
risk of fire, electric shock orelectrocution.
When operating a charger outdoors, always provide
a dry location and use an extension cord suitable
for outdoor use. Use of a cord suitable for outdoor use
reduces the risk of electricshock.
An extension cord must have adequate wire size
(AWG or American Wire Gauge) for safety. The smaller
the gauge number of the wire, the greater the capacity
of the cable, that is, 16 gauge has more capacity than 18
ENGLISH
6
gauge. An undersized cord will cause a drop in line voltage
resulting in loss of power and overheating. When using
more than one extension to make up the total length,
be sure each individual extension contains at least the
minimum wire size. The following table shows the correct
size to use depending on cord length and nameplate
ampere rating. If in doubt, use the next heavier gauge. The
lower the gauge number, the heavier thecord.
Minimum Gauge for Cord Sets
Volts
Total Length of Cord in Feet
(meters)
120 V 25 (7.6) 50 (15.2) 100 (30.5) 150 (45.7)
240 V 50 (15.2) 100 (30.5) 200 (61.0) 300 (91.4)
Ampere Rating
American Wire Gauge
More
Than
Not
More
Than
0 6 18 16 16 14
6 10 18 16 14 12
10 12 16 16 14 12
12 16 14 12 Not Recommended
Do not place any object on top of the charger or
place the charger on a soft surface that might block
the ventilation slots and result in excessive internal
heat. Place the charger in a position away from any heat
source. The charger is ventilated through slots in the top
and the bottom of thehousing.
Do not operate the charger with a damaged cord
orplug.
Do not operate the charger if it has received a sharp
blow, been dropped or otherwise damaged in any
way. Take it to an authorized servicecenter.
Do not disassemble the charger; take it to an
authorized service center when service or repair
is required. Incorrect reassembly may result in a risk of
electric shock, electrocution orfire.
Disconnect the charger from the outlet before
attempting any cleaning. This will reduce the risk of
electric shock. Removing the battery pack will not reduce
thisrisk.
NEVER attempt to connect 2 chargerstogether.
The charger is designed to operate on standard
120V household electrical power. Do not attempt to
use it on any other voltage. This does not apply to the
vehicularcharger.
WARNING: Shock hazard. Do not allow any liquid to
get inside the charger. Electric shock mayresult.
WARNING: Burn hazard. Do not submerge the
battery pack in any liquid or allow any liquid to
enter the battery pack. Never attempt to open the
battery pack for any reason. If the plastic housing of
the battery pack breaks or cracks, return to a service
center forrecycling.
CAUTION: Burn hazard. To reduce the risk of injury,
charge only
DeWALT
rechargeable battery packs.
Other types of batteries may overheat and burst
resulting in personal injury and propertydamage.
NOTICE: Under certain conditions, with the charger
plugged into the power supply, the charger can
be shorted by foreign material. Foreign materials
of a conductive nature, such as, but not limited to,
grinding dust, metal chips, steel wool, aluminum
foil or any buildup of metallic particles should be
kept away from the charger cavities. Always unplug
the charger from the power supply when there is no
battery pack in the cavity. Unplug the charger before
attempting toclean.
Wireless Certifications and Safety
Information
This device is CAN ICES-3(B)/NMB-3(B)compliant.
This device complies with Part 15 of the FCC rules and
Industry Canada License-exempt RSS standard(s).
Operation is subject to the following two conditions:
ʵ This device may not cause harmful interference, and
ʵ This device must accept any interference
received, including interference that may cause
undesiredoperation.
This equipment has been tested and found to comply
with the limits for a Class B digital device, pursuant to Part
15 of the FCC Rules. These limits are designed to provide
reasonable protection against harmful interference in a
residential installation. This equipment generates, uses and
can radiate radio frequency energy and, if not installed and
used in accordance with the instructions, may cause harmful
interference to radio communications. However, there is no
guarantee that interference will not occur in a particular
installation. If this equipment does cause harmful interference
to radio or television reception, which can be determined by
turning the equipment off and on, the user is encouraged
to try to correct the interference by one or more of the
followingmeasures:
ʵ Reorient or relocate the receivingantenna.
ʵ Increase the separation between the equipment
andadaptor.
ʵ Connect the equipment into an outlet on a circuit
different from that to which the adaptor isconnected.
ʵ Consult the dealer or an experienced radio/TV
technician forhelp.
Changes or modifications to this equipment not expressly
approved by the manufacturer could void the user’s
authority to operate the device. This Class B digital
apparatus complies with Canadian ICES-003.
Under Industry Canada regulations, this radio transmitter
may only operate using an antenna of a type and
maximum (or lesser) gain approved for the transmitter by
Industry Canada. To reduce potential radio interference
to other users, the antenna type and its gain should
be so chosen that the equivalent isotropically radiated
power (e.i.r.p.) is not more than that necessary for
successfulcommunication.
To comply with FCC and Industry Canada RF radiation
exposure limits for general population, the antenna used
for this device must not be co-located or operating in
conjunction with any other antenna ortransmitter.
ENGLISH
7
For Bluetooth® Products
When traveling on airlines, be sure to comply with the
airline restrictions on usage of personal electronic devices
and Bluetooth®.
The out of range alert feature has been designed to act
as an aid to warn against products getting misplaced or
stolen. It is not a securitysystem.
The connectivity range is up to 100 feet (30.5 meters)
depending on environment andlocation.
The shortwave radio frequency signals of a Bluetooth®
device may impair the operation of other electronic and
medical devices (such as pacemakers or hearing aids).
NOTE: The Bluetooth® word mark and logos are registered
trademarks owned by the Bluetooth®, SIG, Inc. and any use of
such marks by
DeWALT
is under license. Other trademarks and
trade names are those of their respectiveowners.
This product complies with these standards when operated
with a 6 foot (1.8 meters) or shorter extensioncord.
Charging a Battery (Fig. C)
1. Plug the charger into an appropriate outlet before
inserting batterypack.
11
Fig. C
10
2. Insert the battery pack
11
into the charger, making sure
the battery pack is fully seated in the charger. The red
(charging) light will blink continuously indicating that
the charging process hasstarted.
3. The completion of charge will be indicated by the red
light remaining ON continuously. The battery pack is
fully charged and may be used at this time or left in the
charger. To remove the battery pack from the charger,
push the battery release button
10
on the batterypack.
NOTE: To ensure maximum performance and life of lithium-
ion battery packs, charge the battery pack fully before
firstuse.
Charger Operation
Refer to the indicators below for the charge status of the
batterypack.
DCB107, DCB112, DCB113, DCB115, DCB118, DCB132
Charging
Fully Charged
Hot/Cold Pack Delay*
* DCB107, DCB112, DCB113, DCB115, DCB118, DCB132:
The red light will continue to blink, but a yellow indicator
light will be illuminated during this operation. Once the
battery pack has reached an appropriate temperature, the
yellow light will turn off and the charger will resume the
chargingprocedure.
The compatible charger(s) will not charge a faulty battery
pack. The charger will indicate faulty battery pack by
refusing to light or by displaying a problem pack or charger
blinkpattern.
NOTE: This could also mean a problem with acharger.
If the charger indicates a problem, take the charger and
battery pack to be tested at an authorized servicecenter.
Hot/Cold Pack Delay
When the charger detects a battery pack that is too hot
or too cold, it automatically starts a Hot/Cold Pack Delay,
suspending charging until the battery pack has reached an
appropriate temperature. The charger then automatically
switches to the pack charging mode. This feature ensures
maximum battery packlife.
A cold battery pack will charge at a slower rate than a warm
battery pack. The battery pack will charge at that slower rate
throughout the entire charging cycle and will not return to
maximum charge rate even if the battery packwarms.
The DCB118 charger is equipped with an internal fan
designed to cool the battery pack. The fan will turn on
automatically when the battery pack needs to becooled.
Never operate the charger if the fan does not operate
properly or if ventilation slots are blocked. Do not permit
foreign objects to enter the interior of thecharger.
Electronic Protection System
Li-Ion tools are designed with an Electronic Protection
System that will protect the battery pack against
overloading, overheating or deepdischarge.
The tool will automatically turn off if the Electronic
Protection System engages. If this occurs, place the lithium-
ion battery pack on the charger until it is fullycharged.
Wall Mounting
DCB107, DCB112, DCB113, DCB115, DCB118, DCB132
These chargers are designed to be wall mountable or to
sit upright on a table or work surface. If wall mounting,
locate the charger within reach of an electrical outlet,
and away from a corner or other obstructions which may
impede air flow. Use the back of the charger as a template
for the location of the mounting screws on the wall. Mount
the charger securely using drywall screws (purchased
separately) at least 1" (25.4 mm) long, with a screw head
diameter of 0.28–0.35" (7–9mm), screwed into wood to an
optimal depth leaving approximately 7/32" (5.5 mm) of the
screw exposed. Align the slots on the back of the charger
with the exposed screws and fully engage them in theslots.
Charger Cleaning Instructions
WARNING: Shock hazard. Disconnect the charger
from the AC outlet before cleaning. Dirt and grease
may be removed from the exterior of the charger using
ENGLISH
8
a cloth or soft non-metallic brush. Do not use water or
any cleaningsolutions.
Important Charging Notes
1. Longest life and best performance can be obtained if
the battery pack is charged when the air temperature is
between 65°F and 75°F (18° 24°C). DO NOT charge
the battery pack in an air temperature below +40°F
(+4.5°C), or above +104°F (+40°C). This is important
and will prevent serious damage to the batterypack.
2. The charger and battery pack may become warm to the
touch while charging. This is a normal condition, and
does not indicate a problem. To facilitate the cooling of
the battery pack after use, avoid placing the charger or
battery pack in a warm environment such as in a metal
shed or an uninsulatedtrailer.
3. If the battery pack does not charge properly:
a. Check operation of receptacle by plugging in a lamp
or other appliance;
b. Check to see if receptacle is connected to a light
switch which turns power off when you turn out the
lights;
c. Move the charger and battery pack to a location
where the surrounding air temperature is
approximately 65°F – 75°F (18° – 24°C);
d. If charging problems persist, take the tool, battery
pack and charger to your local servicecenter.
4. The battery pack should be recharged when it fails to
produce sufficient power on jobs which were easily
done previously. DO NOT CONTINUE to use under these
conditions. Follow the charging procedure. You may
also charge a partially used pack whenever you desire
with no adverse effect on the batterypack.
5. Foreign materials of a conductive nature such as, but
not limited to, grinding dust, metal chips, steel wool,
aluminum foil, or any buildup of metallic particles
should be kept away from charger cavities. Always
unplug the charger from the power supply when there
is no battery pack in the cavity. Unplug the charger
before attempting toclean.
6. Do not freeze or immerse the charger in water or any
otherliquid.
Storage Recommendations
1. The best storage place is one that is cool and dry, away
from direct sunlight and excess heat orcold.
2. For long storage, it is recommended to store a fully
charged battery pack in a cool dry place out of the
charger for optimalresults.
NOTE: Battery packs should not be stored completely
depleted of charge. The battery pack will need to be
recharged beforeuse.
SAVE THESE INSTRUCTIONS FOR
FUTURE USE
COMPONENTS (FIG. A)
WARNING: Never modify the power tool or any part
of it. Damage or personal injury couldresult.
Refer to Figure A at the beginning of this manual for a
complete list ofcomponents.
Intended Use
These drills/drivers/hammerdrills are designed
for professional drilling, percussion drilling and
screwdrivingapplications.
DO NOT use under wet conditions or in presence of
flammable liquids orgases.
These drills/drivers/hammerdrills are professional power
tools. DO NOT let children come into contact with the tool.
Supervision is required when inexperienced operators use
thistool.
Variable Speed Trigger Switch (Fig. A)
To turn the tool on, squeeze the trigger switch
1
. To turn
the tool off, release the trigger switch. Your tool is equipped
with a brake. The chuck will stop as soon as the trigger
switch is fullyreleased.
NOTE: Continuous use in variable speed range is not
recommended. It may damage the switch and should
beavoided.
Forward/Reverse Control Button (Fig. A)
A forward/reverse control button
2
determines the
direction of the tool and also serves as a lock-offbutton.
To select forward rotation, release the trigger switch and
depress the forward/reverse control button on the right side
of thetool.
To select reverse, depress the forward/reverse control
button on the left side of thetool.
The center position of the control button locks the tool in
the off position. When changing the position of the control
button, be sure the trigger isreleased.
NOTE: The first time the tool is run after changing the
direction of rotation, you may hear a click on start up. This is
normal and does not indicate aproblem.
Torque Adjustment Collar (Fig. A)
Your tool has an adjustable torque screwdriver mechanism
for driving and removing a wide array of fastener shapes
and sizes and in some models, a hammer mechanism for
drilling into masonry. Circling the collar
3
are numbers, a
drill bit symbol, and in some models, a hammer symbol.
These numbers are used to set the clutch to deliver a torque
range. The higher the number on the collar, the higher the
torque and the larger the fastener which can be driven. To
select any of the numbers, rotate until the desired number
aligns with thearrow.
NOTE: The torque adjustment collar is only engaged during
screwdriving mode and not in drill and hammerdrillmodes.
Dual Range Gearing (Fig. A)
The dual range feature of your drill/driver allows you to shift
gears for greaterversatility.
ENGLISH
9
1. To select speed 1 (high torque setting), turn the tool off
and permit it to stop. Slide the gear shifter
4
forward
(towards the chuck).
2. To select speed 2 (low torque setting), turn the tool off
and permit it to stop. Slide the gear shifter back (away
from the chuck).
NOTE: Do not change gears when the tool is running.
Always allow the drill to come to a complete stop before
changing gears. If you are having trouble changing
gears, make sure that the dual range gear shifter is either
completely pushed forward or completely pushedback.
Worklight (Fig. D)
The worklight
5
and its switch
12
are located on the foot
of the tool. The worklight is activated when the trigger
switch is depressed. The low
13
, medium
14
and spotlight
15
modes can be changed by moving the switch on the
foot of the tool. If the trigger switch remains depressed, the
worklight will remain on in allmodes.
When on low
13
and medium
14
settings, the beam will
automatically turn off 20 seconds after the trigger switch
isreleased.
Fig. D
5
15
13
14
12
Spotlight Mode
The high setting is the spotlight mode
15
. The spotlight
will run for 20 minutes after the trigger switch is released.
Two minutes before the spotlight will shut off, it will flash
twice and then dim. To avoid the spotlight shutting off,
lightly tap the triggerswitch.
WARNING: While using the worklight in medium
or spotlight mode, do not stare at the light or
place the drill in a position which may cause
anyone to stare into the light. Serious eye injury
couldresult.
CAUTION: When using the tool as a spotlight, be sure
it is secured on a stable surface where it will not cause
a tripping or fallinghazard.
CAUTION: Remove all accessories from the chuck
before using the drill as a spotlight. Personal injury or
property damage couldresult.
Low Battery Warning
When in spotlight mode and the battery is nearing
complete discharge, the spotlight will flash twice and then
dim. After two minutes, the battery will be completely
discharged and the drill will immediately shut down. At this
point, replace with a freshbattery.
WARNING: To reduce the risk of injury, always have a
back-up battery or secondary lighting available if the
situation warrantsit.
Keyless Single Sleeve Chuck (Fig. E–G)
WARNING: Do not attempt to tighten drill bits (or
any other accessory) by gripping the front part of the
chuck and turning the tool on. Damage to the chuck
and personal injury may result. Always lock off trigger
switch and disconnect tool from power source when
changingacces sories.
WARNING: Always ensure the bit is secure before
starting the tool. A loose bit may eject from tool
causing possible personalinjury.
Your tool features a keyless chuck
6
with one rotating
sleeve for one-handed operation of the chuck. To insert a
drill bit or other accessory, follow thesesteps.
1. Turn tool off and disconnect tool from powersource.
2. Grasp the black sleeve of the chuck with one hand
and use the other hand to secure the tool. Rotate the
sleeve counterclockwise far enough to accept the
desiredaccessory.
3. Insert the accessory about 3/4" (19 mm) into the chuck
and tighten securely by rotating the chuck sleeve
clockwise with one hand while holding the tool with the
other. Your tool is equipped with an automatic spindle
lock mechanism. This allows you to open and close the
chuck with onehand.
Fig. F Fig. G
Fig. E
6
Be sure to tighten chuck with one hand on the chuck sleeve
and one hand holding the tool for maximumtightness.
To release the accessory, repeat steps 1 and 2above.
ASSEMBLY AND ADJUSTMENTS
WARNING: To reduce the risk of serious personal
injury, turn unit off and remove the battery pack
before making any adjustments or removing/
installing attachments or accessories. An
accidental start-up can causeinjury.
ENGLISH
10
Belt Hook and Bit Clip
(Optional Accessory) (Fig. A)
WARNING: To reduce the risk of serious personal
injury, ONLY use the tool's belt hook to hang the
tool from a work belt. DO NOT use the belt hook
for tethering or securing the tool to a person or object
during use. DO NOT suspend tool overhead or suspend
objects from the belthook.
WARNING: To reduce the risk of serious personal
injury, ensure the screw holding the belt hook
issecure.
CAUTION: To reduce the risk of personal injury or
damage, DO NOT use the belt hook to hang the
drill while using as aspotlight.
IMPORTANT: When attaching or replacing the belt hook
or bit clip, use only the screw
8
that is provided. Be sure to
securely tighten thescrew.
The belt hook
7
and bit clip
9
can be attached to either
side of the tool using only the screw
8
provided, to
accommodate left- or right- handed users. If the hook or bit
clip is not desired at all, it can be removed from thetool.
To move belt hook or bit clip, remove the screw
8
that
holds it in place then reassemble on the opposite side. Be
sure to securely tighten thescrew.
OPERATION
WARNING: To reduce the risk of serious personal
injury, turn unit off and remove the battery pack
before making any adjustments or removing/
installing attachments or accessories. An
accidental start-up can causeinjury.
Installing and Removing the Battery Pack
(Fig. H)
Fig. H
10 11
NOTE: For best results, make sure your battery pack is
fullycharged.
To install the battery pack
11
into the tool handle, align the
battery pack with the rails inside the tool’s handle and slide
it into the handle until the battery pack is firmly seated in
the tool and ensure that it does notdisengage.
To remove the battery pack from the tool, press the release
button
10
and firmly pull the battery pack out of the tool
handle. Insert it into the charger as described in the charger
section of thismanual.
Proper Hand Position (Fig. I)
WARNING: To reduce the risk of serious personal injury,
ALWAYS use proper hand position as shown.
WARNING: To reduce the risk of serious personal
injury, ALWAYS hold securely in anticipation of a
suddenreaction.
Proper hand position requires one hand on the top of the
drill as shown, with the other hand on the mainhandle.
Fig. I
Drilling (Fig. J)
NOTICE: If drilling thin material, use a wood “back-
up” block to prevent damage to thematerial.
1. Select the desired speed/torque range using the gear
shifter to match the speed and torque to the planned
operation. Turn the collar
3
to the drillsymbol.
2. Use sharp drill bits only. For MASONRY, such as brick,
cement, cinder block, etc., use carbide-tipped bits rated
for percussiondrilling.
3. Always apply pressure in a straight line with the bit. Use
enough pressure to keep drill biting, but do not push
hard enough to stall the motor or deflect thebit.
4. Hold tool firmly with both hands to control the twisting
action of the drill. If model is not equipped with side
handle, grip drill with one hand on the handle and one
hand on the batterypack.
WARNING: Drill may stall if overloaded causing a
sudden twist. Always expect the stall. Grip the drill
firmly to control the twisting action and avoidinjury.
5. IF DRILL STALLS, it is usually because it is being
overloaded or improperly used. RELEASE TRIGGER
IMMEDIATELY, remove drill bit from work, and
determine cause of stalling. DO NOT depress TRIGGER
ON AND OFF IN AN ATTEMPT TO START A STALLED
DRILL — THIS CAN DAMAGE THEDRILL.
6. To minimize stalling or breaking through the material,
reduce pressure on drill and ease the bit through the
last fractional part of thehole.
7. Keep the motor running when pulling the bit back out
of a drilled hole. This will help preventjamming.
ENGLISH
11
Fig. J
DRILLING
3
Screwdriving (Fig. K)
1. Select the desired speed/torque range using the
gear shifter to match the speed and torque to the
plannedoperation.
2. Turn the torque adjustment collar
3
to the
desiredposition.
NOTE: Use the lowest torque setting required to
seat the fastener at the desired depth. The lower the
number, the lower the torqueoutput.
3. Insert the desired fastener accessory into the chuck as
you would any drillbit.
4. Make some practice runs in scrap or on unseen areas of
the workpiece to determine the proper position of the
torque adjustmentcollar.
5. Always start with lower torque settings, then advance
to higher torque settings to avoid damage to the
workpiece orfastener.
SCREWDRIVING
Fig. K
3
Hammerdrilling (Fig. L)
1. Select the desired speed/torque range using the gear
shifter to match the speed and torque to the planned
operation. Turn the collar
(
3
)
to the hammerdrillsymbol.
IMPORTANT: Use carbide-tipped or masonry bits rated
for percussion drillingonly.
2. Drill with just enough force on the hammer to keep
it from bouncing excessively or "rising" off the bit.
Too much force will cause slower drilling speeds,
overheating, and a lower drillingrate.
3. Drill straight, keeping the bit at a right angle to the work.
Do not exert side pressure on the bit when drillling as
this will cause clogging of the bit flutes and a slower
drillingspeed.
4. When drilling deep holes, if the hammer speed starts to
drop off, pull the bit partially out of the hole with tool
still running to help clear debris from thehole.
NOTE: A smooth, even flow of dust from the hole indicates
proper drilling rate
HAMMERDRILLING
Fig. L
3
MAINTENANCE
WARNING: To reduce the risk of serious personal
injury, turn unit off and remove the battery pack
before making any adjustments or removing/
installing attachments or accessories. An
accidental start-up can causeinjury.
Cleaning
WARNING: Blow dirt and dust out of all air vents with
clean, dry air at least once a week. To minimize the risk
of eye injury, always wear ANSI Z87.1 approved eye
protection when performingthis.
WARNING: Never use solvents or other harsh
chemicals for cleaning the non-metallic parts of
the tool. These chemicals may weaken the plastic
materials used in these parts. Use a cloth dampened
only with water and mild soap. Never let any liquid
get inside the tool; never immerse any part of the tool
into aliquid.
Accessories
WARNING: Since accessories, other than those
offered by
DeWALT
, have not been tested with this
product, use of such accessories with this tool could be
hazardous. To reduce the risk of injury, only
DeWALT
recommended accessories should be used with
thisproduct.
Recommended accessories for use with your tool
are available at extra cost from your local dealer or
authorized service center. If you need assistance in
locating any accessory, please contact
DeWALT
Industrial
Tool Co., 701East Joppa Road, Towson, MD 21286, call
1-800-4-
DeWALT
(1-800-433-9258) or visit our website:
www.dewalt.com.
MAXIMUM RECOMMENDED
CAPACITIES
DCD791 DCD796
WOOD
Auger 7/8" (22 mm) 7/8" (22 mm)
Paddle 1–1/4" (32 mm) 1–1/4" (32 mm)
Twist 1/2" (13 mm) 1/2" (13 mm)
Self-feed 1–3/8" (35 mm) 1–3/8" (35 mm)
Hole saw 2" (50 mm) 2" (50 mm)
METAL
Twist 1/2" (13 mm) 1/2" (13 mm)
ENGLISH
12
Hole saw 1–3/8" (35 mm) 1–3/8" (35 mm)
MASONRY
Carbide 1/4" (6.5 mm)
Repairs
The charger and battery pack are notserviceable.
WARNING: To assure product SAFETY and
RELIABILITY, repairs, maintenance and adjustment
(including brush inspection and replacement, when
applicable) should be performed by a
DeWALT
factory
service center or a
DeWALT
authorized service center.
Always use identical replacementparts.
Register Online
Thank you for your purchase. Register your product nowfor:
WARRANTY SERVICE: Registering your product will
help you obtain more efficient warranty service in case
there is a problem with yourproduct.
CONFIRMATION OF OWNERSHIP: In case of
an insurance loss, such as fire, flood or theft, your
registration of ownership will serve as your proof
ofpurchase.
FOR YOUR SAFETY: Registering your product will
allow us to contact you in the unlikely event a safety
notification is required under the Federal Consumer
SafetyAct.
Register online at www.dewalt.com/register.
Three Year Limited Warranty
DeWALT
will repair, without charge, any defects due to
faulty materials or workmanship for three years from
the date of purchase. This warranty does not cover part
failure due to normal wear or tool abuse. For further detail
of warranty coverage and warranty repair information,
visit www.dewalt.com or call 1-800-4-
DeWALT
(1-800-
433-9258). This warranty does not apply to accessories
or damage caused where repairs have been made
or attempted by others. THIS LIMITED WARRANTY IS
GIVEN IN LIEU OF ALL OTHERS, INCLUDING THE IMPLIED
WARRANTY OF MERCHANTABILITY AND FITNESS FOR A
PARTICULAR PURPOSE, AND EXCLUDES ALL INCIDENTAL
OR CONSEQUENTIAL DAMAGES. Some states do not allow
limitations on how long an implied warranty lasts or the
exclusion or limitation of incidental or consequential
damages, so these limitations may not apply to you. This
warranty gives you specific legal rights and you may have
other rights which vary in certain states orprovinces.
In addition to the warranty,
DeWALT
tools are covered
byour:
1 YEAR FREE SERVICE
DeWALT
will maintain the tool and replace worn parts
caused by normal use, for free, any time during the first year
afterpurchase.
2 YEARS FREE SERVICE ON DEWALT BATTERY PACKS
DC9071, DC9091, DC9096, DC9182, DC9280, DC9360, DCB120,
DCB127, DCB201, DCB203, DCB203BT, DCB207, DCB361
3 YEARS FREE SERVICE ON DEWALT BATTERY PACKS
DCB200, DCB204, DCB204BT, DCB205, DCB205BT, DCB206,
DCB606, DCB609
NOTE: Battery warranty voided if the battery pack is
tampered with in any way.
DeWALT
is not responsible
for any injury caused by tampering and may prosecute
warranty fraud to the fullest extent permitted bylaw.
90 DAY MONEY BACK GUARANTEE
If you are not completely satisfied with the performance of
your
DeWALT
Power Tool, Laser, or Nailer for any reason, you
can return it within 90 days from the date of purchase with
a receipt for a full refund – no questionsasked.
LATIN AMERICA: This warranty does not apply to products
sold in Latin America. For products sold in Latin America,
see country specific warranty information contained in
the packaging, call the local company or see website for
warrantyinformation.
FREE WARNING LABEL REPLACEMENT: If your warning
labels become illegible or are missing, call 1-800-4-
DeWALT
(1-800-433-9258) for a freereplacement.
FRANÇAIS
13
Définitions : symboles et termes d'alarmes sécurité
Ces guides d'utilisation utilisent les symboles et termes d'alarmes sécurité suivants pour vous prévenir de situations
dangereuses et de risques de dommages corporels oumatériels.
DANGER: indique une situation dangereuse imminente qui, si elle n’est pas évitée, entraînera la mort ou des
blessuresgraves.
AVERTISSEMENT: indique une situation potentiellement dangereuse qui, si elle n’est pas évitée, pourrait entraîner la
mort ou des blessuresgraves.
ATTENTION: indique une situation potentiellement dangereuse qui, si elle n’est pas évitée, pourrait entraîner des
blessures légères oumodérées.
(Si utilisé sans aucun terme) Indique un message propre à lasécurité.
AVIS : indique une pratique ne posant aucun risque de dommages corporels mais qui par contre, si rien n’est fait
pour l’éviter, pourrait poser des risques de dommagesmatériels.
AVERTISSEMENT! lire tous les avertissements de
sécurité et toutes les directives. Le non-respect
des avertissements et des directives pourrait se
solder par un choc électrique, un incendie et/ou une
blessuregrave.
AVERTISSEMENT : afin de réduire le risque de
blessures, lire le mode d’emploi del’outil.
Pour toute question ou remarque au sujet de cet outil
ou de tout autre outil
DeWALT
, composez le numéro
sans frais : 1-800-4-
DeWALT
(1-800-433-9258).
1
Détente à vitesse variable
2
Bouton de commande marche
3
Bague de réglage du couple
4
Bouton de changement de vitesse
5
Lampe de travail
6
Mandrin sans clé
7
Crochet de ceinture (accessoire en option)
8
Vis de montage
9
Range mèche (accessoire en avant/marche arrière option)
10
Bouton de libération du bloc-piles
11
Bloc-piles
12
Interrupteur de la lampe de travail
Français (traduction de la notice d’instructions originale)
Fig. A
6 3 4
2
1
5
12
7
8
9
11
10
8
FRANÇAIS
14
AVERTISSEMENTS DE SÉCURITÉ GÉNÉRAUX
POUR LES OUTILS ÉLECTRIQUES
AVERTISSEMENT! lire tous les avertissements de
sécurité et toutes les directives. Le non-respect
des avertissements et des directives pourrait se
solder par un choc électrique, un incendie et/ou une
blessuregrave.
CONSERVER TOUS LES
AVERTISSEMENTS ET TOUTES
LES DIRECTIVES POUR UN USAGE
ULTÉRIEUR
Le terme « outil électrique » cité dans les avertissements se
rapporte à votre outil électrique à alimentation sur secteur
(avec fil) ou par piles (sans fil).
1) Sécurité du lieu de travail
a ) Tenir l’aire de travail propre et bien éclairée.
Les lieux encombrés ou sombres sont propices
auxaccidents.
b ) Ne pas faire fonctionner d’outils électriques
dans un milieu déflagrant, tel qu’en présence de
liquides, de gaz ou de poussières inflammables.
Les outils électriques produisent des étincelles qui
pourraient enflammer la poussière ou lesvapeurs.
c ) Éloigner les enfants et les personnes à proximité
pendant l’utilisation d’un outil électrique. Une
distraction pourrait en faire perdre la maîtrise à
l’utilisateur.
2) Sécurité en matière d’électricité
a ) Les fiches des outils électriques doivent
correspondre à la prise. Ne jamais modifier la
fiche d’aucune façon. Ne jamais utiliser de fiche
d’adaptation avec un outil électrique mis à la
terre. Le risque de choc électrique sera réduit par
l’utilisation de fiches non modifiées correspondant à
laprise.
b ) Éviter tout contact physique avec des surfaces
mises à la terre comme des tuyaux, des
radiateurs, des cuisinières et des réfrigérateurs.
Le risque de choc électrique est plus élevé si votre corps
est mis à laterre.
c ) Ne pas exposer les outils électriques à la pluie ou
à l’humidité. La pénétration de l’eau dans un outil
électrique augmente le risque de chocélectrique.
d ) Ne pas utiliser le cordon de façon abusive.
Ne jamais utiliser le cordon pour transporter,
tirer ou débrancher un outil électrique. Tenir le
cordon éloigné de la chaleur, de l’huile, des bords
tranchants et des pièces mobiles. Les cordons
endommagés ou enchevêtrés augmentent les risques
de chocélectrique.
e ) Pour l’utilisation d’un outil électrique à
l’extérieur, se servir d’une rallonge convenant à
cette application. L’utilisation d’une rallonge conçue
pour l’extérieur réduira les risques de chocélectrique.
f ) S’il est impossible d’éviter l’utilisation d’un
outil électrique dans un endroit humide,
brancher l’outil dans une prise ou sur un circuit
d’alimentation dotés d’un disjoncteur de fuite à
la terre (GFCI). L’utilisation de ce type de disjoncteur
réduit les risques de chocélectrique.
3) Sécurité personnelle
a ) Être vigilant, surveiller le travail effectué et faire
preuve de jugement lorsqu’un outil électrique
est utilisé. Ne pas utiliser d’outil électrique en
cas de fatigue ou sous l’influence de drogues,
d’alcool ou de médicaments. Un simple moment
d’inattention en utilisant un outil électrique peut
entraîner des blessures corporellesgraves.
b ) Utiliser des équipements de protection
individuelle. Toujours porter une protection
oculaire. L’utilisation d’équipements de protection
comme un masque antipoussière, des chaussures
antidérapantes, un casque de sécurité ou des
protecteurs auditifs lorsque la situation le requiert
réduira les risques de blessurescorporelles.
c ) Empêcher les démarrages intempestifs. S’assurer
que l’interrupteur se trouve à la position
d’arrêt avant de relier l’outil à une source
d’alimentation et/ou d’insérer un bloc-piles, de
ramasser ou de transporter l’outil. Transporter
un outil électrique alors que le doigt repose sur
l’interrupteur ou brancher un outil électrique dont
l’interrupteur est à la position de marche risque de
provoquer unaccident.
d ) Retirer toute clé de réglage ou clé avant de
démarrer l’outil. Une clé ou une clé de réglage
attachée à une partie pivotante de l’outil électrique
peut provoquer des blessurescorporelles.
e ) Ne pas trop tendre les bras. Conserver
son équilibre en tout temps. Cela permet
de mieux maîtriser l’outil électrique dans les
situationsimprévues.
f ) S’habiller de manière appropriée. Ne pas porter
de vêtements amples ni de bijoux. Garder les
cheveux, les vêtements et les gants à l’écart des
pièces mobiles. Les vêtements amples, les bijoux ou
les cheveux longs risquent de rester coincés dans les
piècesmobiles.
g ) Si des composants sont fournis pour le
raccordement de dispositifs de dépoussiérage
et de ramassage, s’assurer que ceux-ci sont bien
raccordés et utilisés. L’utilisation d’un dispositif de
dépoussiérage peut réduire les dangers engendrés par
lespoussières.
4) Utilisation et entretien d’un outil
électrique
a ) Ne pas forcer un outil électrique. Utiliser l’outil
électrique approprié à l’application. L’outil
électrique approprié effectuera un meilleur travail,
de façon plus sûre et à la vitesse pour laquelle il a
étéconçu.
FRANÇAIS
15
b ) Ne pas utiliser un outil électrique dont
l’interrupteur est défectueux. Tout outil électrique
dont l’interrupteur est défectueux est dangereux et
doit êtreréparé.
c ) Débrancher la fiche de la source d’alimentation
et/ou du bloc-piles de l’outil électrique avant de
faire tout réglage ou changement d’accessoire
ou avant de ranger l’outil. Ces mesures préventives
réduisent les risques de démarrage accidentel de
l’outilélectrique.
d ) Ranger les outils électriques hors de la portée
des enfants et ne permettre à aucune personne
n’étant pas familière avec un outil électrique ou
son mode d’emploi d’utiliser cet outil. Les outils
électriques deviennent dangereux entre les mains
d’utilisateursinexpérimentés.
e ) Entretien des outils électriques. Vérifier si les
pièces mobiles sont mal alignées ou coincées,
si des pièces sont brisées ou présentent toute
autre condition susceptible de nuire au bon
fonctionnement de l’outil électrique. En cas de
dommage, faire réparer l’outil électrique avant
toute nouvelle utilisation. Beaucoup d’accidents
sont causés par des outils électriques malentretenus.
f ) S’assurer que les outils de coupe sont aiguisés et
propres. Les outils de coupe bien entretenus et affûtés
sont moins susceptibles de se coincer et sont plus
faciles àmaîtriser.
g ) Utiliser l’outil électrique, les accessoires, les
forets, etc. conformément aux présentes
directives en tenant compte des conditions de
travail et du travail à effectuer. L’utilisation d’un
outil électrique pour toute opération autre que celle
pour laquelle il a été conçu estdangereuse.
5) Utilisation et entretien du bloc-piles
a ) Ne recharger l’outil qu’au moyen du chargeur
précisé par le fabricant. L’utilisation d’un chargeur
qui convient à un type de bloc-piles risque de
provoquer un incendie s’il est utilisé avec un autre type
de b loc-piles.
b ) Utiliser les outils électriques uniquement avec
les blocs-piles conçus à cet effet. L’utilisation de
tout autre bloc-piles risque de causer des blessures ou
unincendie.
c ) Lorsque le bloc-piles n’est pas utilisé, le tenir
éloigné des objets métalliques, notamment
des trombones, de la monnaie, des clés, des
clous, des vis ou autres petits objets métalliques
qui peuvent établir une connexion entre les
deux bornes. Le court-circuit des bornes du bloc-piles
risque de provoquer des brûlures ou unincendie.
d ) En cas d’utilisation abusive, le liquide peut gicler
hors du bloc-piles; éviter tout contact avec ce
liquide. Si un contact accidentel se produit, laver
à grande eau. Si le liquide entre en contact avec
les yeux, obtenir également des soins médicaux.
Le liquide qui gicle hors du bloc-piles peut provoquer
des irritations ou desbrûlures.
6) Réparation
a ) Faire réparer l’outil électrique par un réparateur
professionnel en n’utilisant que des pièces de
rechange identiques. Cela permettra de maintenir
une utilisation sécuritaire de l’outilélectrique.
Avertissements de sécurité relatifs au
marteau perforateur/perceuse/visseuse
Porter une protection auditive lors du perçage à
percussion. Le bruit en émanant pourrait occasionner
une perte de l’acuitéauditive.
Utiliser la/les poignée(s) auxiliaire(s) si fournie(s)
avec l’outil. Une perte de contrôle de l’outil pourrait
occasionner des dommagescorporels.
Tenir l’outil par les surfaces isolées prévues à cet
effet pendant toute utilisation où l’organe de coupe
pourrait entrer en contact avec des fils électriques
cachés. Tout contact de l’organe de coupe avec un fil sous
tension mettra les parties métalliques exposées de l’outil
sous tension et électrocutera l’utilisateur.
Utiliser des brides de fixation ou tout autre dispositif
de fixation pratique permettant de soutenir et de
retenir la pièce sur une plate-forme stable. Tenir la
pièce avec la main ou contre le corps rend la pièce instable
et risque de provoquer une perte de maîtrise de l’outil.
Porter des lunettes de sécurité ou une autre
protection oculaire. Le martelage et la perforation
peuvent projeter des fragments. Les particules projetées
peuvent endommager les yeuxirréversiblement.
Maintenir une prise solide à tout moment. Ne
pas essayer d'utiliser cet outil sans le tenir des deux
mains. Utiliser cet outil en ne le tenant que d'une main
entraînera la perte de son contrôle. Percer ou rencontrer
des matériaux durs tels qu'une barre d'armature peut
également êtredangereux.
Les accessoires et l’outil peuvent devenir brûlants au
toucher pendant l’utilisation. Porter des gants pendant
leur utilisation pour effectuer des travaux produisant
beaucoup de chaleur comme la perforation à percussion
et le perçage desmétaux.
Ne pas utiliser cet outil pendant des périodes
de temps prolongées. Les vibrations causées par la
percussion peuvent poser des risques pour les mains ou les
bras. Porter des gants pour amortir les vibrations, et pour
limiter les risques, faire des pausesfréquentes.
Prendre des précautions à proximité des évents,
car ils cachent des pièces mobiles. Vêtements amples,
bijoux ou cheveux longs risquent de rester coincés dans
ces piècesmobiles.
Consigne de sécurité supplémentaire
AVERTISSEMENT: porter SYSTEMATIQUEMENT
des lunettes de protection. Les lunettes courantes
NE sont PAS des lunettes de protection. Utiliser aussi
un masque antipoussières si la découpe doit en
produire beaucoup. PORTER SYSTÉMATIQUEMENT UN
ÉQUIPEMENT DE SÉCURITÉ HOMOLOGUÉ:
Protection oculaire ANSI Z87.1 (CAN/CSA Z94.3);
FRANÇAIS
16
Protection auditive ANSI S12.6 (S3.19);
Protection des voies respiratoires NIOSH/OSHA/
MSHA.
AVERTISSEMENT: les scies, meules, ponceuses,
perceuses ou autres outils de construction peuvent
produire des poussières contenant des produits
chimiques reconnus par l’État californien pour causer
cancers, malformations congénitales ou être nocifs au
système reproducteur. Parmi ces produits chimiques,
on retrouve:
Le plomb dans les peintures à base de plomb;
La silice cristallisée dans les briques et le ciment,
ou autres produits de maçonnerie; et
L’arsenic et le chrome dans le bois ayant subi un
traitementchimique.
Le risque associé à de telles expositions varie selon la
fréquence à laquelle on effectue ces travaux. Pour réduire
toute exposition à ces produits: travailler dans un endroit
bien aéré, en utilisant du matériel de sécurité homologué, tel
un masque antipoussières spécialement conçu pour filtrer les
particulesmicroscopiques.
Limiter toute exposition prolongée avec les
poussières provenant du ponçage, sciage, meulage,
perçage ou toute autre activité de construction.
Porter des vêtements de protection et nettoyer à
l’eau savonneuse les parties du corps exposées. Le
fait de laisser la poussière pénétrer dans la bouche, les
yeux ou la peau peut favoriser l’absorption de produits
chimiquesdangereux.
AVERTISSEMENT: cet outil peut produire et/
ou répandre de la poussière susceptible de
causer des dommages sérieux et permanents au
système respiratoire. Utiliser systématiquement
un appareil de protection des voies respiratoires
homologué par le NIOSH ou l’OSHA. Diriger les
particules dans le sens opposé au visage et aucorps.
AVERTISSEMENT: pendant l’utilisation, porter
systématiquement une protection auditive
individuelle adéquate homologuée ANSI S12.6
(S3.19). Sous certaines conditions et suivant la durée
d’utilisation, le bruit émanant de ce produit pourrait
contribuer à une perte de l’acuitéauditive.
ATTENTION: après utilisation, ranger l’outil
sur son côté, sur une surface stable, là où il
ne pourra ni faire trébucher ni faire chuter
quelqu’un. Certains outils équipés d’un large bloc-
piles peuvent tenir à la verticale sur celui-ci, mais
manquent alors destabilité.
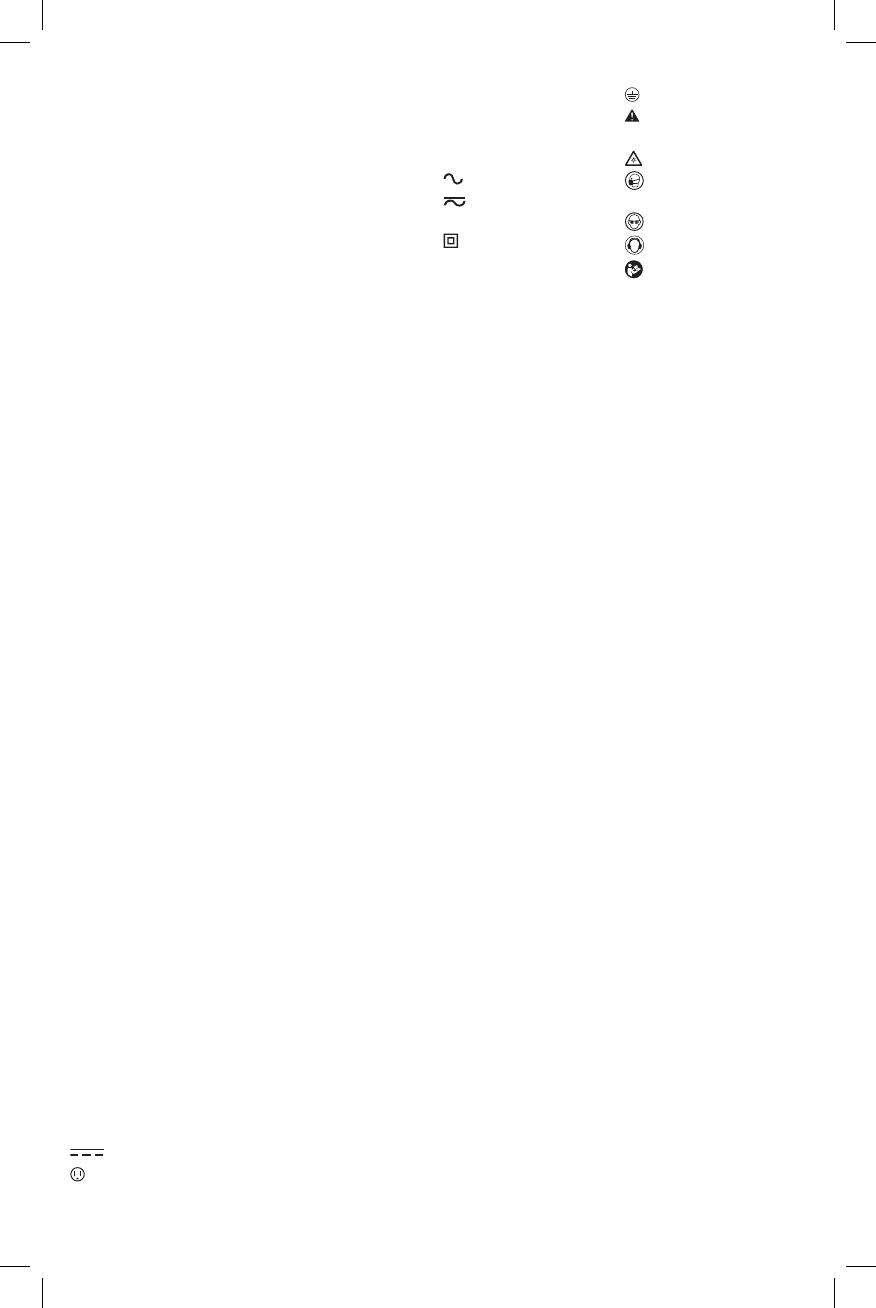
L’étiquette apposée sur votre outil peut inclure les symboles
suivants. Les symboles et leur définition sont indiqués ci-après:
V ......................... volts
Hz ....................... hertz
min ..................... minutes
or DC ...... courant continu
...................... fabrication classe I
(mis à la terre)
…/min .............. par minute
BPM .................... battements par
minute
IPM ..................... impacts par minute
RPM .................... révolutions par
minute
sfpm ................... pieds linéaires par
minute (plpm)
SPM (FPM) ......... fréquence par
minute
A ......................... ampères
W ........................ watts
or AC ........... courant alternatif
or AC/DC .... courant alternatif
ou continu
...................... fabrication classe II
(double isolation)
n
o
....................... vitesse à vide
n ......................... vitesse nominale
...................... borne de terre
...................... symbole
d’avertissement
..................... radiation visible
..................... protection
respiratoire
.....................protection oculaire
.....................protection auditive
..................... lire toute la
documentation
BLOCS-PILES ET CHARGEURS
Le bloc-piles n’est pas totalement chargé d’usine. Avant
d’utiliser le bloc-piles et le chargeur, lire les consignes de
sécurité ci-après puis suivre la procédure de chargement
indiquée. Pour commander un bloc-piles de rechange,
s’assurer d’en inclure le numéro de catalogue et latension.
Cet outil fonctionne avec un chargeur
DeWALT
. S’assurer
de bien lire toutes les consignes de sécurité avant toute
utilisation du chargeur. Consulter le tableau en fin de
manuel pour connaître les compatibilités entre chargeurs
et blocs-piles.
LIRE TOUTES LES CONSIGNES
Consignes importantes de sécurité
les blocs-piles
AVERTISSEMENT : lire toutes les instructions et
toutes les consignes de sécurité propres au bloc-
piles, au chargeur et à l’outil électrique. Tout
manquement aux avertissements et instructions
pose des risques de décharges électriques,
d’incendie et/ou de blessures graves.
Ne pas recharger ou utiliser un bloc-piles en milieu
déflagrant, en présence, par exemple, de poussières,
gaz ou liquides inflammables. Le fait d’insérer ou
retirer un bloc-piles de son chargeur pourrait causer
l’inflammation de poussières ou d’émanations.
NE JAMAIS forcer l’insertion d’un bloc-piles dans un
chargeur. NE modifier un bloc-piles d’AUCUNE façon
pour le faire rentrer dans un chargeur incompatible,
car il pourrait se briser et causer des dommages
corporels graves. Consulter le tableau en dernière page
de ce manuel pour connaître les compatibilités entre
chargeurs et blocs-piles.
Recharger les blocs-piles exclusivement dans des
chargeurs
DeWALT
.
NE PAS éclabousser le bloc-piles ou l’immerger dans l’eau
ou dans tout autreliquide.
Ne pas entreposer ou utiliser l’appareil et le bloc-
piles en présence de températures ambiantes
pouvant excéder 40°C (104°F) (comme dans des
hangars ou des bâtiments métalliques l’été). Pour
préserver leur durée de vie, entreposer les blocs-piles dans
un endroit frais etsec.
REMARQUE: ne pas mettre un bloc-piles dans un
outil dont la gâchette est verrouillée en position de
FRANÇAIS
17
marche. Ne jamais bloquer l’interrupteur en position
deMARCHE.
Ne pas incinérer le bloc-piles même s’il est
sévèrement endommagé ou complètement usagé,
car il pourrait exploser et causer un incendie.
Pendant l’incinération des blocs-piles au lithium-ion, des
vapeurs et matières toxiques sontdégagées.
En cas de contact du liquide de la pile avec la peau,
rincer immédiatement au savon doux et à l’eau. En
cas de contact oculaire, rincer l’œil ouvert à l’eau claire
une quinzaine de minutes ou jusqu’à ce que l’irritation
cesse. Si des soins médicaux s’avéraient nécessaires, noter
que l’électrolyte de la pile est composé d’un mélange de
carbonates organiques liquides et de sels delithium.
Le contenu des cellules d’une pile ouverte peut
causer une irritation respiratoire. En cas d’inhalation,
exposer l’individu à l’air libre. Si les symptômes persistent,
consulter unmédecin.
AVERTISSEMENT: risques de brûlure. Le liquide de la
pile peut s’enflammer s’il est exposé à des étincelles ou
à uneflamme.
AVERTISSEMENT: risques d’incendie. Ne jamais
tenter d’ouvrir le bloc-piles pour quelque raison
que ce soit. Si le boîtier du bloc-piles est fissuré ou
endommagé, ne pas l’insérer dans un chargeur. Ne
pas écraser, laisser tomber, ou endommager les blocs-
piles. Ne pas utiliser un bloc-piles ou un chargeur
qui a reçu un choc violent, ou si l’appareil est tombé,
a été écrasé ou endommagé de quelque façon que
ce soit (p. ex. percé par un clou, frappé d’un coup
de marteau, piétiné). Les blocs-piles endommagés
doivent être renvoyés à un centre de réparation pour
y êtrerecyclés.
Transport
AVERTISSEMENT: risques d’incendie. Au moment
de ranger ou transporter le bloc-piles, veiller à
protéger ses bornes à découvert de tout objet
métallique. Par exemple, éviter de placer le bloc-
piles dans un tablier, une poche, une boîte à outils
ou un tiroir, etc. contenant des objets tels que clous,
vis, clés, etc. Le fait de transporter des blocs-piles
comporte des risques d’incendie, car les bornes
des piles pourraient entrer, par inadvertance,
en contact avec des objets conducteurs, tels
que: clés, pièces de monnaie, outils ou autres.
La réglementation sur les produits dangereux
(Hazardous Material Regulations) du département
américain des transports interdit, en fait, le transport
des blocs-piles dans les commerces ou dans les avions
dans les bagages de cabine, À MOINS qu’ils ne soient
correctement protégés de tout court-circuit. Aussi
lors du transport individuel de blocs-piles, s’assurer
que leurs bornes sont bien protégées et isolées de
tout matériau pouvant entrer en contact avec elles et
provoquer un court-circuit.
Expédition du bloc-piles
DeWALT
FLEXVOLT
MC
Le bloc-piles D
e
WALT FLEXVOLT
MC
possède deux modes:
Utilisation et Expédition.
Mode Utilisation: lorsque le bloc-piles FLEXVOLT
MC
est par
lui-même ou dans un produit D
e
WALT 20v max*, il
fonctionnera comme un bloc-piles de 20v max*. Lorsque le
bloc-piles FLEXVOLT
MC
est dans un produit de 60v max* ou
120v max* (deux blocs-piles de 60v max*), il fonctionnera
comme un bloc-piles de 60v max*.
Mode Expédition: lorsque
le capuchon est inséré sur
le bloc-piles FLEXVOLT
MC
,
le bloc-piles est en mode
Expédition. Les modules
de cellules sont électriquement déconnectés du bloc le
faisant correspondre à trois blocs-piles d’un wattheure (Wh)
inférieur comparé à un bloc-piles de wattheure élevé. Ce
passage à trois blocs-piles à un wattheure inférieur peut
permettre au bloc-piles d’être exempté de suivre certaines
directives d’expédition imposées sur les blocs-piles de
wattheuresupérieur.
L’étiquette du bloc-piles donne deux estimations de
wattheures (se reporter à l’exemple). Selon comment le
bloc-piles est expédié, l’estimation appropriée de wattheure
doit être utilisée pour déterminer les modalités d’expédition
lui correspondant. Si le capuchon d’expédition est utilisé,
le bloc-piles sera considéré comme 3 blocs-piles au
wattheure indiqué pour «Expédition». S’il est expédié sans
le capuchon ou dans un outil, le bloc-piles sera considéré
comme un seul bloc-piles au wattheure indiqué à côté de
«Utilisation».
USE: 120 Wh Shipping: 3 x 40 Wh
Exemple d’étiquetage d’utilisation et d’expédition
Par exemple, le Wh de expédition pourra indiquer
3x40Wh, ce qui correspond à 3 blocs-piles de
40wattheures chacun. L’utilisation du Wh pourra indiquer
120Wh (sous-entendu 1bloc-piles).
Témoin de Charge du Bloc-Piles (Fig. B)
Certains blocs-piles
DeWALT
possèdent un témoin de
charge qui consiste en trois voyants Del verts indiquant le
niveau de charge du bloc-piles.
Le témoin de charge indique approximativement le niveau
de charge restant dans le bloc-piles en fonction des voyants
suivants:
Chargé de 75 à 100%
Chargé de 51 à 74%
Chargé de < 50%
Le bloc-piles doit être rechargé
Pour activer le témoin de charge, maintenez appuyé le
bouton du témoin de charge. Une combinaison des trois
voyants Del verts s’allumera indiquant le niveau de charge.
Lorsque le niveau de charge du bloc-pile atteint la limite
minimale d’utilisation, le témoin de charge reste éteint et le
bloc-piles doit êtrerechargé.
FRANÇAIS
18
Fig. B
REMARQUE: le témoin de charge ne fait qu’indiquer
le niveau de charge du bloc-piles. Il ne donne aucune
indication quant au fonctionnement de l’outil. Son propre
fonctionnement pourra aussi varier en fonction des
composants produit, de la température et de l’application
d’utilisation.
Pour plus d’informations quant au témoin de charge du
bloc-piles, veuillez appeler le 1-800-4-
DeWALT
(1-800-433-
9258) ou vous rendre sur notre site www.dewalt.com.
Le sceau SRPRC®
Le sceau SRPRC® (Société de recyclage des
piles rechargeables du Canada) apposé
sur une pile au nickel-cadmium, à hydrure
métallique de nickel ou au lithium-ion
(ou un bloc-piles) indique que les coûts
de recyclage de ces derniers en fin d’utilisation ont déjà été
réglés par
DeWALT
. Dans certaines régions, la mise au rebut
ou aux ordures municipales des piles au nickel-cadmium, à
l’hydrure métallique de nickel ou au lithium-ion, est illégale;
le programme de l’Appel à Recycler® constitue donc une
solution pratique etécologique.
Appel à Recycler Canada, Inc., en collaboration avec
DeWALT
et d’autres utilisateurs de piles, a mis sur pied de
programme aux États-Unis et au Canada pour faciliter la
collecte des piles au nickel-cadmium, à l’hydrure métallique
de nickel ou au lithium-ion usagées. Aidez-nous à protéger
l’environnement et à conserver nos ressources naturelles
en renvoyant les piles au nickel-cadmium, à l’hydrure
métallique de nickel ou au lithium-ion usagées à un centre
de réparation autorisé
DeWALT
ou chez votre détaillant afin
qu’elles y soient recyclées. On peut en outre se renseigner
auprès d’un centre de recyclage local pour connaître
d’autres sites lesacceptant.
SRPRC® est une marque déposée de l’Appel à Recycler
Canada,Inc.
Directives de sécurité importantes
propres à tous les chargeurs de piles
AVERTISSEMENT : lire toutes les instructions et
toutes les consignes de sécurité propres au bloc-
piles, au chargeur et à l’outil électrique. Tout
manquement aux avertissements et instructions
pose des risques de décharges électriques,
d’incendie et/ou de blessures graves.
NE PAS tenter de charger de bloc-piles avec des
chargeurs autres que ceux décrits dans ce manuel.
Le chargeur et son bloc-piles ont été conçus tout
spécialement pour fonctionnerensemble.
Ces chargeurs n’ont pas été conçus pour une
utilisation autre que recharger les blocs-piles
rechargeables
DeWALT
. Toute autre utilisation
comporte des risques d’incendie, de chocs électriques ou
d’électrocution.
Protéger le chargeur de la pluie ou de laneige.
Tirer sur la fiche plutôt que sur le cordon pour
débrancher le chargeur. Cela permet de réduire
les risques d’endommager la fiche ou le cordon
d’alimentation.
S’assurer que le cordon est protégé de manière à
ce que personne ne marche ni ne trébuche dessus,
ou à ce qu’il ne soit ni endommagé ni soumis à
aucunetension.
N’utiliser une rallonge qu’en cas de nécessité
absolue. L’utilisation d’une rallonge inadéquate
comporte des risques d’incendie, de chocs électriques ou
d’électrocution.
Pour utiliser un chargeur à l’extérieur, le placer dans
un endroit sec et utiliser une rallonge conçue pour
l’extérieur. L’utilisation d’une rallonge conçue pour
l’extérieur réduit les risques de chocsélectriques.
Pour la sécurité de l’utilisateur, utiliser une rallonge
de calibre adéquat (AWG, American Wire Gauge
[calibrage américain normalisé des fils électriques]).
Plus le calibre est petit, et plus sa capacité est grande. Un
calibre16, par exemple, a une capacité supérieure à un
calibre18. L’usage d’une rallonge de calibre insuffisant
causera une chute de tension qui entraînera perte de
puissance et surchauffe. Si plus d’une rallonge est utilisée
pour obtenir une certaine longueur, s’assurer que chaque
rallonge présente au moins le calibre de fil minimum. Le
tableau ci-dessous illustre les calibres à utiliser selon la
longueur de rallonge et l’intensité nominale indiquée sur
la plaque signalétique. En cas de doute, utiliser le calibre
suivant. Plus le calibre est petit, plus la rallonge peut
supporter decourant.
Calibre minimum pour les cordons d'alimentation
Volts
Longueur totale du cordon
d'alimentation en mètre (pieds)
120 V 7,6 (25) 15,2 (50) 30,5 (100) 45,7 (150)
240 V 15,2 (50) 30,5 (100) 61,0 (200) 91,4 (300)
Ampères
AWG
Plus que Pas plus
que
0 6 18 16 16 14
6 10 18 16 14 12
10 12 16 16 14 12
12 16 14 12 Non recommandé
Ne poser aucun objet sur le chargeur. Ne pas mettre
le chargeur sur une surface molle qui pourrait en
bloquer la ventilation et provoquer une surchauffe
interne. Éloigner le chargeur de toute source de chaleur.
Le chargeur dispose d’orifices d’aération sur le dessus et le
dessous duboîtier.
Ne pas le faire fonctionner avec un cordon
d’alimentation ou une ficheendommagée.
Ne pas utiliser le chargeur s’il a reçu un coup,
fait une chute ou a été endommagé de quelque
façon que ce soit. Le ramener dans un centre de
réparationagréé.
Ne pas démonter le chargeur. Pour tout service
ou réparation, le rapporter dans un centre de
réparation agréé. Le fait de le réassembler de façon
  • Page 1 1
  • Page 2 2
  • Page 3 3
  • Page 4 4
  • Page 5 5
  • Page 6 6
  • Page 7 7
  • Page 8 8
  • Page 9 9
  • Page 10 10
  • Page 11 11
  • Page 12 12
  • Page 13 13
  • Page 14 14
  • Page 15 15
  • Page 16 16
  • Page 17 17
  • Page 18 18
  • Page 19 19
  • Page 20 20
  • Page 21 21
  • Page 22 22
  • Page 23 23
  • Page 24 24
  • Page 25 25
  • Page 26 26
  • Page 27 27
  • Page 28 28
  • Page 29 29
  • Page 30 30
  • Page 31 31
  • Page 32 32
  • Page 33 33
  • Page 34 34
  • Page 35 35
  • Page 36 36
  • Page 37 37
  • Page 38 38
  • Page 39 39
  • Page 40 40
  • Page 41 41
  • Page 42 42
  • Page 43 43
  • Page 44 44

DeWalt DCD791B User manual

Category
Cordless combi drills
Type
User manual
This manual is also suitable for

Ask a question and I''ll find the answer in the document

Finding information in a document is now easier with AI