Brizo T60075-BL Installation guide
- Category
- Sanitary ware
- Type
- Installation guide
This manual is also suitable for

MultiChoice
®
Valve Trim
Installation Instructions
Owners Manual
60 Series
T600__
T602__
T604__
Write purchased model number here.
Table of Contents:
Warranty ............................................................................. Page 2
Installation Instructions ....................................................... Pages 3 - 8
Maintenance ....................................................................... Page 8
Replacement Parts ............................................................. Pages 9-19
1
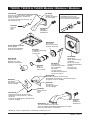
You May Need
CAUTION: This system/device must be set by the
installer to ensure safe, maximum temperature.
Any change in the setting may raise the discharge
temperature above the limit considered safe and
may lead to hot water burns.
NOTICE TO INSTALLER: CAUTION!–As the
installer of this valve, it is your responsibility
to properly INSTALL and ADJUST this valve
per the instructions given. This valve does
not automatically adjust for inlet temperature
changes, therefore, someone must make the
necessary temperature knob adjustments at
the time of installation and further adjustments
may be necessary due to seasonal water
temperature change. YOU MUST inform the
owner/user of this requirement by following the
instructions. If you or the owner/user are unsure
how to properly make these adjustments, please
refer to page 7 and if still uncertain, call us at
1-877-345-BRIZO (2749).
After installation and adjustment, you must afx
your name, company name and the date you
adjusted the temperature knob to the caution label
provided and apply or attach the label to the back
side of the closest cabinet door and the warning
label to the water heater. Leave this Instruction
Sheet for the owner’s/user’s reference.
WARNING: This thermostatic bath valve is
designed to minimize the effects of outlet water
temperature changes due to inlet pressure and
temperature changes, commonly caused by
dishwashers, washing machines, toilets and
the like. It may not provide protection from hot
water burns when there is a failure of other
temperature controlling devices elsewhere
in the plumbing system, if the temperature
knob is not properly set or if the hot water
temperature is changed after the settings
are made or if the water inlet changes due to
seasonal changes.
WARNING: Do not install a shut-off device on
either outlet of this valve. When this type of
device shuts off the water ow, it can defeat
the ability of the valve to balance the hot and
cold water pressures.
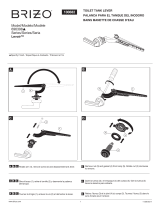
For easy installation of your Brizo
®
faucet you
will need:
• To READ ALL the instructions completely
before beginning.
• To READ ALL warnings,care, and
maintenance information.
05/30/2017
84528 Rev. F
3/32”

84528 Rev. F
www.brizo.com
2
Limited Warranty on Brizo
®
Faucets
© 2016 Masco Corporation of Indiana
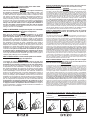
Cleaning and Care
Care should be given to the cleaning
of this product. Although its nish is
extremely durable, it can be damaged by
harsh abrasives or polish. To clean, simply
wipe gently with a damp cloth and blot dry
with a soft towel.
Parts and Finish
All parts (other than electronic parts and batteries) and finishes of this Brizo
®
faucet are warranted to the original con-
sumer purchaser to be free from defects in material and workmanship for as long as the original consumer purchaser
owns the home in which the faucet was first installed or, for commercial users, for 5 years from the date of purchase.
Electronic Parts and Batteries (if applicable)
Electronic parts (other than batteries), if any, of this Brizo
®
faucet are warranted to the original consumer purchaser to
be free from defects in material and workmanship for 5 years from the date of purchase or, for commercial users, for
one year from the date of purchase. No warranty is provided on batteries.
Brizo Kitchen & Bath Company will replace, FREE OF CHARGE, during the applicable warranty period, any part or
finish that proves defective in material and/or workmanship under normal installation, use and service. If repair or
replacement is not practical, Brizo Kitchen & Bath Company may elect to refund the purchase price in exchange for
the return of the product. These are your exclusive remedies.
Brizo Kitchen & Bath Company recommends using a professional plumber for all installation and repair. We also recom-
mend that you use only genuine Brizo
®
replacement parts.
Brizo Kitchen & Bath Company shall not be liable for any damage to the faucet resulting from misuse, abuse, neglect
or improper or incorrectly performed installation, maintenance or repair, including failure to follow the applicable care
and cleaning instructions.
Replacement parts may be obtained by calling the applicable number below or by writing to:
In the United States and Mexico: In Canada:
Brizo Kitchen & Bath Company Masco Canada Limited, Plumbing Group
Product Service Technical Service Centre
55 E. 111th Street 350 South Edgeware Road
Indianapolis, IN 46280 St. Thomas, Ontario, Canada N5P 4L1
1-877-345-BRIZO (2749) 1-877-345-BRIZO (2749)
Proof of purchase (original sales receipt) from the original purchaser must be made available to Brizo Kitchen & Bath
Company for all warranty claims unless the purchaser has registered the product with Brizo Kitchen & Bath Company.
This warranty applies only to Brizo
®
faucets manufactured after January 1, 1995 and installed in the United States of
America, Canada and Mexico.
BRIZO KITCHEN & BATH COMPANY SHALL NOT BE LIABLE FOR ANY SPECIAL, INCIDENTAL OR
CONSEQUENTIAL DAMAGES (INCLUDING LABOR CHARGES) FOR BREACH OF ANY EXPRESS OR IMPLIED
WARRANTY ON THE FAUCET. Some states/provinces do not allow the exclusion or limitation of special, incidental
or consequential damages, so these limitations and exclusions may not apply to you. This warranty gives you special
legal rights. You may also have other rights which vary from state/province to state/province.
This is Brizo Kitchen & Bath Company’s exclusive written warranty and the warranty is not transferable.
If you have any questions or concerns regarding our warranty, please view our Warranty FAQs at www.brizo.com, email us
at [email protected] or call us at the applicable number above.

84528 Rev. F3
B.
1
4
4
2
3
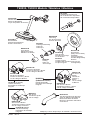
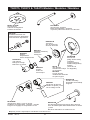
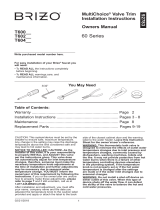
60 Series Installation
1
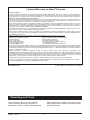
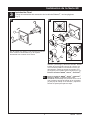
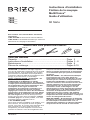
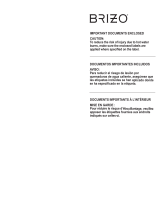
Cartridge Installation
A.
Turn off water supplies. Remove cover (1),
bonnet nut (2) and test cap (3) from the body.
If this is not a thin wall mounting, the entire plas-
terguard (4) may be removed. If screen (5) is in
place, remove before installing cartridge.
1
2
3
4
Rotate the cartridge (1) so the word “UP” (2)
appears on the top. Insert cartridge into valve
body as shown. Make sure the cartridge tubes
and O-rings (3) are properly seated in holes at
the base of the body. Ensure the keys on the
body are fully engaged with the slots in the
body (4).
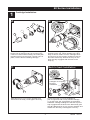
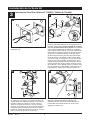
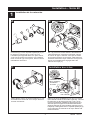
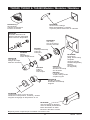
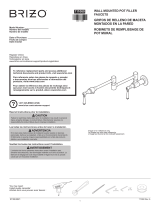
For back to back or reverse installations
(hot on right and cold on left): Rotate cartridge
(1) so the word “UP” (2) appears on the bottom.
Install the cartridge making sure that the keys are
fully engaged with the slots in the brass body (see
step B). Slide bonnet nut (3) over the cartridge and
thread onto the body. Hand tighten securely.
Back to back Installation
Normal Installation
(changes not required)
Reverse
Installation
Cold
Hot
1
3
2
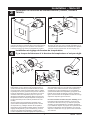
C.
Slide bonnet nut (1) over the cartridge and
thread onto the body. Hand tighten securely.
1
5

84528 Rev. F
4
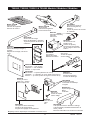
60 Series Installation
2
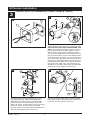
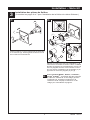
FOR SHOWERHEAD INSTALLATION: Connect
top outlet (1) to shower arm (2) with proper ttings.
To prevent damage to nish on shower arm,
insert wall end of shower arm into shower ange
(3) before screwing arm into riser connection.
Thread showerhead (4) onto shower arm. Apply
plumber tape to pipe threads on both ends. Do not
overtighten showerhead.
Showerhead and Tub Spout Installation
(For Tub Spout installation refer to the installation guide provided with your tub spout)
3
2
1
4
FOR RSVP® SOTRIA® AND VIRAGE®
SHOWERHEAD AND SHOWER ARM
INSTALLATION:
Install a 1/2" threaded pipe nipple to
extend beyond the nished wall 3/8" to 1/2". Apply
plumber tape to thread on pipe nipple and screw
brass adapter (1) securely onto nipple. Apply plumber
tape to outlet end of shower arm and screw
showerhead (2) onto the shower arm (3), using
provided wrench (4) to tighten securely. Check
position of set screw on top of shower arm (3) making
sure it is not sticking through to the inside opening
where it could interfere with the assembly. Slide
shower arm and head assembly over the adapter and
tighten set screw against the adapter.
1
2
3
4
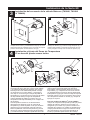
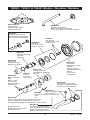
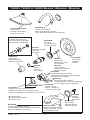
Slide O-ring (1) over cartridge and the bonnet
nut (2). The O-ring, which acts as a spacer to
steady the sleeve, should rest behind the
bonnet nut.
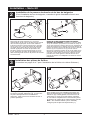
If your model requires a spacer (1), install it into
sleeve (2). Slide the sleeve over the cartridge, body
and O-ring. Ensure sleeve is properly positioned
over the front of cartridge. Note: RSVP
®
models
(series T60X90) do not require spacer (1).
3
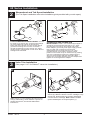
Valve Trim Installation
(See page 6 & 7 for Siderna
®
valve trim installation.)
A.
1
2
B.
2
1

84528 Rev. F
5
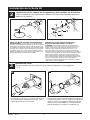
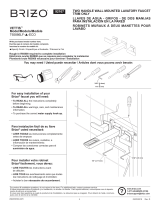
Secure the escutcheon (1) to the bracket (2) with
the 2 screws provided (3). Do not overtighten
escutcheon screws.
Slide trim ring (1) over the cartridge and sleeve
and into the escutcheon. Install volume control
handle base (2) with lever to the right as shown
(3). Install set screw (4) or (5) followed by the
handle lever (6) or (7).
3
Valve Trim Installation
(See page 6 & 7 for Siderna
®
valve trim installation.)
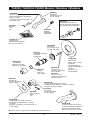
60 Series Installation
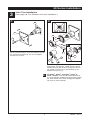
C.
1
2
3
D.
2
1
4
5
3
8
6
7
E.
9
For RSVP
®
, Sotria
™
, Charlotte
®
, Virage
®
&
Rook
™
models, lever should point downward to
6 o’clock position. Install set screw (8) into handle
(9). Push handle onto valve cartridge and tighten
set screw to secure handle.
E.

84528 Rev. F
6
3
Siderna
®
Valve Trim Installation (T60080, T60280 & T60480)
60 Series Installation
Assemble the two mounting sleeves (9) and two
mounting plates (10). Slide the mounting plate
assemblies over the trim sleeve so that the tabs/
plates (10) are at the top and bottom of the trim
sleeve, as shown. Thread screws (11) into mounting
plates just enough to assemble the two sides
together. Slide the mounting plates back against the
wall and nish tightening the screws (11).
Using the mounting plates (10) as a guide, enlarge
hole around rough so that plates can be pushed up
to 1/8" into the wall. Tighten screws (11).
Using supplied Allen wrench, install both anti-
rotational pins (3) into holes (4) in the valve body.
USE CARE TO NOT DROP PINS BEHIND THE
WALL. It is important that the rough be mounted
in the wall as level as possible because of the
square shape of this product. Slide trim sleeve
(5) over the cartridge and bonnet aligning the two
legs (6) of the sleeve over the anti-rotational pins
(3). If the trim is not square, you can try removing
a pin and holding the sleeve secure with the two
set screws (7) provided. Make sure the sleeve is
pushed all the way back so the legs of the sleeve
rest against the valve body. The set screws (7)
should be in a position where they hit just behind
the bonnet nut (8). Tighten set screws (7).
Remove plaster guard (1) from rough (2).
A.
1
2
B.
7
6
7
43
5
8
C.
9
9
11
10
10
11
D.
1/8"
(3 mm)
10
11
10
11
3
4

84528 Rev. F
F.
Place the center hole of the escutcheon (12)
over the trim sleeve and carefully push it back to
the mounting plates (10). Magnets on the back
of the escutcheon will keep it in place.
Place volume control handle (13) over valve
stem (14) and onto the trim sleeve (5). Lever
should point horizontally to 3 o’clock position.
Secure handle with set screw (15).
7
3
Siderna
®
Valve Trim Installation (T60080, T60280 & T60480)
60 Series Installation
13
14
E.
10
12
15
5
4
Installation and Adjustment of the Temperature Knob
Failure to do so may cause injury.
Adjust temperature limit stop! Turn on water
supplies; let the water run at both full hot and
full cold to ensure the water is running as hot/
cold as possible. Place a thermometer in a
plastic tumbler, and hold the tumbler in the
water stream. Place the temperature knob (1)
onto the splines (2), then rotate the temperature
knob counter-clockwise until you achieve your
maximum desired temperature from the outlet
(not more than 120° or the lower temperature
mandated by your local plumbing code).
If max temperature is not achieved before limit
stop (3) on temperature knob (1) meets the
limit stop (4) on the volume control handle.
Remove the temperature control knob (1)
from splines (2). Rotate temperature control
knob (1) clockwise. Place temperature control
knob (1) back onto splines (2) and continue
to rotate counter-clockwise until maximum
desired temperature is achieved.Remove the
temperature knob (1) and replace onto the
splines (2), making sure that the temperature
knob limit stop (3) hits against the volume
handle limit stop (4) as shown. Secure the
temperature knob using screw (5) and place cap
(6) on knob.
For Siderna
®
(series T60X80) models, place
temperature handle (knob) (10) onto valve stem
and secure with screw (11). Ensure O-ring (12) is
assembled on handle cap (13). Install handle cap
by pressing it into place on top of the temperature
handle (10). Secure cap by tightening screw (14)
from the underside of the handle.
1
3
2
1
4
5
6
4
10
Siderna
®
13
12
11
14

84528 Rev. F
8
60 Series Maintenance
Cannot receive more than a trickle of water:
Both hot and cold supply lines must be
pressurized. If only one side is pressurized, the
system will not allow adequate ow of water.
Faucet leaks from showerhead: Remove
the showerhead then turn the water on and
off to verify if the cartridge is leaking or the
showerhead is draining slowly (the showerhead
may need to be cleaned if water drains slowly).
If leak persists -SHUT OFF WATER SUPPLIES
Replace cartridge assembly - RP47201.
Unable to set or maintain mixed water
temperature:
SHUT OFF WATER SUPPLIES. Remove handle
assembly, trim sleeve, and bonnet nut. Check
to make sure the “H” marking on the cartridge
aligns with the hot inlet and the “C” marking on the
cartridge aligns with the cold inlet to the valve body
The thermostatic cartridge cannot function if hot
and cold inlets are reversed.
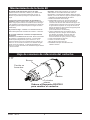
Low ow:
Low ow may be caused by clogged screens within
the thermostatic cartridge. To clean the hot and cold
screens in the cartridge, follow the steps below:
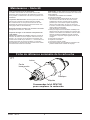
1. SHUT OFF WATER SUPPLIES.
2. Remove the handle assembly.
3. Unscrew the hex shaped portion of the cartridge
from the brass section of the cartridge. the brass
section must be held securely by the ats while
the hex is rotated counter-clockwise. Failure to
secure the brass section while rotating the
hex can result in damage to the cartridge.
(See illustration below)
4. Carefully clean any debris from the screens
under running water. If the debris is difcult to
remove then soak the screens overnight in a
50% water and 50% vinegar solution.
5. Reassemble the cartridge.
6. Replace the handle.
7 Turn the water back on.
8. Reset the limit stop before using the valve.
Cartridge Summary Reference Sheet
Order RP47201 to
Replace Cartridge.
Plastic
Brass
17T
Hex shaped
portion
Flats
Page is loading ...
Page is loading ...
Page is loading ...
Page is loading ...
Page is loading ...
Page is loading ...
Page is loading ...
Page is loading ...
Page is loading ...
Page is loading ...
Page is loading ...
Page is loading ...
Page is loading ...
Page is loading ...
Page is loading ...
Page is loading ...

84528 Rev. F
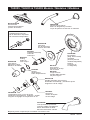
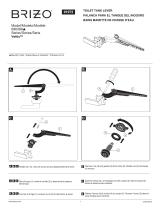
RP62929p
Shower Arm & Flange
Brazo de Regadera y Pestaña
Tuyau de pomme de douche et collerette
T60005, T60205 & T60405 Models / Modelos / Modèles
RP62930p
Escutcheon
(Diag. Screw Holes)
Chapetón
(Huecos para los
Tornillos Diagonales)
Rosace
(Trous de vis
en diagonale)
RP196
Trim Screws
Atornillos de Franja
Vis de finition
RP12630
Longer Screws
Tornillos Más Grandes
Vis plus longues
Model 87305p
Showerhead
Cabeza de Regadera
pomme de douche
RP47201
Cartridge Assembly
Cartucho
Cartouche
RP23336
O-Ring
Anillo "O"
Joint torique
RP50879p
Trim Sleeve
Manga de Franja
Manchon de finition
RP62932p
Temperature Knob, Cover & Screw
Perilla de la Temperatura, Cubierta y Tornillo
Poigneé de réglage de température et vis
RP49089p
Trim Ring
Aro de accesorio
Anneau décoratif
RP29569
Spacer
Separadores
Piéce d'espacement
RP49094p
Tub Spout/Pull-Up Diverter
Tubo de Salida para Bañera/
Botón Desviador de Alzar
Bec/avec dérivation à tirette
RP62931p
Handle Assembly & Set Screw
Ensamble de la Manija y Tornillo de Ajuste
Poignée et vis de calage
RP50465
Set Screw
Tornillo de Ajuste
Vis de calage
RP74785
Available Extension Kit
Kit de Extensión disponible
Kit d’extension disponibles
9
pSpecify Finish / Especifíque el Acabado / Précisez le Fini

84528 Rev. F
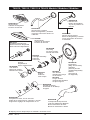
T60010, T60210, T60211 & T60410 Models / Modelos / Modèles
RP49091p
Escutcheon
(Diag. Screw Holes)
Chapetón
(Huecos para los
Tornillos Diagonales)
Rosace
(Trous de vis
en diagonale)
RP49093p
Handle Assembly
Ensamble de la Manija
Poignée
RP49090
Trim Screws
Atornillos de Franja
Vis de finition
RP12630
Longer Screws
Tornillos Más Grandes
Vis plus longues
RP52090p
Showerhead
Cabeza de Regadera
Pomme de Douche
RP47201
Cartridge Assembly
Cartucho
Cartouche
RP23336
O-Ring
Anillo "O"
Joint torique
RP50879p
Trim Sleeve
Manga de Franja
Manchon de finition
RP49092p
Temperature Knob, Cover & Screw
Perilla de la Temperatura, Cubierta y Tornillo
Poigneé de réglage de température et vis
RP49089p
Trim Ring
Aro de accesorio
Anneau décoratif
RP49088
Spacer
Separadores
Piéce d'espacement
RP49094p
Tub Spout/Pull-Up Diverter
Tubo de Salida para Bañera/
Botón Desviador de Alzar
Bec/avec dérivation à tirette
RP54168p
Shower Arm & Flange
Brazo de Regadera y Pestaña
Tuyau de pomme de douche et
collerette
RP74785
Available Extension Kit
Kit de Extensión disponible
Kit d’extension disponibles
10
p Specify Finish / Especifíque el Acabado / Précisez le Fini
RP62929p
Shower Arm & Flange
Brazo de Regadera y Pestaña
Tuyau de pomme de douche
et collerette
87305p
Showerhead
Cabeza de Regadera
Pomme de Douche
RP40593p
Shower Arm
Brazo de Regadera
Tuyau de pomme de
douche

84528 Rev. F
11
RP49350
Set Screw
Tornillo de Ajuste
Vis de Calage
T60030, T60230 & T60430 Models / Modelos / Modèles
RP62598p
Escutcheon
(Diag. Screw Holes)
Chapetón
(Huecos para los
Tornillos Diagonales)
Rosace
(Trous de Vis
en Diagonale)
RP62606p
Handle Assembly & Set Screw
Ensamble de la Manija y Tornillo de Ajuste
Poignée et Vis de Calage
Order Model 87330p
Showerhead
Cabeza de Regadera
Pomme de Douche
RP47201
Cartridge Assembly
Cartucho
Cartouche
RP23336
O-Ring
Anillo "O"
Joint Torique
RP50879p
Trim Sleeve
Manga de Franja
Manchon de Finition
RP62607p
Temperature Knob & Set Screw
Perilla de la Temperatura y Tornillo
de Ajuste
Poigneé de Réglage de Température
et Vis de Calage
RP49089p
Trim Ring
Aro de accesorio
Anneau décoratif
p Specify Finish / Especifíque el Acabado / Précisez le Fini
RP40650
Set Screw
Tornillo de Ajuste
Vis de Calage
RP62603p
Shower Arm, Set Screw & Wrench
Brazo de Regadera, Tornillo de
Ajuste y Llave
Tuyau de Pomme de Douche, Vis
de Calage et Clé
RP49349
Adapter
Adaptador
Adaptateur
RP49350
Set Screw
Tornillo de Ajuste
Vis de Calage
RP49090
Trim Screws
Atornillos de Franja
Vis de Finition
RP12630
Longer Screws
Tornillos Más Grandes
Vis Plus Longues
RP62605p
Tub Spout/Pull-Down Diverter
Tubo de Salida para Bañera/Desviador de Halar
Bec/Avec Dérivation sur Embout
RP49349
Adapter
Adaptador
Adaptateur
RP62604
Wrench
Llave
Clé
RP74785
Available Extension Kit
Kit de Extensión disponible
Kit d’extension disponibles
RP26853
Allen Wrench
Llave
Clé
Page is loading ...

84528 Rev. F
13
T60040, T60240 & T60440 Models / Modelos / Modèles
RP49188p
Escutcheon
(Diag. Screw Holes)
Chapetón
(Huecos para los
Tornillos Diagonales)
Rosace
(Trous de vis
en diagonale)
RP49099p
Handle Assembly
Ensamble de la Manija
Poignée
RP49090
Trim Screws
Atornillos de Franja
Vis de finition
RP12630
Longer Screws
Tornillos más grandes
vis plus longues
RP42431p
Showerhead
Cabeza de Regadera
Pomme de douche
RP47201
Cartridge Assembly
Cartucho
Cartouche
RP23336
O-Ring
Anillo "O"
Joint torique
RP50879p
Trim Sleeve
Manga de Franja
Manchon de finition
RP49098p
Temperature Knob, Cover & Screw
Perilla de la Temperatura, Cubierta y Tornillo
Poigneé de réglage de température et vis
RP49089p
Trim Ring
Aro de accesorio
Anneau décoratif
RP49088
Spacer
Separadores
Piéce d'espacement
RP49126p
Tub Spout/Pull-Up Diverter
Tubo de Salida para Bañera/
Botón Desviador de Alzar
Bec/avec dérivation à tirette
RP71649p
Shower Arm & Flange
Brazo de Regadera y Pestaña
Tuyau de pomme de douche et collerette
RP74785
Available Extension Kit
Kit de Extensión disponible
Kit d’extension disponibles
RP81437p
Tub Spout/Pull-Down Diverter
Tubo de Salida para Bañera/
Botón Desviador de Halar
Bec/avec dérivation dérivation
sur Embout
pSpecify Finish / Especifíque el Acabado / Précisez le Fini

84528 Rev. F
14
T60050, T60250 & T60450 Models / Modelos / Modèles
RP76517p
Escutcheon
(Diag. Screw Holes)
Chapetón
(Huecos para los
Tornillos Diagonales)
Rosace
(Trous de vis
en diagonale)
RP76518p
Handle Assembly & Set Screw
Ensamble de la Manija y Tornillo de Ajuste
Poignée et vis de calage
RP75722p
Shower Arm, Set Screw & Wrench
Brazo de Regadera, Tornillo de
Ajuste y Llave
Tuyau de pomme de douche, vis
de calage y clé
87450p
Showerhead
Cabeza de Regadera
Pomme de douche
RP47201
Cartridge Assembly
Cartucho
Cartouche
RP23336
O-Ring
Anillo "O"
Joint torique
RP50879p
Trim Sleeve
Manga de Franja
Manchon de finition
RP76519p
Temperature Knob & Set Screw
Perilla de la Temperatura y Tornillo de Ajuste
Poigneé de réglage de température et vis de calage
RP49089p
Trim Ring
Aro de accesorio
Anneau décoratif
RP74644p
Tub Spout/Pull-Up Diverter
Tubo de Salida para Bañera/
Botón Desviador de Alzar
Bec/avec dérivation à tirette
RP49349
Adapter
Adaptador
Adaptateur
RP40650
Set Screw
Tornillo de Ajuste
Vis de calage
RP49350
Set Screw
Tornillo de Ajuste
Vis de calage
RP49350
Set Screw
Tornillo de Ajuste
Vis de calage
RP49090
Trim Screws
Atornillos de Franja
Vis de finition
RP12630
Longer Screws
Tornillos Más Grandes
Vis plus longues
RP62604
Wrench
Llave
Clé
RP74785
Available Extension Kit
Kit de Extensión disponible
Kit d’extension disponibles
pSpecify Finish / Especifíque el Acabado / Précisez le Fini
RP26853
Allen Wrench
Llave
Clé
Page is loading ...
Page is loading ...
Page is loading ...

84528 Rev. F
18
Notes / Notas / Notes
T60085, T60285 & T60485 Models / Modelos / Modèles
RP70908p
Tub Spout/Pull-Down Diverter
Tubo de Salida para Bañera/Desviador de Halar
Bec/Avec Dérivation sur Embout
RP49349
Adapter
Adaptador
Adaptateur
RP70905p
Escutcheon
Chapetón
Rosace
RP70909p
Shower Arm & Flange
Brazo de Regadera y Pestaña
Tuyau de Pomme de Douche et Collerette
RP49090
Trim Screws
Atornillos de Franja
Vis de Finition
RP12630
Longer Screws
Tornillos Más Grandes
Vis Plus Longues
RP47201
Cartridge Assembly
Cartucho
Cartouche
RP50879p
Trim Sleeve
Manga de Franja
Manchon de Finition
RP49089p
Trim Ring
Aro de accesorio
Anneau décoratif
RP23336
O-Ring
Anillo "O"
Joint Torique
RP70906p
Handle Assembly & Set Screw
Ensamble de la Manija y Tornillo de Ajuste
Poignée et Vis de Calage
RP70907p
Temperature Knob, Screw & Button
Perilla de la Temperatura, Tornillo y Botone
Poigneé de Réglage de Température, Vis et bouton
RP70916
Set Screw & Allen Wrench
Tornillos de Ajuste y Llaves Hexagonales
Vis de calage et Clés hexagonales
Order Model 87385p
Showerhead
Cabeza de Regadera
Pomme de Douche
RP70918p
Button & O-ring
Botone y Anillo “O”
Bouton et Joint Torique
RP70917p
Spout Flange
Brida del Surtidor
Collerette du bec
RP63510
Set Screw & Allen Wrench
Tornillos de Ajuste y Llaves
Vis de calage et Clés
RP74785
Available Extension Kit
Kit de Extensión disponible
Kit d’extension disponibles
p Specify Finish
p Especifíque el Acabado
p Précisez le ni

84528 Rev. F
T60090, T60290 & T60490 Models / Modelos / Modèles
RP49346p
Escutcheon
(Diag. Screw Holes)
Chapetón
(Huecos para los
Tornillos Diagonales)
Rosace
(Trous de vis
en diagonale)
RP49347p
Handle Assembly & Set Screw
Ensamble de la Manija y Tornillo de Ajuste
Poignée et vis de calage
RP48040p
Shower Arm, Set Screw & Wrench
Brazo de Regadera, Tornillo de
Ajuste y Llave
Tuyau de pomme de douche, vis
de calage y clé
RP48041p
Showerhead
Cabeza de Regadera
Pomme de douche
RP47201
Cartridge Assembly
Cartucho
Cartouche
RP23336
O-Ring
Anillo "O"
Joint torique
RP50879p
Trim Sleeve
Manga de Franja
Manchon de finition
RP49348p
Temperature Knob & Set Screw
Perilla de la Temperatura y Tornillo
de Ajuste
Poigneé de réglage de température et
vis de calage
RP49089p
Trim Ring
Aro de Accesorio
Anneau décoratif
RP49345p
Tub Spout/Pull-Up Diverter
Tubo de Salida para Bañera/
Botón Desviador de Alzar
Bec/avec dérivation à tirette
RP49349
Adapter
Adaptador
Adaptateur
RP40650
Set Screw
Tornillo de Ajuste
Vis de calage
RP49350
Set Screw
Tornillo de Ajuste
Vis de calage
RP49350
Set Screw
Tornillo de Ajuste
Vis de calage
RP49090
Trim Screws
Atornillos de Franja
Vis de finition
RP12630
Longer Screws
Tornillos Más Grandes
Vis plus longues
RP62604
Wrench
Llave
Clé
RP74785
Available Extension Kit
Kit de Extensión Disponible
Kit d’extension disponibles
Notes / Notas / Notes
19
RP26853
Allen Wrench
Llave
Clé
p Specify Finish / Especifíque el Acabado / Précisez le Fini

Delta Faucet Company
Product Service
55 E. 111th Street
Indianapolis, IN 46280

IMPORTANT DOCUMENTS ENCLOSED
CAUTION:
To reduce the risk of injury due to hot water
burns, make sure the enclosed labels are
applied where specified on the label.
DOCUMENTOS IMPORTANTES INCLUIDOS
AVISO:
Para reducir el riesgo de lesión por
quemaduras de agua caliente, asegúrese que
las etiquetas incluidas se han aplicado donde
se ha especificado en la etiqueta.
DOCUMENTS IMPORTANTS À L’INTÉRIEUR
MISE EN GARDE :
Pour réduire le risque d’ébouillantage, veuillez
apposer les étiquettes fournies aux endroits
indiqués sur celles-ci.

BY/POR/PAR _______________ COMPANY/COMPANIA/COMPAGNIE ________________
DATE/FECHA/LE ___________ PHONE/TELÉFONO/TELÉPHONE ____________________
TO BE FILLED OUT BY THE INSTALLER / PARA SER LLENADO POR EL INSTALADOR /
A REMPLIR PAR L’INSTALLATEUR:
NOTICE TO INSTALLER: Place this label on the water heater
next to the temperature adjustment knob.
WARNING:
This series of tub/shower valves does not adjust automatically
for changes in temperature at the hot water heater or inlet. If the
temperature setting of the hot water heater or inlet is changed, the setting
on these valves must be adjusted manually! Failure to re-adjust the valve
may result in hot water burns or extreme cold resulting from variations in
line pressure (such as when a dishwasher or washing machine is in use
while you are taking a shower). After installation, verify that the temperature
knob on the valve is set so that changes in line pressure or temperature do
not result in uncomfortable water temperature changes. If the temperature
setting of the hot water heater or inlet is changed after installation of
the valve, the setting of the temperature knob also must be changed!
Consult the installation instruction sheet for instructions on how to make this
setting, or call us at 1-877-345-BRIZO.
AVISO AL INSTALADOR: Coloque esta etiqueta en el calentador
de agua al lado de la perilla que ajusta la temperatura.
AVISO:
Esta serie de válvulas para bañeras/regaderas no se ajusta
automáticamente a los cambios de temperatura en el calentador de
agua o del agua de entrada. ¡Si el ajuste de temperatura del calentado
del agua caliente o del agua de entrada, el ajuste en estas válvulas
debe ajustarse manualmente! El no reajustar la válvula puede resultar en
quemaduras por agua caliente o temperaturas de agua extremadamente
frías resultando en variaciones de presión y temperatura (como cuando el
fregador de platos o la lavadora están funcionando mientras que se baña).
Después de la instalación, verifique que la perilla para el control de la
temperatura en la válvula está ajustada para que cambios de presión y de
temperatura en la línea no resulten en cambios de temperatura del agua
incómodos. Si el ajuste de la temperatura del calentador de agua o de
la entrada de agua se cambia después de la instalación de la válvula,
la perilla que ajuste ¡la temperatura también se debe cambiar! Consulte
con su hoja de instrucciones de instalación para saber como se ajusta o
cambia el ajuste o llámenos al 1-877-345-BRIZO.
AVIS À L’INSTALLATEUR : Placez cette étiquette sur le chauffe-
eau, près du bouton de réglage de température.
AVERTISSEMENT:
La soupape de robinet de baignoire ou de douche de cette série
ne se règle pas automatiquement en fonction des changements de
température de l’eau chaude au chauffe-eau ou de l’eau d’alimentation.
En cas de modification du réglage de température du chauffe-eau ou de
la température de l’eau d’alimentation, le réglage de ces soupapes doit
être modifié manuellement! Si le réglage de la soupape n’est pas modifié,
le robinet pourra permettre l’écoulement d’eau très chaude susceptible de
causer l’ébouillantage ou d’eau très froide, sous l’effet des variations de
pression et de température dans la tuyauterie d’alimentation (lorsque la
douche est utilisée en même temps que le lave-vaisselle ou la machine
à laver, par exemple). Après l’installation, assurez-vous que le bouton de
température sur la soupape est réglé de manière que les fluctuations de
pression et de température dans la tuyauterie d’alimentation n’entraînent
pas de changements de température de l’eau inconfortables. En cas
de modification du réglage de température du chauffe-eau ou de la
température de l’eau d’alimentation après l’installation de la soupape,
le réglage du bouton de température doit être modifié! Pour régler le
bouton de température, consultez la feuille d’instructions d’installation ou
appelez-nous au 1-877-345-BRIZO.
NOTICE TO INSTALLER: Place this label close to the valve where the
owner will see it, such as inside the door of a cabinet or vanity.
WARNING:
Water temperature changes due to seasonal or other inlet variations, such as changing
the setting on the hot water heater may require adjustment of the temperature knob on
your tub/shower valve to ensure a safe maximum temperature. This valve series does
not automatically adjust for inlet temperature changes. If changes occur and you are
not sure how to make the necessary temperature knob adjustments, please consult
the installation instruction sheet provided with this valve or call 1-877-345-BRIZO.
This valve is designed to reduce the risk of injury due to inlet pressure or temperature
changes, commonly caused by dishwashers, washing machines, toilets and the
like. It may not provide protection from hot water burns when there is a failure
of other temperature controlling devices elsewhere in the plumbing system.
After making the necessary adjustments please fill in the information below. This
valve/system has been set by the person listed below to help ensure a safe maximum
temperature. Any change in the setting may raise the temperature of the water coming
out of the shower or bath above the limit considered safe and could lead to hot water
burns. If this label has not been completed, you should verify that the temperature knob
has been properly adjusted to suit your individual installation. The installation instruction
sheet supplied with the valve provides information on how to make this setting.
AVISO AL INSTALADOR: Coloque esta etiqueta cerca de la válvula
donde el propietario la pueda ver, tal como dentro de la puerta del
gabinete o el tocador.
AVISO:
Los cambios de temperatura del agua por variaciones estacionales u otras variaciones en
el agua de entrada, como cambiando el ajuste en el calentador de agua pueden requerir el
ajuste de la perilla para el control de la temperatura de su unidad bañera/regadera para ayudar
a asegurar una temperatura máxima segura. Este
válvulas
no se ajusta automáticamente a
cambios de temperatura en el agua de admisión. Si los cambios ocurren y usted no está seguro
como hacer los ajustes necesarios con la perilla para controlar la temperatura, por favor
consulte la hoja de instrucciones de instalación proporcionada con esta válvula o llámenos al
1-877-345-BRIZO. Esta válvula está diseñada para reducir el riesgo de lesión por cambios de
temperatura del agua que entra o por los cambios de presión del agua que comúnmente son
causados por los usos simultáneos de fregadoras de platos, lavadoras, sanitarios y aparatos
similares. Pueda no proporcionar protección de quemaduras por el agua caliente cuando
hay una falla de otros mecanismos que controlan la temperatura del agua en otro sitio del
sistema de plomería. Después de hacer los ajustes necesarios, por favor escriba la información
a continuación. Esta válvula/sistema ha sido ajustada por la persona indicada a continuación para
ayudar a asegurar una temperatura máxima segura. Cualquier cambio al ajuste puede aumentar
la temperatura del agua que sale de la ducha o el baño sobre el límite considerado seguro
y puede resultar en quemaduras por el agua caliente. Si esta etiqueta no se a llenado, debe
verificar si la perilla para el control de la temperatura hay sido correctamente ajustada para al
gusto de su instalación individual. La hoja de instrucciones de instalación proporcionada con las
válvulas le suministra información sobre como hacer esto.
AVIS À L’INSTALLATEUR : Placez cette étiquette près de la soupape
à un endroit où le propriétaire pourra la voir, du côté intérieur de la
porte de l’armoire ou du meuble par exemple.
AVERTISSEMENT:
La température de l’eau peut varier en raison des changements de saison, d’une modification
du réglage du chauffe-eau ou d’autres changements. Par conséquent, un réglage du bouton
de température de votre soupape de douche ou de baignoire peut s’imposer pour que la
température maximale de l’eau demeure sécuritaire. Les soupapes de cette série ne s’ajustent pas
automatiquement aux changements de température de l’eau d’alimentation. Si des changements
vous obligent à régler le bouton de température et vous n’êtes pas certain de la marche à suivre,
veuillez consulter le feuillet d’instructions fourni avec la soupape ou appeler au 1-877-345-BRIZO.
Cette soupape est conçue pour réduire les risques de blessures causées par des changements de la
température ou de la pression de l’eau d’alimentation habituellement causés par le lave-vaisselle, la
machine à laver, une toilette ou un autre appareil qui consomme de l’eau. Elle peut ne pas assurer
de protection contre l’ébouillantage en cas de défectuosité d’un autre dispositif de régulation
de la température dans la tuyauterie. Après avoir effectué le réglage nécessaire, veuillez
inscrire l’information requise ci-dessous. La personne dont le nom figure ci-dessous a réglé cette
soupape pour qu’elle puisse maintenir une température maximale sécuritaire. Toute modification du
réglage peut entraîner une élévation de la température de l’eau s’écoulant par la douche ou dans la
baignoire au delà de la limite considérée sécuritaire, ce qui pourrait causer un ébouillantage. Si cette
étiquette n’a pas été remplie, vous devriez vous assurer que le bouton de température a été réglé
en fonction des caractéristiques de votre installation. Le feuillet d’instruction fourni avec la soupape
indique la marche à suivre pour effectuer le réglage.
T60 / T75 Series T66T Series
T60 / T75 Series T66T Series
T60P Series
T60P Series
-
 1
1
-
 2
2
-
 3
3
-
 4
4
-
 5
5
-
 6
6
-
 7
7
-
 8
8
-
 9
9
-
 10
10
-
 11
11
-
 12
12
-
 13
13
-
 14
14
-
 15
15
-
 16
16
-
 17
17
-
 18
18
-
 19
19
-
 20
20
-
 21
21
-
 22
22
-
 23
23
-
 24
24
-
 25
25
-
 26
26
-
 27
27
-
 28
28
-
 29
29
-
 30
30
-
 31
31
-
 32
32
-
 33
33
-
 34
34
-
 35
35
-
 36
36
-
 37
37
-
 38
38


Brizo T60075-BL Installation guide
- Category
- Sanitary ware
- Type
- Installation guide
- This manual is also suitable for
Ask a question and I''ll find the answer in the document
Finding information in a document is now easier with AI
in other languages
- français: Brizo T60075-BL Guide d'installation
- español: Brizo T60075-BL Guía de instalación
Related papers
-
 Brizo T60298-PC Installation guide
-
Brizo R83992 User manual
-
Brizo T60P490-BN Installation guide
-
 Brizo 696388-PC Installation guide
-
Brizo T70430-PN Installation guide
-
 Brizo 696398-NK Installation guide
-
 Brizo T75580-BL TempAssure Thermostatic Valve User manual
-
 Brizo 62843LF-BLGL Maintenance And Installation Manual
-
 Brizo T65886LF-NKPC-ECO Installation guide
-
 Brizo 81376-SL Installation guide


Other documents
-
Intermetro PBH3060HS Datasheet
-
Delta Faucet 88876-PC Installation guide
-
DANCO 88747 Installation guide
-
Signature Hardware Hardesty Thermostatic Shower Set Installation guide
-
Gerber D460074 User manual
-
-
American Standard T420430.295 Installation guide
-
-
Delta OLD MONITOR 1300-1400 Owner's manual
-