
Marine Flooring Products
Installation and Care Instructions
Read these instructions in their entirety before installing Nautolex® Marine Flooring.
Installations can differ widely depending on the boat construction and the surface you will be
covering – wood, fiberglass or metal.
The following procedure is based on the use of water-based vinyl flooring adhesive. The use of
an improper adhesive might result in an unsatisfactory installation.
TOOL LIST:
• Scissors • Sharp Knife
• Brush or Roller • Staples or Tacks
• Smoothing Block • Tape
1. Surface Preparation: It is important that the surface to be
covered is clean and smooth. All moldings and fittings must
be removed from the area to be covered.The preparation of
new wood surfaces should include the sanding and filling of all
holes and gouges. This should be followed by a coat of sealer
to prime and seal the wood, thus reducing the absorption of
adhesive.
If you are covering wood surfaces that have been previously
finished, remove any flaking varnish or paint and any traces
of contaminants such as gasoline or oil. The surface should be
sanded to the bare wood then followed by a coat of sealer
to prime and seal the wood, thus reducing the absorption of
adhesive. For proper results, you must also fill all joints and
seams and seal all exposed edges.
When covering metal surfaces or decks, remove dirt and grease,
then apply a coat of metal primer to reduce the possibility of
corrosion.
With fiberglass boats, the interior surfaces are usually rough.
This is particularly true of boat sides vs. floors. Fiberglass floors
are usually smoother and can be covered with Flooring; however,
it is important to sand these areas prior to installation.
2. Prepare Nautolex Flooring: Cut the Flooring to the
appropriate shape of the area to be covered. When abutting
two pieces of material, be sure to provide enough overlap on
both pieces to line up and space the screw plugs and caulking
lines of the adjacent pieces. If the Flooring will be used to
cover a cabin top or boat side, cut the Flooring to shape, roll
the material out of the way, and proceed to the application of
the adhesive.
3. Adhesive Application: During the adhesive’s “wet” time, water
in the water-based adhesive evaporates into the air. Late in the
“wet” time, the adhesive becomes “sticky”; this “sticky” time is
best for bonding the Flooring to the surface. After the “sticky”
time, the adhesive remains pliable but is beginning to cure.
Direct rain can dilute the adhesive on freshly installed flooring
areas during the “wet” time. High moisture or humidity can
delay the evaporation and drying of the adhesive, resulting in
sub-optimal installation. For these reasons, we suggest you
consider the weather and degree of protection so as to avoid
water or moisture exposure during installation.
When covering a floor or deck, position the Flooring accurately
and secure one half of the width in position temporarily with
staples, tacks or tape. Fold back the unsecured half and apply
the adhesive as follows:
• Follow the adhesive manufacturer’s instructions for proper
application.
• The adhesive should be sticky, but no longer “wet” when the
Flooring is applied. For fiberglass or metal decks, apply
a thin coat of adhesive to the deck and another thin coat
to the Flooring back. When the two surfaces are sticky (not
“wet”) apply the Flooring to the deck. Applying adhesive to
both Flooring and deck will give the best results on wood
decks also.
Tips:
• Typically, one quart of adhesive is sufficient to apply three
lineal yards of 54” wide Flooring.
• A 3” brush is the most practical tool for applying the
adhesive, but a paint roller can also be used. Thinning is not
usually necessary, but if the water-based adhesive becomes
too thick for easy handling, it can be thinned with water.
• Brushes, rollers and tools should be cleaned with water
before the adhesive dries. If the adhesive is allowed to dry,
paint thinner can be used for cleaning.
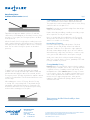
4. Install Nautolex Flooring: After applying the adhesive, gently
smooth the rolled-back half of the Flooring into position. It is
important that air not be trapped between the surface being
covered and the Flooring. This may be avoided by using a
“smoothing pad” or hard roller to smooth the fabric into place
after holding the Flooring up and away from the prepared
surface, and lowering it slowly into place as you smooth it with
the roller. You can then smooth bubbles and wrinkles toward
the edges.
Page 1

ALL OMNOVA PRODUCTS AND SERVICES ARE OFFERED AND SOLD SUBJECT TO THE OMNOVA STANDARD
TERMS AND CONDITIONS OF SALE AGREEMENT SET FORTH AT WWW.OMNOVA.COM
NAUTOLEX is a registered trademark of OMNOVA Solutions Inc.
© 2012 OMNOVA Solutions Inc. July 2012
World Headquarters
175 Ghent Road
Fairlawn, OH 44333
United States
PHONE +1 330 869-4200
FAX +1 330 869-4212
Marine Flooring Products
Installation and Care Instructions (continued)
Trapped air will appear as bubbles or blisters; if small and
scattered they should disappear in a few days. However, if they
are large or close together, the Flooring may have to be lifted
and repositioned.
After the first half of the Flooring has been installed, remove the
tacks or staples holding the other half in position. Fold back this
half exactly as before and apply the adhesive to the remaining
area. Then smooth the Flooring into position as described
previously.
To apply Flooring on removable floorboards, the material
should be cut to overlap around all edges and be folded and
tucked underneath. Apply the adhesive as instructed, and roll
Flooring into position. All edges should then be stapled or tacked
securely to the undersurface of the floorboard at least two inches
from the edges.
When abutting two sections of Flooring, allow the Flooring
to overlap. Then, using a sharp knife or razor blade along a
straight-edge, cut through both thicknesses of material on the
desired line. Lift both the excess top and bottom pieces away,
and smooth the remaining pieces into place.
5. Fasten Edges: After the Flooring is applied, all edges and
center seams must be fastened down and held mechanically.
This may be done with non-rusting staples, tacks or screws, being
careful to install one inch apart or less.
Nautolex Flooring has a controlled shrinkage factor that will give
a tight, smooth finished job.
Replace all moldings and fittings, installing new molding or strips
where required to conceal joints and seams.
Note: It is possible that a few small blisters in the flooring will
develop when sun first strikes the deck. These should dissipate
and be less noticable over a few days.
Non-Mechanical Fastening
If mechanical fastening is impossible because of the boat
construction, be sure that all edge surfaces have a liberal
application of adhesive. Then squeeze the edges against the
deck with a water-dampened rag to press out excess adhesive.
Without fastenings, edges have a tendency to contract or creep,
so be generous with adhesive if the area requires a snug fit.
Avoid center seams which could open up without fastening
strips. Try to cover the area in one piece, particularly if 72” wide
Flooring is available in your area.
Cleaning Nautolex Flooring
Nautolex Marine Flooring has been engineered to be resistant to
soiling and easy to maintain. In most cases, only soap and water
is required. However, if a stubborn stain should develop, use a
mild liquid cleaner. While Nautolex Marine Flooring is resistant
to most common solvents, they should be used with caution since
some contain ingredients that could be harmful to it. If a solvent
must be used, we suggest using turpentine, white gasoline,
naphtha or carbon tetrachloride sparingly. Abrasive cleaners
should never be used.
These instructions should be followed carefully to obtain
satisfactory results.
Page 2
-
 1
1
-
 2
2


Ask a question and I''ll find the answer in the document
Finding information in a document is now easier with AI
Other documents
-
Armstrong Flooring G3606401 Installation guide
-
Future Foam 0554D-34-12 Installation guide
-
 Americana Floors SB-PL-HRM35606 Installation guide
-
TrafficMASTER HD069-6-1200-AB Installation guide
-
 Bruce SHD5362 Installation guide
-
 Bruce EAHHD75L402 Installation guide
-
Mohawk LWCSS467 Installation guide
-
-
 Nydree Flooring FPTBORO01QD4BDM Installation guide
-
 STAINMASTER 288663 Installation guide


