Page is loading ...

12-Cup Coffeemaker / Cafetera de 12 tazas
JW Series / Serie JW
User Manual / Manual del Usuario
©2015 Sunbeam Products, Inc. doing business as Jarden Consumer
Solutions. All rights reserved. Distributed by Sunbeam Products, Inc.
doing business as Jarden Consumer Solutions, Boca Raton, Florida
33431. Sunbeam Products, Inc.is a subsidiary of Jarden Corporation
(NYSE:JAH).
©2015 Sunbeam Products, Inc. operando bajo el nombre de Jarden
Consumer Solutions. Todos los derechos reservados. Distribuido por
Sunbeam Products, Inc. operando bajo el nombre de Jarden Consumer
Solutions, Boca Raton, Florida 33431. Sunbeam Products, Inc. es una
subsidiaria de Jarden Corporation (NYSE:JAH).
U.S. 1-800-MR COFFEE (1-800-672-6333) Canada 1-800-667-8623
Visit us at www.mrcoffee.com / Visítenos en www.mrcoffee.com
Printed in China/Impreso en China P.N. 180024
GCDS-MRC38443-BB BVMC-JWX12CUP_15ESM1
www.mrcoffee.com
BVMC-JWX12CUP_15ESM1.qxd:133834 1/28/15 2:35 PM Page 56

IIMMPPOORRTTAANNTT SSAAFFEEGGUUAARRDDSS
To reduce the risk of fire, electric shock and/or injury to
persons, basic safety precautions should always be followed
when using electrical appliances, including the following:
1. READ ALL INSTRUCTIONS BEFORE USING THIS APPLIANCE.
2. Do not touch the appliance's hot surfaces. Use handles
or knobs. Scalding may occur if the lid is removed during
brewing cycles.
3. To protect against electric shock, do not immerse the
power cord, power plug or appliance in water or in any
other liquid.
4. Close adult supervision is necessary when this appliance
is used by or near children.
5. Turn the appliance OFF and unplug the power cord
from the power source when the appliance and clock
are not in use and before cleaning. Allow the
appliance parts to cool before putting on or taking off
parts and before cleaning the appliance.
6. Do not operate any appliance with a damaged power
cord or power plug, or operate it after the appliance
malfunctions, or has been damaged in any manner.
Return this appliance only to the nearest Authorized
Service Center for examination, repair or adjustment.
7. The use of accessory attachments other than MR. COFFEE
®
brand products may cause hazards or injuries.
8. Do not use the appliance outdoors.
9. Do not let the power cord hang over the edge of a table or
counter, or allow it to come into contact with hot surfaces.
10. Do not place this appliance on or near a hot gas stove
or electric burner or in a heated oven.
11. To disconnect the appliance, turn it OFF, then remove
the power plug from the power supply.
12. Place the appliance on a hard, flat level surface to avoid
interruption of airflow underneath the appliance.
13. Avoid contact with any moving parts.
14. This appliance is designed for household use only.
15. Do not use appliance for other than intended use.
DECANTER USE AND CARE
Follow the instructions below to reduce or eliminate the
chance of breaking the glass decanter or thermal carafe:
• This decanter is designed for use with your MR. COFFEE
®
coffeemaker and therefore must never be used on a
range top or in any oven, including a microwave oven.
• Do not set a hot decanter on a wet or cold surface.
• Do not use a cracked decanter or a decanter having a
loose or weakened handle.
• Do not clean the decanter with abrasive cleaners, steel
wool pads or other abrasive materials.
• Discard the decanter immediately if it is ever boiled dry.
• Protect the decanter from sharp blows, scratches or
rough handling.
WWAARRNNIINNGG!!
To reduce the risk of fire or electric
shock, do not remove any service covers. There
are no user serviceable parts inside the
appliance. Only authorized personnel should
repair the appliance.
Please read ALL of the instructions in this manual carefully
before you begin to use this appliance. Proper care and
maintenance will ensure a long life and a trouble-free
operation for this appliance. Please save these instructions
and refer to them for cleaning and care tips.
SAVE THESE INSTRUCTIONS
2
3
!
BVMC-JWX12CUP_15ESM1.qxd:133834 1/28/15 2:35 PM Page 2

T
T
A
A
B
B
L
L
E
E
O
O
F
F
C
C
O
O
N
N
T
T
E
E
N
N
T
T
S
S
Important Safeguards . . . . . . . . . . . . . . . . . . . . . . . . . . . . . .2
Decanter Use and Care. . . . . . . . . . . . . . . . . . . . . . . . . . . . .3
Special Cord Set Instructions. . . . . . . . . . . . . . . . . . . . . . . . .4
Table of Contents . . . . . . . . . . . . . . . . . . . . . . . . . . . . . . . . .5
Parts Diagram . . . . . . . . . . . . . . . . . . . . . . . . . . . . . . . . . . . .6
Coffeemaker Features and Benefits . . . . . . . . . . . . . . . . . . . .8
Clean Your Coffeemaker Before Using the First Time. . . . . . . .9
Setting The Clock and Delay Brew Time. . . . . . . . . . . . . . . . . 10
Preparing for Use . . . . . . . . . . . . . . . . . . . . . . . . . . . . . . . . .11
• Suggested Coffee Measurement Chart
• Water Filtration System
• Adding Water and Ground Coffee
Brewing Coffee Now . . . . . . . . . . . . . . . . . . . . . . . . . . . . . . 14
Brewing Coffee Later (Delay Brew) . . . . . . . . . . . . . . . . . . . . 16
Cleaning and Maintaining Your Coffeemaker . . . . . . . . . . . . . 17
Troubleshooting Your Coffeemaker. . . . . . . . . . . . . . . . . . . . 20
Service and Maintenance . . . . . . . . . . . . . . . . . . . . . . . . . . .23
Warranty Information . . . . . . . . . . . . . . . . . . . . . . . . . . . . . . 24
Welcome and congratulations on the purchase of your new
MR. COFFEE
®
Coffeemaker. Your new JW Series coffeemaker
will wake up with you in the morning and provide you
breaks and treats during your hectic daily activities. How you
enjoy your MR. COFFEE
®
Coffeemaker is up to you!
SPECIAL CORD SET INSTRUCTIONS
1. A short power supply cord is provided to reduce the
hazards resulting from a person or pet becoming
entangled in, or tripping over, a longer cord.
2. An extension cord may be purchased and used if care is
exercised in its use.
3. If an extension cord is used, the marked electrical rating
of the extension cord must be at least 10 amps and 120
volts. The resulting extended cord must be arranged so
that it will not drape over a countertop or tabletop
where it can be pulled on by children or tripped over
accidentally.
4. This appliance has a polarized plug (one blade is wider
than the other). To reduce the risk of electric shock, this
plug will fit in a polarized outlet only one way. If the plug
does not fit fully in the outlet, reverse the plug. If it still
does not fit, contact a qualified electrician. Do not
modify the plug in any way.
5. You can customize the length of the power cord so that
it is the exact length you desire. To increase the length
of the power cord: grasp the power cord (not the
power plug) and gently lift it out of the slot, then pull it
away from the coffeemaker. To decrease the length of
the power cord: Grasp the power cord (not the power
plug), lift it out of the slot and gently feed it into the
coffeemaker. Lock the cord in the slot when finished.
4
5
WARNING: TO REDUCE THE RISK OF FIRE OR
ELECTRIC SHOCK, DO NOT REMOVE THE
BOTTOM COVER. NO USER SERVICEABLE
PARTS ARE INSIDE. REPAIR SHOULD BE DONE
BY AUTHORIZED SERVICE PERSONNEL ONLY.
WARNING
RISK OF FIRE OR
ELECTRIC SHOCK
DO NOT OPEN
BVMC-JWX12CUP_15ESM1.qxd:133834 1/28/15 2:35 PM Page 4

6
7
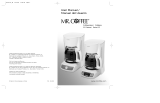
PPAARRTTSS DDIIAAGGRRAAMM
1. Brew Basket Lid
2. Shower Head
3. Water Reservoir
4. Pause ‘n Serve
5. Water Window
6. Warming Plate
(not on thermal models)
7. Decanter
8. Removable Filter Basket
9. Pour Through Reservoir Lid
2
3
8
1
6
7
9
5
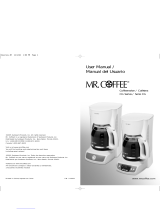
CCoonnttrrooll PPaanneell
(
Fresh Brew™
Timer display and
Fresh Brew™
Timer button
not included on all JW series models)
a.
Clock Display / Fresh Brew™ Timer Display
b. Fresh Brew
™
Timer Display Button
c.
Clean Cycle Indicator
d.
Delay Brew Indicator
e.
Brew Now Indicator
f.
Select/Off Button
g.
Brew Strength
Indicators
(Regular/Strong)
h.
Brew Strength
Button
i.
Set Delay Button
j.
Hour Button
k.
Minute Button
Coffeemaker Extras
((nnoott iinncclluuddeedd wwiitthh aallll mmooddeellss))
Mr. Coffee
®
Brand
Water Filtration System
Mr. Coffee
®
Brand
Permanent Filter
a
b
c
d
e
f
g
h
j
i
4
k
Mr. Coffee
®
Brand 10-12 Cup
Basket-Style Paper Filters
BVMC-JWX12CUP_15ESM1.qxd:133834 1/28/15 2:35 PM Page 6

COFFEEMAKER FEATURES AND BENEFITS
Your new MR. COFFEE
®
coffeemaker has the following features:
• Brewing Capacity – 12 Cups – glass decanter series
– 8 Cups – thermal carafe series
•
RReemmoovvaabbllee FFiilltteerr BBaasskkeett
– The filter basket lifts out for fast
and easy cleaning and filling.
•
PPaauussee ‘‘nn SSeerrvvee
– The Pause ‘n Serve feature allows you up
to 30 seconds to pour a cup of coffee while the
coffeemaker is still brewing. Carefully remove the decanter
and the Pause ’n Serve feature will be automatically
activated, temporarily stopping the flow of coffee into the
decanter.
•
WWaatteerr WWiinnddooww
– Shows amount of water in the reservoir
for accurate filling.
•
NNoonn--SSttiicckk WWaarrmmiinngg PPllaattee
– (not on thermal models) This
feature allows you to keep your coffee hot after brewing.
The non-stick attribute prevents the decanter from sticking
to the surface of the warming plate.
•
BBrreeww SSttrreennggtthh SSeelleeccttoorr
– Adjusts the brewing time to
create a more full-flavored coffee.
•
WWaatteerr FFiillttrraattiioonn SSyysstteemm
– Great tasting coffee begins with
great water! Using the MR. COFFEE
®
carbon-based water
filter in the MR. COFFEE
®
coffeemaker during the brewing
process helps remove up to 97% of the chlorine from the
water and improves the taste of your coffee. (Not included
on all models)
•
CCoorrdd SSttoorraaggee
– Safely stores excess cord to keep your
countertop neat.
•
TTwwoo--HHoouurr AAuuttoo SShhuutt--OOffff
– Keeps your coffee hot for two
hours, then automatically shuts off.
•
PPrrooggrraammmmaabbllee CCoonnttrroollss
–
CClloocckk
– The clock serves as a handy kitchen clock and
8
9
allows you to set the Delay Brew feature and functions
as the Fresh Brew™ Timer feature.
–
FFrreesshh BBrreeww™™ TTiimmeerr ffeeaattuurree
– Lets you know how long
your coffee has been waiting for you. (not included on
all JW series models)
–
DDeellaayy BBrreeww
– Would you like to wake up to a fresh pot
of coffee? The timer allows you to preset when you
would like the coffeemaker to automatically begin
brewing your coffee, up to 24 hours in advance.
–
SSppeecciiaall CClleeaanniinngg CCyyccllee
– Enables you to easily maintain
and clean mineral deposits from your coffeemaker.
NNOOTTEE::
If you have selected any of the operating functions,
the coffeemaker will act upon the last operation selected if
the power is restored within 10 seconds after a power outage.
CLEANING YOUR COFFEEMAKER BEFORE
USING THE FIRST TIME
Make sure your first cup of coffee is as good as can be by
cleaning your MR. COFFEE
®
Coffeemaker before its first use.
Just follow these simple steps:
1. Wash the decanter, decanter lid and the filter basket in a
mixture of mild detergent and water. Rinse each
thoroughly (please refer to the parts diagram).
2. Replace all the parts and close the lid. Then, run a brew cycle
with water only, without adding coffee and coffee filter.
3. When brewing is complete, turn your coffeemaker off,
discard the water in the decanter and rinse the decanter,
decanter lid, and filter basket.
Your coffeemaker is now ready to use. Enjoy it!
BVMC-JWX12CUP_15ESM1.qxd:133834 1/28/15 2:35 PM Page 8

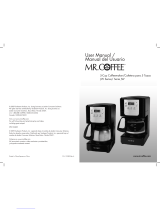
FIGURE 1
FIGURE 2
FIGURE 3
FIGURE 4
cycle, see the Brewing Coffee Later section.
To check the programmed time, push the SET DELAY button.
The display will show the time you have programmed the
coffee to brew. If you press the SET DELAY button again or
wait a few seconds, the display will switch back.
PREPARING FOR USE
Selecting and Measuring Ground Coffee
For best results, use a level tablespoon for ground coffee
measurement. Make sure you use medium grind coffee for a
perfect brew.
A. Suggested Coffee Measurement Chart
10
11
SETTING THE CLOCK AND
DELAY BREW TIME
To Set the Clock:
1. Plug the power cord into a
standard electrical outlet. The
clock will flash on the control
panel to indicate that the time has
not been set yet.
2. Press and hold the HOUR and
MINUTE buttons until you reach
the current time. The AM or PM
indicator is at the left of the
display (Figures 1 and 2).
The clock is now set!
NOTE: Pressing any button before
setting the clock will cause the clock
to start keeping time from 12:00 a.m.
You must set the clock if you want to
use the Delay Brew feature.
To Set the Delay Brew Time:
While the display is in the clock
mode, simply press the SET DELAY
button (Figure 3) and, while the
DELAY BREW yellow light is flashing,
set the brew time by pressing the
HOUR and MINUTE buttons (Figure 4).
The AM or PM indicator is at the left
of the clock display. Within a few
seconds the display will change
to the current time.
The Delay Brew Time is now set!
NOTE: To activate the DELAY BREW
To Brew Ground Coffee
12 Cups 9 tbsp.
10 Cups 7.5 tbsp.
8 Cups 6.5 tbsp.
6 Cups 4.5 tbsp.
4 Cups 3 tbsp.
1 level tablespoon (tbps) = 5 gr./0.17 oz.
1 cup = 5 fl. oz. of brewed coffee
Use more or less coffee to suit your taste.
BVMC-JWX12CUP_15ESM1.qxd:133834 1/28/15 2:35 PM Page 10

C. Adding Water and Ground
Coffee
1. Open the filter basket lid. For
your convenience, you can lift
out the removable filter basket.
2. Place a MR. COFFEE
®
brand 10-12
cup paper basket-style filter or a
MR. COFFEE
®
permanent filter
into the removable filter basket.
(Figure 5)
NOTE: If using paper filters, it is
important that the sides of the
filter fit flush against the side
of the filter basket. If filter collapse occurs, dampen the
filter before placing in the filter basket and adding ground
coffee and water.
3. Add the desired amount of coffee and gently shake to level
the coffee. See the Suggested Coffee Measurement Chart.
4. After following instructions in the
WWaatteerr FFiillttrraattiioonn SSyysstteemm
,
place the MR. COFFEE
®
water filter in the basket, making
sure that the side marked “this side up” faces you and
that the water filter is level.
5. Be sure the removable filter basket is properly centered
and all the way down in the brew basket and close the lid.
6. Fill the decanter with cold, fresh water to the desired
capacity (1 cup equals 5 ounces) For easy and accurate
12
13
B. Water Filtration System
Using the Mr. Coffee
®
carbon-based water filter in the
Mr. Coffee
®
coffeemaker during the brewing process helps
remove up to 97% of the chlorine from the water and
improves the taste of your coffee.
First, look for the MR. COFFEE
®
Filter Friendly symbol on
the bottom of your filter basket. If you do not see this symbol,
please call 1-800-672-6333. To use the water filtration system
in your MR.COFFEE
®
Coffeemaker, please follow these steps:
1. Align the red indicator to the letter on the frame that
corresponds with the month that you are using the disk for
the first time. This serves to remind you to change the disk
every month (approx. 30 brewing cycles). To change the
disk, remove the used disk, insert new disk into the frame.
2. Rinse the water filter in fresh water before first use.
3. Follow
AAddddiinngg WWaatteerr aanndd CCooffffeeee
instructions.
4. When you are done brewing your coffee, rinse the water
filter with fresh water. Do not put your water filter in the
dishwasher.
NOTE: For optimum results, use the water filtration system
with a permanent filter.
Disk & Frame
Red Indicator
FIGURE 5
Permanent
Filter
Top of filter
BVMC-JWX12CUP_15ESM1.qxd:133834 1/28/15 2:35 PM Page 12

14
2. To enjoy a more full flavored cup
of coffee, press the Brew Strength
button once. The STRONG Brew
Strength red light will turn on. The
coffeemaker will remain in the
Brew Strength you have selected
until you change it back to regular
strength by pressing the Brew
Strength button or until you
unplug the machine (Figure 7).
3. After the used coffee grounds have cooled, carefully
remove the filter basket and discard them.
NNOOTTEE::
Always allow the coffeemaker to cool down
before cleaning.
4. Prior to making a second pot of coffee, turn the
coffeemaker off. This will reset the Fresh Brew™ Timer
feature. To turn the coffeemaker off, press the SELECT/OFF
button until all lights turn off.
5. Make sure the decanter is empty before starting to
brew coffee.
6. Be sure to turn your coffeemaker off when no longer
using it.
NNOOTTEE::
Scalding may occur if the lid is removed during
brewing cycles.
The Fresh Brew™ Timer Feature
The Fresh Brew™ Timer feature lets you know how long your
coffee has been waiting for you. At the start of the brew
cycle, The Fresh Brew™ Timer TIMER feature will automatically
be activated.
NOTE: Fresh Brew™ Timer display and Fresh Brew™ Timer
button not included on all JW series models.
FIGURE 7
filling, the water markings on the glass decanter and on
the water window show the amount of water needed to
make the corresponding desired number of cups. Do not
fill past the “12 cup MAX line” or water will flow out of
the overfill hole in the back of the coffeemaker.
The amount of coffee brewed will always be slightly less
than the amount of water poured in the water reservoir.
This is due to the minimum absorption of water by the
coffee grounds.
7. Lift the pour through reservoir lid and pour the water into
the water reservoir. Close the lid and place the empty
decanter onto the warmer plate.
NOTE: Make sure the decanter is fully placed on the
warming plate or the water and the grounds will overflow
from the filter basket. An overflow may cause personal injury
or damage to property.
CAUTION! To reduce the risk of damaging the
decanter and/or the risk of personal injury, do
not add cold water to the decanter if the
decanter is already hot. Allow the decanter to
cool before using.
BREWING COFFEE NOW
1. After completing the steps in the
Adding Water and Coffee section
and with the glass decanter and
the filter basket securely in place,
turn the coffeemaker on by
pressing the SELECT button once.
The BREW NOW green light will
turn on to signal that the
coffeemaker is on and brewing
(Figure 6).
!
FIGURE 6
15
BVMC-JWX12CUP_15ESM1.qxd:133834 1/28/15 2:35 PM Page 14

!
Press the Fresh Brew™ Timer button
once (Figure 8) and the clock time will
change to show the amount of time
that has passed since brewing
completed. Push again to display
current time.
NNOOTTEE::
The BREW NOW green light
must be on for TIMER feature to
operate. The time and delay brew
time cannot be set when the fresh
brew time is displayed.
BREWING COFFEE LATER
1. You must first set the time for when you would like the
coffeemaker to begin brewing your coffee as described in
“Setting the Clock and the Delay Brew Time” section.
2. Prepare your coffeemaker as described in “Adding Water
and Ground Coffee” section.
3. To activate DELAY BREW and
program your coffeemaker to brew
coffee at a later time, press the
SELECT/OFF button twice (Figure
9). The yellow DELAY BREW light
will turn on. The coffeemaker is
now set to automatically brew
coffee at the pre-set later time. At
this time the brew strength light
will turn on. You can select the
strength that you desire by
pressing the BREW STRENGTH
button.
4.
At the pre-set time, the green BREW NOW light will turn
on and the DELAY BREW yellow light will turn off,
indicating the brewing has started in the selected brew
strength. The Fresh Brew™ Timer feature will start.
FIGURE 8
FIGURE 9
5. The coffeemaker warmer plate will keep your coffee hot
for 2 hours and then automatically turn off. Thermal
models will turn off at the end of the brew cycle.
NNOOTTEE::
Scalding may occur if the lid is removed during
brewing cycles.
As a safety feature, your coffeemaker will NOT start again
automatically the next day. If you want your coffee to brew
at the same time the following day, simply add a new filter,
coffee and water and set DELAY BREW, by repeating Steps 2
and 3 above.
To cancel DELAY BREW: Press the SELECT/OFF button until all
lights turn off.
CLEANING AND MAINTAINING YOUR COFFEEMAKER
Daily Cleaning
Always turn off, unplug and allow the coffeemaker to cool
before cleaning. Remove the filter basket, permanent filter
(not included on all models), decanter and decanter lid and
wash them in a solution of hot water and mild liquid soap.
Never use abrasive cleansers, steel wool pads or other
abrasive materials. Dishwasher top rack safe parts: glass
decanter and lid, filter basket and permanent filter. The water
filter disk and thermal decanter are not dishwasher safe.
CAUTION! Never immerse the coffeemaker itself in
water, in any other liquid or place in the dishwasher.
Regular Cleaning and Maintenance
DDeeccaallcciiffyyiinngg yyoouurr MMRR.. CCOOFFFFEEEE
®®
CCooffffeeeemmaakkeerr
Minerals (calcium/limestone) found in water will leave
deposits in your coffeemaker and affect its performance. It’s
recommended that you regularly remove these deposits by
using MR. COFFEE
®
Cleaner or vinegar. MR. COFFEE
®
Cleaner is
available at many retail stores or by calling the Consumer
Service Department at 1-800-MR COFFEE (1-800-672-6333).
16 17
BVMC-JWX12CUP_15ESM1.qxd:133834 1/28/15 2:35 PM Page 16

1. Follow package instructions to prepare one batch of
MR. COFFEE
®
Cleaner. Pour the mixture into the water
reservoir. Before decalcifying, remove the water filtration
disk from the machine.
NOTE: 4 cups or 20 fl. oz. of undiluted, white household
vinegar may be used as a substitute for the cleaner.
2. Place an empty MR. COFFEE
®
10-12 cup basket-style
paper filter or MR. COFFEE
®
permanent filter into the filter
basket and close the brew basket lid.
3. Place the empty decanter back in the unit, centered on
the warmer plate.
4. Press the SELECT/OFF button until the
red CLEAN indicator light turns on
(Figure 10). For your convenience the
cleaning cycle is automatic. The entire
cycle will take 45-60 minutes to
complete. During the cleaning your
coffeemaker will:
a. Slow brew approx. 3 cups of
cleaning solution.
b. Pause for 30 minutes (the CLEAN light will remain on
to alert you that the process is active).
c. After 30 minutes, your coffeemaker will brew the
remainder of the cleaning solution.
d. When complete, the CLEAN light will turn off and your
coffeemaker will turn off.
5. Discard the cleaning solution and rinse the decanter
thoroughly with clean water.
6. Fill the water reservoir with clean, fresh water.
7. Place the empty decanter back on the coffeemaker,
centered on the warming plate.
8. Remove and discard the paper filter used during the
FIGURE 10
cleaning cycle. If a MR. COFFEE
®
permanent filter was used
during cleaning, remove it and rinse it thoroughly before
replacing it in the filter basket.
9. Begin brewing and allow the full brew cycle to complete.
10.Repeat steps 5 through 9 one more time.
Suggested Decalcifying Interval
The frequency of cleaning depends on the hardness of the
water used. The following table gives a suggested cleaning
schedule.
Water Filtration Disk Replacement
Your water filtration disk will need to be replaced once a
month (approx. 30 brew cycles). If the machine will not be
in use for an extended period of time, rinse the water filter
with running water and clean the coffeemaker before use.
Cleaning the Decanter
Hard water can leave a whitish stain on the decanter, and
coffee may then turn this stain brown.
To remove decanter stains:
1. Fill the decanter with a solution of equal parts water and
vinegar and let the solution stand in the decanter for
approximately 20 minutes.
2. Discard the solution, then wash and rinse the decanter.
Do not use harsh abrasive cleaners that may scratch the
decanter, scratches may cause the decanter to break.
18 19
Type of Water Cleaning Frequency
Soft Water Every 80 Brew Cycles
Hard Water Every 40 Brew Cycles
or when red light is flashing (programmable models).
BVMC-JWX12CUP_15ESM1.qxd:133834 1/28/15 2:35 PM Page 18

TROUBLESHOOTING YOUR COFFEEMAKER
Your MR. COFFEE
®
Coffeemaker has been carefully designed
to give you many years of trouble-free service. In the unlikely
event that your new coffeemaker does not operate
satisfactorily, please review the following potential problems
and try the steps recommended BEFORE you call an
Authorized Sunbeam Service Center.
PROBLEM POSSIBLE CAUSE SOLUTION
THE BREW NOW/ON The appliance PLUG UNIT IN.
LIGHT DOES NOT is unplugged.
LIGHT UP There’s a power WAIT FOR POWER TO
outage. BE RESTORED.
THE COFFEE IS The appliance is PLUG UNIT IN.
NOT BREWING unplugged.
There’s a power WAIT FOR POWER TO
outage. BE RESTORED.
The water reservoir CHECK THE WATER
is empty. WINDOWS.
The filter basket is INSERT FILTER
not properly BASKET CORRECTLY.
inserted.
The decanter is not PLACE DECANTER
placed all the way on CORRECTLY ON
the warming plate. WARMING PLATE.
THE COFFEEMAKER There are no coffee ADD THE DESIRED
ONLY BREWS WATER grounds in AMOUNT OF COFFEE
the filter basket. TO THE FILTER.
THE COFFEEMAKER The coffeemaker CLEAN COFFEEMAKER
BREWS SLOWLY needs cleaning. AS DESCRIBED IN
“CLEANING AND
MAINTAINING”
SECTION.
TROUBLESHOOTING YOUR COFFEEMAKER
PROBLEM POSSIBLE CAUSE SOLUTION
THE FILTER BASKET The filter basket is INSERT FILTER BASKET
OVERFLOWS not properly inserted. CORRECTLY.
The decanter is not PLACE DECANTER
placed all the way on CORRECTLY ON
the warming plate. WARMING PLATE.
The decanter lid is PLACE LID ON THE
not on decanter. DECANTER.
Too many coffee REMOVE FILTER,
grounds were DISCARD GROUNDS.
placed in the filter. IF PAPER FILTER,
REPLACE. IF
PERMANENT FILTER,
RINSE. BEGIN BREWING
PROCESS AGAIN.
The decanter was TURN OFF AND
removed from the UNPLUG THE UNIT.
warming plate for ALLOW TO COOL.
more than 30 seconds. WIPE UP THE SPILL.
DO NOT SET HOT
DECANTER BACK
ON THE WET
WARMING PLATE OR
IT MIGHT CRACK.
THE COFFEE IS There’s a power WAIT FOR POWER
NOT HOT outage. TO BE RESTORED.
Auto SHUT-OFF has FOR BEST RESULTS,
been activated. BREW A FRESH POT
OF COFFEE.
20
21
BVMC-JWX12CUP_15ESM1.qxd:133834 1/28/15 2:35 PM Page 20

TROUBLESHOOTING YOUR COFFEEMAKER
PROBLEM POSSIBLE CAUSE SOLUTION
THE COFFEE Coffee grounds other USE COFFEE GRIND
TASTES BAD than for an automatic RECOMMENDED
drip coffeemaker FOR AUTOMATIC
were used. DRIP COFFEEMAKERS.
The ground USE CORRECT
coffee-to-water ratio GROUND
was unbalanced. COFFEE-TO-WATER
RATIO.
The coffeemaker CLEAN COFFEEMAKER
needs cleaning. AS DESCRIBED IN
“CLEANING AND
MAINTAINING YOUR
COFFEEMAKER”
SECTION.
THE GROUNDS ARE The filter is not SEAT FILTER PROPERLY
IN THE COFFEE properly seated WITHIN THE
in the basket. FILTER BASKET.
The filter collapsed. REMOVE FILTER AND
REPLACE.
Do you still have questions? You can call us toll-free at the
Consumer Service Department,1-800-MR COFFEE (1-800-672-6333)
or you can visit us at www.mrcoffee.com.
SERVICE AND MAINTENANCE
Replacement Parts
Replacement parts can be purchased through your
local retailer, online at www.mrcoffee.com, or by
calling our service centers for information on where
you can find a store that carries replacement parts. For
better tasting coffee, we recommend that you use a
MR. COFFEE
®
brand replacement parts.
• Coffee Filters –This coffeemaker uses MR. COFFEE
®
brand
10-12 cup basket-style paper filter or a MR. COFFEE
®
brand
permanent filter.
• Water Filtration – Use MR. COFFEE
®
water filtration
replacement disks (WFF-6) for best results,
• Decanters – This coffeemaker uses the MR. COFFEE
®
brand
12-Cup, Black, Replacement Decanter - PLD12 or MR. COFFEE
®
brand 12-Cup, White, Replacement Decanter - PLD13,
depending on the model and color.
Repairs
If your coffeemaker requires service, do not return it to the
store where you purchased it. All repairs and replacements
must be made by Sunbeam or by an authorized Service Center.
If you live in the U.S. or Canada, please call us at the following
toll-free telephone numbers to find the location of the
nearest authorized service center:
U.S. 1-800-MR COFFEE (1-800-672-6333)
Canada 1-800-667-8623
You may also visit our website at
www.mrcoffee.com
To assist us in serving you, please have the coffeemaker
model number and date of purchase available when you
call. The model number is on the bottom of the coffeemaker.
We welcome your questions, comments or suggestions.
22 23
BVMC-JWX12CUP_15ESM1.qxd:133834 1/28/15 2:35 PM Page 22

In all your communications, please include your complete
name, address and telephone number and a description of
the problem.
WARRANTY INFORMATION
1- Year Limited Warranty
Sunbeam Products, Inc. doing business as Jarden Consumer
Solutions or if in Canada, Sunbeam Corporation (Canada)
Limited doing business as Jarden Consumer Solutions
(collectively “JCS”) warrants that for a period of one year
from the date of purchase, this product will be free from
defects in material and workmanship. JCS, at its option, will
repair or replace this product or any component of the
product found to be defective during the warranty period.
Replacement will be made with a new or remanufactured
product or component. If the product is no longer
available, replacement may be made with a similar product
of equal or greater value. This is your exclusive warranty. Do
NOT attempt to repair or adjust any electrical or mechanical
functions on this product. Doing so will void this warranty.
This warranty is valid for the original retail purchaser from the
date of initial retail purchase and is not transferable. Keep
the original sales receipt. Proof of purchase is required to
obtain warranty performance. JCS dealers, service centers, or
retail stores selling JCS products do not have the right to
alter, modify or any way change the terms and conditions of
this warranty.
This warranty does not cover normal wear of parts or
damage resulting from any of the following: negligent use or
misuse of the product, use on improper voltage or current,
use contrary to the operating instructions, disassembly,
repair or alteration by anyone other than JCS or an
authorized JCS service center. Further, the warranty does
not cover: Acts of God, such as fire, flood, hurricanes and
tornadoes.
What are the limits on JCS’s Liability?
JCS shall not be liable for any incidental or consequential
damages caused by the breach of any express, implied or
statutory warranty or condition.
Except to the extent prohibited by applicable law, any
implied warranty or condition of merchantability or fitness
for a particular purpose is limited in duration to the duration
of the above warranty.
JCS disclaims all other warranties, conditions or
representations, express, implied, statutory or otherwise.
JCS shall not be liable for any damages of any kind resulting
from the purchase, use or misuse of, or inability to use the
product including incidental, special, consequential or
similar damages or loss of profits, or for any breach of
contract, fundamental or otherwise, or for any claim brought
against purchaser by any other party.
Some provinces, states or jurisdictions do not allow the
exclusion or limitation of incidental or consequential damages
or limitations on how long an implied warranty lasts, so the
above limitations or exclusion may not apply to you.
This warranty gives you specific legal rights, and you may also
have other rights that vary from province to province, state
to state or jurisdiction to jurisdiction.
How to Obtain Warranty Service
In the U.S.A.
If you have any question regarding this warranty or would like
to obtain warranty service, please call 1-800-672-6333 and a
convenient service center address will be provided to you.
24 25
BVMC-JWX12CUP_15ESM1.qxd:133834 1/28/15 2:35 PM Page 24

In Canada
If you have any question regarding this warranty or would like
to obtain warranty service, please call 1-800-667-8632 and a
convenient service center address will be provided to you.
In the U.S.A., this warranty is offered by Sunbeam Products,
Inc. doing business as Jarden Consumer Solutions located in
Boca Raton, Florida 33431. In Canada, this warranty is
offered by Sunbeam Corporation (Canada) Limited doing
business as Jarden Consumer Solutions, located at 20 B
Hereford Street, Brampton, Ontario L6Y 0M1. If you have
any other problem or claim in connection with this product,
please write our Consumer Service Department.
PLEASE DO NOT RETURN THIS PRODUCT TO ANY OF
THESE ADDRESSES OR TO THE PLACE OF PURCHASE
NOTES
26
27
BVMC-JWX12CUP_15ESM1.qxd:133834 1/28/15 2:35 PM Page 26

8. No utilice la unidad a la intemperie o aire libre.
9. No permita que el Cable eléctrico de la unidad cuelgue
del borde de una mesa o mostrador, ni que haga
contacto con superficies calientes.
10. No coloque este electrodoméstico cerca o encima de
ninguna superficie caliente, ya sea eléctrica o de gas, o
dentro de un horno caliente.
11. Para desconectar este electrodoméstico, oprima el
botón de “OFF” (APAGAR), luego remueva el enchufe
eléctrico del tomacorriente.
12. Coloque la unidad sobre una superficie dura, plana y
nivelada para evitar interrupciones en el flujo de aire por
debajo de la cafetera.
13. Evite hacer contacto con las partes en movimiento.
14. Esta cafetera ha sido diseñada sólo para uso doméstico.
15. No utilice el artefacto para otros fines que no sean los
especificados.
USO Y CUIDADO DE LA JARRA
Siga las instrucciones a continuación para disminuir o eliminar
el riesgo de quebrar la jarra de vidrio o la jarra térmica:
• Esta jarra fue diseñada para ser utilizada con su cafetera
MR. COFFEE
®
, por cuanto nunca debe ser utilizada sobre
una hornilla o en ningún horno, incluyendo hornos de
microondas.
• No coloque una jarra caliente sobre una superficie mojada o
fría.
• No utilice una jarra agrietada o que tenga una agarradera
suelta o debilitada.
• No limpie la jarra con limpiadores abrasivos, esponjas de
acero u otros materiales abrasivos.
• Descarte la jarra de inmediato si en alguna ocasión hierve
hasta evaporarse todo su contenido.
AADDVVEERRTTEENNCCIIAASS DDEE
SSEEGGUURRIIDDAADD
Para disminuir el riesgo de un incendio, descarga eléctrica
y/o lesión a las personas,siempre deben obedecerse las
precauciones básicas de seguridad al utilizarse equipos
eléctricos, incluyendo las siguientes:
1. LEA TODAS LAS INSTRUCCIONES ANTES DE UTILIZAR ESTE
ELECTRODOMÉSTICO.
2. No toque las superficies calientes del electrodoméstico.
Utilice agarraderas o perillas.Si remueve la tapa de la
jarra durante los ciclos de preparación puede sufrir
quemaduras.
3. Para protegerse de una descarga eléctrica, no sumerja el
cable eléctrico, el enchufe o el electrodoméstico en
agua ni en cualquier otro líquido.
4. Se requiere supervisión adulta atenta cuando esta
unidad sea utilizada por, o cerca de, niños.
5. Apague la cafetera (oprima “OFF” [APAGAR]) y
desenchufe el cable eléctrico del tomacorriente cuando
no se esté utilizando el electrodoméstico o el reloj, y
antes de limpiarlos. Permita que las partes de el
electrodoméstico se enfríen antes de instalar o remover
partes y antes de limpiar la unidad.
6. No opere ningún electrodoméstico que tenga el cable
eléctrico o el enchufe averiado, o luego de que la
unidad se averíe o haya sido dañada de alguna manera.
Devuelva esta unidad solamente al Centro de Servicio
Autorizado más cercano para su revisión, reparación o
ajuste.
7. El uso de accesorios que no sean productos de marca
MR. COFFEE
®
pueden causar riesgos de daños o lesiones.
28
29
BVMC-JWX12CUP_15ESM1.qxd:133834 1/28/15 2:35 PM Page 28

4. Esta unidad cuenta con un enchufe polarizado (uno de
sus contactos es más ancho que el otro). Para disminuir el
riesgo de una descarga eléctrica, este enchufe sólo podrá
colocarse en un tomacorriente polarizado. Si el enchufe
no entra completamente en el tomacorriente, inviértalo.
Si aún no se puede enchufar, comuníquese con un
electricista autorizado. No modifique el enchufe de
manera alguna.
5. Usted puede ajustar el largo del cable eléctrico de
manera que sea de la longitud precisa que usted desee.
Para aumentar el largo del cable eléctrico: agarre el cable
eléctrico (no el enchufe) y hálelo hacia arriba de su
hendidura con delicadeza, retirándolo de la cafetera.
Para disminuir el largo del cable eléctrico: agarre el cable
eléctrico (no el enchufe) y hálelo hacia arriba de su
hendidura, insertándolo con delicadeza en la cafetera.
Fije el cable en la hendidura cuando termine.
ESTE PRODUCTO ES PARA USO DOMÉSTICO ÚNICAMENTE
!
• Proteja la jarra contra golpes secos, rasguños o maltrato.
NNOOTTAA::
Podrían ocurrir quemaduras si la tapa se quita
durante los ciclos de preparación.
¡¡AADDVVEERRTTEENNCCIIAA!!
Para disminuir el riesgo de un
incendio o de descarga eléctrica, no quite las
cubiertas para dar servicio a la unidad. No hay
piezas a las que el usuario pueda dar servicio en
el interior de la cafetera. Sólo el personal
autorizado debe reparar la cafetera.
Por favor lea cuidadosamente TODAS las instrucciones en este
manual antes de que comience a utilizar esta unidad. El
cuidado y mantenimiento apropiados asegurará una larga vida y
una operación sin problemas para esta unidad. Por favor
conserve estas instrucciones y refiérase a ellas para consejos
sobre la limpieza y el cuidado.
CONSERVE ESTAS
INSTRUCCIONES
I
I
N
N
S
S
T
T
R
R
U
U
C
C
C
C
I
I
O
O
N
N
E
E
S
S
E
E
S
S
P
P
E
E
C
C
I
I
A
A
L
L
E
E
S
S
S
S
O
O
B
B
R
R
E
E
E
E
L
L
C
C
A
A
B
B
L
L
E
E
E
E
L
L
É
É
C
C
T
T
R
R
I
I
C
C
O
O
1. Se provee un cable eléctrico corto para disminuir los
riesgos de que una persona o mascota se pudieran
enredar o tropezar con un cable más largo.
2. Se puede adquirir y utilizar una extensión eléctrica si se
usa con precaución.
3. Si se utiliza una extensión eléctrica, la calificación
eléctrica rotulada de la extensión debe ser de al menos
10 amperios y 120 voltios. El cable extendido resultante
debe acomodarse para que no cuelgue del borde de un
mostrador o mesa donde pueda ser tirado por niños o
donde se pueda tropezar con él accidentalmente.
30 31
ADVERTENCIA: PARA REDUCIR EL RIESGO DE
INCENDIO O DE DESCARGA EL CTRICA. NO
RETIRE LA TAPA INFERIOR. NO EXISTEN PARTES
INTERNAS QUE EL USUARIO PUEDA REPARAR.
ÚNICAMENTE PERSONAL DE SERVICIO AUTORIZADO
PUEDE REALIZAR REPARACIONES.
ADVERTENCIA
ÚRIESGO DE INCENDIO O DE
DESCARGA ELÉCTRICA.
NO ABRA
BVMC-JWX12CUP_15ESM1.qxd:133834 1/28/15 2:35 PM Page 30

DIAGRAMA DE PARTES
1. Tapa de la Canasta del
Filtro
2. Cabeza de rocío
3. Tanque de Agua
4. Detenga y Sírvase
(Pause ‘n Serve)
5. Ventanilla del agua
6. Placa calefactora
(no se incluye en los
modelos térmicos)
7. Jarra
8. Canasta Removible del
Filtro
9. Tapa del Tanque de Agua
TABLA DE CONTENIDO
Advertencias de Seguridad. . . . . . . . . . . . . . . . . . . . . . . 28
Uso y Cuidado de la Jarra . . . . . . . . . . . . . . . . . . . . . . . . 29
Instrucciones Especiales Sobre el Cable Eléctrico . . . . . . .30
Tabla de Contenido . . . . . . . . . . . . . . . . . . . . . . . . . . . . 32
Diagrama de Partes . . . . . . . . . . . . . . . . . . . . . . . . . . . . .33
Características y Beneficios de la Cafetera. . . . . . . . . . . . .35
Limpie su Cafetera Antes de Utilizarla por Primera Vez . . . . . .37
Programando la Hora del Reloj y el Período de Demora
del Colado . . . . . . . . . . . . . . . . . . . . . . . . . . . . . . . . . .38
Preparándose para Utilizar la Cafetera . . . . . . . . . . . . . . .39
• Tabla de Medidas de Café Sugeridas
• Sistema de Filtración de Agua
• Añadiendo agua y Café Molido
Colando Café Ahora. . . . . . . . . . . . . . . . . . . . . . . . . . . . .43
Colando Café Luego (Demora del Colado) . . . . . . . . . . . .44
Limpiando y Dándole Mantenimiento a su Cafetera. . . . . . . . 46
Resolviendo Problemas con su Cafetera . . . . . . . . . . . . . .49
Servicio y Mantenimiento . . . . . . . . . . . . . . . . . . . . . . . . 52
Información de Garantía . . . . . . . . . . . . . . . . . . . . . . . . . 53
Bienvenido y le felicitamos por su adquisición de su nueva
cafetera MR. COFFEE
®
. Su nueva cafetera se despertará con
usted en las mañanas y le brindará recesos y momentos
agradables durante su agitada rutina diaria. ¡Disfrute de su
Cafetera MR. COFFEE
®
a su manera!
32
33
2
3
8
1
6
7
9
5
4
BVMC-JWX12CUP_15ESM1.qxd:133834 1/28/15 2:35 PM Page 32

CARACTERÍSTICAS Y BENEFICIOS DE LA CAFETERA
Su nueva Cafetera MR. COFFEE
®
cuenta con las siguientes
características:
• Capacidad de preparación – 12 tazas – serie de jarra de vidrio
– 8 tazas – serie de jarra térmica
• Canasta Removible del Filtro – La canasta del filtro se
saca para un limpiado y llenado fácil y rápido.
• Pause ‘n Serve (Detenga y Sírvase) – Pause ‘n Serve le
otorga hasta 30 segundos para servirse una taza de café
mientras la cafetera aún está colando. Saque la jarra con
cuidado y Pause ‘n Serve se activará automáticamente,
deteniendo temporalmente el flujo del café hacia la jarra.
• Ventanilla del agua – Muestra la cantidad de agua en el
tanque para un llenado preciso.
• Placa calentadora antiadherente – (no incluido con los
modelos térmicos) Esta característica le permite mantener
su café caliente luego de colado. El atributo antiadherente
evita que la jarra se adhiera a la superficie del plato calefactor.
• Selector de Intensidad del Colado – Ajusta el período
de colado para preparar un café más cargado.
• Sistema de Filtración de Agua – ¡Un café de sabor
óptimo comienza con un agua óptima! Usar el filtro a
base de carbón para el agua de Mr.Coffee
®
durante el
proceso de colado en las cafeteras Mr. Coffee
®
ayudar a
eliminar hasta un 97% del cloro del agua y mejora el sabor
de su café.
• Almacenaje del cable – Almacena el sobrante del cable
eléctrico de manera segura para que su mostrador se vea
nítido.
• Apagado Automático en Dos Horas – Mantiene su café
caliente durante dos horas, y luego se apaga automáticamente.
Panel de Control
(La funcion de Fresh Brew™ o Contador de Colado fresco
no se incluyen en todos los modelos de JW.)
a.
Pantalla del Reloj/Pantalla del
Fresh Brew™
Timer o
Contador de Colado Fresco
b. Botón del Fresh Brew™ Timer
o Contador de Colado
Fresco
c.
Luz del Ciclo de Limpieza
d.
Luz de Demora del
Colado
e.
Luz de Colar Ahora
f.
Botón Select/Off
(Seleccionar/Apagar)
g.
Luces de Intensidad
del Colado
(Regular/Cargado)
h.
Botón de Intensidad del
Colado
i.
Botón de Fijar Demora
j.
Botón de la Hora
k.
Botón de Minutos
Otros artículos para su cafetera
((nnoo eessttáánn iinncclluuiiddooss ccoonn ttooddooss llooss mmooddeellooss))
Sistema de
Filtración de Agua
marca Mr. Coffee
®
Filtro Permanente
marca Mr. Coffee
®
a
b
c
d
e
f
g
h
j
i
k
34
35
Filtros de papel tipo
canasta para 10-12 tazas
marca Mr. Coffee
®
BVMC-JWX12CUP_15ESM1.qxd:133834 1/28/15 2:36 PM Page 34

LIMPIE SU CAFETERA ANTES DE UTILIZARLA POR
PRIMERA VEZ
Asegúrese de que su primera taza de café sea tan buena
como sea posible limpiando su Cafetera MR. COFFEE
®
antes
de utilizarla por primera vez. Sólo tiene que seguir estos
pasos sencillos:
1. Lave la jarra, la tapa de la jarra y la canasta del filtro
en una mezcla de detergente suave y agua. Enjuague
bien cada una (favor referirse al diagrama de partes ).
2. Ponga todas las partes de vuelta y cierre la tapa. Luego,
sin poner el café ni el filtro del café, complete un filtro
de colado según se describe en el Paso 1 de “Colando
Café Ahora”.
3. Cuando se complete el colado, apague su cafetera,
descarte el agua en la jarra y enjuague la jarra, la tapa de
la jarra y la canasta del filtro.
Su cafetera ya está lista para utilizarse. ¡Disfrútela!
• Controles Programables:
– Reloj – El reloj le sirve como un práctico reloj de
cocina, le permite programar la función de Demora del
Colado y sirve de contador Regresivo del Colado.
– Función de Fresh Brew™ Timer (Contador de Colado
Fresco) registra cuán fresco está su café desde el
comienzo del ciclo de colado hasta 2 horas después.
(no incluido en todos los modelos de la serie JW)
– Demora del Colado ¿Le gustaría despertarse a disfrutar
de una jarra de café recién colado? La función de
Demora del Colado le permite programar de antemano
cuándo desearía que la cafetera cuele su café
automáticamente, hasta 24 horas por adelantado.
– Ciclo Especial de Limpieza – Le permite dar
mantenimiento y limpiar su cafetera de depósitos
minerales de manera fácil.
NOTA: Si usted ha seleccionado cualquiera de las funciones
de realizar operaciones, la cafetera efectuará la última
operación seleccionada si se restaura el servicio eléctrico
durante los primeros diez segundos luego de un apagón
eléctrico.
37
36
BVMC-JWX12CUP_15ESM1.qxd:133834 1/28/15 2:36 PM Page 36

El indicador AM o PM está a la izquierda del visualizador
del reloj.
En pocos segundos la pantalla cambiará a la hora actual.
¡El Período de Demora del Colado ya ha sido programado!
NOTA: Para activar el ciclo de DEMORA DEL COLADO, vea la
sección “Colando Café Luego”.
Para verificar la hora programada, oprima el botón de SET
DELAY (FIJAR DEMORA). La pantalla mostrará la hora que
usted ha programado para el colado del café. Si usted
oprime el botón de SET DELAY (FIJAR DEMORA) nuevamente
o espera unos cuantos segundos, la pantalla volverá a
mostrar la hora actual.
PREPARÁNDOSE PARA UTILIZAR LA CAFETERA
Seleccionando y Midiendo el Café Molido
Para obtener mejores resultados, utilice una cucharada
nivelada para medir el café molido. Aségurese de utilizar
café molido de textura mediana para un colado perfecto.
A. Tabla de Medidas de Café Sugeridas
Para Colar Café molido
12 tazas 9 cucharadas
10 tazas 7.5 cucharadas
8 tazas 6.5 cucharadas
6 tazas 4.5 cucharadas
4 tazas 3 cucharadas
1 cucharada a ras = 5 g/0.17 oz.
1 taza = 5 onzas fluidas de café colado
Utilice más o menos café según su gusto.
PROGRAMANDO LA HORA DEL
RELOJ Y EL PERÍODO DE DEMORA
DEL COLADO
Para configurar el reloj:
1. Enchufe el cable eléctrico en un
tomacorriente estándar. El reloj
titilará en el panel de controles
para indicar que la hora aún no ha
sido programada.
2. Oprima y mantenga oprimidos los
botones de HOUR (HORA) y MINUTE
(MINUTO) hasta que el reloj marque
la hora actual. El indicador AM o PM
está a la izquierda del visualizador
(Figuras 1 y 2).
¡El reloj ya ha sido programado!
NOTA: El oprimir cualquier botón
antes de programar el reloj hará que el
reloj comience a marcar la hora a partir
de las 12:00 a.m. Usted debe programar
el reloj si desea usar la característica de
Demora del Colado.
Para Programar el Período de
Demora del Colado:
Mientras la pantalla se encuentra en la
modalidad del reloj, tan sólo oprima el
botón de SET DELAY (FIJAR DEMORA)
(Figura 3) y, mientras la luz amarilla de
DELAY BREW (DEMORA DEL COLADO)
titila, programe el período del colado
oprimiendo los botones de HOUR (HORA)
y MINUTE (MINUTO) (Figura 4).
38
39
FIGURA 1
FIGURA 2
FIGURA 3
FIGURA 4
BVMC-JWX12CUP_15ESM1.qxd:133834 1/28/15 2:36 PM Page 38
/