Clatronic mwg 746 h User manual

Category
Microwaves
Type
User manual
MWG 746 H
Bedienungsanleitung/Garantie
Instruction Manual/Guarantee
Instrucciones de servicio/Garantía
Manual de instruções/Garantia
Instrukcja obsługi/Gwarancja
Mikrowelle mit Grill und Heißluftfunktion
Combined Microwave Oven with Grill and Hot Air
Microonda combinada con grill y aire caliente
Combi-microondas com grelha e ar quente
Uniwersalna kuchenka mikrofalowa z grillem i obiegiem gorącego powietrza
6....-05-MWG 746 H NEW + PL 1 10.02.2005, 12:12:10 Uhr
2
DEUTSCH
Inhalt
Übersicht Bedienelemente ............................ Seite 3
Bedienungsanleitung..................................... Seite 4
Übersicht der Bedientasten ........................... Seite 5, 49
Garantie......................................................... Seite 11
ENGLISH
Contents
Control element overview.............................. Page 3
Instruction Manual ......................................... Page 13
Controls ......................................................... Page 14, 49
Guarantee...................................................... Page 20
ESPAÑOL
Indice
Vista de conjunto Elementos de mando......Página 3
Instrucciones de servicio.............................Página 21
Vista general de las teclas de manejo.........Página 22, 50
Garantia.......................................................Página 29
PORTUGUÊS
Índice
Vista geral dos elemntos de comando ........Página 3
Manual de instruções ..................................Página 30
Vista geral das teclas de funcionamento.....Página 31, 50
Garantía.......................................................Página 38
JE˛ ZYK POLSKI
Spis tres´ci
Przegląd elemetów obsługi.......................... Strona 3
Instrukcja obsługi......................................... Strona 39
Przegląd przycisków obsługowych ..............Strona 40, 51
Gwarancja ................................................... Strona 47
6....-05-MWG 746 H NEW + PL 2 10.02.2005, 12:12:15 Uhr
3
Übersicht der Bedienelemente
Overview of the Components
Indicación de los elementos de manejo
Descrição dos elementos
Przegląd elementów obsługi
*) Achtung: Entfernen Sie keine montierten Teile aus dem Garraum und von der Innenseite der Tür!
Caution: Do not remove any installed parts from inside the oven or anything from the inside of the door!
Atención: ¡No retire ningunas piezas montadas del espacio interior de cocción o de la parte interior de la puerta!
Atenção: Não retire objectos montados no sítio para cozer e na parte interior da porta!
Uwaga: Proszę nie usuwać żadnych zamontowanych części z komory kuchenki i niczego z wewnętrznej strony
drzwiczek!
6....-05-MWG 746 H NEW + PL 3 10.02.2005, 12:12:16 Uhr
ENGLISH
13
General Safety Instructions
Read the operating instructions carefully before
putting the appliance into operation and keep the
instructions including the warranty, the receipt and, if
possible, the box with the internal packing.
The appliance is designed exclusively for private use
and for the envisaged purpose. This appliance is not
t for commercial use. Do not use it outdoors (except
if it is designed to be used outdoors). Keep it away
from sources of heat, direct sunlight, humidity (never
dip it into any liquid) and sharp edges. Do not use the
appliance with wet hands. If the appliance is humid or
wet, unplug it immediately. Do not put it in water.
When cleaning or putting it away, switch off the ap-
pliance and always pull out the plug from the socket
(pull on the plug, not the cable) if the appliance is not
being used and remove the attached accessories.
• Do not operate the machine without supervision. If
you should leave the workplace, always switch the
machine off or remove the plug from the socket (pull
the plug itself, not the lead).
To protect children from the dangers posed by
electrical appliances, make sure that the cable is
hanging low and that children do not have access to
the appliance.
Check the appliance and the cable for damage on a
regular basis. Do not use the appliance if it is dama-
ged.
Do not try to repair the appliance on your own. Always
contact an authorized technician. To avoid the expos-
ure to danger, always have a faulty cable be replaced
only by the manufacturer, by our customer service or
by a qualifi ed person and with a cable of the same
type.
Use only original spare parts.
Pay careful attention to the following “Special Safety
Instructions“.
Important Safety Information!
Please read carefully and keep for future use.
Warning: When the door or the door seals are dama-
ged, the microwave oven must not be used until it has
been repaired by a qualifi ed specialist.
Warning: Please do not repair the device yourself,
but have it repaired by an authorised specialist. Car-
rying out maintenance or repair work which involves
removal of the cover that protects the surroundings
from microwave radiation is dangerous unless carried
out by an expert.
Warning: Do not heat liquids in closed containers.
Danger of explosion!
Warning: children must only be allowed to use the
oven without supervision if they have been given
adequate instructions enabling them to use the device
safely and informing them of the dangers of misuse.
If you would like to use your microwave in a cupboard,
on a shelf or similar item, please ensure that you
maintain a space of at least 10 cm to cupboards,
walls etc for ventilation purposes on all sides of the
machine.
Only suitable tableware should be used such as:
glass, porcelain, ceramics, heat-resistant plastic or
special microwave tableware.
If food is being heated or cooked in combustible
materials, such as plastic or paper containers, the
microwave oven should be checked frequently due to
the risk of fi re.
If smoke is produced, turn the device off and remove
the plug. Keep the door closed in order to suffocate
any fl ames.
Delay in boiling: During boiling, particularly during
the reheating of liquids (water), it may happen that the
boiling temperature has been reached but the typical
bubbles have not yet started to rise. The liquid does
not boil evenly. When the vessel is removed this so-
called delay in boiling may result in the sudden forma-
tion of bubbles when the vessel is knocked, causing
the water to boil over. There is a serious danger of
burns! In order to achieve even boiling, please place
a glass rod or similar item, but nothing metallic, in the
vessel.
The contents of babies‘ bottles and jars of baby
food must be stirred or shaken and the temperature
checked before use. There is a danger of burns.
Food with a shell or skin, such as eggs, sausages,
sealed jars etc. must not be heated up in the micro-
wave as they may explode even when heating by the
microwaves is fi nished.
Any dirt on the door frame/door seal and neighbou-
ring parts must be carefully cleaned with a damp
cloth.
Clean the microwave oven regularly and remove any
food residues from the interior.
If the machine is not clean the surface may be
damaged, affecting its serviceable life and possibly
resulting in hazardous situations.
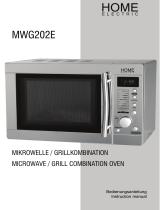
Description of the Operating Controls
1 Door lock
2 Viewing window
3 Cover
4 Drive axle
5 Sliding ring
6 Rotating plate
7 Operating panel
8 Grill heating
9 Grilling grid
6....-05-MWG 746 H NEW + PL 13 10.02.2005, 12:12:35 Uhr
ENGLISH
14
Controls
Number Buttons
For setting the clock, cooking time,
temperature and weight
Microwave Button
For selecting the power level
Grill Button
For grilling and browning
Hot Air Button
Hot air operation, thermostat controlled
Microwave/Grill
Combined Operation Button
Microwave and grill alternate
Microwave/Hot Air
Combined Operation Button
Microwave and hot air alternate
Defrost Button
Activates the defrost function in
conjunction with a time setting
Clock Button
For setting the clock in conjunction with the
number buttons
Cake Programme Button
Timer Button (Countdown)
Potato Programme Button
Popcorn Programme Button
Drinks Programme Button
Pizza Programme Button
Meat Spit Programme Button
Warming Programme Button
Start Button
Start of the programme
Express Button
Start of the express programme –
setting the express cooking time
Stop Button
Press once to stop the cooking process
or cancel an incorrect entry.
Press twice to delete the programme.
Hold down for three seconds to block/
unblock the device.
Information on Grilling and
Combined Operation
As heat radiation is used during grilling and combined
operation, please use only heat-resistant tableware.
When food is only being grilled, metal or aluminium
tableware may also be used -but not during combined
or microwave operation.
For grilling, pizza, baking and combined operation
only the grilling grid is suitable.
Do not place anything on top of the housing as this
becomes hot. Always leave the ventilation slits unco-
vered.
Please use the grilling grid to move the food to be
cooked nearer to the heating element.
Initial Operation
After removing all the accessories from inside the
oven, unpack them and place the sliding ring in the
middle. Position the glass plate on the drive axle in
such a way that it locks into the dents of the drive
shafts and is lying fl at.
Check the device for any visible damage, particularly
in the area of the door. If any damage is found, the
machine must not be used.
In order to avoid interference to other machines when
the microwave oven is operated, do not place it in the
direct vicinity of other electronic devices.
Remove any protective foils that may be adhered to
the housing.
The foils on the inside of the door must not be
removed!
Insert the mains plug into a properly installed
230 V, 50 Hz power socket.
Do not remove any installed parts from inside the
oven or from inside the door!
Using the Device
What you should know about microwave operation:
Your device works with microwave radiation, which
heats up water particles in food in a very short time.
There is no heat radiation and therefore hardly any
browning.
Only food should be heated up with this device.
The device is not suitable for baking in fl oating fat.
Only 1-2 portions should be heated up at the same
time. Otherwise the microwave will become less
effi cient.
If you want to interrupt the cooking process, press the
Stop button.
Microwaves provide their full energy levels immediate-
ly. Pre-heating is therefore not necessary.
Never operate the machine in microwave or combined
mode if it is empty.
The microwave oven does not replace your traditional
cooker. It is used mainly for:
defrosting deep-frozen food
rapid warming/heating of food or drinks
• cooking meals
Please do not use any plastic or paper tableware.
6....-05-MWG 746 H NEW + PL 14 10.02.2005, 12:12:36 Uhr
ENGLISH
15
Confi rmation Signal
The information you put into the device is confi rmed by
an audible signal.
One beep after a button has been pressed: the infor-
mation entered has been accepted.
Two beeps after a button has been pressed:
the information has been refused.
Please correct the information you have entered.
Setting the Time
Note: When the device is switched on for the fi rst time a
ashing colon appears.
1. Press the clock button. The display changes to „:“.
2. Enter the desired hours and minutes using the num-
ber buttons.
3. Press the clock button again. The new time is activa-
ted.
Operating the Microwave
Place the food to be heated up into suitable tableware.
Open the door and place the vessel in the middle of the
glass plate. Then close the door. (For safety reasons the
device only works when the door is fi rmly closed.)
1. Press the Stop button.
2. Select the desired microwave power by pressing the
microwave button once or several times.
Press the microwave button to select
the percentage values
Press: Power Description
1x 100% (P-HI) Full power
2x 90% (P-90)
3x 80% (P-80)
4x 70% (P-70) High
5x 60% (P-60)
6x 50% (P-50) Medium
7x 40% (P-40)
8x 30% (P-30) Low
9x 20 % (P-20)
10x 10 % (P-10) Very low
11x 0% (P-00)
100% corresponds to 900 W
3. Enter the desired cooking time using the number
buttons.
For example:
10:30min cooking time at 100% power
Step Button Display
1Stop
2 Microwave
P- HI
3 1 0 3 0
10:30
4Start
4. Press the Start button to start the machine. The
length of cooking depends on the quantity and con-
sistency of the contents. With a little practice you will
soon learn to estimate the cooking time.
Please note: cooking in the microwave oven is very
much faster than in a standard cooker. If you are not sure,
set the cooking time to low and continue cooking after-
wards if necessary. After the time has elapsed, the device
switches off and the word „END“ appears in the display.
Then you can remove the food.
Rapid Defrosting of Frozen Food
Please note:
As a rule of thumb, 500g of frozen food needs approx.
ve minutes to defrost.
If the frozen food has not fully defrosted within this
time, set the time in 1-minute steps.
Assuming you would like to defrost frozen food and set
the time to fi ve minutes:
1. Press the Stop button.
2. Press the Defrosting button.
3. Enter the desired cooking time using the number
buttons.
Step Button Display
1Stop
2 Defrosting
:
3 5 0 0
5:00
4Start
4. Press the Start button to start the machine.
If the food was frozen in a plastic container, we
recommend that it be briefl y defrosted and then
transferred to a vessel that is suitable for placing in the
microwave oven.
A time of up to 99 minutes and 99 seconds can be set for
defrosting. After the time has elapsed beeps are heard
and the word „END“ appears in the display. Press the stop
button or open the door. The word „END“ goes off.
The following table provides information on manual
defrosting.
Defrosting Table
Food/dish Quantity
Power
in watts
Approx.
time in
minutes
Additional
thawing
time in
minutes
Meat, Sausages
Meat (beef, veal, pork)
in pieces
500 g
1000 g
180
180
14 – 18
25 - 30
10 – 15
20 - 25
Schnitzel, cutlet 200 g 180 4 - 6 5 - 10
Minced meat 250 g 180 6 - 8 5 - 10
Frying sausage,
Frankfurter
200 g 180 4 - 6 5 - 10
Slices of cold meat 300 g 180 4 - 6 5 - 10
Tip: turn the meat halfway through and cover sensitive pieces; break up
the minced meat and remove pieces that have already thawed; separate
sausage slices.
Poultry
Chicken 1000 g 180 20 - 25 10 - 15
Chicken pieces 500 g 180 12 - 15 5 - 10
Duck 1700 g 180 25 - 40 20 - 25
Goose and turkey pieces 500 g 180 12 - 18 10 - 15
Tip: turn poultry halfway through, cover wings and legs, throw away thawed
liquid and do not allow to come into contact with other foods.
Game
Saddle of venison 1000 g 180 20 - 35 20 - 30
Saddle of hare 500 g 180 12 - 13 10 - 20
Tip: turn once and cover edges.
Fish
Prawns, shrimps 250 g 180 5 - 7 5 - 10
Trout 340 g 180 4 - 6 5 - 10
Whole fi sh 500 g 180 7 - 10 10 - 15
6....-05-MWG 746 H NEW + PL 15 10.02.2005, 12:12:39 Uhr
ENGLISH
16
Food/dish Quantity
Power
in watts
Approx.
time in
minutes
Additional
thawing
time in
minutes
Fish fi llet 250 g 180 5 - 7 5 - 10
Tip: stir several times and turn frequently.
Fruit
Raspberries, strawberries 250 g 180 4 - 6 5 - 10
Cherries, plums 250 g 180 5 - 7 5 - 10
Stewed apple 500 g 180 9 - 12 5 - 10
Tip: stir carefully or break up into pieces.
Vegetables: see „Cooking Table“, „Defrosting and Cooking Vegetables“
Bread and Pastries
Rolls 4 pieces 180 ca. 1-3 5
Bread 1000 g 180 13 - 15 8 - 10
Bread for toasting 500 g 180 5 - 6 5 - 10
Stirred cake 500 g 180 6 - 8 5 - 10
Fruit cake 1 piece 180 2 - 3 2 - 3
Flan
1 piece 180 0,5 - 1 3 - 5
1200 g 180 10 - 12 30 - 60
Tip: place the bread and pastries on kitchen crepe paper to take up the
moisture; only defrost sensitive pastry slightly.
Milk Products
Butter 250 g 180 5 - 7 10 - 15
Curds 250 g 180 6 - 8 5 - 10
Cream 200 g 180 3 - 5 2 - 3
Tip: remove the aluminium foil and stir halfway through; whip the cream
until it is semisolid.
Warming
The warming and heating of food is a particular strength
of the microwave. Liquids and foods that are in the
refrigerator can be easily brought up to room temperature
or the right temperature for consumption without the need
for many pots.
The heating times contained in the following table are
only rough guides as the time depends very much on the
starting temperature and the composition of the food. You
are therefore advised to check from time to time whether
the dish is already hot enough.
Heating Table
Food/dish Quantity
Power
in watts
Approx.
time in
minutes
Cover
Liquids
Water, 1 cup 150 g 900 0,5 - 1 no
Water, 0.5 l 500 g 900 3,5 - 5 no
Water, 0.75 l 750 g 900 5 - 7 no
Coffee, 1 cup 150 g 900 0,5 - 1 no
Milk, 1 cup 150 g 900 0,5 - 1 no
Note: Place a glass rod or similar item (nothing metal) into the vessel in
order to prevent delayed boiling. Stir well before drinking.
One-Course Meals
Schnitzel, potatoes
and vegetables
450 g 900 2,5 - 3,5 yes
Goulash with noodles 450 g 900 2 - 2,5 yes
Meat, dumpling
and sauce
450 g 900 2,5 - 3,5 yes
Tip: moisten slightly beforehand, stir from time to time.
Food/dish Quantity
Power
in watts
Approx.
time in
minutes
Cover
Meat
Schnitzel, coated
with breadcrumbs
200 g 900 1 - 2 no
Meatballs, 4 in total 500 g 900 3 - 4 no
Joint 250 g 900 2 - 3 no
Tip: brush with oil so that the breadcrumbs or crust do not become soft.
Poultry
Half a chicken 450 g 900 3,5 - 5 no
Chicken fricassee 400 g 900 3 - 4,5 yes
Tip: brush with oil, stir from time to time.
Extras
Noodles, rice
1 portion 150 g 900 1 - 2 yes
2 portions 300 g 900 2,5 - 3,5 yes
Potatoes 500 g 900 3 - 4 yes
Tip: moisten slightly beforehand.
Soups/Sauces
Clear soup, 1 plate 250 g 900 1 - 1,5 yes
Soup with garnish 250 g 900 1,5 - 2 yes
Sauce 250 g 900 1 - 2 yes
Baby Food
Milk 100 ml 540 0,5 - 1 no
Mash 200 g 540 1 - 1,5 no
Tip: shake well or stir. Check the temperature!
Cooking
Practical Cooking Tips
Please keep to the recommended values in the cooking
table and the recipes. Keep an eye on the cooking pro-
cess until you have more experience.
The door of the microwave can be opened at any time.
The machine switches off automatically.
It starts again when the door is closed.
Foods taken directly from the refrigerator require a slightly
longer cooking time than those at room temperature.
The more compact a food is, the longer is the cooking
time. For example, a large piece of meat has to be
cooked longer than the same quantity of sliced meat.
It is advisable to start cooking sizeable quantities on
maximum power and then to continue cooking evenly on
medium power.
Flat dishes cook faster than thick ones. Therefore it is ad-
visable to spread the food as thinly as possible. Thinner
pieces, e.g. chicken legs or fi sh fi llets should be placed
towards the inside or allowed to overlap.
The following rule of thumb applies:
Double the quantity = almost double the time
Half the quantity = half the time
If you are not able to fi nd a suitable time for a dish, the
following rule applies:
approx. 1 minute cooking time for each 100 g.
All dishes which are covered up on a normal cooker
should also be covered in the microwave oven.
A lid prevents the food from drying out. Suitable covers
are an inverted plate, parchment paper or microwave
foil. Dishes which are to be given a crust should not be
covered when cooked.
6....-05-MWG 746 H NEW + PL 16 10.02.2005, 12:12:41 Uhr
ENGLISH
17
Cooking Table
Food/dish Quantity
Power
in watts
Approx.
time in
minutes
Cover
Vegetables
Aubergines 500 g 720 7 - 10 yes
Caulifl ower 500 g 720 8 - 11 yes
Broccoli 500 g 720 6 - 9 yes
Chicory 500 g 720 6 - 7 yes
Peas 500 g 720 6 - 7 yes
Fennel 500 g 720 8 - 11 yes
Green beans 300 g 720 13 - 15 yes
Potatoes 500 g 720 9 - 12 yes
Turnip cabbage 500 g 720 8 - 10 yes
Leek 500 g 720 7 - 9 yes
Maize cob 250 g 720 7 - 9 yes
Carrots 500 g 720 8 - 10 yes
Paprika 500 g 720 6 - 9 yes
Sprouts 300 g 720 7 - 10 yes
Asparagus 300 g 720 6 - 9 yes
Tomatoes 500 g 720 6 - 7 yes
Courgettes 500 g 720 9 - 10 yes
Tip: Cut the vegetables into small pieces and cook with 2 - 3 tablespoons of
liquid, stir from time to time, continue cooking for 3 - 5 minutes, season just
before serving.
Fruit
Stewed apple, pear 500 g 720 5 - 8 yes
Plum jam 250 g 720 4 - 6 no
Stewed rhubarb 250 g 720 5 - 8 yes
4 baked apples 500 g 720 7 - 9 yes
Tip: add 125 ml water. Lemon juice prevents the fruit from changing colour.
Cook for a further 3 - 5 minutes.
Meat (Ready-made meals)
Meat with sauce 400 g 720 10 - 12 yes
Goulash, stewed strips
of meat
500 g 720 10 - 15 yes
Roulade of beef 250 g 720 7 - 8 yes
Tip: stir from time to time, allow to stand for 3 - 5 minutes.
Poultry (Ready-made meals)
Chicken fricassee 250 g 720 6 - 7 yes
Poultry soup 200 g 720 5 - 6 yes
Tip: stir from time to time, allow to stand for 3 - 5 minutes.
Fish
Fish fi llet
300 g 720 7 - 8 yes
400 g 720 8 - 9 yes
Tip: turn halfway through, continue cooking for 3 - 5 minutes.
Defrosting and Cooking Vegetables
Apple and red cabbage 450 g 720 14 -16 yes
Leaf spinach 300 g 720 11 - 13 yes
Caulifl ower 200 g 720 7 - 9 yes
French beans 200 g 720 8 - 10 yes
Broccoli 300 g 720 8 - 9 yes
Peas 300 g 720 7 - 8 yes
Turnip cabbage 300 g 720 13 -15 yes
Leek 200 g 720 10 - 11 yes
Corn 200 g 720 4 - 6 yes
Carrots 200 g 720 5 - 6 yes
Sprouts 300 g 720 7 - 8 yes
Spinach
450 g 720 12 - 13 yes
600 g 720 15 - 17 yes
Tip: cook in 1 - 2 tablespoons of liquid, stir from time to time or divide
carefully into pieces. Continue cooking for 2 - 3 minutes and season just
before serving.
Food/dish Quantity
Power
in watts
Approx.
time in
minutes
Cover
Soups / Stews (Ready-made meals)
Stew 500 g 720 13 - 15 yes
Soup with garnish 300 g 720 7 - 8 yes
Crème soup 500 g 720 13 - 15 yes
Tip: stir from time to time and continue cooking for 3 - 5 minutes.
Express Cooking
To start express cooking press the express button
repeatedly. The cooking process begins immediately, with
each press of the button increasing the cooking time by 30
seconds. From a time of one minute and up the cooking
time is prolonged by one minute in each case.
The power of the microwave is then 100%.
Automatic-Programmes
With the help of the automatic control it is possible
to cook defi ned quantities of food automatically. The
cooking time and microwave power level are stored in the
programme.
Please proceed as follows:
a) Potatoes
1. Press the Stop button.
2. Press the „Potato“ button once for preparing 120-170g
for press the „Potato“ button twice for the preparation
of 140-200g.
3. Press a number button between 1 and 4 to select a
cooking time.
Button
“Potatoes”
Number Button Cooking Time
1x 1 3min 50sek.
1x 2 7min 10sek
1x 3 11min
1x 4 14min
Button
“Potatoes”
Number Button Cooking Time
2x 1 5min 40sek.
2x 2 9min
2x 3 13min
2x 4 17min
4. Press the Start button to start the machine.
After the time has elapsed, the device switches off
and the word „END“ appears in the display.
Tip: Leave the food in the oven to continue cooking
for 5-10 min.
b) Popcorn
Please only use microwave popcorn in a bag!
1. Press the Stop button.
2. Press the „Popcorn“ button. „2:30“ appears in the
display.
3. Press the Start button to start the machine.
After the time has elapsed, the device switches off and
the word „END“ appears in the display. Then you can
remove the food.
Note: It is possible to change the cooking time.
6....-05-MWG 746 H NEW + PL 17 10.02.2005, 12:12:43 Uhr
ENGLISH
18
Press the „Popcorn“ button twice.
Enter the new cooking time with the number buttons.
Press the Start button.
The new cooking time remains stored in the memory until
it is changed.
c) Pizza
1. Press the Stop button.
2. Press the „Pizza“ button once to heat up a piece of
120-140g, or press the „Pizza“ button twice to heat up
a larger piece.
3. Press the Start button to start the machine.
After the time has elapsed, the device switches off and
the word „END“ appears in the display. Then you can
remove the food.
d) Meat Spit
1. Press the Stop button.
2. Press the „Meat Spit“ button once to prepare small
quantities, or press it twice for the preparation of
larger quantities.
3. Press a number button from 1 to 4 to select a cooking
time.
(„Meat Spit“ button pressed once)
Number Button Weight Cooking Time
1 120g 10min
2 200g 13min
3 400g 17min
4 600g 23min
(„Meat Spit“ button pressed twice)
Number Button Weight Cooking Time
1 170g 12min
2 310g 15min
3 540g 23min
4 800g 30min
4. Press the Start button to start the machine.
After the time has elapsed, the device switches off and
the word „END“ appears in the display. Then you can
remove the food.
e) Drinks
1. Press the Stop button.
2. Press the „Drinks“ button once for heating up 140-
200g. Press the „Drinks“ button twice for heating up
250-310g.
3. Press a number button from 1 to 4 to select a war-
ming-up time.
Button
“Drinks”
Number Button
Warming-up
Time
1x 1 1min 20sek
1x 2 2min 30sek
1x 3 3min 40sek
1x 4 4min 50sek
Button
“Drinks”
Number Button
Warming-up
Time
2x 1 2min 20sek.
2x 2 4min
2x 3 5min 40sek
2x 4 7min 20sek
4. Press the Start button to start the machine.
After the time has elapsed, the device switches off and
the word „END“ appears in the display. Then you can
remove the food.
f) Warming up
1. Press the Stop button.
2. Press the „Warming“ button. „3:40“ appears in the
display.
3. Press the Start button to start the machine.
After the time has elapsed, the device switches off and
the word „END“ appears in the display. Then you can
remove the food.
g) Cake
1. Press the Stop button.
2. Press the „Cake“ button. „40:00“ appears in the
display.
3. Press the Start button to start the machine.
After the time has elapsed, the device switches off and
the word „END“ appears in the display. Then you can
remove the food.
Note: The cooking time can be changed.
Press the „Cake“ button twice.
Enter the new cooking time (up to 99:99) using the
number buttons.
Press the start button.
The new cooking time remains in the memory until it is
changed.
Grill
Please use the grilling grid for grilling in order to achieve
rapid and even browning. Please use suitable heat-re-
sistant crockery or place the food to be grilled directly on
the grid.
Large or thick pieces of food are grilled directly on the
rotating plate!
To grill and gratinate food, proceed as follows:
1. Press the Stop button.
2. Press the grill button once.
3. Enter the desired grilling time using the number
buttons.
4. Press the Start button to start the machine.
After the time has elapsed, the device switches off and
the word „END“ appears in the display. Then you can
remove the food.
Combined Microwave/Grill Operation
When these settings are used the microwave and grill
alternate within the preselected time in the ratio:
Combination1
30% of the
cooking time
is with the
microwave
70% of the
cooking time is
with the grill
Combination2
55% of the
cooking time
is with the
microwave
45% of the
cooking time is
with the grill
6....-05-MWG 746 H NEW + PL 18 10.02.2005, 12:12:45 Uhr
ENGLISH
19
If you prepare food using the combined microwave-grill
functions you should note the following:
For large, thick foods such as roast pork the microwave
time is correspondingly longer than for small, fl at foods.
However, in the case of the grill it is the other way round.
The closer the food is to the grill, the faster it turns brown.
This means that when large joints are prepared using
combined operation the grilling time may be shorter than
for smaller joints.
Please proceed as follows:
1. Press the Stop button.
2. Press the „Microwave/Grill“ button once for combined
operation 1. Press the „Microwave/Grill“ twice for
combined operation 2.
3. Enter the desired cooking time using the number
buttons.
4. Press the Start button to start the machine.
After the time has elapsed, the device switches off and
the word „END“ appears in the display. Then you can
remove the food.
Microwave/Grill
Combined Operation Table
Food/dish Quantity
Approx.
time in
minutes
Cover
Meat, Sausages
Beef, pork or veal in pieces
500 g
750 g
10 - 12
12 - 15
no
no
Smoked pork loin 500 g 12 - 14 no
Meat loaf 500 g 13 - 15 no
Wienerwurst 200 g 2 - 3 no
Frankfurter 200 g 2 - 3 no
Tip: turn the meat halfway through and continue cooking for 3 - 5 minutes;
coat the meat loaf with egg white; prick the sausages with a fork.
Poultry
Boiling fowl 1000 g 13 - 15 no
Chicken pieces 250 g 4 - 5 no
Tip: allow to cook without liquid in its own juice, turn once and continue
cooking for 4 - 5 minutes.
Fish
Trout, blue 300 g 5 - 6 no
Fish fi llet 300 g 3 - 4 no
Tip: turn halfway through and continue cooking for 3 - 5 minutes.
Hot Air Only Operation
During cooking with hot air the hot air circulates inside
the oven. This makes the food brown and crispy faster.
In hot air operation it is possible to select 10 different
temperatures.
Cooking with Hot Air
Assuming you would like to cook at a temperature of
180°C for 40 minutes, please proceed as follows:
1. Press the Stop button.
2. Press the „Hot Air“ button.
3. Select the desired cooking temperature with one of
the number buttons (e.g. 8).
4. Enter the desired cooking time (e.g. 40 min) using the
number buttons.
Step Button Display
1Stop
2 Hot Air
38
1 80
44 0
H:40
5Start
5. Press the Start button to start the machine.
Please note:
A maximum of 9 hours and 99 minutes can be
programmed. After the time has elapsed beeps are
heard and the word „END“ appears in the display.
Press the stop button or open the door. The word
„END“ goes off.
When cooking with hot air it is possible to check the
temperature by pressing the hot air button.
Preheating and Cooking with Hot Air
It is possible to preheat the microwave oven using hot air
operation and then use hot air to cook with.
Assuming you would like to preheat the device to 170°C
and then cook for 35 minutes:
1. Press the Stop button.
2. Press the „Hot Air“ button.
3. Select the desired preheating temperature using one
of the number buttons (e.g. 7).
4. Press the start button. The word „PREH“ (preheat)
ashes in the display. Once the oven has reached the
pre-programmed temperature the „PREH“ symbols
stops fl ashing and appears continuously.
5. Please open the door and place the food to be
cooked on the middle of the rotating plate.
6. Enter the desired cooking time (e.g. 35 min.) using
the number buttons.
7. Press the Start button to start the machine.
After the time has elapsed, the device switches off and
the word „END“ appears in the display. Then you can
remove the food.
Combined Use of Hot Air and Microwave
For this the device has four pre-programmed settings,
making it easier for you to work with both the hot air and
the microwave function.
Please press the microwave/hot air button and then one
of the number buttons from 1 to 4 to select the hot air
temperature.
Button
Number
Button
Temperature(°C)
Microwave/Hot Air 1 150
Microwave/Hot Air 2 180
Microwave/Hot Air 3 200
Microwave/Hot Air 4 230
If you would like to set a time of 25 minutes, for example
to bake a cake at 200°C:
1. Press the Stop button.
2. Please press the microwave/hot air button.
3. Select the desired temperature (200°C) with one of
the number buttons (e.g. 3).
4. Enter the desired cooking time (e.g. 25 min) using the
number buttons.
5. Press the Start button to start the machine.
6....-05-MWG 746 H NEW + PL 19 10.02.2005, 12:12:47 Uhr
ENGLISH
20
Please note:
A maximum of 9 hours and 99 minutes can be
programmed. After the time has elapsed beeps are heard
and the word “END” appears in the display. Press the
stop button or open the door. The word “END” goes off.
When cooking with hot air it is possible to check the
temperature by pressing the microwave/hot air button.
Cooking in Several Steps
It is possible to set the programmes in such a way that
three different functions can be selected.
Assuming you select the following programme for
cooking:
Rapid Defrosting
Preparation in the Microwave
Cooking with Hot Air (without Preheating)
1. Press the Stop button.
2. Press the defrost button.
3. Enter the desired defrost time using the number
buttons.
4. Press the microwave button.
5. Enter the desired microwave cooking time using the
number buttons.
6. Press the hot air button.
7. Select the desired cooking temperature using the
number buttons.
8. Enter the desired hot air cooking time with the number
buttons.
9. Press the Start button to start the machine.
After the time has elapsed, the device switches off and
the word „END“ appears in the display. Then you can
remove the food.
Special Functions
Automatic Reminder:
After cooking has fi nished you are reminded every
2 minutes by a beep to remove the food.
This reminder is switched off by opening the door or
pressing the Stop button.
Disabling:
Press the Stop button for more than 3 seconds to disable
the machine. The fact that the machine is disabled is
then shown in the display. The function of the operating
controls is now blocked. Press the Stop button again for
more than 3 seconds to reactivate the machine.
Timer (Countdown)
The device has a timer function:
1. Press the Stop button.
2. Press the timer button.
3. Enter the desired time using the number buttons.
4. Press the Start button to start the machine.
The set time is counted backwards. When the time has
elapsed a beep is heard.
Note: This function can also be used during operation of
the device.
Cleaning
Always remove the mains plug before cleaning the
machine.
Clean the inside of the oven after use with a slightly
damp cloth.
Please clean the microwave from the outside with a
slightly damp cloth.
Clean the accessories in the usual manner in soapy
water.
The door frame/door seal and neighbouring parts
must be carefully cleaned when dirty with a damp
cloth.
This device has been tested according to all relevant cur-
rent CE guidelines, such as electromagnetic compatibility
and low voltage directives, and has been constructed in
accordance with the latest safety regulations.
Subject to technical changes without prior notice!
Guarantee
The device supplied by our Company is covered by a
24 month guarantee starting on the date of purchase
(receipt).
During the life of the guarantee any fault of the device or
its accessories *) ascribable to material or manufacturing
defects will be eliminated free of charge by repairing or, at
our discretion, by replacing it. The guarantee services do
not entail an extension of the life of the guarantee nor do
they give rise to any right to a new guarantee!
Proof of the guarantee is provided by the proof of
purchase. Without proof of purchase no free replacement
or repair will be carried out.
If you wish to make a claim under the guarantee please
return the entire machine in the original packaging to your
dealer together with the receipt.
*) Damage to accessories does not mean automatic free
replacement of the whole machine. In such cases please
contact our hotline. Broken glass or breakage of plastic
parts are always subject to a charge.
Defects to consumables or parts subject to wearing
(e.g. motor pistons, kneading blades, drive shafts, spare
remote control, spare toothbrushes, saw blades, etc.) as
well as cleaning, maintenance or the replacement of said
parts are not covered by the guarantee and hence are to
be paid!
The guarantee lapses in case of unauthorized tampering.
After the expiry of the guarantee
After the expiry of the guarantee repairs can be carried
by the competent dealer or repair service against the
payment of the ensuing costs.
6....-05-MWG 746 H NEW + PL 20 10.02.2005, 12:12:48 Uhr
49
Übersicht der Bedientasten
Ziffern-Tasten
Zum Einstellen von Uhrzeit, Gardauer,
Temperatur und Gewicht
Taste Mikrowelle
Wahl der Leistungsstufen
Taste Grill
Zum Grillen und Überbacken
Taste Heißluft
Reiner Heißluftbetrieb,
Thermostat gesteuert
Taste Mikrowelle/Grill Kombibetrieb
Mikrowelle und Grill arbeiten abwechselnd
Taste Mikrowelle/Heißluft Kombibetrieb
Mikrowelle und Heißluft
arbeiten abwechselnd
Taste Auftauen
Aktiviert die Auftaufunktion
in Verbindung mit einer Zeiteinstellung
Taste Uhr
In Verbindung mit den Ziffern-Tasten
zum Einstellen der Uhrzeit
Programmtaste Kuchen
Taste Timer (Countdown)
Programmtaste Kartoffel
Programmtaste Popkorn
Programmtaste Getränke
Programmtaste Pizza
Programmtaste Fleischspieße
Programmtaste Aufwärmen
Taste Start
Start des Programms
Taste Express
Start des Expressprogramms –
Setzen der Express-Kochzeit
Taste Stopp
Einmal drücken zum Stoppen des
Garvorgangs oder zum Löschen einer
falschen Eingabe.
Zweimal drücken zum Löschen des
Programms.
3 Sekunden halten zum Sperren/
Entsperren des Gerätes
Controls
Number Buttons
For setting the clock, cooking time,
temperature and weight
Microwave Button
For selecting the power level
Grill Button
For grilling and browning
Hot Air Button
Hot air operation, thermostat controlled
Microwave/Grill
Combined Operation Button
Microwave and grill alternate
Microwave/Hot Air
Combined Operation Button
Microwave and hot air alternate
Defrost Button
Activates the defrost function in
conjunction with a time setting
Clock Button
For setting the clock in conjunction with the
number buttons
Cake Programme Button
Timer Button (Countdown)
Potato Programme Button
Popcorn Programme Button
Drinks Programme Button
Pizza Programme Button
Meat Spit Programme Button
Warming Programme Button
Start Button
Start of the programme
Express Button
Start of the express programme –
setting the express cooking time
Stop Button
Press once to stop the cooking process
or cancel an incorrect entry.
Press twice to delete the programme.
Hold down for three seconds to block/
unblock the device.
HIER ABTRENNEN • HERE SEPARATING
6....-05-MWG 746 H NEW + PL 49 10.02.2005, 12:13:32 Uhr
  • Page 1 1
  • Page 2 2
  • Page 3 3
  • Page 4 4
  • Page 5 5
  • Page 6 6
  • Page 7 7
  • Page 8 8
  • Page 9 9
  • Page 10 10
  • Page 11 11
  • Page 12 12
  • Page 13 13
  • Page 14 14
  • Page 15 15
  • Page 16 16
  • Page 17 17
  • Page 18 18
  • Page 19 19
  • Page 20 20
  • Page 21 21
  • Page 22 22
  • Page 23 23
  • Page 24 24
  • Page 25 25
  • Page 26 26
  • Page 27 27
  • Page 28 28
  • Page 29 29
  • Page 30 30
  • Page 31 31
  • Page 32 32
  • Page 33 33
  • Page 34 34
  • Page 35 35
  • Page 36 36
  • Page 37 37
  • Page 38 38
  • Page 39 39
  • Page 40 40
  • Page 41 41
  • Page 42 42
  • Page 43 43
  • Page 44 44
  • Page 45 45
  • Page 46 46
  • Page 47 47
  • Page 48 48
  • Page 49 49
  • Page 50 50
  • Page 51 51
  • Page 52 52

Clatronic mwg 746 h User manual

Category
Microwaves
Type
User manual

Ask a question and I''ll find the answer in the document

Finding information in a document is now easier with AI