Page is loading ...


EN - DISPOSAL OF THE DEVICE
Dispose of the unit and used batteries in an environment friendly manner
according to your country regulations.
FR - DÉCLASSER L’APPAREIL
Débarrassez-vous de l’appareil et des piles usagées de manière écologique
Conformément aux dispositions légales de votre pays.
NL - VERWIJDEREN VAN HET APPARAAT
Verwijder het toestel en de gebruikte batterijen op een milieuvriendelijke
manier conform de in uw land geldende voorschriften.
DU - ENTSORGUNG DES GERÄTS
Entsorgen Sie das Gerät und die Batterien auf umweltfreundliche Art und
Weise gemäß den Vorschriften Ihres Landes.
ES - DESHACERSE DEL APARATO
Reciclar el aparato y pilas usadas de forma ecologica conforme a las
disposiciones legales de su pais.
PT - COMO DESFAZER-SE DA UNIDADE
Tente reciclar a unidade e as pilhas usadas respeitando o ambiente e em
conformidade com as normas vigentes no seu país.

ENGLISH OPERATION MANUAL
JB SYSTEMS
®
1/82 USB2.2
OPERATION MANUAL
Thank you for buying this JB Systems
®
product. To take full advantage of all possibilities, please read these
operating instructions very carefully.
FEATURES
This unit is radio-interference suppressed. This appliance meets the requirements of the current European
and national guidelines. Conformity has been established and the relevant statements and documents have
been deposited by the manufacturer.
The ultimate tool for DJs and clubs, plays: Audio-CDs, but also CDs and USB-mass storage (USB-stick or
hard drive) containing MP3 and WAV-files!
Alphanumeric LCD display supports ID3V2 tags (song title, artist, album, genre & bit rate)
Full MP3 Playback, supports both CBR and VBR bitrate modes.
Full featured database lookup system: lightning fast selection of the desired tracks while the previous song
is still playing! You can search on title, artist, genre, album or simply based on tracks/folders!
Free Windows Track-Indexer database software available via download!
Touch sensitive jog wheel with CDJ-mode for pitch bending and Vinyl-mode for precise scratching.
Improved “smart random” function with 3 different modes:
Total random: plays tracks, randomly selected from the complete USB-mass storage
Directory random: plays only tracks from a selected directory on the USB-mass storage (avoids mix-
up of 2 completely different music styles: perfect for bars, clubs, restaurants, …)
CD-relay (random): classic relay play on 2 CD’s
Anti-shock Memory 20 seconds on CD, 100% anti-shock on USB-mass storage
Seamless loop (IN/OUT/RELOOP) with stutter effect
Real-time loop edit function
Real-time cue (“Cue on the fly")
Instant start & auto cue function (-48dB)
Fader start/stop (back cue)
1/75sec Frame search, also on MP3
Key Lock (Master tempo)
Pitch ranges: +/-4% +/-8% +/-16%, also on MP3
Full automatic beat counters
4 different speed scan
Reads CD-DA, CD-R, CD-RW
Selectable elapsed, remain and total remain time display
Single/continuous play
BEFORE USE
Before you start using this unit, please check if there’s no transportation damage. Should there be any, do
not use the device and consult your dealer first.
Important: This device left our factory in perfect condition and well packaged. It is absolutely necessary
for the user to strictly follow the safety instructions and warnings in this user manual. Any damage caused
by mishandling is not subject to warranty. The dealer will not accept responsibility for any resulting defects
or problems caused by disregarding this user manual.
Keep this booklet in a safe place for future consultation. If you sell the fixture, be sure to add this user
manual.
To protect the environment, please try to recycle the packing material as much as possible.
ENGLISH OPERATION MANUAL
JB SYSTEMS
®
2/82 USB2.2
Check the contents:
Check that the carton contains the following items:
Main unit
Control unit
Operating instructions
2 cinch cords
1 mini-DIN8 cable 1m
2 fader start cables
1 power cord
SAFETY INSTRUCTIONS:
To prevent fire or shock hazard, do not expose this appliance to rain or moisture.
To avoid condensation to be formed inside, allow the unit to adapt to the surrounding temperatures when
bringing it into a warm room after transport. Condense sometimes prevents the unit from working at full
performance or may even cause damages.
This unit is for indoor use only.
Don’t place metal objects or spill liquid inside the unit. No objects filled with liquids, such as vases, shall be
placed on this appliance. Electric shock or malfunction may result. If a foreign object enters the unit,
immediately disconnect the mains power.
No naked flame sources, such as lighted candles, should be placed on the appliance.
Don’t cover any ventilation openings as this may result in overheating.
Prevent use in dusty environments and clean the unit regularly.
Keep the unit away from children.
Inexperienced persons should not operate this device.
Maximum save ambient temperature is 40°C. Don’t use this unit at higher ambient temperatures.
Minimum distances around the apparatus for sufficient ventilation is 5cm.
Always unplug the unit when it is not used for a longer time or before you start servicing.
The electrical installation should be carried out by qualified personal only, according to the regulations for
electrical and mechanical safety in your country.
Check that the available voltage is not higher than the one stated on the rear panel of the unit.
The socket inlet shall remain operable for disconnection from the mains.
The power cord should always be in perfect condition. Switch the unit immediately off when the power cord
is squashed or damaged. It must be replaced by the manufacturer, its service agent or similarly qualified
persons in order to avoid a hazard.
Never let the power-cord come into contact with other cables!
When the power switch is in OFF position, this unit is not completely disconnected from the mains!
This appliance must be earthed to in order comply with safety regulations.
In order to prevent electric shock, do not open the cover. Apart from the mains fuse there are no user
serviceable parts inside.
Never repair a fuse or bypass the fuse holder. Always replace a damaged fuse with a fuse of the same
type and electrical specifications!
In the event of serious operating problems, stop using the appliance and contact your dealer immediately.
CAUTION
CAUTION: To reduce the risk of electric shock, do not
remove the top cover. No user-serviceable parts inside.
Refer servicing to qualified service personnel only.
The lightning flash with arrowhead symbol within the equilateral triangle is intended to alert the
use or the presence of un-insulated “dangerous voltage” within the product’s enclosure that may
be of sufficient magnitude to constitute a risk of electric shock.
The exclamation point within the equilateral triangle is intended to alert the user to the presence of
important operation and maintenance (servicing) instructions in the literature accompanying this
appliance.
This symbol means: indoor use only
This symbol means: Read instructions
This symbol means: Safety Class I appliance

ENGLISH OPERATION MANUAL
JB SYSTEMS
®
3/82 USB2.2
Please use the original packing when the device is to be transported.
Due to safety reasons it is prohibited to make unauthorized modifications to the unit.
INSTALLATION GUIDELINES:
Placing and using the unit for long periods near heat-generating sources such as amplifiers, spotlights,
etc. will affect its performance and may even damage the unit.
Take care to minimize shocks and vibrations during transport.
When installed in a booth or flight case, please make sure to have good ventilation to improve heat
evacuation of the unit.
To avoid condensation to be formed inside, allow the unit to adapt to the surrounding temperatures when
bringing it into a warm room after transport. Condense sometimes prevents the unit from working at full
performance.
Choose the place where you put your installation very carefully. Avoid presence of heat sources. Avoid
places with vibrations or places that are dusty and humid.
The player will work normally when installed on a surface with max. 15° inclination.
Be very careful while handling CDs, do not touch them with wet or dirty hands.
Discs that are dirty must be cleaned with special designed cloth and cleaning products.
Do not use CDs that are badly damaged (scratched or deformed) they can damage your appliance.
To prevent fire or shock hazard, do not expose this appliance to rain or moisture.
In order to prevent electric shock, do not open the top cover. If a problem occurs, contact your dealer.
Do not place metal objects or spill liquid inside the CD player. Electric shock or malfunction may result.
This CD player uses the semiconductor laser. To allow you to enjoy music at a stable operation, it is
recommended to use this in a room of 5°C – 35°C.
The compact disc player should not be adjusted or repaired by anyone except properly qualified service
personnel.
This unit may cause interference to radio and television reception.
CLEANING THE CD-PLAYER:
Clean by wiping with a polished cloth slightly dipped with water. Avoid getting water inside the unit. Do not
use volatile liquids such as benzene or thinner which will damage the unit.
CONNECTIONS
Connect the mini-DIN8 cable between the control unit and the main unit (CD loader)
Use the supplied cinch cables to connect the audio outputs of the CD player with the CD or line inputs on
your mixing unit.
Connect the mains cable.
CONTROLS AND FUNCTIONS (MAIN UNIT)
1. POWER ON/OFF switch: switches the CD-player on and off.
2. DISC TRAY: Use the OPEN/CLOSE buttons to open disc tray and put the CD in place.
3. OPEN/CLOSE button: press this button to open and close the disc tray. These buttons are disabled
during playback. If the tray is not closed after 60sec. It will close automatically to prevent damage.
4. USB 1 connection: this is the first (type-A) USB-connection, used to connect any USB mass storage
device that was formatted in FAT or FAT32. By default this input is used to connect an occasional USB-
drive like USB-sticks etc.
ENGLISH OPERATION MANUAL
JB SYSTEMS
®
4/82 USB2.2
5. USB 2 connection: this is the second (type-A) USB-connection, used to connect any USB mass storage
device that was formatted in FAT or FAT32. By default this input is used to connect a hard disk.
6. CONTROL connector: connect this connector to the control unit, using the supplied mini-DIN8 cable.
7. AUDIO outputs: Output for the audio signals from the player. Use the supplied cinch/cinch cable to
connect this output to a CD/line input of your mixing unit.
8. MAINS input: connect the player to the AC mains, using the supplied power-cord.
CONTROL UNIT
1. TACTILE JOG-WHEEL: The jog-wheel on this player has 2 parts:
Tactile center part: to match the vinyl feel as close as possible and largely improve scratch
performance. With the JOG MODE button (2) you can change the behavior of this central part.
Check the description of the JOG MODE button (2) for more information.
Outer ring: rubber coated part of the jog wheel which is not touch sensitive. Regardless of the
selected wheel mode the outer ring can be always be used for pitch bending
2. JOG MODE button: toggles between 2 different modes for the tactile jog-wheel. The tactile center part
and outer ring behave differently:
VINYL-mode: used for scratching of any CD or MP3 file.
Tactile center part: During playback, the music stops immediately when you touch the jog-
wheel: playback speed and direction are now fully controlled by the movements of your hand.
In pause mode you can easily set a new cue point.
Outer ring: During playback you can use the outer ring for pitch bending to synchronize the
beats of 2 tracks. In pause mode you will hear the typical very small loops that give you the
possibility to set a cue point with 1frame (1/75seconds) accuracy.

ENGLISH OPERATION MANUAL
JB SYSTEMS
®
5/82 USB2.2
CDJ-mode: this is the standard mode, used by most DJ CD-players. Both the tactile center part and
the outer ring behave identically. While the track is playing, the jog wheel temporarily bends the pitch
of the music up to +/-100% by rotating the wheel clockwise to speed it up or counterclockwise to
slow it down. The amount of pitch change is determined by the speed of rotation. In pause mode you
will hear the typical very small loops that give you the possibility to set a cue point with 1frame
(1/75seconds) accuracy.
3. LOOP IN button: Allows you to set the cue point without stopping the playback (CUE ON THE FLY).
This button also sets the beginning of a seamless loop.
4. LOOP OUT button: Used to set the endpoint when looping music. The player starts to loop seamlessly
until you press this button again to exit. When a loop is programmed but not active you can also restart
the loop. The point where you press the button will be memorized as the new end point of the loop. In
loop edit mode pressing the OUT button stops the loop editing and saves the new loop endpoint.
5. RELOOP/STUTTER button: This button has 3 functions:
RELOOP: When a loop was programmed and you have hit the OUT button, press the RELOOP
button to enter the loop again. To exit the loop: press the OUT button. (begin and end points of the
loop are unchanged)
STUTTER: When a loop is playing you can press this button to restart the loop at once. You can also
press this button when a track is not playing in loop. Every time the RELOOP/STUTTER button is
pressed, it will restart the music from the preprogrammed cue point. The stutter effect adds extra
creativity to your performance.
ENTER EDIT LOOP MODE: When a loop is programmed (LOOP IN and OUT/EXIT buttons are on)
you can enter loop edit mode by pressing the RELOOP/STUTTER button until the display shows the
time of the current loop endpoint: use the JOG-WHEEL to adjust the endpoint.
6. CUE button: Pressing the CUE button during playback provides an immediate return to the position at
which play was started. Playback starts immediately from the programmed cue point for as long as the
CUE button is pressed. The player jumps back to the cue point as soon as the CUE button is released.
Also with the unit in pause mode (Play/Pause button blinks) the jog wheel is used to set a different start
point. By pressing "PLAY/PAUSE" or “LOOP IN” button followed by “CUE", you can confirm this new cue
point.
7. PLAY/PAUSE button: every time you press the PLAY/PAUSE button the player changes from play to
pause or from pause to play. The button blinks as long as the player is set to pause.
8. FOLDER button: changes the function of the TRACK knob (9) while the search key is set to “Std”
(standard track/folder search without Track-Indexer database).
While the LED is off: the TRACK knob is used to browse the tracks of the selected folder.
While the LED is on: the TRACK knob is used to browse the folders on the USB-drive.
9. TRACK knob: this knob has different functions (also see the chapter “HOW TO USE”):
CDs or no Track-Indexer database: depending on the status of the FOLDER button (8) you can
browse tracks or folders on the CD or USB-device. To increase search speed on USB-devices with a
lot of folders/tracks, you can also turn the JOG-WHEEL (1) while you keep the TRACK knob
pressed.
Track-Indexer database search: (press the DATABASE-button (10) and desired search key)
Turn the knob to select the first character of the string you’re looking for, after that use the
JOG-WHEEL to search for the desired track.
Press the knob while you turn it to change the search key in the database, you can search
the keys:
Art: search for “artist names” in alphabetical order (default search key)
Alb: search for “album names” in alphabetical order
Gen: search for “Genres” in alphabetical order
Std: don’t use the Track-Indexer database system, just folders and tracks manually.
During playback: press the knob to see the different ID3-tags on the display:
Press 1x: Artist name of the current track is shown
Press 2x: Album name of the current track is shown
Press 3x: Genre of the current track is shown
Press 4x: Bitrate information of the current track is shown
Setup menu active: while the setup menu is active (see TIME button (19)) turn the knob to browse
the menu, press the knob to select a menu option to change it. Please refer to chapter “SETUP
MENU” for more information.
10. DATABASE / NEXT TRACK button: a very important button if you want to find your next track easily
and fast, even while the previous track is still playing! This button works in two different ways:
ENGLISH OPERATION MANUAL
JB SYSTEMS
®
6/82 USB2.2
NEXT TRACK function: will be used while searching on CDs and mass storage devices that don’t
have the “Track-Indexer database system” files installed. You can only search on track and folder
numbers.
DATABASE function: will be used while searching mass storage devices that have the “Track-
Indexer database system” files installed. You can alphabetically search on artist, track title, genre or
album. Very fast and no need for you to know where your files are located!
Once you have found the desired song, just press the LOAD-button (17) to load the track.
For both functions, please refer to chapter “HOW TO USE” for more information.
11. SEARCH buttons: used to search quickly inside a track.
12. KEY LOCK Button: (Master tempo) activates the Pitch Lock function. This function allows you to make
adjustments to a tracks speed using the SPEED-fader without altering the tonal pitch.
13. PITCH button: press this button to turn the speed function on. Press several times to select one of the 3
different pitch ranges (+/-4%, 8%, 16%). Press this button +/- 2seconds to turn the speed function off.
14. PITCH slider: Press the PITCH button, so the pitch range LED is lit. The speed can be adapted up to +/-
16% by moving the fader. The speed will not change when the pitch range LED is off.
15. PITCH BEND buttons: The speed rises while the “+ button” is pressed and returns to the original pitch
when the button is released. The speed drops when the “– button” is pressed and returns to the original
pitch when the button is released. These buttons can be used to synchronize the beats of 2 tracks.
16. RELAY button: you can select 3 different random play functions.
Total random: press the RELAY button shortly until the LED is lit. Player 1 now plays tracks,
randomly selected from the complete USB-mass storage. While player 1 is playing in random mode,
player 2 can still be used to play any track you like.
Directory random: you can choose to play only tracks from a certain directory: first you have to
select this directory, then press the RELAY button for +/-2seconds until the LED starts blinking.
Player 1 now plays only tracks from the selected directory. (avoids mix-up of 2 completely different
music styles: perfect for bars, clubs, restaurants, …) See chapter “HOW TO USE” for examples.
CD random: first put 2 CDs in the unit, now press the RELAY-button shortly: alternately a track will
be played from both CDs until the relay function is disengaged. You can always put a new CD in the
player that is waiting in standby mode. In this way you can create an endless program.
17. OPEN/CLOSE/LOAD TRACK button: used for two different functions.
Load a track from USB-drive: when the DATABASE/NEXT TRACK-button (10) is used to lookup
the next track, just press the LOAD TRACK button to load the selected track.
Load/eject CDs: press this button to open and close the disc tray. These buttons are disabled
during playback. If the tray is not closed after 60sec. It will close automatically to prevent damage.
18. SOURCE SELECT switch: use this button to select the desired audio source: CD, USB1 or USB2. You
can only select another source while the player is in stop or pause.
19. TIME Button: has different functions:
Change time display: The TIME button switches between elapsed playing time, remaining time in a
selection and total remaining time of the disc. (standard = remaining /track) The “total remaining time
of the disc” is not available on MP3-tracks.
Open setup menu: press the ENTER button for about 3seconds.
Close setup menu: press the ENTER button shortly to leave setup.
20. SGL/CTN: You can choose between “single track mode” and “continuous play”.
Continuous play: the complete CD/USB-drive will be played without interruption. (mostly used in
pubs)
Single track: player stops at the end of each track and waits at the beginning of the next track.
(mostly used by deejays)
Push the SGL/CNT button for more than 1second to switch between normal and “auto cue” mode. In
“auto cue” mode the player waits at the first music note of each track. This means that badly indexed
CDs will not interfere with the instant start capabilities of this player. This is a very useful feature for
deejays!
21. LCD DISPLAY: Shows all important information needed during playback. Refer to the next chapter for
more information.

ENGLISH OPERATION MANUAL
JB SYSTEMS
®
7/82 USB2.2
22. FADER START Sockets: If you are using a mixer with fader start function, connect the player with the
fader start of the mixer. Please note that these sockets must never be connected with any voltage.
23. CONTROL connector: connect this connector to the main unit, using the supplied mini-DIN8 cable.
LCD DISPLAY
1. PLAY/PAUSE indicators: displays the status of the player.
2. CUE: appears when the master cue point is programmed.
3. SINGLE: appears when the unit is set to play just one track at a time. When it is not shown, the player
plays continuously through all tracks.
4. FOLDER/SEARCH KEY indicator: the information depends on the lookup mode you selected.
Standard lookup: (no Track-Indexer database) the current folder number is shown.
Database lookup: the current search key (Art, tit, Alb or Gen) is shown.
5. TRACK indicator: shows the number of tracks available in your current selection.
Standard lookup: (no Track-Indexer database) the track numbers in the current folder are shown.
Track-Indexer lookup: the track numbers that correspond to your Track-Indexer pre-selection.
6. TIME BAR: shows either remaining or elapsed time. Starts flashing at the end of each track to alert the
user to take action.
7. MINUTE: Shows “minutes” time information of current track.
8. SECOND: Shows “seconds” time information of current track.
9. FRAME: Shows “frame” time information of current track. (1 frame = 1/75
th
sec.)
10. ELAPSED, REMAIN: indicates that the time shown on the display is the elapsed or remaining time for
the playing track.
Note: for MP3 files it’s not possible to show the total remaining time for all tracks on the CDROM.
11. ALPHANUMERIC DISPLAY: Shows the names of folders and ID3-tags of MP3 tracks.
12. RANDOM: Is lit while player1 is switched to random mode.
13. AUTO CUE: appears when the “auto cue” function is active.
14. RELOOP/RELOOP: LOOP shows when a loop is programmed. When a loop is programmed and
currently playing, the RELOOP indicator is flashing.
15. PITCH DISPLAY: Shows the actual percentage of speed change, selected with the SPEED slider (14).
16. Padlock: is shown when the pitch lock function (Master Tempo) is active.
17. BPM DISPLAY: shows the output of automatic beat-counter, measured in beats per minute.
ENGLISH OPERATION MANUAL
JB SYSTEMS
®
8/82 USB2.2
SETUP MENU
To increase flexibility some parameters of the USB2.2 can be changed in the setup menu.
To enter the SETUP menu, press the TIME button (19) of the left player for about 3seconds.
Use the TRACK knob (9) to browse the different menu options of the main menu.
Press the TRACK knob (9) to select the menu option you want to change:
Use the TRACK knob (9) to change the parameters of the selected menu option.
If the menu option has submenus, use the JOG-WHEEL (1) to browse these.
Press the TRACK knob (9) again to return to the main menu.
To save your settings: choose menu option 6 (EXIT & SAVE) and press the TRACK knob (9)
1. SENSITIVITY: you can change the sensitivity of the tactile jog wheel to optimize the jog wheel
performance.
Turn the TRACK knob (9) to select one of the 41 possibilities:
o
ADJ. = 0: neutral setting (default setting, OK in most cases)
o
ADJ. = -20: lowest sensitivity
o
ADJ. = +20: highest sensitivity
Press the TRACK knob (9) to save the new value and return to the main menu.
2. SLEEP TIME: to extend the lifetime of the laser, the unit goes automatically to sleep mode while not used
for 15 minutes (default). In this menu option you can change, the time it takes to enter sleep mode:
Turn the TRACK knob (9) to select the desired time: “No SLEEP” 120 minutes.
Press the TRACK knob (9) to save the new value and return to the main menu.
3. Line Setup: you can configure how the text line shows information that is longer than 10 characters. You
can choose 3 different modes + some extra fine-tuning:
There are 3 submenus: turn the JOG-WHEEL (1) to select a submenu.
o
Submenu 1 - L1 Mode:
Turn the TRACK knob (9) to select the desired setting:
L1 Mode = 1: text line scrolls and waits for a certain time before scrolling
starts again. You can set the waiting time in submenu2.
L1 Mode = 2: text line scrolls only one time, then stops.
L1 Mode = 3: text line scrolls continuously.
o
Submenu 2 – start/stop waiting time for scrolling:
Turn the TRACK knob (9) to select the desired value:
Dis. = 0.5s 12.0s: waiting time in seconds.
o
Submenu 3 – scrolling speed:
Turn the TRACK knob (9) to select the desired value:
Run = 50 2000ms: 50ms = fast speed / 2000ms = slow speed
Press the TRACK knob (9) to save the new values and return to the main menu.
4. Firmware version / upgrading: use this option to check and/or upgrade the firmware versions.
Turn the TRACK knob (9) to select the 3 firmware parts:
o
CON: xx: shows the version of the control firmware
o
DSP: xx: shows the version of the DSP firmware
o
SER: xx: shows the version of the servo firmware
o
Upgrade: blinks when the unit is ready to check if there are new firmware versions
available. See “FIRMWARE UPGRADING” for more information.
Press the TRACK knob (9) to return to the main menu.
5. Load defaults: If you really messed up things, you can still reload the default setting!
While “Load Defaults” is shown on the display: press the TRACK knob (9) to load the defaults.
6. Exit & Save: if you want your changes to the setup menu to be permanently saved (also after switching
the unit off) you MUST use this option!
Press the TRACK knob (9) : the display shows “Saving” and exits the setup menu.
FIRMWARE UPGRADING
We strongly suggest to regularly check the USB2.2 product page on www.jbsystems.be to see if new
firmware updates are available. Upgrading firmware should always be done very carefully!
Download the file containing the upgrade file(s)
Read the instructions and follow them strictly, otherwise you could damage your equipment…

ENGLISH OPERATION MANUAL
JB SYSTEMS
®
9/82 USB2.2
Put the files on an EMPTY (important!) USB-stick.
Press the TIME button (19) of the left player for about 3seconds to enter the setup menu.
Use the TRACK knob (9) to browse to menu option “4. Version”
Press the TRACK knob (9) to select the menu option
Turn the TRACK knob (9) until the display shows “Upgrade”.
Use the SOURCE SELECT button (18) of the left player to select USB1 input (4).
Insert the USB-stick with firmware files in USB1-input (4)
Upgrading will start automatically: WAIT (!) until the upgrading process is finished. NEVER turn the
player off while upgrading the software!!!
If the display asks you to turn off the unit: turn the unit off, wait 3seconds and turn it back on.
Check if the software version corresponds to the version marked in the readme file that came with the
update.
INSTALLING THE TRACK-INDEXER SOFTWARE
The USB2.2 works perfectly without the Track-Indexer database files but if you want to search your tracks
easily and lightning fast than you should install the Track-Indexer software on your computer! Please note
that the program currently only works under Windows (XP, Vista, Win7). To be sure that you always have the
latest version, you can download the software from the USB2.2 product page on our website. Installing the
program is very easy: just double-click the file and follow the instructions on your screen.
USING THE TRACK-INDEXER SOFTWARE
Each time you add or remove tracks from your USB hard disk,
you must run the TRACK-INDEXER software again to update the Track-Indexer database files!
After the installation you will see a new program directory called “JB”. In this directory you will find 2 files:
- Uninstall (to uninstall the software)
- DbBuilder (to start the software)
Connect your USB-hard drive to your PC and check which drive letter
was assigned to it.
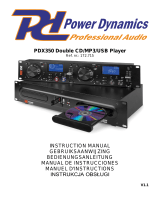
Click on the Track-Indexer icon to start the software: the main screen
is shown.
In the upper center choose your USB-drive.
Press the BUILD-button.
The software starts scanning the USB-drive for compatible audio
files and extracts the ID3-tags to build the Track-Indexer
database files, needed to speed up the search function on the
player. Once the progression bar on the bottom is full, the
database building process is finished and a short summary is shown.
The program wrote the Track-Indexer files (file extensions: .DBH + .dat + .DBX) to the USB-drive so now
you can remove it from your PC and connect it to the USB2.2.
To achieve the best results, please always use the latest version of the Track-Indexer database software.
You can find the software version at the bottom left of the “About” screen.
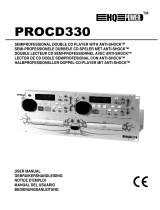
! IMPORTANT MESSAGE FOR VISTA USERS !
Many Vista users will not be able to run the Track-Indexer software.
This problem is caused by the UAC (User Account Control) limitation,
a security option limiting the user privileges in Vista. To overcome this
problem, right-click the Track-Indexer program icon and choose “Run
as administrator” in the popup menu. Windows will respond with the
window shown on the right: just click “Allow”.
ENGLISH OPERATION MANUAL
JB SYSTEMS
®
10/82 USB2.2
HOW TO USE …
Most of the common functions are explained in the previous chapter “controls and functions” In this chapter
we talk about the functions that need a little more explanation.
SOME GENERAL FUNCTIONS:
SEARCH A TRACK WITH THE TRACK-INDEXER SYSTEM:
Important: before you can use the Track-Indexer system, you should scan your USB-drive so it contains
the necessary database files.
You can choose the search-key at any moment by pressing the TRACK-knob (9) while you turn it. You can
search for Art(artist), tit(title), Alb(album) or Gen(genre).
Press the DATABASE-button (10) to start the lookup function the first character of the list you want
to search is blinking in the display.
Turn the TRACK-knob (9) to change the first character.
Selected search-key is ”tit”: turn the JOG WHEEL (1) to browse the list of titles, starting with
the selected first character.
Selected search-key is NOT “tit”: see the example below for search-key = Art(artist)
First turn the JOG WHEEL (1) while you keep the TRACK-knob (9) pressed to browse the list
of artists, starting with the selected first character.
Once you have selected the desired artist, stop pressing the TRACK-knob (9) while you
continue turning the JOG WHEEL (1): now you can browse all the titles from this artist, in
alphabetical order.
Once you have found the right track: press the LOAD TRACK-button (18).
SEARCH A TRACK WITHOUT THE TRACK-INDEXER SYSTEM:
Press and turn the TRACK-knob (9) to select Std(standard lookup system). If the USB-drive has no Track-
Indexer files, the player automatically selects the standard lookup system. You have Two options:
Option 1:
Simply use the combination of FOLDER-button and TRACK-knob to browse the different directories.
Option 2:
Press the DATABASE-button (10) to start the lookup function both the FOLDER and TRACK
displays start blinking.
Turn the TRACK knob (9) to browse the folders. (when the folder LED = on, you will see the folder
names while browsing)
Turn the JOG WHEEL (1) to browse the selected folder at high speed.
Once you have found the right track: press the LOAD TRACK-button (18).
Remark: if you want to browse you folders/tracks at high speed, you can use this method:
Browse folders: turn the JOG-WHEEL while you keep the TRACK-knob pressed (folder LED = on)
Browse tracks: turn the JOG-WHEEL while you keep the TRACK-knob pressed (folder LED = off)
SLEEP MODE:
When source select is set to CD, the player automatically shuts off the transport and laser after about
5~120 minutes (selectable in the setup menu), while in pause or cue mode. This extends the life of your
motor drive and laser. During sleep mode the display shows the word “SLEEP”. To wake up the player,
just press the cue or play button, the display turns to normal and is ready to receive instructions.
RELAY (RANDOM) FUNCTION FOR CDs:
First open the 2 faders of the CD inputs on your mixer. Put a disc in both players and start playback on
one of the units. Press the RELAY button to enable the relay function. Alternately a track will be played
from both units until the relay function is disengaged. You can always put a new CD in the player that is
waiting in pause. In this way you can create an endless program, perfect for use in pubs etc.
NOTE: by switching on the relay function you automatically put both players in single mode.
TOTAL RANDOM ON A USB-drive:
This is the simple random function where any track on your USB-drive can be played randomly on player1:
Open the fader for player1 on your audio mixer.
Press the SOURCE SELECT-button (18) of player1 to choose one of the USB-drives.
Press the RELAY-button (16) shortly until it is lit.
Press the PLAY-button to start random playback.

ENGLISH OPERATION MANUAL
JB SYSTEMS
®
11/82 USB2.2
“SMART” FOLDER RANDOM ON A USB-drive:
This is the “smart” random function where you have full control over which folder you want to play in your
random selection. If you put your tracks in different directories, sorted by genre, you can make a random
of only 1 music genre, perfect for background music in restaurants, shops, clubs & bars without a dj:
Open the fader for player1 on your audio mixer.
Press the SOURCE SELECT-button (18) of player1 to choose one of the USB-
drives.
Press & turn the TRACK-knob (9) to select the “Std” search-key.
Choose the directory you want to play files from in random order.
Press the RELAY-button (16) for about 2seconds until the LED starts blinking.
Press the PLAY-button to start random playback only from the selected folder.
PITCH BENDING:
This function is used to synchronize the beats of two tracks. This can be done in two ways:
PITCH BEND buttons: The speed increases or decreases respectively as long as the PITCH BEND+
or PITCH BEND- buttons are pressed.
JOG WHEEL: During play mode the JOG WHEEL will temporarily bend the pitch of the music by
turning the JOG WHEEL clockwise to speed up or counterclockwise to slowdown. The rotation speed
the JOG WHEEL determines the percent of pitch bend.
CD-TEXT:
Not only MP3 files can show the track name on the display. Some normal audio CDs use CD-TEXT to
show the track names. Also some CDR burning software (ex. Nero) can add CD-TEXT to a normal audio
CD. When the USB2.2 detects these CD-TEXT data, the display will show them automatically.
PLAYING/RECORDING CD-R and CD-RW:
Apart from normal audio CD’s the USB2.2 can play both CD-R (CD recordable) and CD-RW (CD
rewriteable). Please note that you should always use the “disc at once” and “track at once” disc writing
options! Although the USB2.2 is capable of reading CD-R and CD-RW recorded at higher speeds, we
suggest not using recording speeds more than x12 to increase readability. Always buy good quality brands
for CD-R and CD-RW!
If the disc is multi session, it will only play the first session:
if the first session is CD-DA you can only play CD-DA tracks.
if the first session is MP3 you can only play MP3 files.
ABOUT LOOPS:
CREATE A LOOP:
While a track is playing, press the LOOP IN button to program the start point of the loop. Now press the
OUT button to program the endpoint of the loop. The seamless loop starts playing at once. (With some
practice you will be able to create perfect loops!) While the loop is playing, you can press the OUT button
again to exit the loop and continue the rest of the track.
It is possible to program a new loop, even when the current loop is still playing. While the loop is playing,
simply press the LOOP IN button to set the starting point of the new loop. Now enter the endpoint by
pressing the OUT button. Your new loop is programmed and playing.
RESTART A LOOP:
This can be done in 3 ways:
When a loop is programmed and you left it by pressing the OUT button, just press RELOOP to restart
the loop.
When a loop is programmed and you left it by pressing the OUT button, just press OUT again to restart
the loop. The point where you pressed OUT is now programmed as the new endpoint of the loop.
When the loop is still playing, press the RELOOP button to restart the loop immediately. You can
repeat this several times to create a “Stutter” effect.
EDIT A LOOP:
When a loop is programmed, press the RELOOP/STUTTER button for about 2 seconds to enter “loop edit”
mode. While the loop is seamlessly playing, the display shows the time information of the loop endpoint.
Use the jog wheel to set the new loop endpoint. To make things very easy you can hear your modifications
to the loop endpoint continuously. When the loop is perfect, press the LOOP OUT button to save the new
loop endpoint.
ENGLISH OPERATION MANUAL
JB SYSTEMS
®
12/82 USB2.2
SPECIFICATIONS
Power Supply: AC 100-240V 50/60Hz
Power Consumption: 16W
Output level (+/-0.5dB @ 1kHz,0dB): CD: 2.0Vrms USB: 1.85Vrms
Frequency response (+/-0.2dB@0dB): CD: 17-20.000Hz USB: 17-16.000Hz
THD + noise (@ 1kHz, 0dB): CD: 0.008% USB: 0.007%
S/N Ratio (@ 1kHz, 0dB (IHF-A weighted): CD: >126dB USB: >85dB
CD Short access time (next track): <2sec
CD Long access time (track 1 20): <4sec
CD Electronic tracking: Full automatic digital tracking.
MP3 FORMAT:
Possible file extensions: .mp3 ~ .MP3 ~ .mP3 ~ .Mp3
ISO9660: max. 63 character style
Joliet: max. 63 character style
CD-ROM sector format: mode-1 only
USB file system: FAT 12/16/32
Max. Hard disk capacity: 500GB
Max. Folders: CD: 255 USB: 999
Max. Tracks / Folder: CD: 255 USB: 999
Max. Files: CD: 999 USB: 9999 (Track Indexer software)
MP3 FORMATS:
MPEG1 Layer3 (ISO/IEC11172-3): mono / stereo sampled at: 32 - 44,1 - 48kHz
Bitrates: 32 – 320 Kbps
Bitrate modes: CBR (Constant Bitrate), VBR (Variable Bitrate) or Xing
MPEG2 Layer3 (ISO/IEC13818-3): mono / stereo sampled at: 16 – 22,05 - 24kHz
Bitrates: 32 – 160 Kbps
Bitrate modes: CBR (Constant Bitrate), VBR (Variable Bitrate) or Xing
MPEG2,5 Layer3: mono / stereo sampled at: 8 – 11,025 - 12kHz
Bitrates: 32 – 160 Kbps
Bitrate modes: CBR (Constant Bitrate), VBR (Variable Bitrate) or Xing
Dimensions: Main unit: 482(W) x 88.8(H) x see drawing(D) mm
Control unit: 482(W) x 88.8(H) x see drawing(D) mm
Weight: Main unit: 4,6kg Control: 1,7kg (total: 6,3kg)
Every information is subject to change without prior notice
You can download the latest version of this user manual on our website: www.beglec.com

FRANCAIS MODE D’EMPLOI
JB SYSTEMS
®
13/82 USB2.2
MODE D’EMPLOI
Nous vous remercions d’avoir acheté ce produit JB Systems
®
. Veuillez lire ce mode d’emploi très
attentivement afin de pouvoir exploiter toutes les possibilités de cet appareil.
EN VOUS INSCRIVANT POUR LA LETTRE D’INFORMATION VOUS SEREZ TOUJOURS
TENU AU COURANT DES DERNIÈRES NOUVELLES CONCERNANT NOS PRODUITS:
NOUVEAUTÉS, ACTIONS SPÉCIALES, JOURNÉES PORTES OUVERTES, ETC.
SURFEZ SUR: WWW.BEGLEC.COM
CARACTERISTIQUES
Cet appareil ne produit pas d’interférences radio. Il répond aux exigences nationales et européennes. La
conformité a été établie et les déclarations et documents correspondants ont été déposés par le fabricant.
Voici … "l'arme fatale", le summum pour les DJ et les discothèques ! En effet, cet appareil peut TOUT lire :
des CD audio, mais aussi des CD et des appareils de stockage de masse (des sticks USB et des disques
durs USB) contenant des fichiers MP3 et WAV !
Un écran alphanumérique à cristaux liquides permet de lire les tags ID3V2 (titre des plages, artiste et
vitesse d'échantillonnage).
Lecture complète des fichiers MP3, compatible avec les deux modes d'échantillonnage CBR et VBR.
Système de recherche complet dans la base de données : sélection d'une rapidité extraordinaire des
pistes désirées pendant que la piste en cours est toujours en train d'être lue ! Le système vous permet de
rechercher le titre, l'artiste, le genre, l'album, ou simplement faire des recherches sur base des titres et/ou
des dossiers !
Un software Windows gratuit est disponible : il suffit de le télécharger. Il s'agit d'une base de données qui
indexe les pistes.
Molette sensible au toucher avec CDJ pour le pitch bending et mode 'Vinyl' pour un scratching de haute
précision.
Fonction 'smart random' améliorée fonctionnant selon trois modes différents :
Total random : dans ce mode, l'appareil lit des pistes sélectionnées au hasard et se trouvant sur
l'ensemble des appareils USB de stockage de masse ;
Directory random : dans ce mode, l'appareil lit uniquement des pistes sélectionnées à l'intérieur d'un
dossier se trouvant sur les appareils USB de stockage de masse (ce qui permet d'éviter le mélange de
deux (ou plus) genres ou styles de musiques différents ; c'est exactement ce qu'il faut pour un bar, un
club, un restaurant, etc … ;
CD-relay (random) : dans ce mode, l'appareil suit le mode "classique" qui consiste à lire 2 CD à la
suite l'un de l'autre.
Mémoire antichocs de 20 secondes sur CD, 100 % antichocs sur toute unité de stockage de masse USB
Lit les CD-DA, CD-R, CD-RW
Mémoire Antichoc de 20 secondes sur CD, 100% antichoc sur les unités de stockage de masse USB.
Boucle parfaite (IN/OUT/RELOOP)
Fonction d’édition de boucle parfaite en temps réel!
Fonction CUE en temps réel (“CUE on the fly”)
Fonctions Instant Start et Auto Cue (-48 dB).
Portée du contrôle de vitesse (Pitch): +/-4% +/-8% +/-16%, également en MP3
Fader start, fader stop, (back cue),
Key Lock (Master tempo)
Compteurs de temps totalement automatiques
Recherche « Frame » de 1/75sec, également en MP3
Balayage des plages à 4 vitesses différentes
Choix entre l’affichage du temps écoulé, du temps restant ou du temps total restant
Lecture d’une seule plage, ou continue
FRANCAIS MODE D’EMPLOI
JB SYSTEMS
®
14/82 USB2.2
AVANT L’UTILISATION
Quelques instructions importantes:
Avant d’utiliser cet appareil, assurez-vous de l’absence de dommages liés au transport. En cas de
dommages, n’utilisez pas l’appareil et contactez le vendeur.
Important: Cet appareil a quitté notre usine en parfaite condition et bien emballé. Il est primordial que
l’utilisateur suive les instructions de sécurité et avertissements inclus dans ce manuel. La garantie ne
s’applique pas en cas de dommage lié à une utilisation incorrecte. Le vendeur ne prend pas la
responsabilité des défauts ou de tout problème résultant du fait de n’avoir pas tenu compte des mises en
garde de ce manuel.
Conservez ce manuel dans un endroit sûr pour toute consultation future. Si vous vendez l’appareil,
assurez-vous d’y joindre ce manuel également.
Afin de protéger l’environnement, merci de recycler les emballages autant que possible.
Vérifiez le contenu:
Vérifiez si l'emballage contient bien les articles suivants :
lecteur CD
panneau de contrôle
mode d’emploi
2 câbles cinch
1 câble mini-DIN8 de 1m
2 câbles fader start
1 câble d’alimentation
INSTRUCTIONS DE SECURITE:
Afin d’éviter tout risque d’incendie ou de décharge électrique, ne pas exposer cet appareil à la pluie ou
l’humidité.
Pour éviter la formation de condensation à l’intérieur de l’appareil, patientez quelques minutes pour laisser
l’appareil s’adapter à la température ambiante lorsqu’il arrive dans une pièce chauffée après le transport.
La condensation empêche l'appareil de fonctionner de manière optimale, et elle peut même causer des
dommages.
Cet appareil est destiné à une utilisation à l’intérieur uniquement.
Ne pas insérer d’objet métallique ou renverser de liquide dans l’appareil. Aucun objet contenant un liquide,
tels que des vases, ne peut être placé sur cet appareil. Cela risquerait de provoquer une décharge
électrique ou un dysfonctionnement. Si un corps étranger est introduit dans l’appareil, déconnectez
immédiatement de la source d’alimentation.
Aucune source de flamme nue, telle que des bougies allumées, ne peut être placée sur l'appareil.
Ne pas couvrir les orifices de ventilation, un risque de surchauffe en résulterait.
Ne pas utiliser l'appareil dans un environnement poussiéreux et le nettoyer régulièrement.
Ne pas laisser l'appareil à portée des enfants.
Les personnes non expérimentées ne doivent pas utiliser cet appareil.
CAUTION
ATTENTION
:
afin de réduire le risque d’électrocution,
n’enlevez jamais le couvercle de l’appareil. Il n’y a aucune
pièce à l’intérieur de l’appareil que vous puissiez
remplacer vous-même. Confiez l’entretien uniquement à
des techniciens qualifiés.
La flèche dans un triangle met l'utilisateur en garde contre la présence de haute tension sans
isolation dans l'appareil, ce qui peut causer un risque d'électrocution.
Un point d'exclamation dans un triangle prévient de la présence d'instructions relatives au
fonctionnement et à la maintenance se trouvant dans le manuel fourni avec l'appareil.
Ce symbole signifie: uniquement pour usage à l'intérieur.
Ce symbole signifie : Lire le mode d’emploi.
Ce symbole signifie: appareil construit selon les normes de sécurité classe I

FRANCAIS MODE D’EMPLOI
JB SYSTEMS
®
27/82 USB2.2
Chacune de ces informations peut être modifiée sans avertissement préalable. Vous pouvez
télécharger la dernière version de ce mode d’emploi de notre site Web: www.beglec.com
NEDERLANDS HANDLEIDING
JB SYSTEMS
®
28/82 USB2.2
GEBRUIKSAANWIJZING
Hartelijk dank voor de aankoop van dit JB Systems
®
product. Om ten volle te kunnen profiteren van alle
mogelijkheden en voor uw eigen veiligheid is het aangeraden de aanwijzingen zeer zorgvuldig te lezen voor
U het apparaat begint te gebruiken.
DOOR U OP ONZE MAILINGLIJST IN TE SCHRIJVEN ONTVANGT U STEEDS DE
LAATSTE INFORMATIE OVER ONZE PRODUKTEN: NIEUWIGHEDEN, SPECIALE
ACTIES, OPENDEURDAGEN, ENZ.
SURF NAAR: WWW.BEGLEC.COM
KARAKTERISTIEKEN
In dit apparaat is radio-interferentie onderdrukt. Dit product voldoet aan de gangbare Europese en nationale
voorschriften. Het is vastgesteld dat het apparaat er zich aan houdt en de desbetreffende verklaringen en
documenten zijn door de fabrikant afgegeven.
De perfecte speler voor DJs en clubs, speelt: Audio CD’s, maar ook CD’s en USB opslagmedia (USB-stick
of hard disc) welke MP3’s en WAV files bevatten!
Alfanumeriek LCD display voor de weergave van ID3V2 tags (titel, artiest, bit rate)
Volledige MP3 weergave, ondersteunt zowel CBR als VBR bitrate modi.
Uitgebreid database opzoeksysteem: uiterst snelle keuze van de gewenste nummers, terwijl het vorige
nummer nog steeds speelt! U kunt zoeken op titel, artiest, genre, album of gewoon op basis van
nummers/mappen!
Gratis Windows Track-Indexer database-software beschikbaar via download!
Aanraakgevoelig Jog wiel met CDJ-modus voor pitch bending en Vinyl-modus voor een precieze
scratchfunctie.
Verbeterde “smart random” functie met 3 verschillende modi:
Total random: speelt willekeurig nummers uit het USB opslagmedium.
Directory random: speelt willekeurig nummers uit de gekozen file van het USB opslagmedium. (zo
worden er bvb geen totaal verschillende stijlen weergegeven: perfect voor bars, clubs, restaurants, …)
CD-relay (random): klassieke afwisselende weergave over 2 CD’s
Antishock geheugen van 20 seconden met CD, 100% anti-shock met USB opslagmedia
Naadloze loops (IN/OUT/RELOOP) + met stotter effect
Real-time loop edit functie
Direct programmeerbare cue (“Cue on the fly”)
Instant start & auto cue functie (-48dB)
Fader start/stop (back cue)
Frame opzoeking tot op 1/75sec, eveneens met MP3 files
Key Lock (Master tempo)
Pitch bereiken: +/-4% +/-8% +/-16%
Volautomatische beat counters
4 verschillende zoeksnelheden
Leest CD-DA, CD-R, CD-RW
Ondersteunt zowel de CBR als de VBR transmissiesnelheden.
Keuze tussen verstreken, resterende of totaal resterende tijdsweergave
Weergave van één nummer of continu

DEUTSCH BEDIENUNGSANLEITUNG
JB SYSTEMS
®
43/82 USB2.2
Überprüfen Sie den Inhalt:
Folgende Teile müssen sich in der Geräteverpackung befinden:
Haupt Einheit.
Kontroll Einheit.
Bedienungsanleitung.
2 Chinch Kabel.
1 mini-DIN8 Kabel.
2 fader start Kabel
1 Netzkabel
SICHERHEITSHINWEISE
Zur Vermeidung von Stromschlag oder Feuer, Gerät bitte nicht Regen oder Feuchtigkeit aussetzen.
Zur Vermeidung von Kondensation im Inneren des Geräts bitte nach dem Transport in eine warme
Umgebung zum Temperaturausgleich einige Zeit ausgeschaltet stehen lassen. Kondensation kann zu
Leistungsverlust des Geräts oder gar Beschädigung führen.
Gerät nicht im Freien und in feuchten Räumen und Umgebungen verwenden.
Keine Metallgegenstände oder Flüssigkeiten ins Innere des Geräts gelangen lassen. Keine mit Flüssigkeit
gefüllten Gegenstände, z.B. Vasen, auf das Gerät stellen. Kurzschluss oder Fehlfunktion können die Folge
sein. Falls es doch einmal vorkommen sollte, bitte sofort Netzstecker ziehen und vom Stromkreis
trennen.
Offene Brandquellen, wie z.B. brennende Kerzen, sollten nicht auf das Gerät gestellt werden.
Ventilationsöffnungen nicht abdecken, da Überhitzungsgefahr!
Nicht in staubiger Umgebung verwenden und regelmäßig reinigen.
Für Kinder unerreichbar aufbewahren.
Unerfahrene Personen sollen das Gerät nicht bedienen.
Umgebungstemperatur darf 40ºC nicht überschreiten.
Minimalabstand um das Gerät für ausreichende Kühlung = 5cm.
Stets Netzstecker ziehen, wenn Gerät für längeren Zeitraum nicht genutzt oder es gewartet wird.
Elektrische Anschlüsse nur durch qualifiziertes Fachpersonal überprüfen lassen.
Sicherstellen, dass Netzspannung mit Geräteaufkleber übereinstimmt.
Die Netzsteckdose sollte immer gut erreichbar sein, um das Gerät vom Netz zu trennen.
Gerät nicht mit beschädigtem Netzkabel betreiben. Ist die Zugangsleitung beschädigt, muss diese durch
den Hersteller, seinen Vertrieb oder durch eine qualifizierte Person ersetzt werden.
Netzkabel nicht mit anderen Kabeln in Berührung kommen lassen!
Das Gerät ist nicht vollständig vom Netz getrennt, wenn der Netzschalter sich in der AUS-Stellung
befindet.
Vorliegendes Gerät muss geerdet werden, um den Sicherheitsbestimmungen zu entsprechen.
Gerät nicht öffnen. Abgesehen vom Tausch der Sicherung sind keine zu wartenden Bauteile im Gerät
enthalten.
Sicherung niemals reparieren oder überbrücken, sondern immer mit gleichartiger Sicherung ersetzen!
CAUTION
ACHTUNG:
Um sich nicht der Gefahr eines elektrischen
Schlags auszusetzen, entfernen Sie keines der
Gehäuseteile. Im Geräteinneren befinden sich keine vom
Benutzer reparierbaren Teile. Überlassen Sie
Reparaturen dem qualifizierten Kundendienst.
Das Blitzsymbol im Dreieck weist den Benutzer darauf hin, dass eine Berührungsgefahr mit
nicht isolierten Teilen im Geräteinneren, die eine gefährliche Spannung führen, besteht. Die
Spannung ist so hoch, das hier die Gefahr eines elektrischen Schlages besteht.
Das Ausrufezeichen im Dreieck weist den Benutzer auf wichtige Bedienungs- und
Wartungshinweise in den Dokumenten hin, die dem Gerät beiliegen.
Dieses Symbol bedeutet: Nur innerhalb von Räumen verwenden.
Dieses Symbol bedeutet: Achtung! Bedienungsanleitung lesen!
Dieses Symbol bedeutet: Klasse I Klassifizierung
DEUTSCH BEDIENUNGSANLEITUNG
JB SYSTEMS
®
44/82 USB2.2
Bei Fehlfunktion Gerät nicht benutzen und sich mit dem Händler in Verbindung setzen.
Bei Transport bitte Originalverpackung verwenden, um Schäden am Gerät zu vermeiden.
Aus Sicherheitsgründen dürfen an dem Gerät keine unbefugten Veränderungen vorgenommen werden.
INSTALLATIONSANLEITUNG:
Plazieren und benutzen Sie das Gerät für eine längere Zeit neben sehr warmen Geräten wie Verstärker,
Lampen, etc., könnte die Funktion des Gerätes beeinträchtigt oder sogar zerstört werden.
Sollte das Gerät in einem Flightcase betrieben werden, achten Sie auf eine gute Luftzirkulation.
Wenn das Gerät aus einer kalten Umgebung an einem warmen Ort aufgestellt wird, kann sich
Kondenswasser bilden. Um Fehlfunktionen oder Zerstörung zu vermeiden, sollten Sie das Gerät für ca. 1
Stunde vom Stromnetz trennen.
Wählen Sie einen staubfreien, trockenen Ort zur Installation des CD-Players. Vermeiden Sie starke
Hitzequellen und Vibrationen.
Der CD-Player arbeitet normal, wenn die maximale Neigung 15° nicht überschreitet.
Behandeln Sie Ihre CD’s sehr sorgfältig. Berühren Sie sie nicht mit nassen oder schmutzigen Fingern.
Verschmutzte CD’s müssen mit einem speziellen Tuch und Reinigungsprodukten gereinigt werden.
Verwenden Sie keine beschädigten CD’s (zerkratzt oder deformiert). Ihr Gerät kann beschädigt werden.
Um Feuer oder elektrische Schläge vorzubeugen, setzen Sie dieses Gerät niemals Nässe und
Feuchtigkeit aus!
Um sich nicht der Gefahr eines elektrischen Schlags auszusetzen, entfernen Sie keines der Gehäuseteile.
Wenn ein Problem auftritt, wenden Sie sich an Ihren Händler.
Legen Sie keine Metallgegenstände oder Flüssigkeiten in den CD-Player! Die Folge wären Fehlfunktionen
und Beschädigungen des Gerätes
Dieser CD-Spieler benutzt einen Halbleiterlaser. Damit er ohne Probleme arbeiten kann, sollte dieses
Gerät in einem Zimmer mit einer Temperatur von 5°C - 35°C verwendet werden.
Der CD-Player kann nur von qualifiziertem Fachpersonal eingestellt oder repariert werden.
Dieses Gerät kann Interferenzen im Radio- und Fernsehempfang verursachen.
REINIGUNG DES CD-PLAYERS:
Entfernen Sie Staub und Schmutz mit einem weichen, trockenen Tuch. Achten Sie darauf, dass keine
Flüssigkeit in das Geräteinnere gelangen kann. Benutzen Sie keinen Verdünner, Benzin oder andere
chemische Mittel. Die Oberfläche des Gerätes könnte zerstört werden.
ANSCHLÜSSE
Verbinden Sie mit dem mini-DIN8 Kabel die Haupt Einheit mit der Kontroll Einheit.
Verwenden Sie die mitgelieferten Chinch Kabel um den Cd Player an ihren Mixer an die Line Eingänge
anzuschließen.
Schließen sie das Netzkabel an.
TASTEN UND FUNKTIONEN (MAIN UNIT)
1. ON/OFF Schalter: Zum Ein- oder Ausschalten des Players.
2. CD-Lade: Platzieren Sie hier Ihre CD.
3. OPEN/CLOSE Taste: Beim Betätigen dieser Taste öffnet bzw. schließt sich die CD-Lade. Während der
Wiedergabe sind diese Tasten inaktiv. Die CD-Lade schließt sich automatisch nach 60 Sekunden, um
Verschmutzungen im Gerät vorzubeugen.

PORTUGUÊS MANUAL DO UTILIZADOR
JB SYSTEMS
®
81/82 USB2.2
ALTERAÇÃO DE PITCH:
Esta função é utilizada para sincronizar na perfeição as batidas de duas faixas. Pode ser feito de duas
formas:
Botões PITCH BEND: A velocidade aumenta ou diminui respectivamente, enquanto mantiver
pressionados os botões PITCH BEND+ ou PITCH BEND-.
JOG WHEEL: Durante a reprodução o JOG WHEEL irá temporariamente alterar o pitch da música, ao
girar o jog no sentido dos ponteiros do relógio aumenta a velocidade, ao girar no sentido contrário a
velocidade diminui. A velocidade a que girar o jog irá determinar a percentagem de alteração de pitch.
CD-TEXT:
Os ficheiros MP3 não são os únicos a mostrar o nome da faixa no display. Alguns CDs áudio normais
utilizam CD-TEXT par amostrar os nomes das faixas. Além disso alguns softwares de gravaçao de CDs
(ex: Nero) podem adicionar informação CD-TEXT a CDs áudio normais. Quando a informação CD-TEXT
é detectada pelo USB2.2 é automaticamente mostrada no display.
REPRODUZIR/GRAVAR CD-R e CD-RW:
Além de reproduzir CDs normais de áudio, o USB2.2 também reproduz CD-R (CD gravável) e CR-RW
(CD regravável). Lembre-se que deve utilizar sempre as opções de gravação “disc at once” e “track at
once” no seu gravador! Embora o USB2.2 tenha capacidade para ler CD-Rs e CD-RWs gravados a alta
velocidade, sugerimos que não utilize velocidades de gravaçao superiores a 12x de forma a optimizar a
capacidade de leitura. Utilize sempre CD-Rs e CD-RWs de qualidade!
Se o CD for multi-sessão, o CDX-2 só irá reproduzir a primeira sessão:
Se a primeira sessão é CD-DA, só poderá reproduzir as faixas CD-DA.
Se a primeira sessão é MP3 só poderá reproduzir ficheiros MP3.
ACERCA DOS LOOPS:
CRIAR UM LOOP:
Enquanto uma faixa está a ser reproduzida, pressione o botão LOOP IN para programar o ponto de
partida do loop. Em seguida pressione o botão OUT para programar o fim do loop. O loop começa a ser
reproduzido de imediato (com algum treino será capaz de criar loops perfeitos!). Enquanto o loop estiver a
ser reproduzido, pode pressionar o botão OUT novamente para sair do loop e continuar a reproduzir o
resto da faixa.
É possível programar um novo loop, mesmo durante a reprodução de outro loop. Enquanto o loop está a
ser reproduzido, basta pressionar o botão LOOP IN para definir o ponto de partida do novo loop. Em
seguida defina o final, pressionando o botão OUT. O novo loop está agora programado e a ser
reproduzido.
REINICIAR UM LOOP:
Esta operação pode ser efectuada de 3 maneiras:
Se programou um loop e em seguida pressionou botão OUT para sair, basta apenas pressionar botão
RELOOP para reiniciar o loop.
Se programou um loop e em seguida pressionou botão OUT para sair, basta apenas voltar a
pressionar botão OUT para reiniciar o loop. O ponto onde pressionou botão OUT é agora programado
como o novo fim do loop.
Enquanto o loop está a ser reproduzido, pressione o botão RELOOP para reiniciar o loop de imediato.
Pode repetir este processo várias vezes para criar um efeito “Stutter” (Repetição).
EDITAR UM LOOP:
Quando um loop está programado, pressione o botão RELOOP/STUTTER durante cerca de 2 segundos
para entrar no modo “loop edit”. Enquanto o loop esta a ser reproduzido, o display indica a informação
sobre o tempo relativamente ao final do loop. Utilize a grande jog wheel para definir o novo ponto final do
loop. De modo a facilitar a operação é possível ouvir continuamente as modificações ao final do loop.
Quando o loop está perfeito, pressione o botão LOOP OUT para salvar o novo final do loop e sair do loop.
PORTUGUÊS MANUAL DO UTILIZADOR
JB SYSTEMS
®
82/82 USB2.2
ESPECIFICAÇÕES
Fonte de Alimentação: AC 100-240V 50/60Hz
Consumo de energia: 16W
Nível de saída (+/-0.5dB @ 1kHz,0dB): CD: 2.0Vrms USB: 1.85Vrms
Resposta em Frequência (+/-0.2dB@0dB): CD: 17-20.000Hz USB: 17-16.000Hz
THD + noise (@ 1kHz, 0dB): CD: 0.008% USB: 0.007%
S/N Ratio (@ 1kHz, 0dB (IHF-A weighted): CD: >126dB USB: >85dB
Tempo acesso min. CD (faixa seguinte): <2seg
Tempo acesso máx. CD (faixa 1→20): <4seg
Busca Electrónica CD: Busca automática digital.
FORMATO CD:
Extensões ficheiro possíveis: .mp3 ~ .MP3 ~ .mP3 ~ .Mp3
ISO9660: máx. 63 tipo de fonte
Joliet: máx. 63 tipo de fonte
Formato sector CD-ROM: Apenas modo-1
Sistema de ficheiros USB: FAT 12/16/32
Max. Capacidade Disco Rígido: 500GB
Máx. Pastas: CD: 255 USB: 999
Max. Ficheiros por Pasta: CD: 255 USB: 999
Máx. Ficheiros: CD: 999 USB: 9999 (Track Indexer software)
FORMATOS MP3:
MPEG1 Layer3 (ISO/IEC11172-3): Amostragem mono/estéreo: 32 - 44,1 - 48kHz
Bitrates: 32 – 320 Kbps
Modos Bitrate: CBR (Bitrate constante) ou VBR (Bitrate variável) ou Xing
MPEG2 Layer3 (ISO/IEC13818-3): Amostragem mono/estéreo:16– 22,05 - 24kHz
Bitrates: 32 – 160 Kbps
Modos Bitrate: CBR (Bitrate constante) ou VBR (Bitrate variável) ou Xing
MPEG2,5 Layer3: Amostragem mono/estéreo:8– 11,025 - 12kHz
Bitrates: 32 – 160 Kbps
Modos Bitrate: CBR (Bitrate constante) ou VBR (Bitrate variável) ou Xing
Dimensões: U. Principal 482(L) x 88,8(A) x ver desenho (D) mm
U. Controlo 482(L) x 88,8(A) x ver desenho (D) mm
Peso: U. Principal: 4,6kg U. Controlo: 1,7kg (total: 6,3kg)
Estas informações estão sujeitas a alterações sem aviso prévio
Pode fazer download da versão mais recente deste manual no nosso site: www.beglec.com
/