Page is loading ...

TiVo
®
DVR
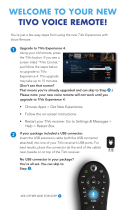
Start Here
Follow these easy steps to connect your
TiVo
®
Series3
TM
HD Digital Media Recorder
Check out the Troubleshooting chapter in the Viewer’s Guide for more help with connecting your TiVo DVR, completing Guided Setup,
and using the TiVo service. If you have more questions, visit www.tivo.com/support for help with getting started, learning about TiVo
service features, audio & video troubleshooting, frequently asked questions, help forums, and more.
© 2006 TiVo Inc. All rights reserved. Reproduction in whole or in part without written permission is prohibited. Printed in Mexico. TiVo, the TiVo logo, WishList, Season Pass, Series3 and the Series3
logo are trademarks or registered trademarks of TiVo Inc. or its subsidiaries, 2160 Gold Street, P.O. Box 2160, Alviso, CA 95002-2160. CableCARD
TM
is a trademark of Cable Television Laboratories,
Inc. All other trademarks are the properties of their respective owners.
www.tivo.com/support
Need some help?
SDOC-00091-001 Rev A1
TM
HD
Television
Get to know your cables (you may not use all of them)
HD Video Cables
Connect the TiVo DVR to an
HDTV using one of these cables
to get high-definition video.
Composite A/V cable for
stereo audio (red & white
ends) & standard video
(yellow end)
Phone cord
Phone splitter
Power cord
Component Video
cable for high definition
video (no audio)
HDMI cable for
high definition video
and digital audio
Coaxial RF cable for
standard audio & video
Basic Cables
Other cables you might need.
Remember:
Connect all cables from the OUT jack
of one device to the IN jack of the next.
OUT IN
Never connect OUT to OUT or IN to IN.
OUT OUT
Network
Choose this option if you have a home network with a broadband Internet connection.
Use the connection that works with your type of home network: Wired or Wireless
Wired (Ethernet) – Connect an Ethernet cable (sold
separately) from your home network to the TiVo DVR’s
Ethernet jack (the upper jack pictured here).
Wireless – Connect a compatible wireless USB network
adapter (sold separately) to one of the DVR’s USB
ports
. The TiVo
®
Wireless G USB Network Adapter
pictured here is available at www.tivo.com/store.
Phone
Choose this option if you don’t have a home network with a
broadband Internet connection. Connect the provided
phone cord from the DVR to a nearby wall jack.
Use the provided phone line splitter if the DVR is sharing
the wall jack with a telephone.
Connect to the TiVo
®
service: Network OR Phone
The TiVo DVR needs to connect to the TiVo service to receive program listings, service updates, and other
information. Network-connected DVRs have access to additional features and services. See Chapter 4 in
the Viewer’s Guide for details. Choose how your DVR will connect: Network or Phone
OR
ETHERNET
USB 1
USB 2
(Optional) Connect an Antenna
Local TV stations broadcast high-definition
signals over the air on dedicated digital
channels.
To receive both digital (ATSC) and standard
(NTSC) channels over the air, connect an
indoor or outdoor antenna to the TiVo
DVR’s ANTENNA IN jack.
Connect to Your Cable
Service
If you are a basic cable subscriber,
connect the Coaxial RF cable coming
out of the wall directly to the CABLE
IN
jack on the back of the DVR.
NOTE: If you subscribe to digital
cable, turn this poster over and
follow the steps on the other
side.
Plug in the Power Cord
The TiVo DVR’s front panel
displays a TiVo logo as it is
starting up.
Tune your TV to see
the Welcome Screen
Turn on your TV.
If you don’t see
the Welcome screen:
Use the Input, Source, or TV/Video
button on your TV remote or TV
to select the audio/video input source you used in step . Press the button until
you see the Welcome screen. On some TVs, you can also change the channel to
select different input sources.
When you see the Welcome screen, you’re ready to begin
Guided Setup, which
customizes the TiVo DVR for your home.
To optimize the TiVo DVR for high-definition viewing, read
Understanding HDTV in the Viewer’s Guide.
To learn more about the amazing, smart-recording features of the
TiVo service, see the Tours in Chapter 1 of the Viewer’s Guide.
Connect Video
Recommended: Connect the HDMI
cable from the TiVo DVR’s HDMI
OUT
jack to the HDMI IN jack on
the back of your high-definition TV.
Alternate: If your TV doesn’t have an
HDMI jack, use the Component
Video
cable instead. Then connect a
separate cable for audio.
See step .
Make note of the input you used on
the back of your TV.
Connect Audio
If you used the HDMI cable in step , you already have
a digital audio connection (HDMI is both audio & video).
Recommended: Connect an Optical Digital Audio cable
(sold separately) from the DVR’s DIGITAL AUDIO jack
to an A/V receiver or home theater system.
Alternate: Connect the red and white ends of the
Composite A/V cable from the DVR’s A/V OUT jacks to
the A/V IN jacks on your TV, A/V receiver, or home
theater system.
Welcome! Start Here
Setting up your TiVo
®
Series3
TM
HD Digital Media Recorder (DVR) is easy.
Activate the TiVo
®
service (if you haven’t already)
The TiVo service is what makes your DVR smart. It includes everything from your program listings to Season Pass
TM
recordings
and WishList
®
searches—all the cool features you’ve heard about.
Some TiVo DVRs are sold with a TiVo service plan. If yours was not, activate the TiVo service at www.tivo.com/activate
or call TiVo Customer Support at 1-877-367-8486. You’ll need your 15-digit TiVo Service Number, found on the label on the
back of the DVR. Write it here for reference ___________________________.
Now, let’s get started with Connecting Your TiVo Digital Media Recorder!
Do you subscribe to Digital Cable?
No
I don’t have
digital cable.
Start with step 1 below.
Yes
I have
digital cable.
Turn this poster over.
Connecting Your TiVo Digital Media Recorder
If you have digital cable,
turn this poster over.

Connecting Your TiVo DVR with CableCARD
TM
Decoders
If you DON’T have digital
cable, turn this poster over.
TiVo
®
DVR
Television
Get to know your cables (you may not use all of them)
HD Video Cables
Connect the TiVo DVR to an
HDTV using one of these cables
to get high-definition video.
Composite A/V cable for
stereo audio (red & white
ends) & standard video
(yellow end)
Phone cord
Phone splitter
Power cord
Component Video
cable for high definition
video (no audio)
HDMI cable for
high definition video
and digital audio
Coaxial RF cable for
standard audio & video
Basic Cables
Other cables you might need.
(Optional) Connect an Antenna
Local TV stations broadcast high-definition
signals over the air on dedicated digital
channels.
To receive both digital (ATSC) and standard
(NTSC) channels over the air, connect an
indoor or outdoor antenna to the TiVo
DVR’s ANTENNA IN jack.
Plug in the Power Cord
The TiVo DVR’s front panel
displays a TiVo logo as it is
starting up.
Tune your TV to see
the Welcome Screen
Turn on your TV.
If you don’t see
the Welcome screen:
Use the Input, Source, or TV/Video
button on your TV remote or TV
to select the audio/video input source you used in step . Press the button until
you see the Welcome screen. On many TVs, you can also change the channel to
select different input sources.
When you see the Welcome screen, you’re ready to begin Guided Setup, which
customizes the TiVo DVR for your home. After CableCARD decoders are installed,
you will need to repeat Guided Setup.
To optimize the TiVo DVR for high-definition viewing, read
Understanding HDTV in the Viewer’s Guide.
To learn more about the amazing, smart-recording features of the
TiVo service, see the Tours in Chapter 1 of the Viewer’s Guide.
Connect Video
Recommended: Connect the HDMI
cable from the TiVo DVR’s HDMI
OUT
jack to the HDMI IN jack on
the back of your high-definition TV.
Alternate: If your TV doesn’t have an
HDMI jack, use the Component
Video
cable instead. Then connect a
separate cable for audio.
See step .
Make note of the input you used on
the back of your TV.
A CableCARD decoder works like
a digital cable box.
CableCARD
TM
What is a CableCARD
TM
decoder?
CableCARD decoders replace your
digital cable box. They allow you to
access the same channels that you
currently subscribe to.
You can only get CableCARD
decoders from your cable
company. Call your cable company
to request two CableCARD decoders,
typically delivered by an installer.
CableCARD decoders allow
compatible devices to receive digital
cable channels without a cable box.
The TiVo
®
Series3
TM
HD DVR is a
CableCARD device.
CableCARD decoders plug into the
slots on the back of the DVR. Plug in
two for dual tuner: watch & record
two channels at the same time.
Disconnect Your Digital Cable Box
CableCARD decoders replace your digital cable
box. Disconnect your cable box from your TV and
set it aside.
NOTE: While you’re waiting for CableCARD
installation, you may want to connect your
cable box to another input on your TV so you
don’t miss any of your favorite shows.
Remember:
Connect all cables from the OUT jack
of one device to the IN jack of the next.
OUT IN
Never connect OUT to OUT or IN to IN.
OUT OUT
When the CableCARD
TM
installer arrives...
Locate the sheet titled “Instructions for CableCARD
Installers,” included in the TiVo DVR carton.
Present these instructions to the installer.
The installer will insert the CableCARD decoders
into the slots on the back of the TiVo DVR, and
activate them.
Network
Choose this option if you have a home network with a broadband Internet connection.
Use the connection that works with your type of home network: Wired or Wireless
Wired (Ethernet) – Connect an Ethernet cable (sold
separately) from your home network to the TiVo DVR’s
Ethernet jack (the upper jack pictured here).
Wireless – Connect a compatible wireless USB network
adapter (sold separately) to one of the DVR’s USB
ports
. The TiVo
®
Wireless G USB Network Adapter
pictured here is available at www.tivo.com/store.
Phone
Choose this option if you don’t have a home network with a
broadband Internet connection. Connect the provided
phone cord from the DVR to a nearby wall jack.
Use the provided phone line splitter if the DVR is sharing
the wall jack with a telephone.
OR
ETHERNET
USB 1
USB 2
Call your cable company and order 2 CableCARD
TM
decoders today!
Connect Audio
If you used the HDMI cable in step , you already have
a digital audio connection (HDMI is both audio & video).
Recommended: Connect an Optical Digital Audio cable
(sold separately) from the TiVo DVR’s DIGITAL AUDIO
jack to an A/V receiver or home theater system.
Alternate: Connect the red and white ends of the
Composite A/V cable from the DVR’s A/V OUT jacks to
the A/V IN jacks on your TV, A/V receiver, or home
theater system.
Connect to Your Cable
Service
Connect the Coaxial RF cable coming
out of the wall directly to the CABLE
IN
jack on the back of the DVR.
NOTE: While you’re waiting for
CableCARD installation, you may
want to leave this cable connected
to your cable box. See step .
Connect to the TiVo
®
service: Network OR Phone
The TiVo DVR needs to connect to the TiVo service to receive program listings, service updates, and other
information. Network-connected DVRs have access to additional features and services. See Chapter 4 in
the Viewer’s Guide for details. Choose how your DVR will connect: Network or Phone
/