
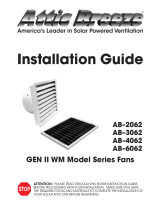
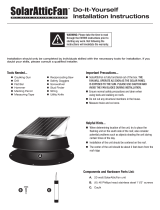
Thank you for purchasing your new solar powered attic vent from Attic Breeze. Our attic vents have
been carefully designed to provide easy installation with minimal tools or experience required.
Before beginning installation of your new attic vent, please read through this guide and review
the tools required for installation. If you do not have the needed tools or feel uncomfortable
performing any of the tasks required for installation, contractor services are available in most
areas to assist you with your installation needs.
Please note that this guide is intended for informational purposes only. Attic Breeze assumes
no responsibility for any damages incurred during or as a result of installation of our products.
Step 1 - Ventilation Requirements: For proper function of your solar attic vent, your home
must have the minimum required amount of outside air intake available to the attic space.
This is typically accomplished through either soffits or gable vents. Attic Breeze recommends
a minimum of 750 square inches of net free area intake ventilation per an installed unit. All
attic intake vents should be clean (no debris) to allow for free movement of outside air into the
attic space.
YOU MUST HAVE THE REQUIRED AMOUNT OF INTAKE VENTILATION AREA TO
ACHIEVE PROPER ATTIC VENTILATION. If your attic does not have adequate ventilation,
you should add enough soffits or gable vents to meet the minimum recommended intake
ventilation area. FAILURE TO MEET THESE REQUIREMENTS MAY RESULT IN POOR
PERFORMANCE OF YOUR ATTIC VENT AND/OR ATTIC DEPRESSURIZATION.
4582 Kingwood Drive
Suite E-154
Kingwood, TX 77345
877-288-4234
www.atticbreeze.net
support@atticbreeze.net
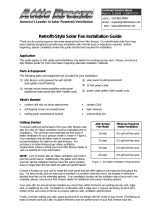
Curb-Mounted Attic Fan Installation Guide
1 Attic Vent Housing with Attached
20-watt or 25-watt Solar Panel and
Thermal Switch.
Parts List
Models 203A/204A/253A/254A Models 203D/204D/253D/254D
1 Attic Vent Housing with Attached
Thermal Switch.
1 20-watt or 25-watt Solar Panel with
15 feet of UV Resistant Wiring.
1 Mounting Bracket Kit
Tools Required
Extension Ladder
Reciprocating Saw
Power Drill with Nut/Screw Driver and
½ inch Bit
Electrical Tape
Self-Tapping Roofing Screws
Caulking Gun with Water Proof
Roofing Sealant
Measuring Tape or Ruler
String and Permanent Marker
Flashing for Curb Box
8 foot weather treated 2x4 Stud
Installation Instructions

Step 2 - Attic Requirements: To achieve the best results from our solar attic vents, Attic
Breeze recommends inspecting the inside of your attic for uncapped shafts and chases, large
unsealed ceiling seams, or other building features which may allow the air in your home to
freely exchange with the air in your attic. Areas where potential air exchange is identified
should be capped or sealed wherever possible.
SOLAR ATTIC VENTS ARE NOT RECOMMENDED FOR HOMES WITH DROP CEILINGS,
CHASES, OR OTHER BUILDING FEATURES THAT DO NOT PROVIDE AN ADEQUATE
SEAL BETWEEN THE LIVING AND ATTIC SPACES. If you are uncertain if this applies to
your situation, contact us to discuss.
Tip: The better your attic space is sealed preventing air exchange with the inside of your
home (even the small gaps), the more effective your attic insulation will become and the
better the performance you will achieve from your solar attic vent. Since thoroughly
sealing your attic could take some time, Attic Breeze recommends doing so only after
your installation is complete. The temperature inside your attic will be greatly reduced
after installation, making this task much more tolerable.
Step 3 - Location of Your Attic Vent: The proper placement of your solar attic vent will be
based on several factors. For optimum performance, the solar attic vent (or solar panel for
models AB-203D/204D/253D/254D) should be positioned facing either south or southwest.
Additionally, the solar attic vent (or solar panel) should be positioned on an area of your roof
that is not shaded or otherwise blocked from the sun for extended periods throughout the day.
Finally, your attic vent should be positioned on an area of your roof that gives the optimum
distance between the solar attic fan and the air intake vents (soffits or gable vents). The key
to finding the best installation location is in maximizing cross-flow ventilation by balancing the
air intake sources.
IF YOUR HOME IS EQUIPPED WITH TURBINE VENTS, THESE VENTS MAY NEED TO
BE SEALED-OFF OR REMOVED. Your solar attic vent will pull air backwards through the
turbine vent, which may result in poor attic cooling performance if the turbine vent is located in
close proximity to the solar attic vent. In many cases, a turbine vent can be removed and the
solar attic fan installed in its place. If you choose to replace a turbine vent, make sure to
widen the attic hole to the required size (20” diameter) after removing the turbine vent.
Tip: For best results, your attic vent should be installed about two feet below the ridge line of
your roof and as close to the mid-point of your house as possible. In most cases, this
will allow for optimum cooling performance to be achieved from your solar attic vent.
Step 4 - Unpack the Attic Vent: Unpack your new solar attic vent and make sure all listed
parts are included. Be sure to remove all packaging material and tape before proceeding.
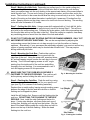
Step 5 - Building the Curb Box: Build a 23 ½” x 23 ½”
curb box using a weather treated 2x4 stud (see Fig. 1). The
curb box should easily fit inside the curb-mount flashing of
the attic vent base. Alternatively, a pre-manufactured curb
flashing may be used for your specific roofing application if
available. Contact your local roofing supply store for more
information on pre-manufactured curb flashings that may be
appropriate for your roofing application.
Installation Instructions (continued)
Fig. 1 - Building the Curb Box

Step 6 - Marking the Attic Hole: Depending on roofing type (i.e. tile, metal roofing etc.),
remove roofing material around the desired installation area to expose the roof decking.
Insert a screw part-way into the roof decking in the approximate center of the area chosen to
install the attic vent. Tie one end of string to a permanent marker, and the other end to the
screw. The knot tied to the screw should allow the string to move freely in a circle. Adjust the
length of the string so that when the marker is pulled tight, it measures 10 inches from the
screw. Keeping tension on the string, trace out a circle onto the roof decking. The resulting
circle will have a diameter of 20 inches.
Step 7 - Cutting the Attic Hole: Using a power drill equipped with a ½ inch drill bit, drill a
hole anywhere along the circle that was previously traced out during Step 6. This will be a
pilot hole for the reciprocating saw. Following the circle pattern, insert the reciprocating saw
into the pilot hole and cut out the hole in the roof. When the cutting is complete, clear away
any remaining pieces of wood from the sides of the hole and rafters.
DO NOT CUT THROUGH ANY ROOFING RAFTER OR FRAMING MEMBER. ONLY CUT
AND REMOVE THE ROOF SHEATHING. This can be accomplished by adjusting the
reciprocating saw so that it does not cut deep enough to cut into the rafters or framing
members. Alternatively, if your saw cannot be adequately adjusted, you must cut around any
rafters or framing members which may be located near the attic hole. This may require
drilling additional pilot holes.
Step 8 - Mounting the Curb Box: Position the curb box
over the attic hole. The box should be squared with the
ridge line of the roof. Using the power drill, screw/nut driver
bit, and self-tapping screws, secure the curb box to the roof
decking. Tow in the self-tapping screws at a 45° angle,
starting from the inside wall of the curb box and drilling
through to the roof decking. It is recommended to use 4
inch self-tapping screws for this procedure.
MAKE SURE THAT THE CURB BOX IS SECURELY
FASTENED TO THE ROOF DECKING. The curb box will
be the primary anchor holding the attic vent to the roof.
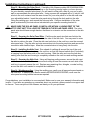
Step 9 - Flashing the Curb Box: Flash the curb box using
the most appropriate flashing material for your specific roof
type (see Fig. 3 for common curb flashing materials).
Replace tiles or metal roofing, leaving enough working space
between the edge of the tiles and the curb box so that the
flashing can be slipped into place.
Install the sill flashing first. Screw or nail the flashing into the
curb box. DO NOT NAIL THE FLASHING TO THE ROOF
DECKING. Next, install the side flashing and fasten it in
place. If using step shingles, slip them under each row of
roofing tiles, working your way up from the bottom. Slip the
base of the head flashing under the roofing tiles and set it in
place over the top of the side flashing. Screw the head
flashing into the curb box.
Installation Instructions (continued)
Fig. 3 - Flashing the Curb Box
Fig. 2 - Mounting the Curb Box

Step 10 - Mounting the Solar Panel: If installing Attic Breeze models AB-203A/204A/253A-
254A, skip ahead to Step 12. Depending on the mounting bracket option you have chosen
for your remotely mounted solar panel, you will need to either drill a hole in your roof or attic
wall to accommodate the solar panel wire. Using a power drill equipped with a ½ inch bit, drill
a hole in the roof centered over the area chosen for your solar panel or in the attic wall near
your adjustable bracket. Insert the solar panel wiring through the hole and into the attic.
Using the caulking gun, seal around the hole and wire. Continue installation of the solar
panel as directed by the instructions included with your specific mounting bracket kit.
MAKE SURE THE SOLAR PANEL IS INSTALLED WITHIN 14 LINEAR FEET OF THE
ATTIC VENT UNIT TO ALLOW FOR TENSION IN THE SOLAR PANEL WIRE. The solar
panel wire should have enough slack so that there is no tension on the connection to the attic
vent unit.
Step 11 - Securing the Solar Panel Wire: Find the solar panel wire that was fed into the
attic in Step 10 and temporarily secure it to the side of the attic hole. You may need to enter
the attic to retrieve the wire. Place the attic vent unit close to the curb box, near the secured
solar panel wire. Plug the attic vent wire connections into the solar panel wire and secure the
connection with electrical tape. Allow the connected wires to hang freely into the attic.
Step 12 - Installing the Attic Vent: Run a bead of caulking all around the top of the curb
box. Position the attic vent unit over the curb box so that the thermal switch wire (if included)
is hanging from the bottom side of the vent housing. Slide the attic vent over the curb box,
making sure that the vent housing is completely seated on the curb box and caulking sealant.
Step 13 - Securing the Attic Vent: Using self-tapping roofing screws, secure the attic vent
unit to the curb box. Attic Breeze recommends using at least two screws on each side of the
curb box to properly secure the unit. Replace any remaining tiles, shingles, or metal roofing
around the attic vent needed to complete the installation.
Step 14 - Weatherproofing: Using the caulking gun, caulk over all exposed screw heads on
the curb box. If installing Attic Breeze models AB-203D/204D/253D/254D, caulk over the
solar panel mounting bracket screws as required.
Congratulations, your installation is now complete! Make sure to save your warranty information and
invoice. If you have any questions or comments about our products, please contact our support staff
to discuss. From everyone at Attic Breeze, we thank you for your purchase!
www.atticbreeze.net 877-288-4234 support@atticbreeze.net
Installation Instructions (continued)
-
 1
1
-
 2
2
-
 3
3
-
 4
4


Attic Breeze 254A Installation guide
- Type
- Installation guide
Ask a question and I''ll find the answer in the document
Finding information in a document is now easier with AI
Related papers

Other documents
-
 Active Ventilation RBV-8-C2-CMF Specification
-
Active Ventilation RBV-12-C2-CMF Specification
-
Ampetronic WM-C-LP Installation guide
-
 Air Vent EV16624BR Operating instructions
-
 Matrix Infinity Flexi RV Installation guide
-
Swisher 2960 Owner's manual
-
 SolarAtticFan SAFB-SS Installation guide
-
Ekena Millwork GVPRO14X1401FUN Installation guide
-
 Bauhaus 30X30CM Installation guide
-
 Artic Breeze AB-255 Installation guide


