Extreme Tools, Inc.
740 Frontenac Road
Naperville, Illinois 60563
630.369.9303
www.ExtremeTools.net
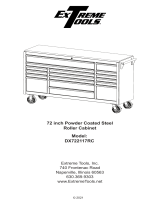
41 inch Painted Steel
Tool Cart
© 2019
Model: EX4106TCS
41” 6 Drawer Sliding Top Tool
Cart with Bumpers
Model: EX4106TC
41” 6 Drawer Flip Top Tool
Cart with Bumpers

Tool Cart with Flip Top Parts List
EX4106TC
Optional Caster
Locking Bracket
17
7
8
14
1
12
10
11
9
3
2
16
6
4
15

ITEM NO.
PART NUMBER
DESCRIPTION
QTY.
1
EX4125TC-00
BODY WELDMENT
1
2
SW-150LB-2087B (OL)
OUT. SLIDE (150#)
7
3
Z-DL4125TC
DRAWER LINER
4
Z-CA6SB(CR)
6 X 2 CHROME CASTER (S/B)
4
5
Z-PR.188
3/16" SS POP RIVET
11
6
Z-SCM6-12MM
M6-1.0X12 SOCKET HEAD SCREW
4
7
EX4125TC-40R
LID ASSY - TC
1
8
GAS STRUT (350m-
13.78)
GAS STRUT
2
9
DR3-4125TC
DRAWER 3
1
10
DR1-4125TC
DRAWER 1
3
11
DR2-4125TC
DRAWER 2
2
12
Z-TCBMPR-SC
TC CORNER BUMPERS
4
13 304005 1
14
EX4125TC-27
TRAY DIVIDER
7
15
Z-BTM10-25MM
M10X25mm HEX BOLT
16
LOCK/KEYS -
SEE LOCK FACE FOR CODE
6
16
Z-HNDL4106TC
PUSH HANDLE-4106TC
1
17
Z-CA6SB LOCK
CASTER LOCK - MAG SWIVEL
4
Tool Cart with Flip Top Parts List
EX4106TC
Replacement keys may be ordered using the code that appears
on the face of the lock.
To order replacement parts, have the part number, tool box
color and quantity ready. If under warranty, the serial number is
REQUIRED to get replacement parts.
Not all parts are available under warranty and may be
purchased separately.

Tool Cart with Sliding Top Parts List
EX4106TCS
44
18
12
20
3
11
1
5
17
10
9
10
8
16
19
12
20
5
17
Optional Caster
Locking Bracket
21

Tool Cart with Flip Top Parts List
EX4106TC
ITEM NO PART NUMBER DESCRIPTION QTY
1 EX4125TX-00 (ST) BODY WELDMENT 1
3 SW-100LB-2087B SET 100LBS., 20.87'' BB SLIDE (SET) 9
4 EX4125TC-38STA SLIDING TRAY ASSEMBLY-RH 2
5 Z-HNDL4125TC SS TUBULAR HANDLE-4106TC 1
6 EX4125TC-44 LOCK COVER 1
7 Z-M4-6MS M4-0.7 X 6MM SCREW 5
8 304005
LOCK-KEYS - SEE KEY CODE ON LOCK
1
9 DR1-4125TC DRAWER 1 3
10 DR2-4125TC DRAWER 2 2
11 DR3-4125TC DRAWER 3 1
12 Z-CA6SB (CRS )
6 X 2 CHROME MAG CASTER
SWIVEL/BRAKE
4
15 EX4125TC-43 CAM-4106TCST 1
16 EX4125TC-27 TRAY DIVIDER 7
17 Z-SCM6-12MM M6-1.0X12 SOCKET HEAD SCREW 4
18 Z-TCBMPR-SC TC CORNER BUMPERS 4
19 Z-DL4125TC PVC DRAWER LINER 6
20 Z-BTM10-25MM M10X25MM HEX BOLT 16
21
Z-CA6SB LOCK
CASTER LOCK - MAG SWIVEL
4
Replacement keys may be ordered using the code that appears
on the face of the lock.
To order replacement parts, have the part number, tool box
color and quantity ready. If under warranty, the serial number is
REQUIRED to get replacement parts.
Not all parts are available under warranty and may be
purchased separately.

Handle Installation
NOTE: Install the handle rst to make it easier to move the tool cabinet.
Position the handle over the holes in the cabinet and attach with the provided
(4) M6 Socket Head Screws. Tighten securely.
ASSEMBLY
Caster Installation
NOTE: Lock the lid / sliding top and
drawers BEFORE proceeding!
Tool Cart is heavy. Installation requires
assistance of another adult to complete
this step.
With assistance, carefully lay the cabinet
on its back onto a soft surface such as a
mat to protect the cabinet nish.
Position each swivel casters on the bottom
of the cabinet.
Use (4) M10 hex bolts to install each
caster. (Please note: M10 hex bolts have
built-in washers and do not require an
additional washers.) Insert M10 Hex Bolts
through the bottom of the caster and then
insert the end of the bolts into the holes
in the bottom of the Cabinet. Tighten all 4
bolts securely. LOCK CASTER!
Repeat instructions above for installing all
casters. LOCK ALL CASTERS BEFORE
lifting cart to upright postion!

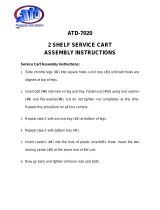
Installing OPTIONAL Caster Locking Bracket
To convert two of the casters from swivel to xed, the OPTIONAL Caster
Locking Bracket must be installed.
1. To install, rst locate the
(2) casters that are on the
opposite side of the cart
from the side handle. Fixed
casters must be located
opposite the side handle.
Handle
Casters
2. With the cart standing upright,
move the cart so the brakes
on the casters are facing the
back of the cart - ALL CASTER
BRAKES SHOULD BE FACING
THE BACK OF THE CART.
Caster brakes should face
the rear of the the cart.

5. Repeat Step 4 for the other
caster.
Loosen (2)
outer bolts
DO NOT
REMOVE!
3. Engage the brakes on all (4)
casters.
Locate the casters on the opposite
side from the side handle.
Loosen the (2) bolts & washers
closest to the outer edge of the cart.
DO NOT REMOVE BOLTS! ONLY
LOOSEN THE BOLTS!
4. Slide the open slots of the
Caster Locking Bracket into
the gap between the washer
and the caster plate. The long
part of the bracket will slide
in between the caster forks to
prevent them from turning.
Securely tighten the bolts.
Installed Caster
Locking Bracket

Drawer Removal
Pull drawer out so that it is almost
fully extended.
Push up on the black lever on one
drawer slide and at the same time
push down on the lever on the
other side.
With the levers in these positions,
pull the drawer out until it releases
from the drawer slides.
Drawer Replacement
Extend the drawer slides.
Careful align the brackets on
the sides of the drawers with the
slots of the cabinet slides. Insert
the brackets on the side of each
drawer into the slots of the cabinet
slides.
Once properly inserted,
completely close the drawer to
set the slides into their properly
functioning positions.
MAINTENANCE
Lubricate the casters once a year with high quality ball bearing grease.
Lubricate the slides twice a year with high quality, petroleum-based
lubricant. This may be required more often If operating the tool box in colder
climates.
Use mild detergent and water to clean drawer fronts, drawer trim and other
surfaces.
Grease and oil can be removed with standard, non-abrasive, non-
ammable cleaning products.
Auto wax will help preserve the unit’s high gloss nish. Follow directions as
provided.
OPERATING PROCEDURE

SAFETY
Do not attempt to lift the cabinet by its side handle using chains, ropes or lifting device.
Side handle may fail resulting in personal injury or damage to the product!
Use a forklift or similar lifting device with forks placed under the bottom of the tool box to
move if tool box cannot be moved by two people.
CLOSE THE DRAWERS AND LOCK THE TOOL BOX BEFORE MOVING THIS
PRODUCT!
If drawers are not locked they could open and make the product unstable and tip which
may cause personal injury or damage to the product.
Do NOT stand on this product or lean on the drawer or work top.
Wear safety glasses when removing or repositioning the slides. The tool box could slip
resulting in personal injury.
Do NOT mount this product on a truck bed or other moving object. This may cause
personal injury or product damage. Mounting this product on any surface will void the
warranty.
Do NOT tow with power equipment. The product could tip which may cause personal
injury or product damage.
Do NOT alter this product in any manner or attach electrical equipment. This may cause
personal injury or product damage and will void the warranty.
DRAWERS MUST BE CLOSED AND TOOL BOX LOCKED USING KEYS
BEFORE MOVING!
The maximum weight for each drawer should not exceed 100 lbs. (45 kg) for single slides
and 200 lbs. (90 kg) for drawers with double slides.
Maximum overall weight should not exceed 1.500 lbs. (680 kg.)
Use caution when closing the chest lid/sliding top. Remove hands from the area before
closing to prevent personal injury.
Do NOT pull this product. Push the product to prevent personal injury.
ENGAGE THE BRAKES when not moving this product. Locked casters prevent the
product from rolling which may result in personal injury or damage to the product.
This product may become unstable and tip if more than one drawer is open at a time. To
prevent personal injury or damage to product, OPEN ONLY ONE DRAWER AT A TIME.
Lock product and properly secure before moving with a forklift or other device.
Keep the product on a level surface. The product could become unstable and tip if stored
or moved on an uneven surface which may result in personal injury or product damage.
WARNING
CAUTION - IMPORTANT PRODUCT INFORMATION
/