
14
GENERAL OPERATING
INSTRUCTIONS
Carefully read the instruction manual
and warranty limitations.
The machine must be connected to a
grounded power outlet.
The machine must be kept clean by frequently
washing the grill, the drip tray, the capsule holder,
the tank and the steam wand.
EXTREMELY IMPORTANT: never immerse
the machine in water or put it in the dishwasher.
The water contained in the
tank must be replaced regularly.
Do not use the machine if the tank is empty.
After changing the water, place the tank back
in the machine, making sure it is inserted
all the way.
We recommend descaling the machine
at least every 2 months using a descaling
agent made especially for espresso machines.
See instructions in the DESCALING chapter.
The machine is outfi tted with a valve that
maintains constant pressure, for this
reason some water may drip from the capsule holder.
TECHNICAL DATA
Steam wand
Cup warmer rail
Weight without packaging: 9 Kg
Voltage: 230 V, 50 Hz (EU); 120 V, 60 Hz (USA)
Power: 1200W (EU), 1200W (USA)
Power consumed in power off mode: <1W
The A-weighted sound pressure level is below 70 dB
The manufacturer reserves the right to make changes or im-
provements without notice.
Casing: PC+ABS (EU), PC (USA)
Internal thermo block: steel
Water tank: 1.0 liters (33.8 ounces)
Pump: 15 bar
Coffee pressure during extraction: 15 bar
Size: 200 x 340 x 350 mm (7.9 w x 13.4 d x 13.8 h”)
2 solenoid valves
Electronic card with the following functions:
- automatic coffee shut off (volume programmable)
- high-precision temperature control (coffee and steam)
- descaling treatment indicator
- boiler temperature indicator
- beeper
- automatic descaling program
- power save
INDEX
MACHINE PARTS ....................................................................15
IMPORTANT SAFEGUARDS .....................................................16
USING THE ESPRESSO MACHINE ..........................................................16
INSTALLATION OF THE ESPRESSO MACHINE ........................................16
CLEANING THE ESPRESSO MACHINE ....................................................16
TROUBLESHOOTING ............................................................................16
IMPROPER USE OF THE APPLIANCE......................................................17
INSTALLATION AND START-UP OF ESPRESSO MACHINE ...........17
TURNING ON/OFF ....................................................................18
STAND-BY ...........................................................................................18
MAKING COFFEE .....................................................................18
SETTING THE QUANTITY OF COFFEE IN A CUP ..........................19
PREPARING CAPPUCCINO........................................................19
PREPARING HOT WATER .........................................................20
PREPARING COFFEE AFTER GENERATING STEAM .....................21
DESCALING ............................................................................21
CLEANING AND MAINTENANCE ................................................23
RECOMMENDATIONS ..............................................................25
TROUBLESHOOTING ................................................................ 24
WARRANTY LIMITATIONS ........................................................ 25

15
EN
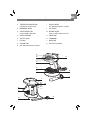
MACHINE PARTS
B
O
P
D
E
F
A
C
Q
I
H
G
A TEMPERATURE INDICATOR LIGHT
(indicates the machine status)
B MAIN ON/OFF SWITCH
C COFFEE BREW BUTTON
(starts and stops coffee fl ow)
D COFFEE BREW HEAD
E TRAY FULL FLOAT
F CUP GRILL
G STEAM BUTTON
H DRIP TRAY (placed beneath cup grill)
N
M
L
I CAPSULE HOLDER
(for “Metodo Iperespresso” capsules)
L CUP HOLDER
M INTERNAL BEEPER
(emits an audible signal to the user)
N POWER CORD
O STEAM WAND
P WATER TANK
Q DATA PLATE (on bottom)

16
IMPORTANT SAFEGUARDS
When using electrical appliances always follow the safety pre-
cautions below.
Using the espresso machine
- Read all Instructions.
- This machine is intended for household use only. Any other
use is considered improper and therefore dangerous.
- Unplug the power cord from the electrical socket when the
machine is not in use.
- Do not touch hot surfaces. Use handles and knobs.
- This machine is manufactured to “make espresso coffee”
and “prepare hot beverages”: use care to prevent scalding
due to water spray or any improper use of the machine.
- The machine is not designed to be used by people (including
children) with limited physical, mental or sensory abilities or
insuffi cient experience and/or skills, unless they are super-
vised by a person responsible for their safety, who provides
instructions on how to use the appliance.
- Children must be kept under supervision to prevent them
from playing with the appliance.
- Use the machine indoors only and away from atmospheric
agents.
- To protect against fi re, electric shock or personal injury do
not immerse the cord, plug or body of the machine in water
or any other liquid.
- Do not use the machine for purposes other than those for
which it was designed.
- Do not place the machine on, or near, electrical or gas bur-
ners or inside a hot oven.
- The machine must be turned on only when being used. After
use it must be turned off by pressing the on/off button
and unplugged from the power outlet.
- Before unplugging the machine make sure that the on/off
button is off (unlit).
- Using attachments
not recommended
by the manufacturer
may result in fi re,
electric shock or per-
sonal injury.
- Do not let the cord
hang over tables or
countertops or touch
hot surfaces.
- The appliance has to be placed in a horizontal position.
- The appliance is only to be installed in locations where it can
be overseen by trained personnel.
- To reduce the risk of injury, do not drape cord over the
counter top or table top where it can be pulled on by children
or tripped over unintentionally.
Installation of the espresso machine
- Read the instructions carefully.
- Do not install the machine in an area where the temperature
may reach 0°C/30°F or lower (if water freezes, the ap-
pliance may be damaged) or higher than 40°C/140°F.
- Check that the electrical voltage used corresponds to the
requirements indicated on the machine data plate. Connect
the machine only to a properly grounded power outlet with a
minimum rating of 6 A for models powered at 230 Vac,
and 12 A for models powered at 120 Vac.
- If the plug and the outlet are not compatible, have the plug
replaced with a proper one by an authorized service center
(applies to 208 volt machines ).
- Place the machine on a countertop away from water taps
and sinks.
- After removing the packaging, check that the appliance is in
perfect condition before installation.
- Do not leave the packaging materials the machine within
children’s reach.
Cleaning the espresso machine
- Make sure the machine is off; the on/off button must be
unlit.
- Unplug the machine.
- Wait until the machine is cool before cleaning.
- Clean the body and attachments with a wet cloth and then
wipe with a non-abrasive dry cloth. It is recommended not to
use detergents.
- Do not expose the machine to water spray or immerse it in
water, partially or fully.
Troubleshooting
Do not use the appliance if the cord or plug are damaged, if the
appliance shows signs of malfunctioning or has been damaged
in any way. Take the machine to the nearest authorised service
center for checks or repairs.
If the power cord is damaged it must be replaced by the manu-
facturer or an authorised service center.
IMPORTANT: SAVE THESE INSTRUCTIONS.

17
EN
In case of damage or malfunction, turn off the appliance and
do not tamper with it. For repairs contact a service center au-
thorised by the manufacturer and request the use of original
spare parts only. Failure to comply with these instructions may
compromise safe operation of the machine and will result in
the forfeiture of warranty rights.
Improper use of the appliance
- This appliance is intended for household use only. Any other
use is to be regarded as improper and therefore dangerous.
- The manufacturer is not liable for accidents caused by non-
compliance with existing legislation on electrical grounding
systems.
- The manufacturer is not liable for possible damage caused
by improper, incorrect or unreasonable use.
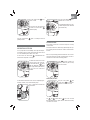
INSTALLATION AND START-UP
OF ESPRESSO MACHINE
Before connecting the machine to a power supply, carefully
read the safety instructions given in the chapter: “IMPORTANT
SAFEGUARDS”.
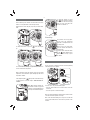
Make sure that the machine is
unplugged.
Insert the capsule holder from below and turn it to the right
until it locks into place.
Pull the water tank out of the machine and fi ll it with fresh
drinking water until the MAX mark is reached.
Caution: always fi ll the tank with fresh, still drinking water
only. Hot water or other liquids may damage
the tank. Do not use the machine without water.
Fit the tank to the machine, making
sure it is fully inserted in place.
Insert the plug into the outlet. Con-
sult the following chapter to switch
on the appliance.
D
I
O
Note: it is advisable to keep the ori-
ginal packaging (at least for the
duration of the warranty period) in
order to ship the machine to an au-
thorised service center for repair if
necessary.
Caution.
While the machine is operating, contact with the brew
head D, the steam wand O or the metal part of the capsule
holder may cause burns.

18
TURNING ON/OFF
Before switching on the machine check the water level in the
tank; if necessary add water as described previously.
Empty and rinse out the drip tray every time you fi ll the water
tank.
To switch the machine on, press the button until it lights
up.
The icons in the circle will light up progressively to indicate the
increase in the boiler temperature.
After a few minutes, when the machine reaches the operating
temperature, the brew button symbol will light up and a brief
beep will be emitted.
If the triangular symbol
lights up and an intermittent beep
is emitted, please consult the chapter: “PROBLEMS AND SO-
LUTIONS”.
Note: When using the machine for
the fi rst time or after a long period
of disuse, we suggest dispensing a
few cups of water without capsule.
To switch the machine off, press
the
button until the front panel
goes off; never disconnect the plug
from the power outlet when the
machine is switched on.
Stand-by
The machine has been program-
med to respect the environment
and reduce consumption when it is
not being used.
When it is not in use, after 30 mi-
nutes the machine will switch off
automatically.
5 minutes before automatic switch
off, the
button will fl ash. If you
want to machine to stay on, press
the button.
MAKING COFFEE
The X7.1 machine is designed to function exclusively with illy
“Metodo Iperespresso” capsules.
To make coffee, carry out the following steps:
- Turn the capsule holder to the left and remove it from the
brew head.
- Insert the capsule as shown in the fi gure.
Note: the capsule should slide easily into place; if this is not the
case take it out and reposition it correctly.
Note: coffee will start fl owing out a couple of seconds after
you press the button; this is normal for the operation of the
machine.

19
EN
- Insert the capsule holder in the brew head; turn the handle
to the right until it locks into place.
- Check that the coffee button is lit.
- Press and release the coffee button ; the machine will
brew the programmed quantity of coffee. To stop the fl ow in
advance, press the button again.
To make other coffees, remove the used capsule and repeat
the above steps.
Warning:
- The capsules are single-dose and cannot be used to
make two coffees.
- To ensure greater safety, the machine automatically
stops fl ow after approximately one minute.
- Remember to empty and clean the drip tray frequently.
SETTING THE QUANTITY OF
COFFEE IN A CUP
The X7.1 machine allows you to brew the desired quantity of
coffee in two modes: automatic and manual.
AUTOMATIC MODE - to set and memorise the quantity of cof-
fee to be brewed, carry out the following steps:
- Insert a capsule into the capsule holder and then fi t the latter
to the brew head.
- Place a cup beneath the capsule holder.
- Press the coffee button and keep it pressed until the coffee
has reached the desired level. Release the button. The ma-
chine is now programmed.
MANUAL MODE - to set the machine to work in the manual
mode, carry out the following steps:
- Insert a capsule into the capsule holder and then fi t the latter
to the brew head.
- Place a cup beneath the capsule holder.
- Press the coffee button and keep it pressed until the ma-
chine automatically stops dispensing coffee. Release the
button. In this case the programming has been cancelled.
Note: in the automatic mode it is also possible to make coffee
using the manual procedure.
- Press the coffee button for about 3 seconds;
- Press the coffee button again to stop the fl ow;
- In this manner you will not change the quantity of coffee
initially programmed.
Note: when the machine is set for MANUAL MODE of the quan-
tity of coffee, after you start brewing it will be necessary to
press the coffee button again when the coffee has reached the
desired level in the cup in order to stop the fl ow.
PREPARING CAPPUCCINO
The machine features a steam wand for frothing the amount of
milk necessary to prepare one or more cappuccinos.
Prepare one or more cups of coffee following the instructions
in the previous section.
Froth the milk as follows:
Press the steam button ; the
steam icon in the central circle will
light up to signal that the machine
is getting ready to dispense steam.

20
When the machine reaches the
right temperature, the
button
will light up.
At this point the machine will emit
a brief beep.
Place a suitable empty container
(preferably a metal pitcher) bene-
ath the steam wand and press the
button to discharge any resi-
dual water; when only steam co-
mes out press the button again.
Note: while steam is being dispen-
sed the
button will fl ash.
- Pour refrigerated milk into a suitable container (prefera-
bly a metal pitcher).
Note: For an optimal result: pour 75ml of cold whole milk ta-
ken directly from the fridge into a container (preferably a metal
pitcher) and keep the steam wand submerged in the milk for a
maximum of 25 seconds.
Submerge the steam wand com-
pletely into the milk.
Press the
button and wait for
the milk to froth.
On reaching the desired result,
press the
button again.
- After each use, you should thoroughly clean the steam
wand of milk residue:
Z
X
Press the
button for a few se-
conds.
Then press the
button again.
Wait a few minutes for the wand to
cool down.
Remove the outer part Z and wash
it under running water.
Wipe the inside part X clean with
a wet cloth.
Note: The two end parts of the steam wand can also be washed
in a dishwasher; in this case also remove the inside part from
the metal tube. After cleaning, fi t the inside part X all the way
onto the steam wand; then fi t the outer part Z.
Warning:
- Contact with steam and with the steam wand may cause
severe burns.
- If no steam is dispensed, after about 5 minutes the
machine will automatically switch back to the coffee
brewing mode; a minute before this occurs the
but-
ton will fl ash. If you want to dispense more steam, press
the button.
- While the machine is warming up and as long as it re-
mains in the steam mode, it carries out heating cycles in
the boiler which may cause small amounts of steam to
be discharged from the capsule holder: therefore, keep
limbs and other parts of the body away from the coffee
brew zone in order to avoid scalding.
PREPARING HOT WATER
The steam wand of the machine can also be used to dispense
hot water for making tea and infusions.
Check that the coffee button
is lit.
Carry out the following steps:
Clean the steam wand of any milk
residues.
Place a metal pitcher beneath the
steam wand.

21
EN
Press the steam button for at
least 3 seconds.
The machine will start dispensing
hot water; the steam button
”will fl ash rapidly.
Press the steam button again on reaching the desired
quantity of water.
PREPARING
COFFEE AFTER GE-
NERATING STEAM
It is very important to avoid making coffee right after dispen-
sing steam because the water generated by the thermo block
is too hot and will impair the fl avor of the coffee.
For this reason the coffee button
is disabled when the
thermo block temperature is too high.
To switch the machine back to the
coffee mode, press the coffee but-
ton and wait until the
button
lights up; during this cooling down
phase (approximately 10 minutes),
the cup icon in the central circle
will fl ash.
To switch the machine back to the coffee mode quickly (appro-
ximately 1 minute), carry out the following steps:
Place a metal pitcher beneath the
steam wand.
Keep the steam button pres-
sed down for 3 seconds.
A programmed quantity of hot wa-
ter will be dispensed; the fl ow will
stop automatically.
DESCALING
The formation of limescale is a natural consequence of using
of the machine.
The machine features an automatic program designed to opti-
mise cleaning and remove limescale residues from inside the
machine.
Note: use only descaling products intended for coffee machi-
nes.Please follow the procedure described below, not the in-
structions on the label of the descaling product.
If the icon in the central circle
fl ashes (1 fl ash every two seconds)
proceed as follows:
Starting the procedure:
Keep the coffee button and
steam button pressed down
together for at least 5 seconds.
The
and buttons and the icon in the circle will
fl ash simultaneously to signal that the automatic descaling
cycle has been selected.

22
- Take out and fi ll the tank with 1 litre of water (up to the MAX
level).
- Introduce the descaling product supplied with the machine
into the tank full of water; wait for it to dissolve.
- Remove the capsule and capsule holder.
1 Liter
- Place an empty container with a capacity of at least 1 litre
beneath the brew head.
- Turn the steam wand toward the container; water will fl ow
out both from the brew head and the steam wand.
- Press the
button.
The
button and the icon in the circle will fl ash si-
multaneously to signal the beginning of the descaling cycle,
which lasts about 30 minutes.
- At the end of the cycle the machine will emit a beep The
button and the icon in the circle will start fl ashing
together with the other signals already present.
At this point it is necessary to clean the internal water circuit of
the machine of any residues of the descaling agent.
That is, the machine must be run through a rinse cycle; carry
out the following steps:
- Remove the tank and clean it thoroughly; fi ll it with 1 litre of
fresh water (up to the MAX level).
1 Liter
- Place an empty container with a capacity of at least 1 litre
beneath the brew head.
- Turn the steam wand toward the container; water will fl ow
out both from the brew head and the steam wand.
- Press the
button.
The
button and the icon in the circle will fl ash si-
multaneously to signal the beginning of the cycle for rinsing
the internal water circuit of the machine.
- At the end of the rinse cycle all the fl ashing signals will go off
and a beep will be emitted.
- Remove the water collection container from beneath the
brew head and wash it thoroughly.
- Refi ll the water tank again.
- Now the machine is ready for use.
WARNING:
- Should a mains power failure occur during the descaling
procedure, it will be necessary to repeat the cycle from
the start.
- If descaling is not performed as needed, scale build-up
may cause malfunctioning not covered by the warranty.
It is advisable to use the descaling agent supplied with
the machine.
- Do not use vinegar, lye, salt or formic acid because they
may damage the machine.

23
EN
The descaling solution must be disposed of in accordance
with the applicable laws and regulations.
CLEANING AND MAINTENANCE
The machine and its components must be cleaned at least
once a week.
Keep the water in the tank fresh; wash the tank and fi ll it daily
with fresh drinking water.
Do not use ethyl alcohol, solvents, abrasive sponges and/or
aggressive chemicals.
Caution: do not dry the machine and/or it components in a
microwave or conventional oven.
To clean the machine, carry out the following steps:
Switch the machine off and discon-
nect the plug from the power
outlet.
Remove the water tank and wash it
under running water.
Empty out the capsule holder and
wash it under running water.
- Remove the grill and wash it with warm water.
- Remove the drip tray and wash it with warm water.
- Remove the outer end part of the steam wand.
- Remove the inside part of the steam wand from the metal
tube.
- After separating the two components, wash them separately
with warm water.
- After washing the components fi t the inside part on the me-
tal tube and then fi t the outer part.
Note: when you refi t the inside and outer end parts of the steam
wand, make sure to push them up all the way.

24
TROUBLESHOOTING
You press the button but it does not
light up.
Check the mains electrical connection; check the status of the circuit breakers protecting the home
electrical system.
The machine does not make coffee.
Carry out the following operations:
- Fill the water tank; make sure it is fi tted completely into place.
- Remove the capsule holder from the coffee brew head.
- Wait until the
button lights up (machine ready to brew).
- Place a container underneath the brew head and press the coffee button.
- Dispense water for a few seconds.
- Stop the fl ow.
- Insert a new capsule in the capsule holder and fi t it to the brew head; proceed with making coffee.
You press the
button and the ma-
chine does not dispense steam.
Steam comes out but it does not froth
the milk.
Case a) If the steam icon in the circle is lit, wait until the steam button lights up.
Case b)
If the steam icon in the circle is not lit, press the steam button and wait until the steam
button lights up (machine warming up).
Case c)
Possible clogging of the steam wand: switch off the machine; wait for it to cool down (at
least an hour); remove any obstructions from the outlet holes of the steam wand.
Water leaks out of the brew head during
brewing.
Insert a new capsule in the capsule holder and fi t it to the brew head; proceed with making coffee.
Fast beeps and fl ashing triangular icon.
Carry out the following operations:
- Switch off the machine.
- Fill the tank.
- Place a container under the steam wand and press the
button.
- Switch on the machine and wait about 10 seconds for the
button to light up.
Triangular icon fl ashing rapidly.
Carry out a descaling cycle.
Water leaks from the inside of the ma-
chine.
Switch off the machine and unplug it.
Water leaks from the tank after you have
fi lled it.
Empty the tank; press on the transparent rubber gasket of the coupling valve inside the tank.
Some drops of coffee come out of the
capsule during the fi rst seconds of
brewing.
Any dripping that occurs during the fi rst seconds of brewing is to be considered normal.
Note: If the problem persists, contact an authorised service center.

25
EN
Disposal of end-of-life electric and electronic equipment by
private households in the European Union.
The WEEE symbol used on this product means that it must not
be disposed of together with other domestic waste and should
be collected separately. Consumers have the opportunity to
hand in their used appliance to distributors free of charge on a
1:1 basis when they purchase a new product..
For further information about the collection of appliances to
be scrapped, please contact the local authority in your town
of residence, the local waste disposal service or the retailer
where the product was purchased. Consumers are responsible
for disposing of end-of-life appliances in accordance with the
current provisions of law and non-compliance therewith may
be subject to fi nes and criminal sanctions.
The correct disposal of this product will contribute to protecting
the environment, natural resources and human health.
RECOMMENDATIONS
To enjoy a high quality espresso, remember to:
- Change the water in the tank at least once a week.
- If possible use water with a low calcium content to redu-
ce scale build-up inside the machine.
- Used warmed cups.
This appliance is intended to be used in household and similar
applications such as:
- staff kitchen areas in shops, offi ces and other working
environments;
- farm houses;
- by client in hotels, motels and other residential type envi-
ronments;
- bed and breakfast type environments.
WARRANTY LIMITATIONS
The warranty does not cover damage or malfunctions caused
by:
- failure to carry out periodic descaling.
- operation with a voltage that differs from the rating
shown on the data plate (see chapter MACHINE PARTS).
- improper use or use that is not compliant with the in-
structions.
- internal modifi cations.
The warranty does not cover the costs of repairing machines
that have been handled by non-authorised service centers.
Such costs shall be completely borne by the customer.
It is recommended:
- not to place the drip tray in a dishwasher
- to always keep the bottom of the inside of the column
supporting the tank dry.
Failure to follow these recommendations may cause damage
to the machine body which is not covered by the warranty.
WARNING:
It is advisable to keep the original packaging (at least for
the duration of the warranty period) in order to ship the
machine to a service center for repair if necessary.
Any damage caused by transport without adequate packa-
ging will not be covered by the warranty.
-
 1
1
-
 2
2
-
 3
3
-
 4
4
-
 5
5
-
 6
6
-
 7
7
-
 8
8
-
 9
9
-
 10
10
-
 11
11
-
 12
12


Metodo X7 User manual
- Category
- Coffee makers
- Type
- User manual
Ask a question and I''ll find the answer in the document
Finding information in a document is now easier with AI
Other documents
-
Dualit Espress-Auto Coffee and Tea Machine Instruction manual & Guarantee
-
Hisense HCM20CDRH User manual
-
Saeco LM 1100 User manual
-
 Renato's UNIQUE User manual
-
Cuisinart EM-350 User manual
-
Expobar Quartz User manual
-
-
Saeco INCANTO SUP021R User manual
-
-
 Francis&Francis x 7 Owner's manual

