Clarke CDE35B 6470310 Operating & Maintenance Instructions
- Category
- Power tools
- Type
- Operating & Maintenance Instructions

OPERATING & MAINTENANCE
INSTRUCTIONS 0305
DUST/CHIP EXTRACTOR
MODEL No. CDE35B
Part No. 6470310
DUST/CHIP EXTRACTOR

-1- -10-
Please note that the details and specifications contained herein are correct at the time of going to
print. However CLARKE International reserve the right to change specifications at any time without
prior notice. Always consult the machines data plate
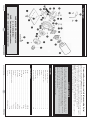
Item Part No Description Qty
Parts List
1 QB35001 Castor 4
2 QB35002 Pan Head Screw~M6x16 16
2a QB35002a Nut~M6 16
3 QB35003 Spring Washer~Ø6 16
4 QB35004 Base Plate 1
5 QB35005 Pan Head Screw~M5x10 12
6 QB35006 Inlet Cover 1
7 QB35007 Socket Head Screw~M6x20 1
8 QB35008 Set Screw~M8x10 2
9 QB35009 Washer 1
10 QB35010 Turbo Fan 1
11 QB35011 Collector Body 1
12 QB35012 Washer~Ø8 18
12a QB35012a Nut~M8 6
13 QB35013 Hex Head Screw~M8x10 6
14 QB35014 Hex Head Screw~M8x15 12
15 QB35015 Hex Head Screw~M6x15 6
15a QB35015a Nut 6
16 QB35016 Switch 1
17 QB35017 Clamp 1
18 QB35018 Motor 1
19 QB35019 Seal 1
20 QB35020 Motor Plate 1
21 QB35021 Key~5x5x30 1
22 QB35022 Packing 1
23 QB35023 Outlet 1
24 QB35024 Collection Bag 1
25 QB35025 Handle 1
26 QB35026 Power Cord 1
27 QB35027 Hooks 2
28 QB35028 Hex Head Screw~M6x25 2
29 QB35029 Hose Adaptor 1
IMPORTANT:
The use of parts other than CLARKE replacement parts may result in safety hazards,
decreased tool performance and may invalidate your warranty.
Component Check List (Item Nos in brackets refer to parts list on page 10 )
Checklist
1 off Operating Instructions.
1 off Base Plate. (4) + 1 off & Motor Plate. (20) + 1 off Collector Body & Motor.
(11 & 18)
1 off Outlet. (23) + 1 x Seal. (22)
1 off Inlet/Hose Adaptor. (29)
1 off Collector Bag. (24)
4 off Castors. (1)
1 off Handle. (25)
1 off Clamp. (17)
Note:
To aid assembly, all fixing screws etc are loosely fitted and need to be removed
as assembly is progressed.
IMPORTANT
Before commencing please check contents and advise immediately of any
shortages.
IMPORTANT!
This device is designed to collect large dust particles -
wood chips, sawdust etc. greater that 5 microns in size.
When cutting materials which may be toxic (some
hardwoods, MDF etc.), the user must wear a dust mask
capable of filtering dust down to 1 - 1.5 microns.

-2-
-9-
Parts Diagram
PARTS & SERVICE TEL: 020 8988 7400
or e-mail as follows:
PARTS: [email protected]
SERVICE: [email protected]
CLARKE GUARANTEE
This CLARKE product is guaranteed against faulty manufacture for a period of 12
months from the date of purchase. Please keep your receipt as proof of purchase.
This guarantee is invalid if the product is found to have been abused or tampered
with in any way, or not used for the purpose for which it was intended.
Faulty goods should be returned to their place of purchase, no product can be
returned to us without prior permission.
This guarantee does not affect your statutory rights.
Please read these instructions carefully before operating the tool
Thank you for purchasing this CLARKE wood chip and dust extractor.
Before using the device, please read this manual thoroughly and carefully follow all
instructions given. This is for your own safety and that of others around you, and is also to
help you achieve a long and trouble free service from your new equipment.
Your new extractor is designed to collect wood chips and dust only.
DO NOT use to pick up flammable or readily combustible material, hot ashes, coals etc., or
use in the presence of explosive liquids or vapour.
Contents
Component Check List ................................................................................ 1
Safety Precautions ........................................................................................ 3
Electrical Connections ................................................................................. 5
Assembly ........................................................................................................ 6
Operation ...................................................................................................... 7
Maintenance ................................................................................................. 7
Trouble Shooting ........................................................................................... 8
Parts List & Diagram ................................................................................. 9-10
Specifications
Model: ................................................................................................ CDE35B
Part No: .............................................................................................. 6470310
Voltage: .............................................................................................. 230 vac
Power Rating: ........................................................................................... 1HP
Fuse Rating: ......................................................................................... 13amp
Motor Speed: .................................................................................. 2970 RPM
Noise Level: ................................................................................. 50~60 dB(A)
Dust Bag: ........................................................................................... 5 micron
Operating Temperature: ................................................................... -10~40º
Weight: ..................................................................................................... 22kg
Dimensions: .......................................................................... 470x380x460mm

-8-
-3-
Trouble Shooting
Problem Probable Cause Suggested Remedy
Motor will not run.
Excessive sawdust in the
air.
Excessive impeller noise.
Motor fails to develop
full power.
1. Defective cord, plug,
switch and or motor.
2. Fuse blown.
1. Consult your nearest
Clarke dealer.
2. Replace fuse.
1. Loose connectors.
2. Filter/dust bag worn or
damaged.
1. Tighten connectors.
2. replace bag.
1. Impeller dirty, (sawdust
build up).
2. Loose or impeller rubbing.
1. Switch OFF and isolate
from mains, clean impeller.
2. Consult your nearest
Clarke dealer.
Excessive noise. 1. Defective motor.
2. Loose fan.
1. Have motor/fan checked
by qualified service
technician.
1. Circuit overloaded.
2. Undersize extension lead,
too long or not fully
unwound.
1. Use on separate circuit.
2. Change extension lead.
Motor starts slowly fails to
reach full speed.
1. Low voltage.
2. Windings burned out or
open circuit.
1. Request voltage check by
an electrician
2. Have motor repaired or
replaced.
Motor does not start
when ON switch is
pressed
1. Switch contacts burnt.
2. Start capacitor faulty.
1. Have switch replaced.
2. Have capacitor replaced.
DO NOT attempt to carry out repairs yourself, unless you are fully competent, all work must
be carried out by a qualified technician
Safety Precautions
WARNING:
As with all machinery, there are certain hazards involved with their operation
and use. Exercising respect and caution will considerably lessen the risk of
personal injury. However, if normal safety precautions are overlooked or
ignored, personal injury to the operator or damage to property, may result.
1. ALWAYS Learn the machines’ applications, limitations and the specific potential
hazards peculiar to it. Read and become familiar with the entire
operating manual.
2. ALWAYS use a face or dust mask if operation is particularly dusty.
3. ALWAYS check for damage. Before using the machine, any
damaged part, should be checked to ensure that it will operate
properly, and perform its intended function. Check for alignment of
moving parts, breakage of parts, mountings, and any other condition
that may affect the machines’ operation. Any damage should be properly repaired
or the part replaced. If in doubt, DO NOT use the machine. Consult your local dealer.
4. ALWAYS disconnect the tool/machine from the power supply before servicing and
when changing accessories, removing and emptying dust bag etc.
5. ALWAYS wear safety goggles, manufactured to the latest European Safety Standards.
Everyday eyeglasses do not have impact resistant lenses, they are not safety glasses.
6. ALWAYS keep work area clean. Cluttered areas and benches invite accidents.
7. ALWAYS ensure that adequate lighting is available. A
minimum intensity of 300 lux should be provided. Ensure
that lighting is placed so that you will not be working in your
own shadow.
8. ALWAYS keep children away. All visitors should be kept a
safe distance from the work area, especially whilst operating
the machine.
9. ALWAYS maintain machine in top condition. Keep tools/machines
clean for the best and safest performance. Follow maintenance
instructions.
10. ALWAYS handle with extreme care do not carry the tool/machine
by its’ electric cable, or yank the cable to disconnect it from the
power supply .
11. ALWAYS ensure the switch is off before plugging in to mains. Avoid
accidental starting.
12. ALWAYS concentrate on the job in hand, no matter how
trivial it may seem. Be aware that accidents are caused
by carelessness due to familiarity.
13. ALWAYS keep your proper footing and balance at all
times don’t overreach. For best footing, wear rubber
soled footwear. keep floor clear of oil, scrap wood, etc.
1. Switch OFF and isolate from the main electrical supply by removing the plug from the
socket, ensure it is not possible to be plugged back in accidentally by somebody
else by tying up etc, attach a warning label.
2. Remove 12 screws securing the inlet cover, (6), and remove cover to expose the
impeller.
3. Clean impeller using a brush, cleaning cloth, vacuum cleaner and/or low pressure
compressed air.
CAUTION : Beware of sharp edges.
If any servicing (other than the above cleaning) becomes necessary, it should be carried
out by an authorised service centre.
NOTE : The speed of this motor cannot be regulated or changed.
WARNING
NEVER LEAVE UNATTENDED WHEN COVER IS REMOVED

-7- -4-
14. ALWAYS wear proper apparel. loose clothing or jewellery
may get caught in moving parts. wear protective hair
covering to contain long hair.
15. ALWAYS use recommended accessories. the use of improper
accessories could be hazardous.
16. ALWAYS remove plug from electrical outlet when adjusting,
changing parts, or working on the machine.
17. NEVER operate machine while under the influence of drugs, alcohol or any
medication.
18. NEVER leave machine running unattended. turn power off. Do
not leave the machine until it comes to a complete stop.
19. NEVER force the machine. it will do a better and safer job at
the rate for which it was designed.
20. NEVER use power tools in damp or wet locations or expose
them to rain. Keep your work area well illuminated. do not
use in explosive atmosphere (around paint, flammable liquids
etc.). Avoid dangerous environment.
Additional Safety Precautions
1. Do not use if the electric cable, plug, collection bag or the motor, is in poor
condition.
2. Do not pick up flammable or readily combustible material, hot ashes, coals
etc., or use in the presence of explosive liquids or vapour.
3. Do not use in enclosed areas where flammable, explosive or toxic vapours
are given off, by oil based paints, paint thinner, petrol etc.
4. Do not pick up burning cigarettes or other smoking substances.
5. Do not change or clean the dust bag , or carry out any servicing, without first
disconnecting the machine from the mains supply. ALWAYS wear a dust mask when
emptying the dustbag
6. Do not allow the ventilation slots in the motor to become blocked.
7. Always keep Guards/Covers in place and in a serviceable condition.
8. Always keep the mains cable well away from the machine and ensure an adequate
electrical supply is close to hand so that the operation is not restricted by the length
of cable.
9. Always switch the machine OFF immediately the task is completed. Ensure the electric
cable and hose is stowed away and not left as a hazard, i.e. for others to trip over.
10. Never leave machines running unattended. Turn power OFF and wait until the
machine has come to a full stop before leaving.
11. EARTH ALL MACHINES. if the machine is equipped with a three-pin plug, it should be
plugged into a three-pin earthed socket. NEVER remove the earth pin.
Additionally, please keep these instructions in a safe place for future reference.
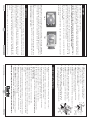
Fig. 2 Fig. 3
When using the dust collector, keep a close eye on the waste collection bag, DO NOT allow
the bag to become overfull, always attempt to empty when approximately three quarters
full. It may be necessary to pull waste from collection bag by hand, if so, wear gloves to
protect hands from sharp splinters etc, a suitable dust mask should also be worn
NOTE:
When emptying the waste bag, take care of flying dust, wear safety goggles and dust
mask, ensure there are no other people or animals in the close vicinity that may be affected
if sawdust does happen to blow about.
Operation
DO NOT OPERATE WITHOUT ALL PARTS IN PLACE!
Do not attempt to clean, remove or attach dust bags or carry out any servicing to the unit
whilst it is in operation, ALWAYS ensure it is switched off and isolated from the mains by
removing the plug from the socket.
CAUTION : The blower housing contains a high speed fan blade that could amputate fingers,
grab loose clothing and neckties etc, and propel dust at very high velocities.
To switch ON, press the switch cover down, slide in direction of arrow (see fig. 2) and lift up,
this will expose the ON/OFF buttons, (see fig. 3 ) Push the ON button, (green button ‘I’). DO
NOT close the cover as this will switch the machine OFF again.
NOTE : in case of emergency, close the switch cover quickly, cover will latch down and
motor will be switched OFF.
To switch OFF normally, press OFF button, (red button ‘O’), always close cover to prevent
accidental starting.
Maintenance
Excessive dust in the motor can cause overheating, ensure all air vents are clear, to avoid
eye injury or adverse reaction to dust, clean the machine by blowing out the air vents using
low pressure compressed air, where possible.
Check the power cable to ensure it is sound and free from cracks, bare wires etc. avoid
using solvents when cleaning plastic parts, most plastics are susceptible to damage from
the various types of commercial solvents.
All bearings etc., in this tool are lubricated with a sufficient amount of high grade lubricant
for the tools lifetime under normal operating conditions, therefore no further lubrication is
required.
Occasionally it will be necessary to manually clean the impeller, to do this proceed as follows.

-5- -6-
Electrical Connections
This appliance is fitted with a standard, 230 Volt (50Hz) BS 1363 approved 13 amp plug, for
connection to a standard domestic 13 Amp electrical supply. We strongly recommend that
connection be via a Residual Current Device (RCD).
WARNING! THIS APPLIANCE MUST BE EARTHED
IMPORTANT: Should the plug be replaced, it is important to note that he wires in the mains lead
are coloured in accordance with the following code
Green & Yellow .................................................Earth
Blue ..................................................................Neutral
Brown ...............................................................Live
As the colours of the flexible lead of this appliance may not correspond with the coloured
markings identifying terminals in your plug proceed as follows:
• Connect GREEN & YELLOW coloured cord to plug terminal marked with a letter “E” or Earth
symbol “ ” or coloured GREEN or GREEN & YELLOW.
• Connect BROWN coloured cord to plug terminal marked with a letter “L” or coloured RED.
• Connect BLUE coloured cord to plug terminal marked with a letter “N” or coloured BLACK.
If this appliance is fitted with a plug which is moulded onto the electric cable (i.e. non-rewirable)
please note:
1. The plug must be thrown away if it is cut from the electric cable. There is a danger of electric
shock if it is subsequently inserted into a socket outlet.
2. Never use the plug without the fuse cover fitted.
3. Should you wish to replace a detachable fuse carrier, ensure that the correct replacement
is used (as indicated by marking or colour code).
Fuse Rating
The fuse in the plug must be replaced with one of the same rating (13 amps) and this
replacement must be ASTA approved to BS1362.
IMPORTANT:
If a cable extension is needed, it is essential to comply with the following data.
Voltage Extension length Cable section
230v Up to 20m 2.5mm2
230v From 20 to 50m 4mm2
Assembly (Item Nos in brackets refer to parts list on page 10 )
TOOLS REQUIRED
Phillips screwdriver.
Flat Bladed Screwdriver
10mm spanner.
1. Lay components out neatly.
2. Turn complete unit over and fit castors (1) using screws and nuts supplied.
3 Attach the handle (25) using the two screws supplied, DO NOT overtighten.
4. Attach the hose adaptor (29) to the inlet cover (6), screws supplied. (see Fig. 1) this
is safety requirement and must be adhered to, as this part also prevents finger
access into the impeller.
5. Fit the outlet (23) with the seal (22) between the outlet and the collector body,
6 nuts bolts and washers supplied, DO NOT overtighten.
6. Attach the collector bag (24) to the outlet (23), and secure with the clamp (17)
supplied, (DO NOT overtighten).
Your Wood Chip/Dust Collector is now ready for use. Before plugging in and switching on,
ensure the safety instructions are followed, and the electrical; supply is correct.
If the collector is to be connected to a wood saw or other woodworking machine, ensure
you have the correct diameter of hose, etc.
Flexible hose and accessories are available from your nearest Clarke dealer.
Additionally, the machine may be wall mounted. Provided for this are two hooks (27), the
hooks are fitted to the wall at a convenient location, with the screw centres 170mm apart,
using the appropriate fixings (not supplied).
The base of the machine is provided with two holes for the hooks to be located into, so that
the collector bag is hanging downwards, to use the machine this way, it is necessary to
remove the castors first, (store safely for future use).
Ensure the wall fixings are of sufficient strength to support the machine, considering the
machines weight and vibration during its operation.
Fig. 1
-
 1
1
-
 2
2
-
 3
3
-
 4
4
-
 5
5
-
 6
6


Clarke CDE35B 6470310 Operating & Maintenance Instructions
- Category
- Power tools
- Type
- Operating & Maintenance Instructions
Ask a question and I''ll find the answer in the document
Finding information in a document is now easier with AI
Related papers
-
Clarke Woodworker CPT800 Specification
-
Clarke CBS300 Operation & Maintenance Instructions Manual
-
-
-
-
-
-
-
-
Other documents
-
Record Power RSDE1 Original Instruction Manual
-
Axminster Trade Series User manual
-
Axminster Trade 105783 Original Instructions Manual
-
-
-
-
King Canada KC-5043FX-2 User manual
-
-
-