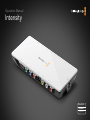
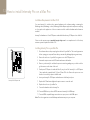
Blackmagicdesign Intensity Pro User manual
- Category
- Camcorders
- Type
- User manual
This manual is also suitable for


Contents
Intensity Operation Manual
How to Install
How to Install on a Windows PC 9
Installation Requirements for Windows 9
Installing Intensity Pro in your PCIe computer 9
Before Connecting Intensity Shuttle via USB 3.0 10
Connecting Intensity Shuttle to your USB 3.0 computer 11
Installing Desktop Video software for Windows 12
How to Install on a Mac Pro 13
Installation Requirements for Mac OS X 13
Installing Intensity Pro in your Mac Pro 13
Installing Desktop Video software for Mac OS X 14
Software
Blackmagic Software 16
Setting Blackmagic Preferences 16
Blackmagic Media Express 2 20
Blackmagic Speed Disk (PC) 28
Uncompressed Disk Arrays (PC) 28
Blackmagic Speed Disk (Mac) 29
Disk Arrays (Mac) 29
Third Party Applications / Windows 30
Adobe Premiere Pro 30
Adobe After Effects 33
Adobe Photoshop 34
Sony Vegas Pro 9 35
Third Party Applications / Mac 36
Adobe Premiere Pro 36
Adobe After Effects 39
Adobe Photoshop 40
Adobe Final Cut Pro 41
08 45
53
64
15
Helpful Information
Support 46
Which connections should I use for best quality video? 46
USB 3.0 Frequently Asked Questions 48
Uncompressed data rates for capture and playback 50
Compressed data rates for capture and playback 51
Troubleshooting 52
Connection Diagrams
Intensity Shuttle: Component Analog Video Connections 54
Intensity Shuttle: S-Video Analog Connections 55
Intensity Shuttle: Composite Analog Video Connections 56
Intensity Shuttle: Connecting to an HDMI HDTV 57
Intensity Shuttle: Video Workflow 58
Intensity Pro: Component Analog Video Connections 59
Intensity Pro: S-Video Analog Connections 60
Intensity Pro: Composite Analog Video Connections 61
Intensity Pro: Connecting to an HDMI HDTV 62
Intensity Pro: Video Workflow 63
Warranty
Warranty Terms and Conditions 65

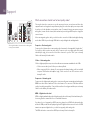
Welcome
3
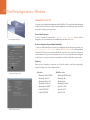
Welcome to Intensity!
We hope you share our dream of making the video industry truly creative by allowing everyone access to
the highest quality video and sound. Intensity includes the same high quality video technology used in all
Blackmagic Design video products, so you won’t be limited creatively.
I have always felt that everyone should have the possibility of self-actualization through creative expression.
When you think about it, creativity, design and the arts are the true essence of humanity and is what makes
us unique as a species. Television is a wonderful creative medium because it overloads the senses with
exciting vision and sound, while being easy for viewers to experience.
Until now, the high quality video required for feature films, music videos, television commercials and
episodic television production required massive equipment costs. Unfortunately this turned the television
industry into an exclusive club. I think one of the most exciting things we have done at Blackmagic Design
is make the highest quality video available to all of us - so now your creative abilities can make you the
world’s best.
We are really excited about what you’ll do with your new Intensity!
The instruction manual you’re reading now contains all the information you’ll need for installing your
Intensity, plus extra instructions on using it as a powerful HDMI based editing, design and effects solution.
Please take the time to check it out as there are lots of tips and tricks to help you.
Before you install Intensity, please visit our support page at www.blackmagic-design.com to download the
latest updates to this instruction manual and Intensity driver software. We have more helpful tech notes on
our support page, and you might find a newer version of the software and manual than was included on
the CD with your Intensity package.
Lastly, please register your Intensity serial number with us, when you download the latest Intensity driver
software, so we can keep you updated when new software is released.
Perhaps you can even send us your latest “show reel” of work completed on your Intensity and any ideas
for changes to the Intensity software. We are constantly working on new features and improvements, so we
would really love to hear from you!
Grant Petty
CEO Blackmagic Design

Welcome
4
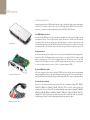
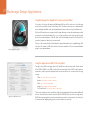
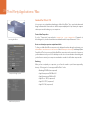
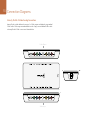
Intensity Shuttle
Component analog video
HDMI
USB 3.0
Composite analog video
Left & Right
analog audio
S-Video

Welcome
5
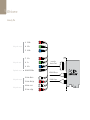
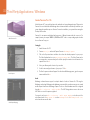
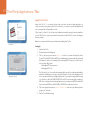
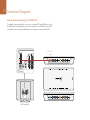
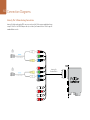
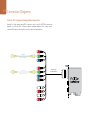
Intensity Pro
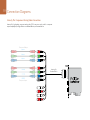
3. R-Y Out
4. Y Out
5. B-Y Out
7. R-Y In
8. Y In
9. B-Y In
10. AES/SPDIF Out
12. Audio Out Left
13. Audio Out Right
14. Audio In Left
15. Audio In Right
3
4
5
7
8
9
10
12
13
14
15
Intensity Pro
Breakout Cable
HDMI 4:2:2 Output
HDMI 4:2:2 Input
Analog video output
Analog video input
Analog audio output
Analog audio input
Digital audio output

Welcome
6
Introducing Intensity
Intensity features the latest HDMI and analog technology for the highest quality capture and playback
on Mac OS X or Windows computers. Now you can edit using big-screen HDMI televisions and video
projectors, or capture uncompressed quality directly from AVCHD and HDV cameras.
True HDMI digital connections
Intensity features HDMI input for connecting cameras and digital set-top boxes for the highest quality
uncompressed capture. Get the highest quality capture possible from AVCHD and HDV cameras
by capturing from the camera’s image sensor and bypassing the compression chip. Because edit
software cannot play back to AVCHD and HDV cameras for monitoring, Intensity is ideal for monitoring
uncompressed HD, or AVCHD, HDV and even DV edits on big screen televisions and video projectors.
Analog connections
Intensity includes analog video and audio connections for capture and playback from analog equipment.
Capture from VHS or DVD players via the composite input, or use analog Y,Cr,Cb for capture in high
quality component video in SD or HD. Featuring analog audio, Intensity can connect to VHS and
S-Video decks, DVD players, set top boxes, AVCHD cameras and many more. Now you can play back
to televisions and monitors in composite, S-Video, component analog or HDMI.
Go beyond HDV video quality
HDV video compression suffers from not being full 1920 HD resolution, with the extra processing required
making editing difficult. Now you can capture and play back full resolution HDTV uncompressed video for
true broadcast and feature film quality editing, totally eliminating HDV & DV compression quality problems.
Professional video standards
Intensity Pro will instantly switch between HD and SD video standards including HDTV 1080i/50,
1080i/59.94, 1080p/23.98, 1080p/24, 720p/50, 720p/59.94, NTSC and PAL. Intensity Shuttle also
instantly switches between HD and SD video standards and has extra formats including HDTV 1080i/50,
1080i/59.94, 1080i/60, 1080p/23.98, 1080p/24, 1080p/25, 1080p/29.97, 1080p/30, 720p/50, 720p/59.94,
720p/60, NTSC and PAL. Intensity allows capture in professional file formats which are fully compatible
with Blackmagic Design’s DeckLink, Multibridge and UltraStudio capture products.
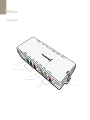
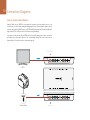
Intensity Pro PCI Express card
Intensity Shuttle
Intensity Pro breakout cable

Welcome
7
Compatible with all video software
Compatible with QuickTime™ and DirectShow™, Intensity can use a wide range of video software for
video capture and playback in either standard definition or high definition 4:2:2. Use Blackmagic Media
Express to capture and play back your clips without having to buy anything more. Use Final Cut Studio™
or Adobe Premiere Pro® on Mac OS X™, or Premiere Pro® and Sony Vegas Pro 9 on Windows™ for
editing and then combine Adobe After Effects® and Photoshop® for broadcast design and paint. Then
finish your job by using DVD authoring software to give your clients a DVD.
Copy protected video
HDMI video sources may output copy protected video. By law Intensity is not allowed to capture from
copy protected HDMI sources, such as HDCP encrypted video and DVD players.

How to Install
8

How to install Intensity Pro on a Windows PC
9
Installation Requirements for Windows
Your new Intensity includes video capture hardware and a software package containing the Blackmagic
driver, Blackmagic codecs, Blackmagic Media Express application and presets and plug-ins for popular
video applications. It does not matter in which order the hardware and software are installed.
Intensity Pro hardware is a x1 lane PCI Express card and should work in any x1, x4, x8 or x16 lane PCI
Express slot, whereas Intensity Shuttle hardware connects via USB 3.0. Older computers only have USB
2.0 ports and it is essential that Intensity Shuttle directly connects to a dedicated USB 3.0 port.
Please see the support pages at www.blackmagic-design.com/support for a comprehensive list of the
latest, minimum system requirements for Windows.
Installing Intensity Pro in your PCIe computer
1. Shut down and remove the power plug from the back of your computer. This is a safety precaution
before opening your computer. Ensure that you are statically discharged by using a static strap.
2. Remove the side cover of your computer to gain access to the PCI Express slots.
3. Remove your Intensity Pro card from the protective static bag making sure you don’t touch the
gold connectors on the base of the card.
4. Find a spare PCI Express slot within the computer, any slot will do. Intensity Pro is a PCI Express
1 lane card and is compatible with 1, 4, 8 and 16 lane PCIe slots. Remove the metal port access
cover and it’s screw from the back of your computer.
5. Insert your Intensity Pro PCI Express card and ensure it clicks firmly into place.
6. Secure the card with a screw and replace the side cover of your computer.
7. Connect the breakout cable to Intensity Pro.
8. Connect HDMI devices, such as an AVCHD camera to Intensity Pro’s HDMI input.
9. Connect HDMI compatible large screen televisions or projectors to the HDMI output.
Note: This is also a great time to install disk arrays and extra memory into your computer.
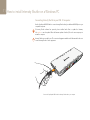
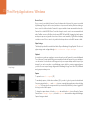
Intensity Pro PCI Express card

How to install Intensity Shuttle on a Windows PC
10
Before Connecting Intensity Shuttle to your USB 3.0 computer
IMPORTANT INFORMATION
USB 3.0 hardware requires the latest versions of USB 3.0 software drivers and firmware to enable the
high speed performance required for high definition video capture and playback.
While most new motherboards and computers are now shipping with suitable versions of USB 3.0
software drivers and firmware, it is very important to ensure you have installed the latest versions
before installing your Blackmagic Design USB 3.0 product. Please download the latest USB 3.0 drivers
and firmware, for your USB 3.0 motherboard or computer, from the vendor’s website.

How to install Intensity Shuttle on a Windows PC
11
Connecting Intensity Shuttle to your USB 3.0 computer
Use the SuperSpeed USB 3.0 cable to connect Intensity Shuttle directly to a dedicated USB 3.0 port on your
compatible computer.
If Intensity Shuttle software has previously been installed and offers to update the firmware,
click Update to run the update. When the firmware update is finished, follow the onscreen prompt to
restart the computer.
Intensity Shuttle is now ready for use. The connection diagrams toward the end of this manual show how to
connect Intensity Shuttle to video equipment.
Connect the SuperSpeed USB 3.0 cable to Intensity Shuttle and to your computer.

Installation
12
Installing Desktop Video software for Windows
Contents
The Desktop Video software installer will install the following components:
Blackmagic Desktop Video drivers
Blackmagic Design Control Panel
Blackmagic Media Express application
Blackmagic AVI and QuickTime™ codecs
Blackmagic Disk Speed Test
Adobe® presets and plug-ins
Desktop Video software
1. The CD supplied with the Intensity hardware contains the Desktop Video software. Before you
install, ensure you have the very latest driver. Visit www.blackmagic-design.com/support
2. Open the “Desktop Video” folder and launch the “Desktop Video” application.
3. The drivers will now be installed on your system. An alert will appear: “Do you want to allow
the following program from an unknown publisher to make changes to this computer?”
Click Yes to continue.
4. You will see a dialog bubble saying “found new hardware” and the hardware wizard will appear.
Select “install automatically” and the system will find the required Desktop Video drivers. You will
then receive another dialog bubble saying “your new hardware is ready for use.”
5. Now restart your machine to enable the new software drivers.
Automatic firmware updating
After your computer has restarted, the software will check the Intensity hardware to see what firmware
the card contains. If the firmware version does not match the software version, Desktop Video will offer
to update the firmware. This is automatic and all you need to do is click OK to start the update. After the
firmware has updated, restart your computer to complete the process.
Programmable firmware can provide new features, compatibility with new hardware and support for
new formats.
Click “Yes”.
Desktop Video Setup Wizard
Restart your PC!

How to install Intensity Pro on a Mac Pro
13
Installation Requirements for Mac OS X
Your new Intensity Pro includes video capture hardware and a software package containing the
Blackmagic driver, Blackmagic codecs, Blackmagic Media Express application and presets and plug-
ins for popular video applications. It does not matter in which order the hardware and software are
installed.
Intensity Pro hardware is a x1 lane PCI Express card and should work in any PCI Express slot in a Mac Pro.
Please see the support pages at www.blackmagic-design.com for a comprehensive list of the latest,
minimum system requirements for Mac OS X.
Installing Intensity Pro in your Mac Pro
1. Shut down and remove the power plug from the back of your Mac Pro. This is a safety precaution
before opening your computer. Ensure that you are statically discharged by using a static strap.
2. Remove the side cover of your Mac Pro to gain access to the PCI Express slots.
3. Unscrew the captive screws in the PCI bracket and remove the bracket.
4. Remove your Intensity Pro card from the protective static bag making sure you don’t touch the
gold connectors on the base of the card.
5. Find a spare PCI Express slot within the Mac Pro, any slot will do. Intensity Pro is a PCI Express
1 lane card and is compatible with 1, 4, 8 and 16 lane PCIe slots. Remove the port access cover
from the slot in which you plan to install the card.
6. Insert your Intensity Pro PCI Express card and ensure it clicks firmly into place.
7. Replace the PCI bracket and tighten the captive screws to secure the card.
8. Replace the side cover of your Mac Pro.
9. Connect the breakout cable to Intensity Pro.
10. Connect HDMI devices, such as AVCHD cameras to Intensity Pro’s HDMI input.
11. Connect HDMI compatible large screen televisions or projectors to the HDMI output.
Note: This is also a great time to install disk arrays and extra memory into your computer.
Intensity Pro PCI Express card

Installation
14
Installing Desktop Video software for Mac OS X
Contents
The Desktop Video software installer will install the following components:
Blackmagic Desktop Video drivers
Blackmagic Design system preference
Blackmagic Media Express application
Blackmagic QuickTime™ codecs
Blackmagic Disk Speed Test
Adobe® presets and plug-ins
Apple Final Cut Pro™ Easy Setups, presets and enablers
Note: Before installing any software or hardware you will need administrator privileges.
Desktop Video software
1. The CD supplied with the DeckLink card contains the Desktop Video software. Before you install,
ensure you have the very latest driver. Visit www.blackmagic-design.com/support
2. Open the “Desktop Video Installer” folder and launch the “Desktop Video Installer” application.
3. Click Continue, Agree and Install buttons and the drivers will be installed on your system.
4. Now restart your machine to enable the new software drivers.
Automatic firmware updating
After your Mac has restarted, the software will check the DeckLink hardware to see what firmware the card
contains. If the firmware version does not match the software version, Desktop Video will offer to update
the firmware. This is automatic and all you need to do is click OK to start the update. After the firmware has
updated, restart your Mac to complete the process.
Programmable firmware can provide new features, compatibility with new hardware and support for
new formats.
Follow install prompts.
Select Destination.

Software
15

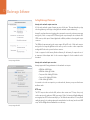
Blackmagic Software
16
Setting Blackmagic Preferences
Blackmagic preferences control how video and audio is managed on the inputs and outputs of your
Intensity. Blackmagic preferences are almost identical on Windows and Mac OS X.
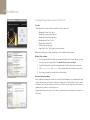
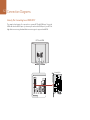
On Windows 7, open the Control Panel and click on “Hardware and Sound” to reveal the Blackmagic
Design Control Panel. Open the Blackmagic Design Control Panel to gain access to the Intensity settings.
On Mac OS X, open the System Preferences and look in the “Other” category to locate the Blackmagic
Design system preferences. Click the Blackmagic icon to gain access to the Intensity settings.
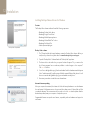
Blackmagic Design Control Panel on Windows 7
Blackmagic Design system preferences on Mac OS X 10.6

Blackmagic Software
17
Setting Blackmagic Preferences
Intensity video and audio output connections
All of the video and audio outputs of Intensity are active all of the time. This means that when you play
video through Intensity, it will be play out through all video and audio outputs simultaneously.
Intensity Pro uses shared connectors for analog video output and so one must choose between component
analog video, S-Video or composite NTSC/PAL analog video output. Intensity Pro also includes an AES/
SPDIF connector, which outputs 2 channel digital audio at 48 kHz, in addition to the analog audio output
connectors.
The HDMI and component analog video outputs support HD and SD video. S-Video and composite
analog video do not support high definition video and so you will not see video on these outputs when
working with HD video unless you switch on down conversion.
S-video is supported on both Intensity Shuttle and Intensity Pro but Intensity Pro requires the use of
an inexpensive S-video adapter cable. See the connection diagrams for S-video towards the end of
this manual.
Intensity video and audio input connections
Intensity supports the following combinations of video and audio on its inputs:
HDMI Video & HDMI Audio
HDMI Video & Analog RCA Audio
Component Video & Analog RCA Audio.
Composite (Y In) & Analog RCA Audio.
S-Video & Analog RCA Audio
It is essential to select the correct inputs for your video and audio, otherwise you may see a blank screen
and hear no audio.
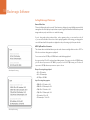
NTSC setup
The NTSC composite video used in the USA, and some other countries uses 7.5% setup. Setup is only
used in composite video and never in HDMI, component or S-Video. Your Intensity will handle adding and
removing setup from NTSC video automatically for you. The USA and countries that use 7.5% setup should
enable this setting; if you’re working in Japan and countries that don’t use this setup, leave this set to 0 IRE
setup. The PAL and high definition standards do not use this setup.
Intensity settings in Windows
Intensity settings in Mac OS X

Blackmagic Software
18
Setting Blackmagic Preferences
Remove Filter Jitter
“Remove field jitter when video is paused” allows Intensity to display only a single field when paused, while
turning this mode off will display a complete frame in pause. Single field eliminates field flicker from paused
images and most people would choose to enable this setting.
If you’re doing work without interlaced video, such as animation, then you can turn this mode off
so you can see both fields in full resolution for best quality. Regardless of this setting, you always get the
correct full frame dual field output when in playback mode, as this setting only effects paused video.
HDTV Up/Down/Cross Conversion
The software drivers included with Intensity can be used to downconvert high definition video to NTSC or
PAL video in real time during capture or playback.
Cross conversion from HD 720p to HD 1080i can be enabled during playback.
Up conversion from SD to HD can be performed during capture. If your project is in the HD 1080i format,
your SD video will upconvert to HD 1080i. If your project is in the HD 720p format, your SD video will
upconvert to HD 720p when an upconversion option is chosen.
Output Processing during playback
HD to SD Letterbox
HD to SD Anamorphic
HD 720p to HD 1080i
Input Processing during capture
1080i HD to SD Letterbox 16:9
1080i HD to SD Anamorphic 16:9
720p HD to SD Letterbox 16:9
720p HD to SD Anamorphic 16:9
SD Letterbox 16:9 to HD
SD Anamorphic 16:9 to HD
Select Input Processing
Select Output Processing

Blackmagic Software
19
Setting Blackmagic Preferences
Video Levels
A video processing amplifier (Video Proc Amp) is provided for use with analog video and chroma levels
and ideally should always be used in conjunction with a waveform monitor. By contrast to digital video,
analog video can suffer from inconsistencies even between identical analog devices such as two analog
tape decks. The video level controls can be used to correct inconsistencies in analog video input and
output. The option to Calibrate Analog Video In will only be available if the Set Input option in
the Settings are set to an analog video option. If a digital input is being used, such as SDI or HDMI, or if
your Blackmagic capture device does not include analog input, the option to Calibrate Analog Video
In will remain grayed out and unavailable. The Reset Gain button resets the video levels back to their
original settings.
By default, Blackmagic products use SMPTE component analog levels as almost all analog video monitors
and modern video equipment use SMPTE levels. Sony Betacam SP decks can use Betacam levels and you
may need to enable the checkbox Use Betacam Y,B-Y,R-Y Levels with these analog decks. Sony CRT
monitors support Betacam and SMPTE levels to allow direct monitoring from a Betacam SP deck. These
monitors include a switch so you can choose between Betacam and SMPTE and you also need to choose
the corresponding SMPTE/Betacam setting in the Blackmagic Video Levels. If in doubt, try a test capture
and you should see a very noticeable brightness shift if you choose the wrong levels.
Audio Levels
An audio processing amplifier (Audio Proc Amp) is provided for use with analog audio. It can be used to raise
or lower an audio signal. By contrast to digital audio, analog audio can suffer from inconsistencies between
audio channels and so analog audio channels can be adjusted independently from each other. AES/EBU
audio is digital and does not suffer from level inconsistencies between audio channels. Accordingly all AES/
EBU audio channels are raised or lowered together. The Reset Gain button resets the audio levels back
to their original settings.
The option to Use HiFi Audio Levels is always enabled when using analog audio with Intensity.
This option may be changed with some other Blackmagic Design capture products which connect to
professional, balanced analog audio hardware.
Video levels
Audio levels

Welcome
20 Blackmagic Media Express
20
Welcome to Media Express 2
Blackmagic Media Express 2 is a sophisticated software application which enables UltraStudio, DeckLink,
Multibridge and Intensity users to capture, play back and preview video and audio via Blackmagic capture hardware.
Media Express 2 replaces all previous versions of Blackmagic Deck Control and Blackmagic Media Express.
We hope you love the new interface and features.
Media Express has an intuitive interface and requires a 1920 x 1200, or 1280 x 800, pixel computer display to
compliment its uncluttered appearance. The capture, playback and master views are color-coded so you will
know at a glance which mode is being used.
Media Express uses many of the same keyboard shortcuts which are standard in the video industry so there is
little to learn. Use j, k, l to shuttle backwards, pause and shuttle forwards.
Media Express can directly capture to, and play back from, DPX files or movie files.
Use the Grab Frame feature to capture still images during capture or playback. Frame grabs are saved in the
targa (.tga) graphic file format.
Blackmagic Media Express 2 is not NLE software and does not have a timeline. It is a great tool when you don’t
need the complexity of NLE software but simply want to capture and play back, especially when working with
video compositing software.
Page is loading ...
Page is loading ...
Page is loading ...
Page is loading ...
Page is loading ...
Page is loading ...
Page is loading ...
Page is loading ...
Page is loading ...
Page is loading ...
Page is loading ...
Page is loading ...
Page is loading ...
Page is loading ...
Page is loading ...
Page is loading ...
Page is loading ...
Page is loading ...
Page is loading ...
Page is loading ...
Page is loading ...
Page is loading ...
Page is loading ...
Page is loading ...
Page is loading ...
Page is loading ...
Page is loading ...
Page is loading ...
Page is loading ...
Page is loading ...
Page is loading ...
Page is loading ...
Page is loading ...
Page is loading ...
Page is loading ...
Page is loading ...
Page is loading ...
Page is loading ...
Page is loading ...
Page is loading ...
Page is loading ...
Page is loading ...
Page is loading ...
Page is loading ...
Page is loading ...
-
 1
1
-
 2
2
-
 3
3
-
 4
4
-
 5
5
-
 6
6
-
 7
7
-
 8
8
-
 9
9
-
 10
10
-
 11
11
-
 12
12
-
 13
13
-
 14
14
-
 15
15
-
 16
16
-
 17
17
-
 18
18
-
 19
19
-
 20
20
-
 21
21
-
 22
22
-
 23
23
-
 24
24
-
 25
25
-
 26
26
-
 27
27
-
 28
28
-
 29
29
-
 30
30
-
 31
31
-
 32
32
-
 33
33
-
 34
34
-
 35
35
-
 36
36
-
 37
37
-
 38
38
-
 39
39
-
 40
40
-
 41
41
-
 42
42
-
 43
43
-
 44
44
-
 45
45
-
 46
46
-
 47
47
-
 48
48
-
 49
49
-
 50
50
-
 51
51
-
 52
52
-
 53
53
-
 54
54
-
 55
55
-
 56
56
-
 57
57
-
 58
58
-
 59
59
-
 60
60
-
 61
61
-
 62
62
-
 63
63
-
 64
64
-
 65
65


Blackmagicdesign Intensity Pro User manual
- Category
- Camcorders
- Type
- User manual
- This manual is also suitable for
Ask a question and I''ll find the answer in the document
Finding information in a document is now easier with AI
Related papers
-
Blackmagicdesign DeckLink Series User manual
-
-
Blackmagicdesign ATEM 1 M/E Operating instructions
-
-
-
-
Blackmagic Pocket UltraScope User manual
-
Other documents
-
Blackmagic Desktop Video User manual
-
-
-
-
-
-
-
-
-
 Delkin DDCFST560256 User manual
