
- 0 -
Pull-up Lifter
user manual
Tip: Read the instruction manual carefully before use and store it properly.

- 1 -
Thank you for purchasing this product. Please read these instructions carefully for proper use.
Safety precautions
Warning
Do not use after illness, overfatigue or drinking alcohol.
Child users must be accompanied by an adult to prevent accidents.
When using, wear comfortable clothing and avoid wearing slippers or skirts.
Start with the most appropriate amount of exercise, as excessive exercise can affect your
health.
The load weight of the product is 90kg. Overloading may cause failure or damage. Before
using, make sure all parts are installed correctly and all screws and nuts are screwed into place.
Consult your fitness instructor before use and use the equipment according to the
instructions.
Note
This product is a household machine. Avoid commercial use.
Do not use in locations where fires may occur.
When exercising, go to large areas where no one is around and keep away from
Dangerous things.
If this product is not used, the floor may be damaged. Be sure to lay a carpet.
If you are not using the product, please do not put it in the following places: A. A
place that is too hot or too cold. B. The sun shines directly outside the house. C.
Place near the gas furnace or near the fire. D. Cold and humid place. E. Places
where children can touch F. Places where oil smoke and water vapor are generated.
Do not use the product on a rough surface.
Installation diagram

- 2 -
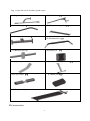
Step 1: Open the box to check the product parts
(A) Leg tube (2)
(B) Main frame(2)
(C) Auxiliary pipe(2)
(D) Foot connecting tube(1)
(E) Main pipe connection(1)
(F) Horizontal bar(1)
( G) Backrest tube (1)
(H) Elbow pad (1)
(I) Legrest adjustment tube(1)
(J) Sit-up board support tube(1)
(K) Leg rest tube(1)
(L) Elbow pad(2)
(M) Sit-up board (1)
Kit accessories

- 3 -
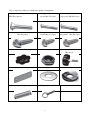
Step 1: Open the package to confirm the product components
(1)Semi-circular square neck screw
M8*40 (4 pieces)
(2)Hexagon socket head cap
screws M8*70 (8 pcs)
(3) Hexagon socket head
cap screws M8*80 (2 pcs)
(4)Hexagon socket head cap screws
M8*40 (4 pcs)
(5)Hexagon socket head cap
screws M8*15 (2 pcs)
(6)Hexagon socket head
cap screws M8*50 (3 pcs)
(7) Plastic handle nut M8 (4 pieces)
(8) M8 nuts (21)
(9)Plastic handle screw
M8*45 (4)
(10)Reinforced pad (2 pieces)
(11)Round gaskets (6)
(12)Curved gaskets (4)
(13)Curved pad (4 pieces)
(14)Plug (3 pieces)

- 4 -
(15)External hexagon wrench
(16)hex wrenches
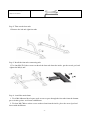
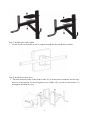
Step 2: Take out the foot tube
1. Remove the left and right foot tube
Step 3: Install the foot tube connecting tube
1. Use four M8*70 (2)hex screws to thread the foot tube from the inside, put the curved pad, and
tighten the M8(8) nut.
Step 4 ; install the main frame
1. Use 4 M8*40 round head square neck screws to pass through the foot tube from the bottom,
put a circular gasket, and fasten with M8 nut.
2. Use four M8*70 hex socket screws to thread out from the inside, place the curved pad and
fasten with the M8 nut.

- 5 -
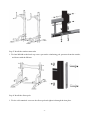
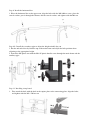
Step 5: Install the reinforcement tube
1. Use four M8*40 socket head cap screws, put on the reinforcing pad, penetrate from the outside,
and fasten with the M8 nut.
Step 6: Install the elbow pads
1. Use the self-contained screw on the elbow pad and tighten it through the iron plate.

- 6 -
Step 7: Installing the back cushion
1. Use the screws on the backrest tube to tighten through the sky and the back cushion.
Step 8: Install the backrest lever
1. The inner and outer holes of the backrest tube (G) are inconsistent in diameter and the large
holes are facing inward. Use the hexagonal screws of M8* 15(5), put the circular washer (11),
and tighten the Allen key (16). .

- 7 -
Step 9: Install the horizontal bar
1. Place the horizontal bar on the upper arm, align the hole with the M8*80 hex screw, place the
curved washer, pass it through the bottom, add the curved washer, and tighten with the M8 nut.
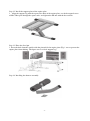
Step 10:Install the secondary pipe to adjust the height suitable for you
1. Put the sub-tube directly from the top of the main frame and adjust the hole position when
adjusting to the appropriate height.
2. Fasten the M8 plastic nut with the M8*45 plastic handle screw through the main frame and the
auxiliary pipe.
Step 11: Installing sit-up board
1. First attach the hole with the hole in the supine plate to the connecting plate, align the holes,
and tighten with the M8 * 50 hex nut.

- 8 -
Step 12: Install the support plate of the supine plate
1. Align the support leg with the square tube hole of the supine plate, use the hexagonal screw
of M8* 50 to pass through the square tube, and tighten the M8 nut with the hex wrench.
Step 13: Place the fixed pin
1. Insert the hole from the outside with the pin and fix the supine plate (Fig. 1 acts to prevent the
supine plate from shaking. The figure acts as a fixed support leg.)
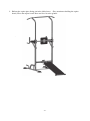
Step 14: Installing the footrest assembly

- 9 -
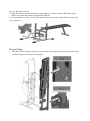
Step 15: Install the footrest
1. Align the footrest with the hole of the connecting piece. Insert it with an M8*50 hexagon
socket screw from the outside and tighten the M8 nut.
2. Corresponding to 2 holes, it is inserted and fixed from the outside with a bolt (the tube angle
can be adjusted)
Sit up folding:
1. The supine plate fixing pin in the flat state and the fixed supine plate tube pin are pulled out
and folded upward (as shown in the figure).

- 10 -
2. Pull out the supine plate fixing pin in the folded state. (Pay attention to holding the supine
board.) Place the supine board down and level it to the ground.
.

- 11 -
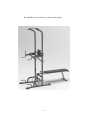
The 6206B model is installed, as shown in the figure.

- 12 -
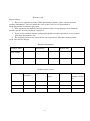
Warranty card
Buyer reading:
1. This card is a product warranty. When purchasing a product, please clearly enter the
purchase information. You can contact the sales or after-sales service department to
repair the product or purchase spare parts.
2. If the product is not normally used for quality reasons (except improper use) within the
warranty period, we will not charge a repair fee.
3. If you are not satisfied with the quality of the product you have purchased, it is less than 1
week from the purchase date
4. The warranty period is one year from the date of purchase. After the warranty period,
repair costs will be charged
Purchase information
Product repair records
Customer name
Whereto buy
Purchase date
Street address
Tel
product name
Product model
Product No
Date of receipt
Failure
description
Repair date
content
Repair
Repair shop
Distribution to
customers Arrival
date
-
 1
1
-
 2
2
-
 3
3
-
 4
4
-
 5
5
-
 6
6
-
 7
7
-
 8
8
-
 9
9
-
 10
10
-
 11
11
-
 12
12
-
 13
13


Ask a question and I''ll find the answer in the document
Finding information in a document is now easier with AI
Other documents
-
Quickie Q700 M Owner's manual
-
 Thomashilfen Guidebook Rehab Strollers User guide
-
Invacare IH6300 Owner's Operator And Maintenance Manual
-
-
-
 Symmetrikit Medium User manual
-
Rifton New Size 1 Stander User manual
-
 OAKWORKS Powerline Series User manual
-
True Fitness XFW-8200 3-Way Press Bench User manual
-
Aseptico ADC-01C Owner's manual


