Page is loading ...

Installation Instructions
Instrucciones de instalación
English / Español
Table of Contents / Índice......2
Kenmore®
Commercial Washer
Lavadora comercial
P/N W10837709A
Sears Brands Management Corporation
Hoffman Estates, IL 60179 U.S.A.
www.kenmore.com

2
Table of Contents
Índice
WASHER SAFETY .................................................................................. 3
TOOLS & PARTS .................................................................................... 4
DIMENSIONS ......................................................................................... 5
LOCATION REQUIREMENTS ............................................................... 6
DRAIN SYSTEM ......................................................................................7
ELECTRICAL REQUIREMENTS ............................................................. 8
INSTALLATION INSTRUCTIONS ......................................................... 9
CONNECT DRAIN HOSE ....................................................................10
CONNECT INLET HOSES .....................................................................11
LEVEL WASHER ....................................................................................12
INSTALLING COIN SLIDE AND COIN BOX ....................................12
COMPLETE INSTALLATION ................................................................13
TYPICAL FULL LOAD SIZES ................................................................. 13
WASHER MAINTENANCE ..................................................................14
ALTERNATE PARTS & ACCESSORIES ................................................14
WARRANTY ...........................................................................................15
ASSISTANCE OR SERVICE ............................................. BACK COVER
SEGURIDAD DE LA LAVADORA ......................................................... 16
HERRAMIENTAS Y PIEZAS .................................................................. 17
DIMENSIONES ..................................................................................... 18
REQUISITOS DE UBICACIÓN ............................................................ 19
SISTEMA DE DESAGÜE ...................................................................... 20
REQUISITOS ELÉCTRICOS ................................................................... 21
INSTRUCCIONES DE INSTALACIÓN ................................................ 22
CONEXIÓN DE LA MANGUERA DE DESAGÜE ..............................23
CONEXIÓN DE LAS MANGUERAS DE ENTRADA ......................... 24
NIVELACIÓN DE LA LAVADORA ....................................................... 25
INSTALACIÓN DEL TRAGAMONEDAS
Y LA CAJA DE MONEDAS ................................................................. 25
COMPLETE LA INSTALACIÓN ......................................................... 26
TAMAÑOS DE CARGAS TÍPICAS DE VOLUMEN COMPLETO ..... 26
MANTENIMIENTO DE LA LAVADORA ............................................ 27
PIEZAS Y ACCESORIOS ALTERNATIVOS ........................................ 27
GARANTÍA ............................................................................................ 28
AYUDA O SERVICIO TÉCNICO ............................CONTRAPORTADA

3
WASHER SAFETY

4
Parts Supplied:
TOOLS & PARTS
Tools Needed:
Level Pliers Utility Knife
9/16" (14 mm)
Open-End Wrench
Flat-Blade Screwdriver
Drain hose with clamp,
U-form, and cable tie
Optional tools:
Flashlight Bucket
Water Inlet Hoses (2) Inlet Hose Washers (4)
Service Door Lock
Assembly
Coin Slide Decal Kit

5
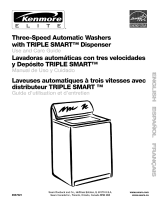
DIMENSIONS
Front View Side View
42
1
/2"
(1.080 m)
36
1
/4"
(921 mm)
8
1
/4"
(210 mm)
1"
(25 mm)
27"
(686 mm)
Back View
44
1
/2"
(1.130 m)
27"
(686 mm)
4
1
/4"
(108 mm)
6
3
/4"
(171 mm)
37
1
/4"
(946 mm)
36
3
/4"
(933 mm)
10
1
/2"
(267 mm)
16"
(406 mm)
5
1
/2"
(140 mm)
1"
(25 mm)
42
1
/2"
(1.080 m)

6
Selecting the proper location for your washer improves
performance and minimizes noise and possible washer “walk.”
Your washer can be installed in a basement, laundry room,
or recessed area. See “Drain System.”
Companion appliance location requirements should also be
considered.
IMPORTANT: Do not install or store the washer where it will
be exposed to the weather. Do not store or operate the washer
in temperatures at or below 32°F (0°C). Some water can remain
in the washer and can cause damage in low temperatures.
Proper installation is your responsibility.
You will need:
■ A water heater set to 120°F (49°C).
■ A grounded electrical outlet located within 4 ft. (1.2 m) of
power cord on back of washer. See “Electrical Requirements.”
■ Hot and cold water faucets located within 4 ft. (1.2 m)
of hot and cold water ll valves on washer, and water pressure
of 20–100 psi (138–690 kPa). A pressure reduction valve should
be used in the supply line where inlet pressure entering the
building exceeds 100 PSI (690 kPa) to avoid damage to the
washer mixing valve.
■ Single washer installations require 12" (300 mm) minimum
risers to provide an air cushion and avoid noise and damage
to valves.
■ A level oor with maximum slope of 1" (25 mm) under entire
washer. Installing on carpet is not recommended.
■ Floor must support washer’s total weight (with water and load)
of 315 lbs (143 kgs).
■ A oor drain under the bulkhead. Prefabricated bulkheads
with electrical outlets, water inlet lines, and drain facilities
should be used only where local codes permit.
LOCATION REQUIREMENTS
Recessed Area or Closet Installation
This washer may be installed in a recessed area. The installation
dimensions shown are the minimum spaces allowable. Additional
spacing should be considered for ease of installation and
servicing. Companion appliance spacing should be considered.
Minimum installation spacing
16"
(406 mm)

7
8"
(203 mm)
Wall standpipe drain system
See requirements for oor standpipe drain system.
DRAIN SYSTEM
Drain system can be installed using a oor drain, wall standpipe,
oor standpipe, or laundry tub. Select method you need.
Floor standpipe drain system
Minimum diameter for a standpipe drain: 2" (51 mm). Minimum
carry-away capacity: 10 gal. (38 L) per minute. Top of standpipe
must be at least 39" (990 mm) high; install no higher than
96" (2.44 m) from bottom of washer.
Laundry tub drain system
8"
(203 mm)
39"
(990 mm)
39"
(990 mm)
8"
(203 mm)
Floor drain system
Floor drain system requires a Siphon Break Kit (Part Number
285320). Minimum siphon break: 28" (710 mm) from bottom
of washer. Additional hoses may be needed.
Minimum capacity: 20 gal. (76 L). The top of the laundry tub
must be at least 39" (990 mm) above oor.

8
ELECTRICAL REQUIREMENTS
■ A 120-volt, 60-Hz., AC-only, 15- or 20-amp, fused electrical
supply is required. A time-delay fuse or circuit breaker is
recommended. It is recommended that a separate circuit
breaker serving only this appliance be provided.
■ This washer is equipped with a power supply cord having
a 3 prong grounding plug.
■ To minimize possible shock hazard, the cord must be plugged
into a mating, 3 prong, grounding-type outlet, grounded in
accordance with local codes and ordinances. If a mating outlet
is not available, it is the personal responsibility and obligation
of the customer to have the properly grounded outlet installed
by a qualied electrician.
■ If codes permit and a separate ground wire is used, it is
recommended that a qualied electrician determine that
the ground path is adequate.
■ Do not ground to a gas pipe.
■ Check with a qualied electrician if you are not sure the
washer is properly grounded.
■ Do not have a fuse in the neutral or ground circuit.

9
INSTALLATION INSTRUCTIONS
It is necessary to remove all shipping materials for proper
operation and to avoid excessive noise from washer.
1. Move washer to within 4 ft (1.2 m) of its nal location; it must
be in a fully upright position.
NOTE: To avoid oor damage, set washer onto cardboard
before moving it and make sure lid is taped shut.
2. To avoid damaging oor, place cardboard supports from
shipping carton on oor behind washer. Tip washer back
and place on cardboard supports. Remove shipping base.
Set washer upright.
IMPORTANT: Removing shipping base is necessary for proper
operation.
NOTE: Keep shipping base in case you need to move washer
later.
3. Remove tape from washer lid, open lid, and remove cardboard
packing tray from tub. Be sure to remove all parts from tray.
NOTE: Keep tray in case you need to move washer later.

10
8"
(203 mm)
Proper routing of the drain hose avoids damage to your oor
due to water leakage.
Remove drain hose from the washer drum
1. Remove cap from the washer drain port on the back of
the washer.
2. If clamp is not already in place on elbow end of drain hose,
slide it over end as shown.
3. Squeeze clamp with pliers and slide elbow end of drain
hose onto washer drain port and secure with clamp.
4. The washer drain system can be installed using a oor drain,
wall standpipe, oor standpipe, or laundry tub.
CONNECT DRAIN HOSE
5. Place hose into standpipe (shown in picture) or over side
of laundry tub.
IMPORTANT:
■ Drain hose is not to exceed 8" (203 mm) into drain pipe;
do not force excess hose into standpipe or lay on bottom
of laundry tub. Drain hose form must be used.
■ It is the responsibility of the installer to install and secure
the drain hose into the provided plumbing/drain in a
manner that will avoid the drain hose coming out of,
or leaking from, the plumbing/drain.
6. For oor drain installations, you will need to remove the drain
hose form from the end of the drain hose. You may need
additional parts with separate directions. See “Tools and Parts.”
7. The oor drain system requires a siphon break that may be
purchased separately. The siphon break (Part Number 285320)
must be a minimum of 28" (710 mm) from the bottom of the
washer. Additional hoses might be needed.
Drain
hose
form

11
CONNECT INLET HOSES
Connect Inlet Hoses to Washer
1. Attach cold water hose to cold water inlet valve marked
with a blue ring. Screw coupling by hand until it is snug.
2. Attach hot water hose to hot water inlet valve marked
with a red ring. Screw coupling by hand until it is snug.
3. Use pliers to tighten couplings an additional two-thirds turn.
NOTE: Do not overtighten. Damage to the valve can result.
4. Turn on water faucets to check for leaks. A small amount
of water may enter washer. It will drain later.
NOTE: Replace inlet hoses after 5 years of use to reduce the
risk of hose failure. Record hose installation or replacement
dates on the hoses for future reference.
Periodically inspect and replace hoses if bulges, kinks, cuts,
wear, or leaks are found.
Insert new hose washers (supplied) into each end of the inlet hoses.
Firmly seat the washers in the couplings.
Connect Inlet Hoses to Water Faucets
1. Attach hose to hot water faucet. Screw on coupling until it is
seated on washer. Repeat process for cold water.
2. Use pliers to tighten the couplings an additional two-thirds turn.
IMPORTANT: Do not overtighten or use tape or sealants on valve
when attaching to faucets or washer. Damage can result.
3. Secure drain hose to inlet hose with zip strap.
Clear Water Lines
■ Run water through both faucets and inlet hoses,
into a laundry tub, drainpipe, or bucket, to get
rid of particles in the water lines that might clog
the inlet valve screens.
■ Check the temperature of the water to make
sure that the hot water hose is connected to the
hot water faucet and that the cold water hose is
connected to the cold water faucet.
CouplingWasher

12
1. Move the washer to its nal location. Place a level on top
edges of washer. Use side seam as a guide to check levelness
of sides. Check levelness of front using lid, as shown. Rock
washer back and forth to make sure all four feet make solid
contact with oor.
LEVEL WASHER
IMPORTANT: Level washer properly to reduce excess noise
and vibration.
Not Level
LEVEL
Not Level
2. Use a 9/16" or 14 mm open-end or adjustable wrench to turn
jam nuts clockwise on feet until they are about 1/2" (13 mm)
from the washer cabinet. Then turn the leveling foot clockwise
to lower the washer or counterclockwise to raise the washer.
Recheck levelness of washer and repeat as needed.
HELPFUL TIP: You may want to prop up front of washer about
4" (102 mm) with a wood block or similar object that will support
weight of washer.
Place level here
Place level here
INSTALLING COIN SLIDE AND COIN BOX
The coin slide mechanism, service door lock and key, and coin
box lock and key are not included with some models, but can
be obtained from the usual industry sources.
Remove the service door of the meter case by lifting it up at the
back. Install the money-accepting device. (Refer to manufacturer’s
instructions for proper installation.)
A ground connection is needed for the coin slide, which can be
made by connecting the available harness (W10846503) to the
coin slide.
Install a coin vault with lock and key in the meter case opening
(for models that do not come equipped with a coin box).
Ground
connection
Place level here
Place level here
Jam nut
Models with
metal feet
Jam nut

13
■ Check electrical requirements. Be sure that you have
the correct electrical supply and the recommended
grounding method.
■ Check that all parts are now installed. If there is an
extra part, go back through steps to see what was skipped.
COMPLETE INSTALLATION
■ Check that you have all of your tools.
■ Check that shipping materials were completely removed
from washer.
■ Dispose of/recycle all packaging materials.
■ Check that the water faucets are on.
■ Check for leaks around faucets and inlet hoses.
■ Remove lm from console and any tape remaining on washer.
■ Plug into a grounded outlet or connect power.
■ Check that circuit breaker is not tripped or fuse is not blown.
■ Start washer using the payment system (if available)
to check that the wash cycle completes without an error
code or water leak.
TYPICAL FULL LOAD SIZES
Load Type Loading Suggestion Load Type Loading Suggestion
Mixed Load 3 double sheets
4 pillowcases
6 pair shorts
8 T-shirts
2 shirts
2 blouses
8 handkerchiefs
Heavy Work Clothes 3 pair pants
3 shirts
1 coverall
4 pair jeans
1 overall
Permanent Press 2 double or
1 king size sheet
1 tablecloth
1 dress
1 blouse
2 slacks
3 shirts
2 pillowcases
Knits 3 blouses
4 slacks
6 shirts
4 tops
4 dresses

14
WASHER MAINTENANCE
It is recommended that berglass items not be washed in coin-
operated washers. If these items are washed in the washer, run the
washer through a complete cycle to rinse any residue away that
might be left in the washer.
Operating Tips
Transporting Your Washer
■ Shut o both water faucets. Disconnect and drain water inlet
hoses.
■ Disconnect drain from drain system and drain any remaining
water into a pan or bucket. Disconnect drain hose from back
of washer.
■ Unplug power cord.
■ Place inlet hoses and drain hose inside washer basket.
■ Drape power cord over edge and into washer basket.
■ Place packing tray from original shipping materials back inside
washer and reuse shipping base to support the motor and tub.
If you do not have original packaging, place heavy blankets or
towels above basket, between the washer top and the tub ring.
Close lid and place tape over lip and down the front of the
washer. Keep lid taped until washer is moved to new location.
ALTERNATE PARTS & ACCESSORIES
Your installation may require additional parts. If you are interested
in purchasing one of the items listed here, call the toll-free number
on the back cover.
If You Have: You Will Need:
Overhead sewer Standard 20 gal. (76 L)
39" (990 mm) tall drain tub
or utility sink, sump pump and
connectors (available from local
plumbing suppliers)
1" (25 mm) standpipe 2" (51 mm) diameter to 1" (25 mm)
diameter Standpipe Adapter Part
Number 3363920
Connector Kit Part Number
285835
Lint clogged drain Drain Protector Part Number
367031 Connector Kit Part
Number 285835
Floor drain system Siphon break, Part Number
285320 Connector Kit (x2) Part
Number 285835 Extension Drain
Hose Part Number 285863
Water faucets beyond
reach of ll hoses
2 longer water ll hoses:
6 ft. (1.8 m) 90° bend hose
Part Number 76314, 10 ft. (3.0 m)
Part Number 350008
If You Have: You Will Need:
Inlet hoses are sold as a pair in kit
W10575888
Accessories
Washer Drip Trays
Part Number 8212526
Fabric Softener Dispenser Kit
Part Number 63594
Drain beyond the reach
of Inlet hose
4 ft. (1.2 m) Drain Hose Extension
Part Number DRNEXT4

15
KENMORE APPLIANCE WARRANTY
KENMORE LIMITED WARRANTY
FOR ONE YEAR from the date of sale this appliance is warranted
against defects in material or workmanship when it is correctly
installed, operated, and maintained according to all supplied
instructions.
WITH PROOF OF SALE, a defective appliance will receive free
repair or replacement at option of seller.
For warranty coverage details to obtain free repair or
replacement, visit the web page: www.kenmore.com/warranty.
This warranty covers ONLY defects in material and
workmanship, and will NOT pay for:
1. Expendable items that can wear out from normal use, including
but not limited to lters, belts, bags, or screw-in base light
bulbs.
2. A service technician to clean or maintain this appliance, or to
instruct the user in correct appliance installation, operation, and
maintenance.
3. Service calls to correct appliance installation not performed
by Sears authorized service agents, or to repair problems with
house fuses, circuit breakers, house wiring, and plumbing or gas
supply systems resulting from such installation.
4. Damage to or failure of this appliance resulting from
installation not performed by Sears authorized service agents,
including installation that was not in accord with electrical, gas,
or plumbing codes.
5. Damage to or failure of this appliance, including discoloration
or surface rust, if it is not correctly operated and maintained
according to all supplied instructions.
6. Damage to or failure of this appliance, including discoloration
or surface rust, resulting from accident, alteration, abuse, misuse
or use for other than its intended purpose.
7. Damage to or failure of this appliance, including discoloration
or surface rust, caused by the use of detergents, cleaners,
chemicals, or utensils other than those recommended in all
instructions supplied with the product.
8. Damage to or failure of parts or systems resulting from
unauthorized modications made to this appliance.
9. Service to an appliance if the model and serial plate is missing,
altered, or cannot easily be determined to have the appropriate
certication logo.
DISCLAIMER OF IMPLIED WARRANTIES; LIMITATION
OF REMEDIES
Customer’s sole and exclusive remedy under this limited warranty
shall be product repair or replacement as provided herein. Implied
warranties, including warranties of merchantability or tness
for a particular purpose, are limited to one year or the shortest
period allowed by law. Seller shall not be liable for incidental
or consequential damages. Some states and provinces do not
allow the exclusion or limitation of incidental or consequential
damages, or limitation on the duration of implied warranties of
merchantability or tness, so these exclusions or limitations may
not apply to you.
This warranty applies only while this appliance is used in the
United States.
This warranty gives you specic legal rights, and you may also
have other rights which vary from state to state.
Sears Brands Management Corporation
Homan Estates, IL 60179
3/2015

16
SEGURIDAD DE LA LAVADORA
Si no sigue las instrucciones de inmediato, usted puede
morir o sufrir una lesión grave.
Si no sigue las instrucciones, usted puede morir o sufrir
una lesión grave.
Todos los mensajes de seguridad le dirán el peligro potencial, le dirán cómo reducir las posibilidades de sufrir una lesión y lo que
puede suceder si no se siguen las instrucciones.
Su seguridad y la seguridad de los demás es muy importante.
Hemos incluido muchos mensajes importantes de seguridad en este manual y en su electrodoméstico. Lea y obedezca siempre
todos los mensajes de seguridad.
ADVERTENCIA
PELIGRO
Este es el símbolo de alerta de seguridad.
Este símbolo le llama la atención sobre peligros potenciales que pueden ocasionar la muerte o una lesión a
usted y a los demás.
Todos los mensajes de seguridad irán a continuación del símbolo de advertencia de seguridad y de la palabra
“PELIGRO” o “ADVERTENCIA”. Estas palabras significan:

17
Piezas suministradas:
HERRAMIENTAS Y PIEZAS
Herramientas necesarias:
Nivel Pinzas Cuchillo para uso general
Llave de extremo abierto
de 9/16" (14 mm)
Destornillador de hoja plana
Manguera de desagüe con
abrazadera, molde en forma de u
y fleje de atadura rebordeado
Herramientas optativas:
Linterna Cubeta
Arandelas de la manguera
de entrada (4)
Mangueras de entrada
de agua (2)
SEGURIDAD DE LA LAVADORA
Ensamblaje de cerradura
de la puerta de servicio
Juego calcomanía
de tragamonedas

18
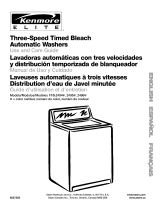
DIMENSIONES
Vista frontal Vista lateral
Vista posterior
44
1
/2"
(1.130 m)
27"
(686 mm)
4
1
/4"
(108 mm)
6
3
/4"
(171 mm)
37
1
/4"
(946 mm)
36
3
/4"
(933 mm)
10
1
/2"
(267 mm)
16"
(406 mm)
5
1
/2"
(140 mm)
1"
(25 mm)
42
1
/2"
(1.080 m)
42
1
/2"
(1.080 m)
36
1
/4"
(921 mm)
8
1
/4"
(210 mm)
1"
(25 mm)
27"
(686 mm)

19
Seleccione una ubicación apropiada para su lavadora, para
realzar el rendimiento y reducir al mínimo el ruido y la posible
“caminata” de la lavadora.
Su lavadora se puede instalar en un sótano, cuarto para lavar
o un lugar empotrado. Vea “Sistema de desagüe”.
Deberá tenerse en cuenta también los requisitos para la ubicación
de otro electrodoméstico que le acompañe.
IMPORTANTE: No instale o almacene esta lavadora donde estará
expuesta a la intemperie. No guarde ni haga funcionar
su lavadora a temperaturas iguales o inferiores a 32 °F (0 °C).
El agua que quede en la lavadora puede ocasionar daños a bajas
temperaturas. La instalación correcta es su responsabilidad.
Usted necesitará:
■ Un calentador de agua jado en 120°F (49°C).
■ Un contacto con conexión a tierra ubicado a no más de 4 pies
(1,2 m) del cable eléctrico en la parte posterior de la lavadora.
Vea “Requisitos Eléctricos”.
■ Grifos de agua caliente y de agua fría ubicados a una
distancia de no más de 4 pies (1,2 m) de las válvulas de
llenado del agua caliente y fría en la lavadora y una presión
de agua de 20–100 lb/pulg² (138–690 kPa). Debe usarse una
válvula de reducción de presión en la línea de suministro donde
la presión de entrada hacia el edicio exceda 100 lb/pulg²
(690 kPa) para evitar daños a la válvula de mezcla
de la lavadora.
■ Para las instalaciones con lavadoras simples se requieren
montantes de un mínimo de 12" (300 mm) para que provean
una cámara de aire, y eviten el ruido y los daños a las válvulas.
■ Un piso nivelado con un declive máximo de 1" (25 mm) debajo
de la lavadora completa. No se recomienda la instalación
sobre una alfombra.
■ El piso debe sostener el peso total de la lavadora (con el agua
y la carga) de 315 lb (143 kg).
■ Un desagüe de piso debajo del tabique. Los tabiques divisorios
prefabricados con contactos eléctricos, las líneas de entrada
de agua y las instalaciones con desagües deben ser usados
únicamente donde los códigos locales lo permitan.
REQUISITOS DE UBICACIÓN
Instalación en zona empotrada o en el clóset
Esta lavadora podrá instalarse en un área empotrada. Las
dimensiones de instalación que se ilustran a continuación son
para los espacios mínimos permitidos. Debe considerarse espacio
adicional para facilitar la instalación y el servicio técnico. Debe
considerarse el espacio adicional para otro electrodoméstico que
le acompañe.
Espacio mínimo para la instalación
16"
(406 mm)

20
SISTEMA DE DESAGÜE
El sistema de desagüe de la lavadora se puede instalar utilizando
un desagüe de piso, un tubo vertical de pared, un tubo vertical de
piso o una tina de lavadero. Seleccione el método que necesita.
Sistema de desagüe de tubo vertical de piso
Diámetro mínimo para el desagüe de tubo vertical: 2" (51 mm).
Capacidad de desplazamiento mínima: 10 gal. (38 L) por minuto.
La parte superior del tubo vertical debe estar a 39" (990 mm)
de altura como mínimo; instálela a no más de 96" (2,44 m)
de la base de la lavadora.
Sistema de desagüe de tina de lavadero
8"
(203 mm)
8"
(203 mm)
39"
(990 mm)
39"
(990 mm)
8"
(203 mm)
Sistema de desagüe de tubo vertical de pared
Vea los requisitos para el sistema de desagüe de tubo vertical
de piso.
Sistema de desagüe de piso
Un sistema de desagüe por el piso requiere de un juego de
desviación de sifón (pieza número 285320). Desviación de sifón
mínima: 28" (710 mm) de la base de la lavadora. Se pueden
necesitar mangueras adicionales.
Capacidad mínima: 20 gal. (76 L). La parte superior de la tina
de lavadero debe estar a 39" (990 mm) del piso como mínimo.
/