Page is loading ...

BE CAREFUL WHEN USING PARTS WITH SHARP POINTS OR EDGES.
KEEP AWAY FROM CHILDREN UNDER THREE YEARS OF AGE.
ALL EXPERIMENTS THAT ARE IN DIRECT SUNLIGHT SHOULD BE
PERFORMED WHILE WEARING SUNGLASSES.
ADULTS ARE ADVISED TO READ MANUAL AND SUPERVISE WHEN
NECESSARY.
WARNING:
No park of this publication may be reproduced or transmitted, in any form or
by any means, without permission in writing from the publisher.
Make your own solar energy lab!
Tree of Knowledge
© 1999 Tree of Knowledge (1979)
SUN POWER

THE PARTS IN YOUR KIT
thermometer
(tube and scale)
parabolic reflector
test tube
reflector support
heat absorber bag
reflector pin
test tube holder
lens
support
reinforcer
LETTER TO SUPERVISING ADULT
Dear Adult,
This solar energy kit has been designed for children from the age of 8 and up. It is
primarily for playing with, and learning about solar energy and temperature. While
performing the activities, one learns how to conduct and follow them through, as well
as learning how to draw conclusions.
The theory behind solar energy is difficult. We have attempted to explain a very small
part of this theory. It is not essential for the child to read or understand this theory,
however, if you can explain, it would be helpful for encouraging the child to learn.
In the booklet, there are several experiments/activities which require certain household
objects. The opportunity for the child to look around the house and search for each
item is valuable as this helps to show that science is part of everyday life.
Most of the activities can easily be performed by children, however, we do suggest that
you read this short booklet together with the child. You may feel that there are
certain activities which are not suitable for your child at this stage of his/her
development. There are a few experiments which we feel require adult supervision.
These experiments are marked with this sign:
When working with the child, it is important to stress that all parts of the kit not in use
should remain in the box. After experimenting, the parts should be returned to the box.
This kit must be kept out of reach of children below the age of three years as it
contains small parts that may be choking hazard.
We hope that both you as an adult, and the child playing with this kit will enjoy
experimenting and learning together.
1

2
TABLE OF EXPERIMENTS
Experiment no. 1 The thermometer
Experiment no. 2 Converting sunlight into heat
Experiment no. 3 Sunlight shining through a window
Experiment no. 4 The heat from an electric light bulb
Experiment no. 5 Black water
Experiment no. 6 The solar heater
Experiment no. 7 Solar heater and reflected light
Experiment no. 8 Solar heat can be reflected
Experiment no. 9 The solar pond
Experiment no. 10 Determining the focal point
Experiment no. 11 Burning a feather
Experiment no. 12 Singeing a piece of rubber
Experiment no. 13 Cold water in sunlight
Experiment no. 14 Dark liquids in sunlight
Experiment no. 15 Influence of ink
Experiment no. 16 Brewing tea
Experiment no. 17 Melt a candle
Experiment no. 18 Frying an egg white
Experiment no. 19 Additional sunlight
Experiment no. 20 The focal point of lens
Experiment no. 21 Concentrated heat
Experiment no. 22 Charring paper
Experiment no. 23 A lense’s shadow
Experiment no. 24 The solar trap
Experiment no. 25 Homemade solar reflector
Experiment no. 26 Alterations and variations
INTRODUCTION TO SUN POWER
The energy we use today is usually obtained from fossil fuels, such as oil, gas or coal.
Even electricity is a fossil fuel, because most of the electricity generated today is made
by burning one of these three kinds of raw material.
Fossil fuels like coal, gas and oil, which we use for things like heating, lighting, and
cooking, won’t last forever. One day the world’s supply will run out. So what will take
their place? One possibility is energy from the sun. which we call solar energy. For
many years now scientists have been developing ways of collecting and using solar
energy, because it is clean, sate and something the world cannot run out of – though
obviously some parts of the world have more of it than others!
The experiments in this kit should give you some idea about how the sun’s rays create
energy. As this kit deals with solar energy, there are some experiments that may not
give you good results without strong sunlight. These experiments are marked with this
sign:
You will find a few experiments that require adult supervision. These experiments are
marked with this sign:
After reading this short introduction, you are ready to start with your experiments.

3
Experiment no. 1 The thermometer
There are many types of thermometers; the one enclosed in your kit is the most
common kind. It contains a bulb of liquid at one end and a long thin bore which runs
up the center of the glass tube. When the liquid in the bulb is heated, it expands and
moves up the bore; when it is cooled, it moves down.
To determine the temperature we see how far the liquid has moved up or down
the bore and read off the temperature from the plastic base.
The scale of your thermometer is calibrated in both the Celsius and Fahrenheit scales.
The Celsius (sometimes referred to as
Centigrade) scale is the one most commonly
used in scientific work. On the Celsius scare
0
o
is the freezing point of water and 100
o
is
the boiling point of water. The range between
the freezing and boiling point of water is divided
into 100 equal parts of degrees. Degrees Celsius
are written as
o
C.
The United States still uses the Fahrenheit
scale of temperature, you will very often come
across this unit of temperature measurement.
In the Fahrenheit scale water freezes at 32
o
and boils at 212
o
. The temperature range
between the freezing and boiling point of water
is divided into 180 equal parts of degrees. The
common abbreviation for a degree Fahrenheit
is
o
F.
There is one other temperature scale which
is in common use in more advanced scientific
work; it is the Kelvin scale. Knowing that a
gas when cooled one degree centigrade loses
1/273 of its pressure, Lord Kelvin reasoned
that at 273
o
C below zero –absolute zero – a
gas would not have any pressure. He devised
a scale where 0
o
K is that theoretical point
where gases do not exert any pressure and
each degree is identical to a degree centigrade.
Included here you will find a comparative
chart of all these temperatures.
-60
-40
-20
0
20
40
60
80
100
120
140
160
180
200
220
-50
-40
-30
-20
-10
0
10
20
30
40
50
60
70
80
90
220
230
240
250
260
270
280
290
300
310
320
330
340
350
360
100
110
370
380
TEMPERATURE SCALE CONVERSION
FAHRENHEIT- CENTIGRADE- KELVIN
water boils
human body
temperature
room temperature
water freezes
WARNING: Your thermometer is only capable of measuring up to 50
o
C.
Make sure that you do not leave it in boiling water, which is 100
o
C,
or 212
o
F.

4
Experiment no. 2 Converting sunlight into heat
This experiment seems so easy, elementary, even childish, that you probably won’t
want to try it! Go ahead, do it all the same. It is worthwhile!
Take 3 transparent cups of the same size that are either glass or plastic. Place one on
a dark sheet of paper and two on white paper. Stand these outside in sunlight and pour an
equal amount of cold water into each, about half a cupful should be enough. Measure
the temperature of the water in each with the thermometer.
Now, cover one of the cups that is on the white paper, with a transparent saucer, or even
some cling film.
Measure the temperature of the three cups
-after 10 minutes
-after 30 minutes
-after 60 minutes
Did you notice any differences? Did any of the results surprise you?
Some facts to help you with your observations and recordings:
a) A dark background generally absorbs more heat than a light background.
b) Glass or plastic absorbs a small quantity of the sun’s ray.
c) The glass of plastic retards the evaporation of water.
d) When water evaporates, some of the heat is lost since it is used up during the
evaporation process.
Experiment no. 3 Sunlight shinning through a window
Repeat Experiment No. 2, but this time, perform it on a table in a room with the
window closed. In other words, you will test sunlight which has passed through glass
windows.
Before you start, have a guess what the results might be. Even the scientist who
developed these experiments was not sure what the results would be until he tried it!
Experiment no. 4 The heat from an electric light bulb.
What would you expect to find if, instead of sunlight, you were to use the light of an
electric lamp on the ceiling of your room? Try it.
An electric light bulb gives out heat. It is absorbed in the room and y our thermometer
is not sensitive enough to register the difference.
Experiment no. 5 Black water
Supposing you were to dye the water you place in
the glasses black. Would you expect to obtain a
higher temperature? Could this idea be put to practical
use? Perhaps you could design an experiment to test
this idea (hypothesis).
If you have no black ink, you could make some by
dripping some water into the top of a dried felt tip
pen, collecting the water as it emerges from
the bottom. As an extra bonus, the dried out felt
tip pen will write again!
cartridge
ink

5
Experiment no. 6 The solar heater
Take your heat absorber bag and fill it with cold water. You may find
this difficult as there is very little room between the transparent cover
and the black backing. It is necessary to prepare the heat absorber
bag so that you can use it.
To do this, ask an adult to heat some water until it is hot, but not
boiling. Hold the bag at A and B and dip it into the water for about
half a minute, be careful the water will be hot. Remove it and blow
into A as if it was a balloon which you want to inflate. Hold B with
your finger to prevent the air from escaping and keep it like that for
about a minute. The bag cools and stays inflated, ready for use.
Take your heat absorber bag and fill it with cold water, then lean it against the box lid
or the polystyrene tray, in such a manner that the transparent side of the bag is facing
the sun. As the sun heats the water in the bag, the warmer water becomes lighter and
rises to the top of the absorber bag. The cold water will drop down. You may able to feel a
temperature difference by touching the bag at top and bottom.
A commercial hot water tank is very similar to our bag. A water tank is placed above
the heater and a pipe from the bottom of the tank is connected to inlet A and another
from the top of the tank to outlet B. As the water is heated, it rises and goes to the top
of the tank. As water rises in the tank, it pulls in colder water from the bottom
of the tank to be heated.
A B

6
Experiment no. 7 Solar heater and reflected light
Perform Experiment 6 again, exactly as you did
before, but this time take a mirror and stand it
at a distance from the solar heater in such a way
that it reflects the sunlight onto the solar heater.
The latter will now absorb the direct sunlight as
it did before, and, in addition, it will received
some reflected energy from the mirror.
The warm water at the top of the heat absorber bag
will be hotter than in the last experiment (Exp 6).
Experiment no. 8 Solar heat can be reflected
Place the thermometer on the window sill so that it
is shielded from the sun by the card. Record the
temperature reading.
Now hold your mirror in such a way that the sun’s
rays are reflected from the mirror onto the
thermometer tube. Take a new reading after several
minutes. The temperature should now read practically
the same temperature as it would read if it were facing
the sun directly.

7
Experiment no. 9 The solar pond
At the southern tip of Israel, near the town of Eilat, is a small lake. At first glance
nothing seems remarkable about it. The water is warm and salty and not particularly
clean. However, this lake attracts scientists from all over the world because it is a
“solar pond.” If current research proves successful, this small lake may make a major
contribution towards solving the world’s energy shortage.
If the sun shines on a pool of water, the top layer becomes slightly hotter since hot
water usually rises to the top. But hot water evaporates faster than cold, and when
water evaporates, it takes heat energy with it.
You can easily test this by wetting your forearm and blowing on it. When you blow on
your wet arm, you speed the process of evaporation. You arm feels cold during this
process because heat is lost from your arm while the water evaporates. The water has
used the heat from your arm as a part of the evaporation process.
In an ordinary pool the sun shines on the water, adding heat. Then the water
evaporates, losing heat. Eventually, a balance is reached where any extra heat causes
more evaporation and the pool reaches a steady temperature.
A solar pool is different. Underground there is a salt-water well so the water at the
bottom is much more salty than the layer at the top. The top layer acts as a magnifying
glass, focusing the sun’s heat onto the lower layer. The salty water is heavier than
ordinary water, even when hot. Therefore, unlike ordinary water, the heated salty
water sinks, instead of rising. It is now strictly prohibited to bathe in this pool. Before
the scientific facts relating to this solar pond were known, swimmers who dived into the
bottom were badly scalded. Today, scientists are investigating the possibility of building
artificial solar pools in order to exploit this solar energy trapped in the salt-water layer.
You too can try out this idea. Take a coloured plastic
bowl or glass (not white.) Fill it to one-third of its
depth with water and put in as much salt as will
dissolve. If you have some ink or dark food dye,
colour this solution.
Now, carefully and slowly pour into the bowl or glass
some fresh water. Pour it slowly down one side,
using a spoon to direct the flow. It is important to
prevent the two liquids from mixing. The ink in the
salt water will tell you if you have been successful.
Let it stand in the sun for some time and then measure
the temperature at the top, the middle and the bottom.
concentrated
salt water
and ink
fresh water

8
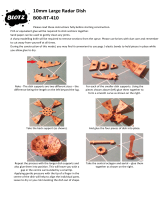
Adult supervision is necessary for this task.
To build your furnace, ask an adult to use a craft knife to
carefully separate the polystyrene tray where the test
tube and other parts were stored. The parabolic base is
ready for use.
Lay your parabolic reflector in the dish and align it so that
the four cutouts at the edge of the dish are over the four
small holes in the polystyrene support.
Push a reflectors pin into each of the small holes so that
the pin head presses and holds the parabolic reflector
in place.
Slide the reflector legs onto the protrusions in the
polystyrene support as shown in the following diagram:
Be sure to push both legs in as far as they can go. One
of the protrusions in the polystyrene support has a
rectangular hole in it; be sure that it is completely on
the outside of the reflector leg.
Push the support reinforcer until its “half
circle” head is laying on the polystyrene
protrusion. Insert each of the two wire ends
of the test tube holder into each of the holes
in the support reinforcer.
Place the test tube into the test tube holder as
shown in the diagram.
BUILDING THE SOLAR FURNACE
parabolic
reflectors
polystyrene
support
cut out small holes
in the reflector
reflector pin
rectangular hole
dish
support reinforcer

9
To concentrate heat, your solar furnace must face the sun.
It is constructed in such a way that the parabolic reflector and its
polystyrene support can be tilted so that you can point the reflector
directly at the sun.
You will achieve the best results in your experiments with the solar
furnace if you try them when the sun is directly overhead. This is
due to the fact that the sun’s rays are strongest when they strike
the earth at an angle of 90
o
.
When the sun is directly overhead, its rays travel the shortest possible distance before
they reach you. Rays that strike your reflector at a greater angle (when the sun is not
directly overhead) are weaker since they travel a longer distance through the earth’s
atmosphere. As the rays travel from the sun, the atmosphere of the earth absorbs some
of their heat. If the rays travel a longer distance, they lose more heat. In addition to
that, when the sun’s rays strike the ground at an angle, they cover a greater area and
less heat is available than when the sun is overhead.
A breeze or wind will cool the items while you are trying to heat them. Needless to say,
on a cloudy day you will be unable to perform some experiments.
Experiment no. 10 Determining the focal point
The focal point (F.P.) of our parabolic reflector is located 6 cm above its deepest place.
Place your solar furnace in sunlight. Take a white sheet of paper and slowly move it
towards the reflectors. As the sheet approaches the focal point of the reflector you will
begin to see a circular bright spot. The closer you get, the smaller the spot becomes.
It is quite small at the focal point. At this point, our solar furnace will be the most
effective.
The focal point is the point in mid-air where all the light hitting our parabolic reflector
is reflected upon. What happens as you move the paper closer to the reflector than its
focal point?
Experiment no. 11 Burning a feather
For this experiment, you will need a small dark birds feather, which can be found out
in the garden.
Hold this feather 2 – 3 inches above the reflector with the
reflector pointing towards the sun. Move the feather a little
up and down, right and left (horizontally and vertically),
until you reach a point where the feather begins to smoke.
This is the focal point. At this point, the concentrated
sunlight is enough to singe the feather.
It is easy to burn a dark feather, while a white one will
hardly be affected.
While performing this experiment, and the previous and
following ones, take care not to block the sunlight with your
hand, from reaching the reflector.
USING THE SOLAR FURNACE
USE SUNGLASSES WHILE PERFORMING THIS EXPERIMENT!!
NEVER LOOK DIRECLY AT THE SUN!!

10
Experiment no.12 Singeing a piece of rubber
As you approach the focal point of the parabolic reflector with a piece of rubber, the
latter begins to smoke and smell. The rubber will help you to determine the
approximate area around the F.P. at which the sunlight is concentrated.
Experiment no.13 Cold water in sunlight
Half fill a test tube with cold water and attach it to the test tube holder.
Measure the temperature of the water and then place the holder and test tube into
direct sunlight for 5 minutes. How great was the rise in temperature?
Experiment no 14. Dark liquids in sunlight
Repeat the last experiment but this time, add a few drops of ink (See Exp.5.)
How great is the rise in temperature now?
Experiment no. 15 Influence of ink
Repeat the last experiment with water coloured with a few drops of ink.
The water should boil. How long does it take to bring the water to boil?
Can it be done in winter?
Experiment no. 16 Brewing tea
Place a few tea leaves (less than ? teaspoonful) into a test tube and add enough water
to half fill it. Fit this into the solar furnace. See how long it takes to brew yourself a
“cup of tea.”
Never drink directly from a test tube.
Experiment no. 17 Melt a candle
Insert a small candle into the test tube and bring it into the F.P. of
the reflector. The candle will melt.
NOTE: In this experiment you will dirty the test tube with molten
wax and it will be difficult to clean. To do so you need soap, hot
water and a test tube cleaner. You can make one by wrapping a little
steel wool around a pencil or suitable stick. Clean it carefully.
Experiment no. 18 Frying an egg white
Take an uncooked egg and separate the white from the yolk. Pour some of the egg
white into the test tube. Bring this into the F.P. of the solar heater.
Can you cook the egg white? How long does it take to make it hard?
Solar energy is used for cooking in remote areas of the world.

11
Experiment no. 19 Additional sunlight
The solar reflector faces the sun. It collects
all the sunlight that falls on it and concentrates
it at the F.P.
What would happen if you reflected some
additional sunlight by means of an ordinary
mirror or even several mirrors?
Can you increase the heat at the F.P.
significantly?
Experiment no. 20 The focal point of your lens
The lens enclosed in your kit is a 20.0 diameter double convex converging lens with
a F.P. of 35mm.
All light rays striking our lens on one side will meet at a single point exactly 35mm on
the other side of the lens. Try it.
Hold your lens over any letter E in this booklet. As you increase the height of the lens
over the letter E, the letter grows and grows until a point is reached where the image
seems to become blurred! This is the focal point. Try to measure whether it really is
35mm.
FOCUSSING ENERGY
A converging lens focuses all the energy received on its surface on a considerably
smaller area.
Our lens has a surface of approximately 300 square millimeters. If we focus our lens
on an area 1 mm square, that area receives 300 times the energy per mm.
If our lens receives from the sun one joule of radiant energy per mm then the focal
point of our lens would receive 300 joules per mm.
This concentration of energy increases the temperature of the body placed at the focal
point. While the total energy has not increased, the effect of the energy is localized,
resulting in higher temperatures at the Focal Point.
Experiment no. 21 Concentrated heat
In a normally lit room, place the bulb of your thermometer at the focal point of the lens.
Note the temperature at the start of the experiment and again after 5 minutes. Was
there any noticeable change?
Now take your lens and thermometer outside into direct sunlight. Again, place the tip
of the thermometer into the focal point of the lens. Note temperature at start of
experiment and see how long it takes your thermometer to reach the top (55
o
C).
Be sure to remove the thermometer at that temperature.
mirror

12
Experiment no. 22 Charring paper
Place your lens in bright sunlight with a white piece of paper at its focal point. Can you
char the paper? If the sun is bright enough, you may be able to char it. It will char
best right at the edge of the paper.
The white paper reflects most of the sunlight and solar heat. Even though the solar
heat is concentrated at a small point the paper barely, if at all, reaches its kindling point.
Experiment no. 23 A lenses’ shadow
Try to locate a small bottle cap the same size
as your lens. Fill the cap with water.
Place it in direct sunlight for 10 minutes.
Measure and record the water temperature at
the beginning and end of the time period.
Now start again. Place an equal amount of
water in your bottle cap. Make sure the water
is at the same starting temperature as before.
This time place the water in sunlight with the
lens in front of the cap and the water at the F.P.
of the lens. Compare the temperature of the
water after 10 minutes with the results of your
previous try – they should be very similar.
When the lens is placed in front of the water in the bottle cap the concentrated rays
converge on a small area of the water. The surrounding area will be in the shadow of
the lens, so it does not receive the energy that is being gathered by the lens. The total
amount of heat received remains the same. If the area of the body of water is smaller
than that of the lens, then the water will receive more energy and the lens can be
thought of as a collector.
Experiment no. 24 The solar trap
For this and the next two experiments, you need fairly large pieces of card of stiff
drawing paper. You also need some glue and aluminum foil.
Find a piece of thin card or stiff drawing paper about 50 cm x 30cm. Cover a table
with a piece of old newspaper to protect it. Place the card on the newspaper. With a
pain brush, or cotton ball, spread the glue evenly over the card. Take a piece of
aluminum foil the same size as the card. Stick it down smoothly and firmly.
You have made a crude cardboard mirror! Let the glue dry for at least half an hour.
In the meantime take it outdoors and try, by
means of this mirror, to reflect sunlight onto
the wall of a house. See what happens when
you bend the cardboard mirror slightly. After
alf an hour, roll the card into a cone (funnel)
as illustrated. The side with the aluminum
foil must be inside. The top opening should
be approximately 20cm across, the bottom
about 2.5 cm. Fix together with tape, glue or
staples.
You solar trap is ready.

13
Now, go outside into the sunlight. If anybody asks you what you are doing, answer
innocently. “I’m trapping some sunlight!” People may not understand what you are
doing, but in fact you are being very scientific. This is exactly what you are about
to do! Insert your index finger into the small hole of the cone. Stand in sunlight and
slowly turn around, revolving in a complete circle. You will find there is a point where
your finger feels much hotter. At that point, of course, you are facing the sun.
Now, still keeping your finger in the hole, lower and elevate your arm. There comes a
point where you will take your finger out quickly! There is no danger that you will
burn your finger, but it will get uncomfortably hot. If you insert a candle into the
opening, instead of your finger, it will melt like butter! A bit of rubber will start to
smoke and smell!!!
Experiment no. 25 Homemade solar reflector
Cut out a circle with a diameter of 30 cm on another piece of card of stiff paper.
Stick some aluminum foil onto this disc just as you did when making the first solar trap.
Step 1: Bisect the circle by drawing a line
through its middle.
Step 2: Bisect this line by drawing another
line through the middle at right
angles to the first.
Step 3: Cut along the four lines from the
outside of the circle towards the
center, but stop cutting 2 cm before
you reach the center.
You disc should now look like this:
Now punch a 2 mm hole at the center of the
disc.
Measure and mark a point 2 cm to the right of
each slit and overlap the two sides of the slit so
that the one side comes to lie on the other, at the
point you mark.
Do this with every slit and fasten it with glue,
tape or staples.
You have made something that looks like a
Chinese hat. This is your solar reflector.
Of course, the silver paper must be inside!
Go out into the sunlight and try it out.
Compare it with the solar reflector that comes
with this kit.
2 cm hole at center
2 cm
2 cm
15
90º
pencil mark 2 cm from radius
13 cm slit
along the radius

14
Experiment no. 26 Alterations and variations
This last experiment is not one, but many experiments. In all depends on how
interested you are in learning more about solar energy.
You could make two more solar traps: one ? the size described here, the other twice
the size.
Similarly, you could make a larger and smaller
solar reflector (Chinese hat) and compare them.
Of course, the larger the reflecting surface, the
more energy can be collected and concentrated.
However, it is not only the amount of surface area
that matters. What would happen if you changed
the angle of the solar trap? You could change
the angle of the solar trap as illustrated in A or
as in B.
At what point within the cone is the heat as its greatest?
What would happen if you overlapped the lips of your slit in the solar collector more
than 3 cm or less?
CONCLUSION
You have now hopefully completed the experiments with solar energy that are in this
booklet. Solar energy is an endless energy source available in our world today.
n order to answer the needs of the future, new technologies need to be developed.
Worldwide research is underway and is constantly progressing in the field.
The development of alternative energy sources is essential.
Our goal is to introduce you to the basics of solar energy.
We hope that by performing the experiments in this kit, you have become familiar
and aware of the powers and effects of solar energy.
B A

P38-03050-81001000
/