Page is loading ...

oversized drop arm
commode
www.drivemedical.com
lifetime limited
warranty
Your Drive brand product is warranted to be free
of defects in materials and workmanship for the
lifetime of the original consumer purchaser.
This device was built to exacting standards and
carefully inspected prior to shipment. This Lifetime
Limited Warranty is an expression of our confi-
dence in the materials and workmanship of our
products and our assurance to the consumer of
years of dependable service.
In the event of a defect covered by this
warranty, we will, at our option, repair or replace
the device.
This warranty does not cover device failure
due to owner misuse or negligence, or normal
wear and tear. The warranty does not extend to
non-durable components, such as rubber
accessories, casters, and grips, which are subject
to normal wear and need periodic replacement.
If you have a question about your Drive device or
this warranty, please contact an authorized Drive
dealer.
© 2005 Medical Depot, Inc. All rights reserved.
Drive is a trademark of Medical Depot, Inc.
Port Washington N.Y. 11050 USA Made in China
EU Authorized Representative
Drive International, LLC
Globe Lane - Stockport
DUKINFIELD SK16 4RE, GB

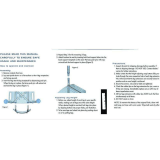
Figure 2
1. Before use, adjust height of each leg to your
specific needs, making sure all legs are at the
same height. When desired height is reached,
lock legs into place by aligning buttons into
proper holes, per illustration above.
2. To be sure legs are locked into place by
pushing down on or by pulling legs.
adjusting leg height
commode assembly
instructions and precautions
1. Before assembling, allow toilet seat and lid to
reach room temperature if exposed to cold.
This will help prevent the seat and lid clamps
from cracking while being assembled onto
commode back frame rail.
2.. Align the toilet seat clamps onto the back
frame rail. (Both clamps should sit outside
the pail brackets.) Push down on seat until
clamps snap firmly into place.
3. Slide pail in from front of commode.
Figure 1
assembling commode seat and lid
additional precautions
1. Toilet seat must be in down position before use.
Failure to do so may result in breakage of com
mode and possible injury.
2. Do NOT install commode without first reading and
understanding this assembly and instruction
sheet. If you can not understand these instructions,
contact a healthcare, dealer or technical
professional before attempting to install.
Otherwise, injury or damage may occur.
3. Inspect all parts for shipping damage before
assembly. If there is shipping damage -
DO NOT USE. Contact dealer/carrier for further
instructions.
4. Make certain that the height adjusting snap
buttons fully protrude through the same respective
hole of each leg extension. This will ensure that
the leg extensions are securely locked in position
and an even height is achieved (see Figure 1).
5. Ensure ALL screws, nuts and/or bolts are
tightened.
6. Check the rubber tips on the leg extensions for
rips, wear or if they are missing. Immediately
replace any or all if any of these imperfections
exist.
7. All four leg extensions with rubber tips MUST
touch the floor simultaneously at all times.
8. Users with limited physical strength should be
supervised or assisted while using commode.
/