Page is loading ...

Part No 1062011 1 Drop Arm Commode
For more information regarding Invacare products, parts, and services,
please visit www.invacare.com
Drop Arm Commode
Model No. 9669
NOTE: Check all parts for shipping damage. In case of damage, DO NOT use. Contact
Carrier/Invacare for further instructions.
Safety Summary
To ensure the safe and proper installation of the Drop Arm Commode, these instructions
MUST be followed:
WARNING
DO NOT use this equipment without first reading and understanding this instruction
sheet. If you are unable to understand the warnings, cautions and instructions,
contact a healthcare professional, dealer or technical personnel if applicable, before
attempting to install this equipment - otherwise, injury or damage may occur.
Invacare products are specifically designed and manufactured for use in conjunction
with Invacare accessories. Accessories designed by other manufacturers have not
been tested by Invacare and are not recommended for use with Invacare products.
Snap buttons MUST be fully engaged and aligned in the proper height adjustment
hole of each leg before use. This ensures that the legs are securely locked and an
even height adjustment is achieved.
Make certain all screws, nuts and/or bolts are tight at all times.
Inspect rubber tips on the leg extensions for rips, wear or if they are missing. Replace
them immediately if any of these conditions exist.
Leg extensions with rubber tips MUST be in contact with the floor at all times.
Toilet seat MUST be down before attempting to sit on the commode. Pail holders
are not constructed to support the weight of an individual, only the pail and its
contents.
Use the arm supports only for assistance. DO NOT attempt to use the arms to
support full body weight.
Arms should be unlatched and dropped to assist in transfer onto/off the device.
Users with limited physical capabilities should be supervised or assisted when using
the commode.
The Commode listed has a weight limitation of 250 lbs (114 kg). Consult a qualified
technician if assistance is required in selecting the appropriate Invacare commode
for you.
INSTALLATION WARNING
Before removing/installing seat and lid, allow seat/ring to reach room temperature if
exposed to cold. This will help prevent the seat clamps from breaking when being
removed/installed onto commode back frame rail.
Installation Instructions
SAVE THESE INSTRUCTIONS

Drop Arm Commode 2 Part No 1062011
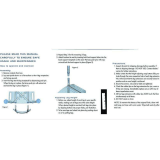
Adjusting the Leg Height
NOTE: For this procedure, refer to FIGURE 1.
1. Remove commode from carton.
2. Align the snap button of each leg
extension with the appropriate
adjustment hole in the leg frame.
3. Make certain that the snap buttons are
fully engaged into the adjustment hole
of each leg frame and are at the same
height before using.
FIGURE 1 Adjusting the Leg Height
Installing/Removing the Commode Seat and Lid
NOTE: For this procedure, refer to FIGURE 2.
Installing
1. Align the seat clamps of the toilet seat onto the back frame rail.
NOTE: Each clamp should sit outside the pail holders.
2. Push down on seat until it clamps
firmly into place.
3. Repeat STEPS 1-2 to install the lid.
Removing
NOTE: Always remove the lid before removing
the seat.
1. Grasp the back corner of the lid and lift
up firmly.
2. Repeat STEP 1 for the seat.
FIGURE 2 Installing/Removing the
Commode Seat and Lid
Operating the Drop Arms
NOTE: For this procedure, refer to FIGURE 3 on page 3.
1. Grasp one arm latch handle firmly. Refer to Detail “A” of FIGURE 3.
2. Squeeze the arm latch handle toward the drop arm tube shown in FIGURE 3.
3. Gently lower the drop arm tube shown in Detail “B” of FIGURE 3.
4. Perform STEPS 1-3 for the opposite arm.
Snap Button
Leg Frame
Commode Seat
(Lid Not Shown)
Seat Clamp
Back Frame Rail
Pail
Pail
Holder

Part No 1062011 3 Drop Arm Commode
WARNING
When repositioning arm(s) to the locked position, ensure that the bottom portion of
the arm latch rests on top of the pin on the upright portion of the leg tube. The arm
will then be positioned for use.
5. Reverse STEPS 1-3 to reposition arm(s) into the locked position.
FIGURE 3 Operating the Drop Arms
Replacing the Armrests
NOTE: For this procedure, refer to FIGURE 4.
1. Remove the two Phillips
®
screws from
the underside of each drop arm tube.
2. Lift armrest from each drop arm tube.
3. Reverse STEPS 1-2 to install/reinstall
the armrests.
FIGURE 4 Replacing the Armrests
Cleaning and Lubrication
Cleaning
Clean with a damp cloth and non-abrasive cleanser.
Lubrication
To make raising or lowering the seat/lid easier, you may lubricate the commode back
frame rail with a very small amount of petroleum jelly or furniture polish.
DETAIL “A”
DETAIL “B”
Drop Arm
Tube
Arm Latch
(Locked)
Pin
Drop Arm Tube
Arm Latch
(Unlocked)
Pin
Upright
Leg Tube
Arm
Latch
Drop Arm Tube
Pin
Upright
Leg Tube
Phillips
Screws
Armrest
Drop Arm
Tube

LIMITED WARRANTY
PLEASE NOTE: THE WARRANTY BELOW HAS BEEN DRAFTED TO COMPLY WITH FEDERAL
LAW APPLICABLE TO PRODUCTS MANUFACTURED AFTER JULY 4, 1975.
This warranty is extended to the original purchaser/user of our products.
This warranty gives you specific legal rights and you may also have other legal rights which vary
from state to state.
Invacare warrants its product to be free from defects in materials and workmanship for a period of
three years for the original purchaser. If within such warranty period any such product shall be
proven to be defective, such product shall be repaired or replaced, at Invacare's option. This
warranty does not include any labor or shipping charges incurred in replacement part installation or
repair of any such product. Invacare's sole obligation and your exclusive remedy under this warranty
shall be limited to such repair and/or replacement.
For warranty service, please contact the dealer from whom you purchased your Invacare product. In
the event you do not receive satisfactory warranty service, please write directly to Invacare at the
address below. Provide dealer's name, address, model number, date of purchase, indicate nature of
the defect and, if the product is serialized, indicate the serial number.
Invacare Corporation will issue a return authorization. The defective unit or parts must be returned
for warranty inspection using the serial number, when applicable, as identification within thirty days
of return authorization date. DO NOT return products to our factory without prior consent. C.O.D.
shipments will be refused; please prepay shipping charges.
LIMITATIONS AND EXCLUSIONS: THIS WARRANTY SHALL NOT APPLY TO PROBLEMS
ARISING FROM NORMAL WEAR OR FAILURE TO ADHERE TO THE ENCLOSED
INSTRUCTIONS. IN ADDITION, THE FOREGOING WARRANTY SHALL NOT APPLY TO
SERIAL NUMBERED PRODUCTS IF THE SERIAL NUMBER HAS BEEN REMOVED OR
DEFACED; PRODUCTS SUBJECTED TO NEGLIGENCE, ACCIDENT, IMPROPER OPERATION,
MAINTENANCE OR STORAGE; PRODUCTS MODIFIED WITHOUT INVACARE'S EXPRESS
WRITTEN CONSENT (INCLUDING, BUT NOT LIMITED TO: MODIFICATION THROUGH THE
USE OF UNAUTHORIZED PARTS OR ATTACHMENTS): PRODUCTS DAMAGED BY REASON
OF REPAIRS MADE TO ANY COMPONENT WITHOUT THE SPECIFIC CONSENT OF
INVACARE; PRODUCTS DAMAGED BY CIRCUMSTANCES BEYOND INVACARE'S CONTROL;
PRODUCTS REPAIRED BY ANYONE OTHER THAN AN INVACARE DEALER. SUCH
EVALUATION SHALL BE SOLELY DETERMINED BY INVACARE.
THE FOREGOING WARRANTY IS EXCLUSIVE AND IN LIEU OF ANY OTHER WARRANTIES
WHATSOEVER, WHETHER EXPRESSED OR IMPLIED, INCLUDING THE IMPLIED
WARRANTIES OF MERCHANTIBILITY AND FITNESS FOR A PARTICULAR PURPOSE, AND
THE SOLE REMEDY FOR VIOLATIONS OF ANY WARRANTY WHATSOEVER, SHALL BE
LIMITED TO REPAIR OR REPLACEMENT OF THE DEFECTIVE PRODUCT PURSUANT TO THE
TERMS CONTAINED HEREIN. THE APPLICATION OF ANY IMPLIED WARRANTY
WHATSOEVER SHALL NOT EXTEND BEYOND THE DURATION OF THE EXPRESS
WARRANTY PROVIDED HEREIN. INVACARE SHALL NOT BE LIABLE FOR ANY
CONSEQUENTIAL OR INCIDENTAL DAMAGES WHATSOEVER.
THIS WARRANTY SHALL BE EXTENDED TO COMPLY WITH STATE/PROVINCIAL LAWS
AND REQUIREMENTS.
Invacare Corporation
www.invacare.com
USA
One Invacare Way
Elyria, Ohio USA
44036-2125
800-333-6900
Canada
570 Matheson Blvd E Unit 8
Mississauga Ontario
L4Z 4G4 Canada
800-668-5324
Invacare, Yes, you can. and the Medallion
Design are registered trademarks of
Invacare Corporation.
Phillips is a registered trademark of The
Phillips Screw Company.
©2006 Invacare Corporation
Part No 1062011
Rev G - 06/01/06
/