Page is loading ...

Rimage Allegro 100™ User Guide

For more information visit rimage.com/support
2003751_B
1
Rimage Corporation reserves the right to make improvements to the equipment and software described in this document at any time without any prior
notice. Rimage Corporation reserves the right to revise this publication and to make changes from time to time in the content hereof without obligation
of Rimage Corporation to notify any person or organization of such revisions or changes.
This document may contain links to web sites that were current at the time of publication, but may have moved or become inactive since. This
document may contain links to sites on the Internet that are owned and operated by third parties. Rimage Corporation is not responsible for the
content of any such third-party site.
© 2016, Rimage Corporation
Rimage® is a registered trademark of the Rimage Corporation. Allegro™ is a trademark of the Rimage Corporation. Windows® is a registered trademark
of Microsoft Corporation.
All other trademarks and registered trademarks are the property of their respective owners.
The most recent version of this document can be found at www.rimage.com/support.
Rimage Corporation
201 General Mills Blvd, Golden
Valley, MN 55427, USA
Toll Free +1.800.445.8288
Rimage Europe GmbH
Albert-Einstein-Strasse 26
63128 Dietzenbach, GERMANY
Tel +49 (0)6074.8521.0
Rimage Japan Co., Ltd.
4F Arai #38 Bldg.,
2-7-1 Hamamatsu-cho,
Minato-ku, Tokyo 105-0013 Japan
Tel +81.3.6452.8780
Rimage Taiwan
2F.-7, No. 508, Sec. 5,
Zhongxiao East Road., Xinyi Dist.,
Taipei City 110, TAIWAN
Tel +886.2.2726.0100
Rimage Information Technology
(Shanghai) Co., Ltd.
10B & 10C, World Plaza,
855 South Pudong Road
Shanghai, 200120 CHINA
Tel +86.21.5887.8906

Contents
2003751_B
For more information visit rimage.com/support
2
Introduction . . . . . . . . . . . . . . . . . . . . . . . . . . . . . . . . . . . . . . . . . . . 3
About This User Guide. . . . . . . . . . . . . . . . . . . . . . . . . . . . . . . . . . . . . . . . . . . . .3
About Your Product. . . . . . . . . . . . . . . . . . . . . . . . . . . . . . . . . . . . . . . . . . . . . . . .3
Important Information . . . . . . . . . . . . . . . . . . . . . . . . . . . . . . . . . . 4
Support Contact Information. . . . . . . . . . . . . . . . . . . . . . . . . . . . . . . . . . . . . . . .4
Learn More Online . . . . . . . . . . . . . . . . . . . . . . . . . . . . . . . . . . . . . . . . . . . . . . . .4
Technical Support . . . . . . . . . . . . . . . . . . . . . . . . . . . . . . . . . . . . . . . . . . . . . . . . .4
Optical Disc Recording Software Disclaimer. . . . . . . . . . . . . . . . . . . . . . . . . 5
Safety Information. . . . . . . . . . . . . . . . . . . . . . . . . . . . . . . . . . . . . . . . . . . . . . . . 5
Compliance Information. . . . . . . . . . . . . . . . . . . . . . . . . . . . . . . . . 6
Printer Requirements . . . . . . . . . . . . . . . . . . . . . . . . . . . . . . . . . . . 7
Ink Requirements. . . . . . . . . . . . . . . . . . . . . . . . . . . . . . . . . . . . . . . . . . . . . . . . . .7
Label Design Requirements . . . . . . . . . . . . . . . . . . . . . . . . . . . . . . . . . . . . . . . .7
Print Requirements . . . . . . . . . . . . . . . . . . . . . . . . . . . . . . . . . . . . . . . . . . . . . . . .7
Identifying the Parts of the Allegro 100. . . . . . . . . . . . . . . . . . . . 8
Front Panel and Top . . . . . . . . . . . . . . . . . . . . . . . . . . . . . . . . . . . . . . . . . . . . . . 8
Rear Panel . . . . . . . . . . . . . . . . . . . . . . . . . . . . . . . . . . . . . . . . . . . . . . . . . . . . . . 9
Overview of Operation . . . . . . . . . . . . . . . . . . . . . . . . . . . . . . . . . 10
Using the External Output Bin. . . . . . . . . . . . . . . . . . . . . . . . . . . . . . . . . . . . . .10
Hardware Setup. . . . . . . . . . . . . . . . . . . . . . . . . . . . . . . . . . . . . . . 11
Setup . . . . . . . . . . . . . . . . . . . . . . . . . . . . . . . . . . . . . . . . . . . . . . . . . . . . . . . . . . . 11
Load Discs . . . . . . . . . . . . . . . . . . . . . . . . . . . . . . . . . . . . . . . . . . . . . . . . . . . . . . 11
Install the All-in-One Ink Cartridge . . . . . . . . . . . . . . . . . . . . . . . . . . . . . . . . . 12
Advanced Printer Driver Functions (PC) . . . . . . . . . . . . . . . . . . 13
Paper Size . . . . . . . . . . . . . . . . . . . . . . . . . . . . . . . . . . . . . . . . . . . . . . . . . . . . . . 13
Non-printable Outer Margin . . . . . . . . . . . . . . . . . . . . . . . . . . . . . . . . . . . . . . . 13
Print Quality . . . . . . . . . . . . . . . . . . . . . . . . . . . . . . . . . . . . . . . . . . . . . . . . . . . . . 13
Disc Surface Quality. . . . . . . . . . . . . . . . . . . . . . . . . . . . . . . . . . . . . . . . . . . . . . 14
Color Matching . . . . . . . . . . . . . . . . . . . . . . . . . . . . . . . . . . . . . . . . . . . . . . . . . . 14
Ink Saturation. . . . . . . . . . . . . . . . . . . . . . . . . . . . . . . . . . . . . . . . . . . . . . . . . . . . 14
Inner Diameter . . . . . . . . . . . . . . . . . . . . . . . . . . . . . . . . . . . . . . . . . . . . . . . . . . . 14
Cartridge Alignment . . . . . . . . . . . . . . . . . . . . . . . . . . . . . . . . . . . . . . . . . . . . . 14
Center The Print Image . . . . . . . . . . . . . . . . . . . . . . . . . . . . . . . . . . . . . . . . . . . 14
Details . . . . . . . . . . . . . . . . . . . . . . . . . . . . . . . . . . . . . . . . . . . . . . . . . . . . . . . . . . 15
Enable Bi-di Printing . . . . . . . . . . . . . . . . . . . . . . . . . . . . . . . . . . . . . . . . . . . . . . 15
Using Other Graphics Programs . . . . . . . . . . . . . . . . . . . . . . . . . 16
Maintenance and Troubleshooting. . . . . . . . . . . . . . . . . . . . . . . 17
Troubleshooting the Allegro 100 . . . . . . . . . . . . . . . . . . . . . . . . . . . . . . . . . . . 17
Cleaning the Allegro 100. . . . . . . . . . . . . . . . . . . . . . . . . . . . . . . . . . . . . . . . . . 17
Transporting the Allegro 100. . . . . . . . . . . . . . . . . . . . . . . . . . . . . . . . . . . . . . . 17
Cleaning the All-in-One Ink Cartridge. . . . . . . . . . . . . . . . . . . . . . . . . . . . . . . 17
Technical Support . . . . . . . . . . . . . . . . . . . . . . . . . . . . . . . . . . . . .20
Technical Specifications. . . . . . . . . . . . . . . . . . . . . . . . . . . . . . . . 21

3
For more information visit rimage.com/support
2003751_B
Introduction
This manual provides the information needed to operate, identify the parts
of, and configure the printing preferences for the Rimage Allegro 100 disc
publishing system. To set up and install your Rimage Allegro 100, refer to
the Rimage Allegro 100 Setup and Installation Guide included with your
product.
For technical information, refer to the Rimage Allegro Series User Guide
document found at www.rimage.com/support. From the Support page
select: Autoloader & Printer Support > User Guides tab.
About This User Guide
• While we try to maintain all versions of our manuals and
documentations, please note that the English version found on our
website always contains the most up-to-date information.
• Unless otherwise indicated, all Windows navigation statements are
Windows 7 paths. Other Windows operating systems’ navigation may
dier slightly.
• These notes and symbols are used throughout the manual to help
clarify information:
Note: A Note provides supplemental information or information that may
apply only in special cases. For example, memory limitations, equipment
configurations, or details that apply to specific versions of a program
would be included in a Note.
Tip: A Tip provides techniques and procedures to help with your specific
needs. A Tip suggests alternative methods that may not be obvious and
helps you understand the benefits and capabilities of the product.
Important! An Important note provides information essential to the
completion of a task. You can disregard information in a Note or Tip and
still complete a task, but do not disregard an Important note.
Caution: A Caution indicates that failure to observe this guideline
could result in loss or damage to the equipment, product, software, or
data.
Warning! A Warning indicates that failure to follow this guideline
could result in bodily injury to personnel operating or maintaining the
equipment.
About Your Product
The Rimage Allegro 100 is part of the Desktop series of disc publishing
systems. It is a robotic-controlled system with two recorders and an
embedded inkjet printer. The Rimage Allegro 100 records and prints discs.
When the discs are finished, the Rimage Allegro 100 places them in the
output bins. The terms “printer” and “Rimage Allegro printer” are used
throughout this guide to refer to the embedded inkjet printer.
Important! Your Rimage Allegro 100 may not look exactly like the model
featured in this user guide.
The Rimage Allegro 100 operates with Rimage Software Suite. When
installed with Rimage Software Suite, the Rimage Allegro 100 can be
shared on a network, allowing all users to create discs from their desktops.
For more information about setting up and submitting orders over a
network, please contact Rimage Technical Support.

4
For more information visit rimage.com/support
2003751_B
This section provides support contact information, and cautions and
warnings, for the Rimage Allegro 100 system.
Technical Specifications for this product can be found at:
www.rimage.com/support. From the Support page select: Autoloader &
Printer Support > User Guides tab.
Support Contact Information
RIMAGE US, CANADA, LATIN AMERICA
Rimage US/Worldwide Technical Support
201 General Mills Blvd,
Golden Valley, MN 55427, USA
US: +1.800.553.8312, Option 2
International: +1.952.946.0004, Option 2
Email: [email protected]
RIMAGE EUROPE
Rimage Europe GmbH
Albert-Einstein-Str. 26
63128 Dietzenbach, GERMANY
+49 (0)6074.8521.14
Email: [email protected]
RIMAGE ASIA-PACIFIC
Rimage Japan Co., Ltd.
#38 Arai Bldg.
2-7-1 Hamamatsucho, Minato-ku
Tokyo, 105-0013 JAPAN
+81.3.6452.8780
Email: [email protected]
Rimage Information Technology (Shanghai) Co., Ltd
10B & 10C, World Plaza
855 South Pudong Road
Shanghai, 200120 CHINA
+86.21.5887.8905
Email: [email protected]
Rimage Taiwan
2F-7, No. 508, Sec. 5
Zhongxiao East Rd.
Taipei City 110, TAIWAN
+886.2.2726.0100
Email: [email protected]
Contact Rimage Services
Website: www.rimage.com/support. Log in and select the Ask Us tab.
When you contact Rimage
Services, please provide:
• System serial number and
software version
• Functional and technical
description of the problem
• Exact error message
received
Make note of your Rimage product information
below for future reference.
Note: Make sure you update the Serial Number
here if you receive a replacement system.
Serial Number:
Product Name:
Date of Purchase:
Learn More Online
At www.rimage.com/support, you can experience Rimage’s world-class
Support and Services, including:
Autoloader & Printer Support:
Firmware, documentation and videos for your Rimage systems and
Rimage Printers.
Software Suite Support:
Service packs, downloads and documentation for your Rimage Software
Suite.
Software Solutions Support:
Service packs, downloads and documentation for tailored Rimage
software solutions.
Service Offerings & Information:
Service and support information including maintenance oerings,
installation and training options, service parts lists, end of service
information, and other Rimage FAQs.
Technical Support
Rimage oers a variety of service and support options for the Allegro
100 including Rapid Exchange as well as Software Subscriptions and
Support. Please contact your Rimage Value Added Reseller or Rimage for
additional information and pricing.
Important Information

5
For more information visit rimage.com/support
2003751_B
Optical Disc Recording Software
Disclaimer
This Product, Software, or Documentation may be designed to assist
you in reproducing material for which you own the copyright or have
obtained permission to copy from the copyright owner. Unless you own the
copyright or have permission to copy from the copyright owner, you may
be violating copyright law and be subject to payment of damages and
other remedies. If you are uncertain about your rights, you should contact
your legal advisor. If you are neither in possession of the copyright nor
have authorization from the owner of the copyright, unauthorized copying
of copyrighted material on an optical disc or any other media violates
national and international law and can result in severe penalties.
Safety Information
This manual and the indications on the product allow proper and safe
operation. The indication marks below help protect you and other persons
from injury, and equipment from damage.
Warning! According to ANSI (American National Standards Institute)
standards, a warning is used to indicate situations that could result in
bodily injury to personnel operating or maintaining the equipment.
Caution: Indicates that failure to observe this guideline could result
in loss or damage to the equipment, product, software, or data.
Safety Precautions
To ensure safety, read these precautions and familiarize yourself with their
meaning before using the equipment.
Warning!
• California Prop 65 Warning: This product contains a chemical
known to the State of California to cause cancer. (California law
requires this warning to be given to customers in the State of
California.)
• An authorized technician should perform all service procedures.
• Use of controls or adjustments or performance of procedures
other than those specified herein may result in hazardous radiant
exposure.
• Ink may be harmful if swallowed. Avoid contact with eyes. Ink
contains nitrites. If ingested, seek immediate medical attention.
Keep out of reach of children.
Caution:
• To prevent fire or shock hazard, do not expose the unit to rain
or moisture. To reduce the risk of electric shock, do not remove
exterior panels. No user-serviceable parts inside. Refer servicing to
qualified service personnel. Operate the unit with only the proper
electrical specifications as labeled on the unit and AC adapter.
• This product contains a laser diode of a higher class than 1. To
ensure continued safety, do not remove any covers or attempt
to gain access to the inside of this product. Refer all servicing to
qualified personnel. The following label appears inside your unit:
Class 1 Laser Product Laser Klasse 1.
• Use of controls or adjustments or performance of procedures other
than those specified herein may result in hazardous radiation.
• All equipment with AC line voltage, or low DC voltages, such as
switches, power supplies, fuses, fans, non-stepper motors, must be
replaced with Rimage-approved components to maintain the safety
approval issued by UL.
• Use only the supplied AC power cord. For more information or to
order a new power cord, contact Rimage Customer Service.
• This product is designed for an oce environment.
• Rimage All-in-One Ink Cartridges are not licensed for modification.
• Refilling All-in-One Ink Cartridges may result in damage to the
cartridge or printer.
Important Information

6
For more information visit rimage.com/support
2003751_B
Product Name
Rimage Allegro 100
Model
RAS34
Notice for USA
NOTE: This equipment has been tested and found to comply with the limits for a Class A digital device, pursuant to part 15 of the FCC
Rules. These limits are designed to provide reasonable protection against harmful interference when this equipment is operated in
a commercial environment. This equipment generates, uses and can radiate radio frequency energy and, if not installed and used in
accordance with the instruction manual, may cause harmful interference to radio communications. Operation of this equipment in a
residential area is likely to cause harmful interference, in which case the user will be required to correct the interference at his own
expense.
This product complies with UL 60950-1+A1+A2.
Notice for Canada
This Class A digital apparatus complies with Canadian ICES-003 Issue 5:2012. Cet appareil numerigue de la classe A est conforme a la
norme NMB-003 du Canade.
This product complies with CAN/CSA-C22.2 No. 60950-1-07+A1+A2.
Notice for Europe
This product is in conformity with the EMC Directive (89/336/EEC) and the Low-Voltage Directive (73/23/EEC) through
compliance with the following European standards: EN 55032: 2012 Class A Limit; EN 55024: 2010; EN61000-3-2:2014; EN61000-
3-3:2013; EN60950-1:2006+A1:2010+A11:2009+A12:2011+A2:2013. The CE mark has been afxed in accordance with the CE Marking
Directive 93/68/EEC.
Notice for Japan
This is a Class A product based on the standard of the Voluntary Control Council for Interference by Information Technology Equipment
(VCCI). If this equipment is used in a domestic environment, radio interference may occur, in which case, the user may be required to take
corrective action.
Translation:
Notice for Korea
It is certied that foregoing equipment has been certicated under the Framework Act on Telecommunications and Radio Waves Act.
Translation:
위 기기는 전기통신기본법, 전파법 에 따라 인증되었음을 증명 합니다.
B급 기기 (가정용 정보통신기기): 이 기기는 가정용으로 전자파적합등록을한 기기로서 주거지역에서는 물론 모든지역에서 사용할
수 있습니다.
Notice for Taiwan
This is class A digital device. It may cause radio-frequency interference when used in a residential area. In this case, the users are
advised to take appropriate precautions.
Translation:
這是甲類的資訊產品,在居住的環境中使用時,可能會造成射頻干擾,在這種情況下,使用者會被要求採取某些適當的對策.
Notice for Australia
This product complies with AS/NZS CISPR32:2013.
Compliance Information

7
For more information visit rimage.com/support
2003751_B
Printer Requirements
This section describes the ink, label design, and print requirements for the
Rimage Allegro 100 system.
Ink Requirements
Important!
• Use only authentic Rimage All-in-One Ink Cartridges in the Allegro 100.
• Keep All-in-One Ink Cartridges sealed in their original packaging until
they are needed.
• Store cartridges at room temperature (60° to 78° F / 15.6° to 26.6° C).
• Store All-in-One Ink Cartridges in an upright position, not on their sides or
upside down.
• Do not remove the protective tape from a new All-in-One Ink Cartridge
until immediately before installation. After you remove the tape, do not
reapply it.
• After you have removed the protective tape, do not touch the contacts
and nozzles.
• Print discs at least once a month to keep All-in-One Ink Cartridges in
good working order.
The Rimage Allegro 100 will work only with an authentic Rimage All-in-One
Ink Cartridge.
Label Design Requirements
The Rimage Software Suite includes a label editor called CD Designer™,
which is installed on your PC during a typical installation of Rimage software.
You can use CD Designer to design your disc labels.
If you prefer to design labels in a software application other than CD
Designer, use the following criteria:
• File format: For best results, import your graphic files into CD Designer
and save your labels as .btw files. You may also print correctly sized and
formatted JPEG, TIFF or PDF files.
• Color mode: Labels imported into CD Designer must be in RGB color
mode.
• Resolution (pixels per inch): For best results, use images set to a
minimum of 300 pixels per inch.
• Label design size: Design labels with a height of 4.72 in / 120 mm and
a width of 4.72 in / 120 mm. This is the diameter of a full-size disc. The
hole is 0.59 in / 15 mm. The printable area and hub sizes may vary
between disc manufacturers.
Hub Size
0.95 in / 24 mm
Printable Area
4.65 in / 118 mm
Note: Most Rimage media has a printable area with an outside diameter
of 4.65 in / 118 mm and an inside diameter of 0.95 in / 24 mm. On most
labels, print settings of 118 mm and 24 mm are recommended. Please refer
to the image.
Print Requirements
All labels created and saved through CD Designer are in the correct file
format (.btw) for printing with the Rimage Allegro 100. If you are creating
and saving labels with a software application other than CD Designer,
save your labels as PDF files before printing with the Rimage Allegro 100.

8
For more information visit rimage.com/support
2003751_B
Identifying the Parts of the Allegro 100
This illustration shows the Rimage Allegro 100 system and its components.
Front Panel and Top
The Robotic Arm moves discs from the Input Bin, to the CD/
DVD Recorder, to the Printer, and finally to the Output Bin.
The CD/DVD Recorder is automatically loaded and unloaded
by the system’s Robotic Arm.
The Recorder Tray Button manually opens or closes the
Recorder Tray. In normal operation, the in/out movement of the
Recorder Tray is controlled automatically and this button is not
used.
The Cover is a durable plastic cover that will protect the
system from dust and interference. When the cover is opened,
the ink cartridge carriage automatically moves, if needed, into
position to allow loading of ink. It also provides access to both
internal bins to load or unload media.
The left Input/Output Bin and right Input Bin are under the
Cover of the system.
The right Input Bin can hold up to 50 discs and is the main
input bin for blank media.
The left Input/Output Bin can hold up to 50 discs. By default,
it is used as an output bin. If desired, use Rimage System
Manager software to configure the left bin for input, thereby
increasing your total input capacity to 100 discs. When doing
so, attach the External Output Bin.
The External Output Bin is used when both internal bins are
used as input. See “Using the External Output Bin” instructions.
Reject/Kiosk Area
CD/DV
D
Recorders
Front
Cover
Control Panel /
Status Lights
Ink
Cartridge
Carrier
Robotic
Disc
Transporte
r
Output Bin
Power Button
Ink Cartridge
Button
Input Bin
Recorder T
ray
Button
Power
Button
External Output
Bin and Holder
Control Panel/
Status lights
Ink Cartridge
Button
Front
Cover
Robotic Arm
CD/DVD
Recorders
Recorder
Tray Button
Input/
Output Bin
Input Bin
Output/Reject Area
Ink Cartridge
Carrier

9
For more information visit rimage.com/support
2003751_B
9
For more information visit rimage.com/support
Identifying the Parts of the Allegro 100
This illustration shows the input ports found on the rear panel of the Allegro 100.
Rear Panel
The USB 3.0 Port is connected to an open USB 3.0 port on your PC with a
USB 3.0 cable, included with your system.
The Power Input Port connects to the included power cable.
Note: Your Allegro system may come with an extra power cable. Please
use the correct power cable for your region.
Power Input
Port
Main Power
Switch
USB 3.0 Port

10
For more information visit rimage.com/support
2003751_B
Your new Allegro 100 system is an automated, precision device intended
for light-duty disc publishing. The process of duplicating and printing a CD/
DVD job on your system happens automatically for you. The following is a
complete description of that process:
1. Up to 50 blank discs may be loaded at one time into the right Input
Bin.
2. The left Input/Output Bin also has a 50 disc capacity. By default, the
left Input/Output Bin is configured for output, and should not be loaded
with discs.
3. The system’s integrated Robotic Arm will first remove any discs from
the CD/DVD recorders. It may also check the bins to determine the
number of discs. If the system state is already known, the Robotic Arm
may not move at all.
4. The Recorder Tray opens automatically and the Robotic Arm places
a disc into the CD/DVD Recorder Drive. After the disc is placed in the
recorder, the Robotic Arm checks the input stack to check that two
discs were not accidentally picked.
5. The Recorder Tray then automatically shuts. If a disc does not record
properly (meaning that all or part of that disc is not recordable), the
Robotic Arm picks it out of the Recorder Tray and sends it to the Output
Bin.
6. The CD/DVD Recorder is now writing to the disc. If you were to fully
record a CD with data, audio, video or music (650 MB), recording time
is about 3 ½ minutes each. A full DVD records in about 7-15 minutes
depending on the speed of the media to which you are recording.
Most jobs don’t fill the entire disc, so recording time is usually less than
this.
7. After recording, the Recorder Tray opens automatically. The Robotic
Arm will lift the disc out of the Recorder Tray. The Recorder Tray will
close, and the Printer Tray will open. The Robotic Arm will lower the
disc into the Printer Tray, and the Printer Tray will then automatically
close.
8. If publishing more than one disc, the
Robotic Arm
will load the
CD/DVD
Recorder Drive
with a blank disc from the Input Bin to start recording the
next round.
9. Once recording has started on the next round, printing will start with
the recorded disc from the previous round. This simultaneous printing
and recording greatly increases the throughput of your system.
10. Print time varies according to which print mode has been selected (See
“Color Matching” on page 14). In most cases, print time takes no more
than 2 minutes. After printing the first disc, the system’s
Printer Tray
opens automatically. The
Robotic Arm
moves the finished disc to the
Output Bin
.
11. The Robotic Arm will now load the second recorded disc into the
Printer Tray for printing.
12. The process starts over and repeats until all blank discs are gone or
the number of discs that you have specified via software has been
copied and printed.
Using the External Output Bin
You can increase the total input capacity of the Allegro system to 100 discs
by having the left Input/Output Bin function as a secondary input bin. To do
this, perform the following steps:
1. Attach the External Output Bin (included) according to the
instructions in the “Allegro 100 Setup and Installation Guide.” Failure
to use the External Output Bin can result in potential jamming or
scratching of discs.
2. The External Output Bin can hold up to 100 discs.
3. Use the Rimage System Manager to configure the left Input/Output
Bin as a secondary input bin.
4. Load the left Input/Output Bin with up to 50 blank discs.
The Allegro 100 will now use the left Input/Output Bin as a secondary
input bin, and the External Output Bin will collect the finished discs.
To reset the left bin to function once again as an output bin, return to the
Rimage System Manager software and reconfigure the settings.
Overview of Operation

11
Hardware Setup
For more information visit rimage.com/support2003750
Setup
This section will describe the step-by-step process of setting up your
Allegro 100 system. This includes information on how to load the supplies
(ink and disc media) necessary to start producing discs.
Load Discs
Note: Your Allegro system can print directly onto virtually any brand of
inkjet printable-surface CD/DVD media. However, dierent brands of discs
have dierent printable coatings. Because of this, you may need to adjust
the printer driver settings to accommodate your specific brand of CD/DVD
media. Refer to Advanced Printer Driver Functions on page 11 for further
printer driver information. For optimal results, use Rimage media (CDs and
DVDs), specially designed for inkjet printers.
Refer to the following steps when loading discs into the system:
1. Open the Cover of the system.
2. If needed, the system will automatically reposition the Ink Cartridge
Carrier and Robotic Arm to allow easy access to the Input Bin.
3. Load the Input Bin (the bin located on the right-hand side of the
system) with up to 50 blank discs.
4. Leave the left Input/Output Bin empty if using it for output. If you have
configured it as a secondary input bin using Rimage System Manager,
and you have attached the External Output Bin, the left Input/Output
Bin may be loaded with up to 50 blank discs for a total 100 disc input
capacity.
5. Closer the Cover to return to normal operation.

12
For more information visit rimage.com/support
2003751_B
Hardware Setup
Install the All-in-One Ink Cartridge
The Allegro 100 uses a single ink cartridge to print on your media,
supporting monochrome, spot color and full-color images.
1. Open the Cover. The Ink Cartridge Carrier will automatically move, if
needed, to the load position.
2. Open the cartridge cover by pressing down on the tab.
3. Remove the All-in-One Ink Cartridge from its packaging. Slowly
remove the tape covering the cartridge’s print head.
4. Insert the All-in-One Ink Cartridge into the Ink Cartridge Carrier,
copper end first, and snap the cartridge cover in place.
5. Close the system’s Cover.
6. You may be prompted to align the cartridge as soon as the software is
started. Follow the procedures displayed on your PC screen.
Note: An alignment print is required when you install a new All-in-One
Ink Cartridge. The software will always prompt you to align the cartridge.
Make sure that there is an unprinted disc in the Input Bin to complete this
alignment.

13
For more information visit rimage.com/support
2003751_B
Once the Rimage software has been successfully installed on your PC,
as directed by the Allegro 100 Setup & Installation Guide, you will want
to take a moment to familiarize yourself with the printer driver settings
for your system. These settings aect the print quality of your discs. The
default settings of the system’s printer driver will fit most printing needs.
Please refer to the following steps to change or verify your printer driver
options:
1. Click the Windows icon on your PC screen and choose or search for
Devices and Printers.
2. Click on the Allegro 100 icon with the right mouse button and select
Printing Preferences.
The following instructions apply to printing CD, DVD, and Blu-ray™
discs. Blu-ray is available as an option for the Allegro 100 system.
Paper Size
The Paper Size option will be set to Disc 120 mm for printing onto
printable surface CDs and DVDs.
Non-printable Outer Margin
Adjust this value to print all the way to the outer edge of a CD. This is
useful if you are printing full coverage images. As you lower this value,
the Allegro 100 will print closer to the outer edge of the CD. Please note
that with most media, the printable surface does not extend all the way
to the edge of the disc.
Print Quality
This setting has the most dramatic eect on the quality, speed and ink
usage of the print. Color matching also aects print quality. Start with the
Advanced Printer Driver Functions (PC)

14
For more information visit rimage.com/support
2003751_B
default setting, and select from the available settings to adjust the print
quality, speed, and ink coverage to your preferences for printing.
Disc Surface Quality
This setting enables a finer adjustment to each of the “Print Quality”
settings in the previous paragraph.
Color Matching
Best for Graphics mode is best used for graphical images where
accurate color reproduction is not as essential. Images printed in this
mode will look more vibrant because more ink is being used to produce
them. However, printing images of people may produce skin tones that
have a reddish tint.
Best for Photos mode is best used for photographic images where
accurate color reproduction is very essential. Images printed in this
mode will look lighter than those printed in Graphics mode. Skin tones
especially will look more natural in this mode.
Note: Exact color matching of the printed discs to the screen may never
be possible because there are factors aecting color that are out of the
printer driver’s control. The surface of the disc reacts with the ink in the
cartridge to produce the color. For this reason, when printing the same
image to dierent types of discs with dierent surfaces, the printed output
can look dierent.
Ink Saturation
This option controls the ink saturation of the printed image. When
printing onto some brands of printable discs, you may need to adjust this
control in order to optimize the ink saturation for the printable surface of
your specific media. If discs do not seem to be drying completely, it may
be necessary to reduce this value.
Inner Diameter
This value changes the size of the non-printed center. Larger numbers
cause the non-printed center to be larger, and smaller numbers make
the non-printed center smaller. This number is incremented by 0.1 mm, so
a change of 10 for inner diameter changes the diameter by 1 mm.
Inner Diameter Non-Printed Diameter
0.905 in / 24 mm (Default)
0.591 in / 15 mm (This is the size of the hole in the center of the disc.
Inner diameter cannot be adjusted lower than this.)
Cartridge Alignment
The Cartridge Alignment prints a test print and then automatically scans
the print to configure your printer for bidirectional printing and to align
the color cartridge. It is important to perform this calibration every time
you change a cartridge. If you forget to perform this calibration, you will
be prompted to do so before your first print from the new cartridge.
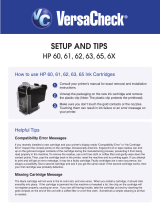
Center The Print Image
Note: Your printer comes from the factory pre-calibrated to print the
image in the center of the CD. You can use this adjustment if you need to
fine-tune this location.
If you ever wish to verify your factory-calibrated Vertical and Horizontal
calibration settings, you can run a simple calibration procedure to
ensure that your images will be centered when printed on a CD. To do
this, refer to the following steps:
1. Verify that a disc and an All-in-One Ink Cartridge are installed in the
system. It is important to use the same brand of disc that you normally
use for your publishing, because dierent brands of discs may vary
slightly in size. Also, verify that the system is powered ON and that it is
connected to your computer.
2. Click on Center the Print Image and then click the Properties button.
The printer will begin printing the calibration test print.
3. When the print is complete, rotate the same disc 180º and put the disc
back in the Input Bin and repeat Step 2 using the same disc.
4. When the second run of the print is complete, you should have a test
print that looks similar to the following:
Advanced Printer Driver Functions (PC)

15
For more information visit rimage.com/support
2003751_B
-5 -4 -3 -2 -1 0 1 2 3 4 5
5 4 3 2 1 0 -1 -2 -3 4 -5
Horizontal Calibration
Find and enter the number
whose lines tough
(must be the SAME number)
Vertical Calibration
Find and enter the number
whose lines tough
(must be the SAME number)
NOTE:
After printing this image
once, rotate this CD
so the ARROWS point
to the BACK of the printer
and print again.
-5
-4
-3
-2
-1
0
1
2
3
4
5
5
4
3
2
1
0
-1
-2
-3
-4
-5
BACK
BACK
5. Along the vertical axis of the printed disc, find the number whose lines
touch. For example, in the above illustration, enter the number 2 into
the Vertical box of the Calibration window and 0 for the Horizontal
axis.
6. Select the OK button. Your images should now be centered when
printed on a disc. After your selections have been made, close out of
the Printer Setup window. You are now ready to go to an application
program and print. All printer driver selections will stay the same until
you change them; powering o the printer does not aect the settings.
Details
Select this button to display the current ink levels as well as options for
cleaning and changing the All-in-One Ink Cartridge.
Details
Select the Details button for information on the drivers, firmware,
alignment and number of discs printed with your Allegro 100 system.
Click Reset Factory Default to set all print centering and cartridge
alignment settings back to factory defaults.
Enable Bi-di Printing
Your Allegro 100 system supports bi-directional printing. When
bi-directional printing is enabled, the print head moves quickly from
left to right, then right to left, which requires precise alignment. When
bi-directional printing is not enabled, all printing is done in one direction,
which operates more slowly but does not require cartridge alignment.
Set the “Enable Bi-di Printing” option to Ye s for faster printing that
requires cartridge alignment. Set it to No for slower printing that does not
require cartridge alignment.
Advanced Printer Driver Functions (PC)

16
For more information visit rimage.com/support
2003751_B
While CD Designer will handle most labeling needs, other graphics
programs can be used if you prefer.
When printing and burning using other Rimage software than CD Designer,
your system will support the following additional standard label image file
formats: BMP, TIFF, JPEG, GIF, PNG, PRN, and PDF. These formats can be
exported from most standard graphics software, such as Adobe Photoshop
or Illustrator.
When creating images in other graphics programs, we recommend
creating a 4.72 in x 4.72 in (120 mm x 120 mm) square image with a
minimum resolution of 300 dpi.
Using Other Graphics Programs

17
For more information visit rimage.com/support
2003751_B
Troubleshooting the Allegro 100
The Rimage Software Suite monitors the functions of your Allegro system,
and will alert you to any errors or situations requiring your attention.
Use the Rimage System Manager to monitor your system’s functions. To
troubleshoot any problems, please follow the on-screen prompts from
the Rimage System Manager software. If needed, additional assistance
with the software can be found in the Help section of the Rimage System
Manager software or on the Rimage website at:
www.rimage.com/support.
Cleaning the Allegro 100
Note: Do NOT attempt to oil or grease the Allegro 100’s Robotic Arm shaft
or other components. You will likely cause more harm than good! Any
moving parts are designed to operate for the life of the machine with no
additional lubrication required.
Use a clean, lint-free rag with a small amount of ammonia window cleaner
to clean the system’s outside case and trays. This type of cleaner is
very eective on inks that may accumulate on the Printer Tray. Stronger
cleaning solutions are NOT recommended because they may damage the
paint and plastic materials from which the parts are manufactured. Always
disconnect your system’s power cords before cleaning. Resume operation
only after the surfaces are completely dry.
Transporting the Allegro 100
To prevent damage to the Allegro 100’s Robotic Arm during shipment, it is
important to properly secure it.
To prepare for transport, remove the ink cartridges and Bins, close the
Cover and then do the following:
1. With the Cover closed, switch o both the Power Button on the top of
the Allegro 100 and the Main Power Switch on the back of the unit.
2. Press and hold the Ink Cartridge Button.
3. While continuing to hold the Cartridge Button, switch on power to the
unit by switching on both the Power Button and the Main Power Switch
on the back.
4. Continue to hold the Ink Cartridge Button for five seconds. After
several more seconds, the robotics will undock and the Robotic Arm
will lower. Power will shut o automatically once the robotics are in
transport position.
5. If you have the cardboard spacer that was shipped with the unit,
replace the spacer inside the unit and close the Cover. If you don’t
have the cardboard spacer, secure the Robotic Arm and cartridges to
the sides of the unit with tape and close the Cover.
Cleaning the All-in-One Ink Cartridge
It may be necessary to clean the ink cartridge nozzles if you notice
reduced print quality, or if you suspect that a cartridge nozzle has become
slightly dried out or clogged. If the cartridge has been left out of the
Allegro 100 more than 30 minutes, the ink in the printhead nozzles may
have dried. If you are having print quality problems, follow the steps
below:
1. First, check the Rimage System Manager to ensure that the ink level
in the cartridge is more than 10%. If the ink level is lower than 10%,
replace the cartridge.
2. If the ink level is above 10%, you will need to clean the cartridge.
Maintenance and Troubleshooting

For more information visit rimage.com/support
2003751_B
18
3. Prepare items needed for procedure.
Two Paper Towels Glass of Water
(folded four times each)
4. Soak the paper towels in water for 5 seconds.
Note: Do not squeeze water from paper towels after removing from
water.
5. Place one paper towel on printhead nozzles.
Printhead Nozzles
6. Gently press paper towel with finger.
7. Leave the paper towel on the printhead nozzles for 30-40 seconds.
Maintenance and Troubleshooting

For more information visit rimage.com/support
2003751_B
19
8. Remove the paper towel from the printhead nozzles and discard.
9. Place the second paper towel on a flat/hard surface that cannot be
damaged by moisture.
10. Firmly press the printhead nozzles into the paper towel and drag the
printhead in the direction indicated in the following diagram:
11. After wiping the printhead nozzles, the paper towel should show all
three colors, as shown in the following diagram:
12. If all three colors are present, proceed to Step 13. If the paper towel
doesn’t show all three colors, then repeat Steps 3-11. If paper towel still
does not show all three colors repeating Steps 3-11, then replace the
cartridge.
13. Ensure that the printhead and printhead contacts are completely dry
by dabbing gently with a dry, lint-free cloth or paper towel. Printer
damage may result if the printhead contacts are not completely dry.
Printhead Nozzles Printhead Contacts
14. Clean the printhead by doing the following steps:
• Reinstall the printhead.
• Print a test disc
Maintenance and Troubleshooting
/