Triumph Adler fax 950 Operating instructions
- Category
- Multifunctionals
- Type
- Operating instructions
This manual is also suitable for

UTAX LF 85
your office partner
INSTRUCTION HANDBOOK
please read the instruction handbook
carefully before using this machine. keep it
close to the machine for easy reference.

Windows™ and MS-DOS® are registered trademarks of Microsoft
Corporation.
IBM and IBM PC/AT are registered trademarks of International
Business Machines, Inc.
Centronics is a registered trademark of Centronics Corporation.
HP PCL is a trademark of Hewlett-Packard Corporation.
Symantec and WinFax Pro are registered trademarks of Symantec
Corporation.
Adobe and Photoshop are trademarks of Adobe Systems
Incorporated.
Xerox and TextBridge are trademarks of Xerox Corporation.
All other company and product names are trademarks or registered
trademarks of their respective company.

As an ENERGY STAR Partner, UTAX (UTAX GmbH) has determined
that this product meets the ENERGY STAR guidelines for energy efficiency.
The ENERGY STAR program is an energy reduction plan introduced by the
United States Environmental Protection Agency in response to environmental
issues and for the purpose of advancing the development and utilization of
more energy efficient office equipment.
* ENERGY STAR is a U.S. registered mark.

Important! Please read first.
This section contains notes and cautions which
should be read prior to using the facsimile for the
first time in order to ensure safe and proper
operation of this facsimile.
Fax Operation (Basic)
This section contains explanations from setting
paper through to basic fax operation. The
procedure in this section on setting paper should
be read even if this fax unit is to be used as a
printer or for copying purposes.
Various Copy Functions
This section contains information on procedures to
make copies from your originals. A number of
convenient copying modes, such as Standard
copying, Group copying, Sort copying and Duplex
copying are available.
Fax Operation (Various functions)
This section contains explanations of transmission
and reception procedures which are somewhat
more elaborate than the basic operation and
include communications which use the timer, as
well as broadcast transmission which allows
automatic transmission of the same document to
multiple destinations.
Replacing Consumables and Maintenance
This section contains explanations on replacing the
imaging unit and the toner cartridge, as well as
cleaning inside the facsimile.
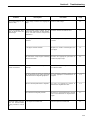
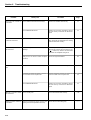
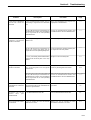
Troubleshooting
This section contains explanations on handling
problems which may occur during daily operation of
your facsimile such as communications errors and
paper jams, as well as information on
troubleshooting procedures.
Fax Operation (Other functions)
This section contains explanations on somewhat
more complicated functions of the facsimile which,
through their use, can make the facsimile an even
more convenient tool.
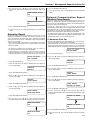
Management Report/List Print Out
This section contains explanations on how to print
out the various management reports and lists
which contain important information about fax
communications and facsimile settings.
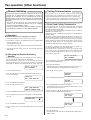
Other Settings and Registration
This section contains explanations on certain
settings which the user can adjust themselves.
Refer to this section to change default settings.
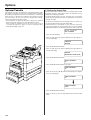
Options
This section contains explanations on use when
one or more of the available options is installed in
this facsimile. The options available for use with
this fax are: the Optional Cassette, the RS-232C
board, the Printer board and the Dual Line Kit.
Reference
This section contains information on operation flow,
error code explanations and machine
specifications.
Using this Instruction Handbook
Operational procedures and explanations have been separated into different sections in order to allow
those using a facsimile for the first time, as well as those familiar with fax operation, to use this facsimile
efficiently and properly and with relative ease. A basic introduction to each section can be found below for
reference.

Please read the instruction handbook before using the facsimile.
Keep it close to the facsimile for easy reference.
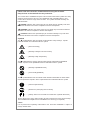
The sections of this handbook and parts of the facsimile marked with symbols are safety
warnings meant to protect the user, other individuals and surrounding objects, and
ensure correct and safe usage of the facsimile. The symbols and their meanings are
indicated below.
DANGER: Indicates that serious injury or even death will very possibly result from
insufficient attention to or incorrect compliance with the related points.
WARNING: Indicates that serious injury or even death may result from insufficient
attention to or incorrect compliance with the related points.
CAUTION: Indicates that personal injury or mechanical damage may result from
insufficient attention to or incorrect compliance with the related points.
Symbols
The symbol indicates that the related section includes safety warnings. Specific
points of attention are indicated inside the symbol.
...........[General warning]
...........[Warning of danger of electrical shock]
...........[Warning of high temperature]
The symbol indicates that the related section includes information on prohibited
actions. Specifics of the prohibited action are indicated inside the symbol.
...........[Warning of prohibited action]
...........[Disassembly prohibited]
The
● symbol indicates that the related section includes information on actions which
must be performed. Specifics of the required action are indicated inside the symbol.
...........[Alert of required action]
...........[Remove the power plug from the outlet]
...........[Always connect the facsimile to an outlet with a ground connection]
Please contact your service representative to order a replacement if the safety warnings
in the handbook are illegible or if the handbook itself is missing. (fee required)
<Note>
Due to performance updating, information in this instruction handbook is subject to
change without notice.

I
Contents
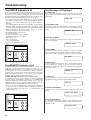
The ERROR Indicator is Lit ...................................6-2
The MEMORY Indicator is Lit................................6-2
This Message is Displayed....................................6-2
A Power Failure Report is Printed Out.................6-3
Paper has Jammed ................................................6-4
A Document or Original has Jammed..................6-7
Troubleshooting Tables ........................................6-8
Section 6 Troubleshooting
6HFWLRQ Replacing Consumables and
Maintenance
Replacing the Toner Cartridge..............................5-2
Replacing the Imaging Unit...................................5-4
Cleaning Inside the Facsimile...............................5-5
(1) Cleaning the Main Charger............................5-5
(2) Cleaning the Document Scanning Section....5-6
6HFWLRQImportant! Please read first.
6HFWLRQ Fax Operation (Basic)
6HFWLRQ Making Copies
CAUTION LABELS ..........................................1-2
INSTALLATION PRECAUTIONS.....................1-2
PRECAUTIONS FOR USE...............................1-3
Names of Parts.......................................................2-2
(1) Main Body......................................................2-2
(2) Operation Panel.............................................2-4
Preparation .............................................................2-6
(1) Caution On Moving the Fax Unit ...................2-6
(2) Attaching the included seals..........................2-6
(3) Setting Paper.................................................2-6
(4) Connecting the Power Cord ..........................2-7
(5) Warm Up .......................................................2-7
Functions and Features of this Facsimile ...........2-8
(1) Initial Mode ....................................................2-8
(2) File Number...................................................2-8
(3) F-Code Based Communication .....................2-8
(4) Dual Access...................................................2-9
(5) Duplex Fax Reception ...................................2-11
(6) Batch Transmission.......................................2-11
(7) ECM (Error Correction Mode)
Communication............................................2-11
(8) Password Check Reception
(Restricted Communication) ........................2-11
(9) Auto Shut-Off Function..................................2-11
(10) Auto Clear Function.....................................2-11
(11) Memory Reception ......................................2-11
(12) Memory Back-Up Function..........................2-11
Sending Documents (Auto Fax Transmission) ...2-12
Receiving Documents (Auto Fax Reception) ......2-17
Canceling a Communication.................................2-18
One-Touch Keys.....................................................2-19
(1) Registering ....................................................2-19
(2) Modifying and Deleting..................................2-20
(3) Printing Out the One-Touch Key and
Abbreviated Number Lists............................2-20
● Entering Characters...........................................2-21
Abbreviated Numbers............................................2-22
(1) Registering ....................................................2-22
(2) Modifying and Deleting..................................2-23
(3) Dialing............................................................2-24
Directory .................................................................2-25
Redialing Functions...............................................2-26
(1) Automatic Redialing.......................................2-26
(2) Manual Redialing...........................................2-26
Standart Copying and Group Copying.................3-2
Sort Copying...........................................................3-3
Duplex Copying (1-sided to 2-sided)....................3-4
Duplex Copying (2-sided to 2-sided)....................3-5
Duplex Copying (2-sided to 1-sided)....................3-6
6HFWLRQ Fax Operation
(Various Functions)
Standby Transmission...........................................4-2
Interrupt Transmission..........................................4-2
Communication Using the Timer..........................4-2
Broadcast Transmission .......................................4-3
Manual Fax Transmission .....................................4-4
Manual Fax Reception ...........................................4-4
Auto FAX/TEL Switching.......................................4-5
TAD Reception .......................................................4-6

II
Contents
Remote Switching..................................................7-2
(1) Operation.......................................................7-2
(2) Changing the Remote Switching Number .....7-2
Polling Communication.........................................7-2
(1) Polling Transmission .....................................7-2
(2) Memory Polling Transmission .......................7-3
(3) Polling Reception...........................................7-3
(4) Continuous Polling Reception .......................7-4
(5) Reverse Polling .............................................7-5
(6) F-Code Based Confidential Polling
Reception.....................................................7-5
(7) Storing Documents in a Confidential Box
(F-Code Based Confidential Polling
Transmission) ..............................................7-6
F-Code Based Confidential Communication.......7-7
(1) Registering Confidential Boxes .....................7-7
(2) Deleting Confidential Boxes ..........................7-8
(3) F-Code Based Confidential Transmission.....7-8
(4) Printing Out Documents from
a Confidential Box........................................7-9
(5) Printing Out a Confidential Box Report..........7-10
(6) Printing Out a Confidential File List ...............7-10
F-Code Based Relay Broadcast Transmission ...7-11
(1) Registering Relay Boxes ...............................7-11
(2) Deleting Relay Boxes ....................................7-12
(3) Sending Documents ......................................7-13
(4) Printing Out a Relay Box Report ...................7-13
Encryption Communication ..................................7-14
(1) Registering and Modifying Encryption
Keys.............................................................7-14
(2) Required Operation .......................................7-15
(3) Printing Out an Encryption Key List...............7-15
Fax Forwarding ON/OFF........................................7-16
Group Dial Keys .....................................................7-16
(1) Registering ....................................................7-16
(2) Modifying and Deleting..................................7-17
(3) Dialing with a Group Dial Key........................7-18
(4) Printing Out a Group Dial List........................7-18
Chain Dial Keys......................................................7-18
(1) Registering ....................................................7-18
(2) Modifying and Deleting..................................7-19
(3) Using a Chain Dial Key..................................7-20
(4) Printing Out a Chain Dial List ........................7-20
Program Keys.........................................................7-20
(1) Registering ....................................................7-20
(2) Modifying and Deleting..................................7-24
(3) Using a Program Key ....................................7-25
(4) Printing Out a Program Dial List....................7-25
6HFWLRQ Fax operation (Other functions)
Restricted Access..................................................7-25
(1) Restricted Access ON/OFF ...........................7-26
(2) Registering Department Codes .....................7-26
(3) Deleting Department Codes ..........................7-27
(4) Message Display in the Initial Mode
(Restricted Access is Turned ON) .................7-27
(5) Entering Your Access Code ..........................7-28
(6) Printing Out the Department List ...................7-28
(7) Changing the Management Password ..........7-28
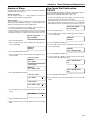
Activity Report........................................................8-2
(1) Automatic Print Out .......................................8-2
(2) Manual Print Out............................................8-2
Transmission Report .............................................8-2
Reception Report ...................................................8-3
Delayed Communication Report
(Memory Entry Report) ........................................8-3
(1) Automatic Print Out .......................................8-3
(2) Manual Print Out............................................8-4
User Setting List.....................................................8-4
Confirmation Report ..............................................8-4
Restricted Access Report .....................................8-5
(1) Automatic Print Out .......................................8-5
(2) Manual Print Out............................................8-5
6HFWLRQ Management Report/List Print
Out
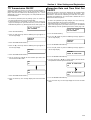
Setting the Date and Time.....................................9-2
Registering your Self-station Information
(fax number and name)........................................9-2
TTI Transmission ON/OFF.....................................9-3
Reception Date and Time Print Out ON/OFF .......9-3
Add Sample Image on Reports ON/OFF ..............9-4
Message Display and Reports/Lists Language...9-4
Password Check Reception ON/OFF ...................9-5
Speaker Monitor Volume.......................................9-5
Alarm ON/OFF ........................................................9-6
Speaker Monitor ON/OFF ......................................9-6
Bulletin Board Function ON/OFF..........................9-7
Super Fine Function ON/OFF................................9-7
Setting the Paper Size ...........................................9-8
Duplex Fax Reception ON/OFF.............................9-8
Number of Rings ....................................................9-9
One-Touch Dial Confirmation ON/OFF.................9-9
Changing the Automatic Reception Mode...........9-10
Auto Shut-Off Time ................................................9-10
Remote Diagnosis ON/OFF ...................................9-11
6HFWLRQ Other Settings and
Registration

III
Contents
Optional Cassette ...............................................10-2
(1) Setting the Paper Size................................10-2
(2) Setting the Paper Feed Selection Mode.....10-3
RS-232C Board....................................................10-4
(1) Names of Parts...........................................10-4
(2) Functions of the RS-232C Board................10-4
(3) Precautions.................................................10-4
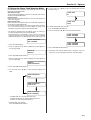
(4) Connecting the Fax to Your Computer.......10-5
(5) RS-232C Mode ON/OFF ............................10-5
(6) PC-Fax Reception ON/OFF........................10-6
(7) Recommended Computer Environment .....10-6
(8) Installing the TWAIN system ......................10-6
(9) Recommended Applications.......................10-7
(10) Setting the Scanning Parameters.............10-7
(11) Scanning...................................................10-7
(12) Error Messages ........................................10-7
(13) Removing the TWAIN system ..................10-8
Printer Board .......................................................10-9
● Windows 95/98 ...........................................10-9
(1) Names of Parts...........................................10-9
(2) Connecting the Printer to Your Computer ..10-9
(3) Required Computer environment ...............10-9
(4) Installing the Printer Driver Software..........10-9
(5) Connecting to the Printer in Windows 95/98
and Making a Test Print............................10-10
(6) Setting the Printing Parameters..................10-10
(7) Managing the Printing Process...................10-11
(8) Removing the Printer Driver .......................10-12
(9) Cautions when Printing...............................10-12
● Windows NT4.0...........................................10-13
(1) Names of Parts...........................................10-13
(2) Connecting the Printer to Your Computer ..10-13
(3) Required Computer Environment...............10-13
(4) Installing the Printer Driver Software..........10-13
(5) Connecting to the Printer in
Windows NT4.0 and Making a Test Print .10-13
(6) Setting the Printing Parameters..................10-13
(7) Managing the Printing Process...................10-14
(8) Removing the Printer Driver .......................10-15
(9) Cautions when Printing...............................10-16
● Windows 3.1 ...............................................10-16
(1) Names of Parts...........................................10-16
(2) Connecting the Printer to Your Computer ..10-16
(3) Required Computer Environment...............10-16
(4) Installing the Printer Driver .........................10-16
(5) Connecting to the Printer in Windows 3.1 ..10-16
(6) Setting the Printing Parameters..................10-17
(7) Managing the Printing Process...................10-18
(8) Removing the Printer Driver .......................10-19
(9) Cautions when Printing...............................10-19
6HFWLRQ Options
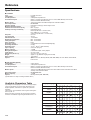
Specifications.......................................................11-2
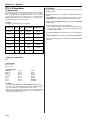
Available Characters Table .................................11-2
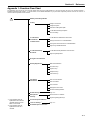
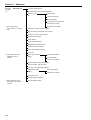
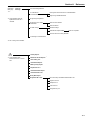
Appendix 1: Function Flow Chart.......................11-3
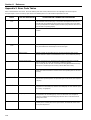
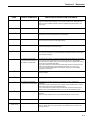
Appendix 2: Error Code Tables ..........................11-6
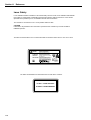
LASER SAFETY....................................................11-8
6HFWLRQ Reference
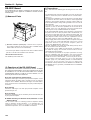
PCL 4.5 Emulation ..............................................10-20
(1) Description..................................................10-20
(2) Printing .......................................................10-20
Dual Line Kit ........................................................10-21
(1) The Dual Line Function ..............................10-21
(2) Names of Parts...........................................10-21
(3) Registering your Self-station Information
(fax number and name) (2nd line) ............10-22
(4) Transmission Line Priority ON/OFF
(2nd line)...................................................10-22
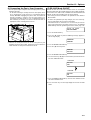
(5) Canceling a Communication (2nd line).......10-23
(6) Number of Rings (2nd line).........................10-24
(7) Changing the Automatic Reception
Mode (2nd line).........................................10-24
(8) Fax Forwarding ON/OFF (2nd line)............10-25
(9) Registering and Deleting Confidential
Boxes(2nd line).........................................10-25
(10) Printing Out Documents from
a Confidential Box (2nd line)...................10-26
(11) Registering and Deleting Relay Boxes
(2nd line).................................................10-26

6HFWLRQ
Important! Please read first.
1-1

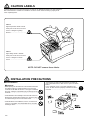
INSTALLATION PRECAUTIONS
1-2
CAUTION LABELS
Caution labels have been attached to the facsimile at the following locations for safety purposes.
BE SUFFICIENTLY CAREFUL to avoid fire or electric shock when removing a paper jam or
when replacing toner.
Label 2
High temperature inside. Do not
touch parts in this area, because
there is a danger of getting
burned. ........................................
Label 1
High voltage inside. NEVER
touch parts in this area, because
there is a danger of electric
shock. .........................................
NOTE: DO NOT remove these labels.
■ Environment
CAUTION
• Avoid placing the facsimile on or in locations which are
unstable or not level. Such locations may cause the
facsimile to fall down or fall over. This type of situation
presents a danger of personal injury or damage to the
facsimile. .......................................................................
•
Avoid locations with humidity or dust and dirt. If dust or
dirt become attached to the power plug, clean the plug
to avoid the danger of fire or electrical shock.
................
• Avoid locations near radiators, heaters, or other heat
sources, or locations near flammable items, to avoid
the danger of fire. ..........................................................
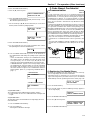
• To keep the facsimile cool and facilitate changing of
parts and maintenance, allow access space as shown
below.
Leave adequate space, especially around the left
cover, to allow air to be properly ventilated out of the
facsimile. .......................................................................

1-3
INSTALLATION PRECAUTIONS
Other precautions
• Adverse environmental conditions may affect the safe
operation and performance of the facsimile. Install in
an air-conditioned room (recommended room
temperature: around 20°C, humidity: around 65%RH)
and avoid the following locations when selecting a site
for the facsimile.
.
Avoid locations near a window or with exposure to
direct sunlight.
.
Avoid locations with vibrations.
.
Avoid locations with drastic temperature fluctuations.
.
Avoid locations with direct exposure to hot or cold air.
.
Avoid poorly ventilated locations.
■ Power supply/Grounding the facsimile
WARNING
• DO NOT use a power supply with a voltage other than
that specified. Avoid multiple connections in the same
outlet. These types of situations present a danger of
fire or electrical shock. ..................................................
■ Cautions when using the facsimile
WARNING
• DO NOT place metallic objects or containers with
water (flower vases, flower pots, cups, etc.) on or near
the facsimile. This type of situation presents a danger
of fire or electrical shock should they fall inside.............
• DO NOT remove any of the covers from the facsimile
as there is a danger of electrical shock from high
voltage parts inside the facsimile...................................
• DO NOT damage, break or attempt to repair the power
cord. DO NOT place heavy objects on the cord, pull it,
bend it unnecessarily or cause any other type of
damage.
These types of situations present a danger of fire or
electrical shock. .............................................................
• NEVER attempt to repair or disassemble the facsimile
or its parts as there is a danger of fire, electrical shock
or damage to the laser. If the laser beam escapes,
there is a danger of it causing blindness. ......................
• If the facsimile becomes excessively hot, smoke
appears from the facsimile, there is an odd smell, or
any other abnormal situation occurs, there is a danger
of fire or electrical shock. Remove the power plug from
the outlet immediately and contact your service
representative................................................................
• If anything harmful (paper clips, water, other fluids,
etc.) falls into the facsimile, remove the power plug
from the outlet immediately to avoid the danger of fire
or electrical shock. Then contact your service
representative. ..............................................................
• DO NOT remove or connect the power plug with wet
hands, as there is a danger of electrical shock. ............
• For safety purposes, ALWAYS remove the power plug
from the outlet when cleaning the main charger. ..........
• ALWAYS contact your service representative for
maintenance or repair of internal parts..........................
• Plug the power cord securely into the outlet. If metallic
objects come in contact with the prongs on the plug, it
may cause a fire or electric shock. ................................
• Always connect the facsimile to an outlet with a ground
connection to avoid the danger of fire or electrical
shock in case of an electric short. If an earth
connection is not possible, contact your service
representative. ..............................................................
Other precautions
• DO NOT connect the facsimile to the same outlet as
an air conditioner or copier, etc.
• Connect the power plug to the closest outlet possible
to the facsimile.
■ Handling of plastic bags
WARNING
• Keep the plastic bags that are used with the facsimile
away from children. The plastic may cling to their
nose and mouth causing suffocation. ..........................
PRECAUTIONS FOR USE

1-4
PRECAUTIONS FOR USE
CAUTION
• DO NOT pull the power cord when removing it from
the outlet. If the power cord is pulled, the wires may
become broken and there is a danger of fire or
electrical shock. (ALWAYS grasp the power plug
when removing the power cord from the outlet.)...........
• ALWAYS remove the power plug from the outlet when
moving the facsimile. If the power cord is damaged,
there is a danger of fire or electrical shock. ..................
•
ALWAYS hold the designated parts only when lifting or
moving the facsimile.
....................................................
• If dust accumulates within the facsimile, there is a
danger of fire or other trouble. It is therefore
recommended that you consult with your service
representative in regard to cleaning of internal parts.
This is particularly effective if accomplished prior to
seasons of high humidity. Consult with your service
representative in regard to the cost of cleaning the
internal parts of the facsimile.........................................
• For safety purposes, ALWAYS remove the power plug
from the outlet when performing cleaning operations...
Other precautions
• DO NOT place heavy objects on the facsimile or cause
other damage to the facsimile.
• DO NOT open the front cover or pull out the power
plug while transmitting, receiving, or copying.
•
During print out, some ozone is released, but the
amount does not cause any ill effect to one's health. If,
however, the facsimile is used over a long period of time
in a poorly ventilated room or when making an extremely
large number of copies, the smell may become
unpleasant. To maintain the appropriate environment for
the facsimile, it is suggested that the room be properly
ventilated.
• The facsimile may only be used within the country of
purchase due to the different safety and
communication standards in each country.
(International communication standards, however,
make the communication between countries possible.)
• The facsimile may be inoperable in areas with poor
telephone lines or communication conditions.
• “CALL WAITING” or other telephone company optional
services that produce audible tones or clicks on the
line can disrupt or cause termination of facsimile
communications.
• DO NOT touch electrical parts, such as connectors or
printed circuit boards. They could be damaged by
static electricity.
• DO NOT attempt to perform any operations not
explained in this handbook.
• CAUTION: Use of controls or adjustments or
performance of procedures other than those specified
herein may result in hazardous radiation exposure.
• Return used battery to point of sales.
■ Cautions when handling
consumables
CAUTION
• Avoid inhalation, ingestion, skin or eye contact. If
ingestion occurs, dilute stomach contents thoroughly
with water and seek medical treatment. If skin contact
occurs, wash with soap and water. If contact with eyes
occurs, flush thoroughly with water and seek medical
treatment........................................................................
• Prolonged inhalation of excessive dusts may cause
lung damage. Use of this product, as intended, does
not result in inhalation of excessive dusts. ...................
• Do not incinerate toner and toner containers.
Dangerous sparks may cause burn...............................
• Keep away from children. ..............................................
Other precautions
• Always read the safety instructions which are included
in the box or printed on the container when handling
consumables.
• Dispose of the imaging unit in accordance with
Federal, State and Local rules and regulations.
• Store consumables in a cool, dark location.

6HFWLRQ
Fax Operation (Basic)
2-1

Names of Parts
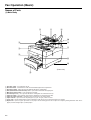
(1) Main Body
2-2
Fax Operation (Basic)
1 Operation panel…Use to operate the fax.
2 Document table…Set documents to be transmitted and originals to be copied here.
3 Document guides…Adjust to match the width of documents and originals.
4 ADF (Automatic Document Feeder) cover…Open when a document or original jams.
5 Main body release button…Press to open the facsimile.
6 Document eject tray…Once ejected, documents and originals are stacked on this tray.
7 Paper eject table…Once ejected, received faxes and copies are stacked on this table.
8 Paper eject table extension…Fold open when receiving faxes or making copies.
9 Paper cassette…Up to 500 sheets of plain paper (75 g/m
2
- 80 g/m
2
) can be set here.
0 Cover plate…Flip the attached cover plate up or down in order to access the desired one-touch key number.
! Duplex unit…Open if a paper jam occurs in the paper cassette during print out of a Duplex fax reception (printing onto both sides of the
paper) or when making Duplex (2-sided) copies.
13
2
0
4
7
!
%
8
5
9
6
(Front view)

2-3
6HFWLRQ Fax Operation (Basic)
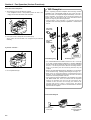
@ Imaging unit…This unit plays a major role in creating the image on received faxes and copies. When a message is displayed which tells
you to replace the imaging unit, replace the old unit with a new one.
# Toner cartridge…When a message telling you to replace the toner cartridge is displayed, replace the old unit with a new one.
$ Toner cartridge release lever…Use this lever when replacing the toner cartridge.
% Fax moving handles…Hold these handles when moving the facsimile.
^ Telephone jack…Use this jack to connect a separately purchased telephone.
* This jack is not available on those units purchased in the Netherlands and Ireland.
& Line jack…Use this jack to connect the fax to a telephone line with the modular cord.
* Power receptacle…Connect the power cord here.
%
^
&
*
$
@
#
(Rear view)
(Internal view)

2-4
6HFWLRQ Fax Operation (Basic)
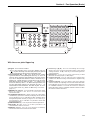
1 STOP key…Press to stop operations in progress, revert to the
initial mode, or eject documents from the ADF (Automatic
Document Feeder).
2 COPY/SPACE key…Press in order to make copies or to change a
character into a space during input of the other party’s name or fax
number.
3 START key…Press to start fax transmission, manual fax reception
or other operations.
4 CLEAR/ON-HOOK key…Press to erase a registered fax number
or other data when registering and cancelling data under a given
function or to dial without the need to pick up the telephone
receiver.
5 ON-HOOK indicator…Lit when the CLEAR/ON-HOOK key has
been pressed while the telephone receiver is still “on the hook”.
6 PAUSE/REDIAL key…Press to redial the last number dialled.
Press also while registering a fax number under an abbreviated
number or one-touch key in order to insert a pause of a few
seconds at that point in dialling.
7 ABBR./DIRECTORY key…Press to dial with abbreviated numbers
or to search the directory for names that are registered under
abbreviated numbers.
8 Message display…Displays the present date, time, operation
procedures and trouble, etc.
9 Resolution select key…Press to select the degree of resolution
most suitable to the documents being transmitted or the originals
being copied.
0 Resolution indicators…The uppermost indicator (PHOTO
MODE) is for the photograph mode, the middle indicator (SUPER
FINE) is for the Super Fine mode, and the lowermost indicator
(FINE) is for the Fine mode. Press the resolution select key to light
the resolution indicator corresponding to the desired mode. When
all of the indicators are out, the fax is in the Normal mode. (Refer
to page 2-13.)
! Reception mode select key…Press to select the desired
reception mode.
@ Reception mode indicators…The uppermost indicator
(MESSAGE TEL.) is for the TAD (message telephone) reception
mode. The bottom indicator (MANUAL RX.) is for the Manual fax
reception mode. When using a separately purchased telephone
with message telephone capabilities in conjunction with the fax,
press the reception mode select key until the MESSAGE TEL.
indicator lights. The Auto fax reception mode is the default setting
in this fax and, in this case, both indicators are out. When using
the Manual fax reception mode with a separately purchased
telephone connected to the facsimile, make sure the MANUAL RX.
indicator is lit.
# FUNCTION key…Press to select one of the facsimile’s functions
or registration procedures.
$ ENTER FUNCTION key…Press during registration and setting
procedures to register the currently entered data under a given
function.
% ON LINE indicator…Lit when the facsimile is to be used as a
printer or scanner.
^ ERROR indicator…Lit when a communications error or
mechanical problem has occurred.
& MEMORY indicator…Lit when there are documents stored in
memory.
A4
A4
8
1
2
8
1
2
C
1
#
3
5
6
4
8
9
7
0
*
2
A A
26 27
28 29 30
21 22
23 24 25
31 32
33 34 35
36 37
38 39 40
41 42
43 44 45
12
345
67
8910
11 12
13 14 15
16 17
18 19 20
ABC
DEF GHI
JKL
MNO
PQR
ST UVW
XYZ
*
# 0~9
@
/
. :
( )
&
? [ ] % !
=
Aa
%
@! ‡°231)›5467
^& 90 8 * $fi⁄¤‹fl# (
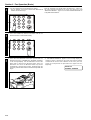
(2) Operation Panel
With the cover plate flipped down

2-5
6HFWLRQ Fax Operation (Basic)
* Keypad…Use to enter fax numbers.
* Even if your telephone service is for pulse dialling, press the
" " key after connecting to the other party and any key pressed
on the keypad after that will transmit the related tone signal.
( One-touch keys (No. 1 - 45)…Press to dial the fax number
registered under the corresponding one-touch key, as well as to
enter one of the characters marked under that key. Each of these
keys can be designated to function as either a one-touch key, a
program key, a group dial key or a chain dial key. Flip the cover
plate down to access one-touch keys No. 1 - 20, and flip it up to
access one-touch keys No. 21 - 45. When entering characters, flip
the cover plate down and press the one-touch key (No. 1 - 15)
marked with the desired character. One-touch key No. 19 serves
as the CAPS LOCK key. (Refer to “● Entering Characters”,
page 2-21.)
) MEMORY TX. indicator…Lit in the Memory transmission mode.
When this indicator is out, the fax is in the Direct Feed
transmission mode.
⁄ ALTERNATE DISPLAY key…When carrying out 2 operations
simultaneously (Dual access function) the display can be switched
for the duration this key is held down to allow monitoring of the
background operation currently in progress. If the STOP key is
pressed while this key is held down it is possible to cancel that
background operation.
¤ PRINT REPORTS key…Press to print out a desired report or list.
‹ DELAYED TX. key…Press to perform procedures for
communications which use the timer.
› MEMORY TX. key…Press to select between the Memory
transmission and Direct Feed transmission modes.
fi Cursor keys (씱) (씰)…Press to scroll through the message
display and select the desired function and/or setting. When
entering characters, the (씰) cursor key is also used to register the
selected character.
fl DUPLEX key…Press this key when transmitting 2-sided
documents or making Duplex (2-sided) copies.
‡ Contrast select key…Press to select the level of contrast most
suitable to the documents being transmitted or the originals being
copied.
° Contrast indicators…Press the contrast select key to light the
contrast indicator corresponding to the desired mode. When both
of the indicators are out, the fax is in the Normal mode. Make sure
the “DARKER” indicator is lit in order to increase the contrast of
lighter documents and the “LIGHTER” indicator in order to reduce
the contrast of darker documents.
A4
A4
8
1
2
8
1
2
C
1
#
3
5
6
4
8
9
7
0
*
2
A A
26 27
28 29 30
21 22
23 24 25
31 32
33 34 35
36 37
38 39 40
41 42
43 44 45
(
With the cover plate flipped up

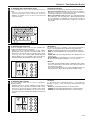
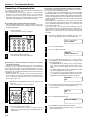
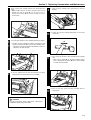
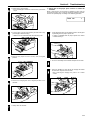
3
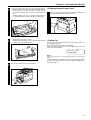
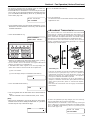
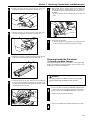
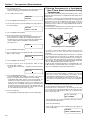
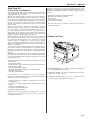
3. Apply pressure on the middle and on both ends of the paper
stop plate that is set in the paper cassette, and lower it in the
direction of the arrow shown in the illustration to remove the
stop plate from the cassette.
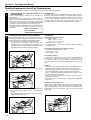
CAUTION
Observe the following points of caution when picking up or moving
the facsimile to avoid dropping it as there is a danger of personal
injury or damage to the unit.
• This facsimile should ALWAYS be picked up or moved by two or
more people.
• Get a firm hold on the fax moving handles located on both sides
of the facsimile whenever picking it up or moving it.
• BE SURE to maintain the facsimile in a horizontal position
whenever picking it up or moving it.
2-6
6HFWLRQ Fax Operation (Basic)
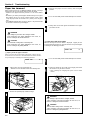
Preparation
Prior to using this facsimile for the first time BE SURE to read
“(1) Cautions On Moving the Fax Unit” first. Then perform the steps
listed in procedures “(2) Attaching the Included Seals” through “(5)
Warm Up” in order.
(1) Cautions On Moving the Fax Unit
* DO NOT throw the packing material away as it should be used any
time the facsimile is moved to another location.
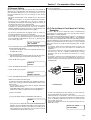
(2) Attaching the Included Seals
Included with this fax are label seals (one-touch key seals, a special
characters seal and key-indicator seal) and a one-touch key label
sheet.
• Each one-touch key seal should be marked with the appropriate
information and placed above the corresponding one-touch key
No. 1 - 20 in order to indicate the information registered under that
key. The one-touch key label sheet should be marked with the
corresponding information and, with the cover plate up, placed over
one-touch keys No. 21 - 45.
• The special characters seal should be attached to the top of the
cover plate, directly under one-touch key No. 10.
• The key-indicator seal indicates the meanings of the symbols shown
on the operation panel and should be attached to a location on the
fax that makes it easy for the user to refer to.
1
1. Pull the paper cassette straight out towards you. After
pulling it out as far as it will go, lift up slightly on the paper
cassette and remove it from the facsimile.
* Hold the cassette with both hands when drawing it out.
2
2. Press down on the cassette bottom plate to lock it into place.
(3) Setting Paper
Up to 500 sheets of plain paper (75 g/m
2
- 80 g/m
2
) can be set in the
paper cassette at any one time. Use only A4 or Folio size paper.
When this facsimile is to be used for the first time, when changing to
a different size of paper after that or when simply replenishing paper,
carry out the following procedure in order to set paper into the paper
cassette.
The size of paper set in the cassette must be registered in the
operation panel as well. When changing the size of the paper in the
paper cassette, be sure to change the paper size registered in the
operation panel. (Refer to “Setting the Paper Size”, page 9-8.)

2-7
6HFWLRQ Fax Operation (Basic)
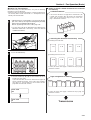
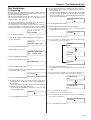
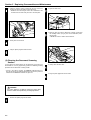
4
4. Insert the clip on one side of the paper stop plate into the
appropriate hole in the paper cassette corresponding to the
size of paper to be set, and then place the centre clip and
the clip on the opposite side into their respective holes as
well.
* MAKE SURE that the clips are properly inserted into the
cassette and that the cassette stop plate is firmly in place.
5
5. Set the paper in the paper cassette.
* MAKE SURE that the paper is set under the claws located
on both sides of the paper cassette.
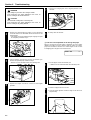
6
6. Reinsert the paper cassette in the facsimile.
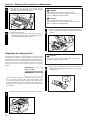
(4) Connecting the Power Cord
Plug one end of the power cord into the power receptacle and
the other end into the power outlet in the room.
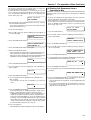
(5) Warm Up
Once the power cord is connected to the facsimile and an outlet, the
fax will begin to warm up.
Warm up normally requires less than 30 seconds.
Once the fax has warmed up, it will automatically enter the initial
mode (waiting for operation).
NOTE
Once warm up begins, a message will appear in the message
display.
In order to change the language used in the message display and on
printed reports and lists, refer to “Message Display and Report/Lists
Language”, page 9-4.
6(7 '2&80(17

2-8
6HFWLRQ Fax Operation (Basic)
Functions and Features of this
Facsimile
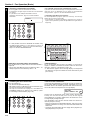
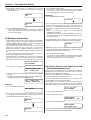
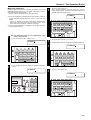
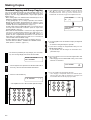
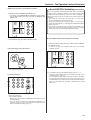
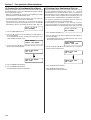
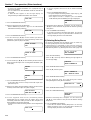
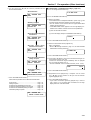
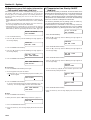
(1) Initial Mode
The initial mode refers to the operational status of this facsimile while
it is waiting for some operation to begin. The message display will
revert to this initial mode upon completion of each successful fax or
copy operation. The message display will also revert to this initial
mode if no action is carried out on the facsimile for 1 minute during
any procedure or when the STOP key is pressed.
• Message display in the initial mode
The message display in the initial mode differs according to whether
Restricted access is turned ON or OFF. (Refer to “Restricted Access”,
page 7-25.) Even when Restricted access is turned OFF, the status of
any operation in progress will be shown in the message display.
MAKE SURE to check the message display PRIOR to performing any
operation.
A: When restricted access is turned ON
* It is first necessary to enter a viable access code or the registered
management password in order to use the facsimile.
B: When restricted access is turned OFF
(When there are no communications in progress)
C: When restricted access is turned OFF
(When a communication is in progress)
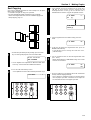
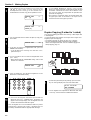
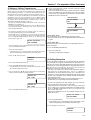
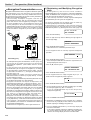
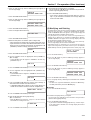
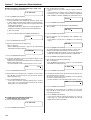
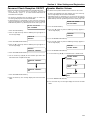
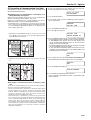
(3) F-Code Based Communication
This fax possesses F-Code based capabilities that enable F-Code
based communication. This type of communication is possible to and
from any fax that also possesses F-Code based capabilities, even if
that fax is not one of our models. (Even if the other unit is one of our
models, it must also possess F-Code based capabilities in order to
enable F-Code based communication.)
This facsimile is equipped with the following F-Code based
communication functions.
• F-Code based Confidential Polling communication (Refer to
page 7-5.)
• F-Code based Confidential communication (Refer to page 7-7.)
• F-Code based Relay broadcast transmission (Refer to page 7-11.)
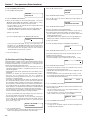
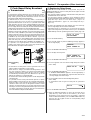
● F-Code commands
With F-Code communication, an imaginary “box” (Confidential box or
Relay box) is created in the fax unit’s memory. F-Code commands
are used to specify the box that correspond to the communication and
to specify the method of communication between the transmitting and
receiving parties.
There are four different F-Code commands:
• Subaddress (SUB)
• Subaddress ID (SID)
• Selective polling address (SEP)
• F-Code password (PWD)
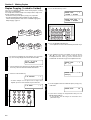
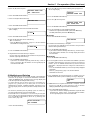
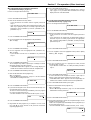
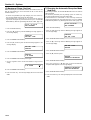
● Subaddress (SUB)
The SUB (subaddress) command is used by the transmitting party to
specify the address (box number) of the desired box (Confidential box
or Relay box), registered in advance in the receiving party’s facsimile.
Confidential reception or Relay broadcast transmission is then
possible depending on whether the specified box has been registered
as a Confidential box or a Relay box.
* This facsimile can transmit a SUB (subaddress) that is anywhere
between 1 and 20 digits long and that subaddress may include any
combination of the symbols “*” and “#”, spaces, and numerals from
0 - 9. Since the number of characters that can be used for the SUB
(subaddress) in the other party’s fax varies depending upon their
facsimile, the SUB (subaddress) you use must match theirs.
* When registering a SUB (subaddress) for a Confidential or Relay
box in this facsimile, however, you should only enter a 4-digit
address (0000 - 9999).
● Subaddress ID (SID)
The SID (subaddress ID) command is used to limit the number of
people that can use the F-Code communication function. If a SID
(subaddress ID) is registered along with the SUB (subaddress), then
F-Code Communication will only be successful when the
corresponding SIDs (subaddress ID) match as well.
* This facsimile can transmit a SID (subaddress ID) that is anywhere
between 1 and 20 digits long and that subaddress may include any
combination of the symbols “*” and “#”, spaces, and numerals from
0 - 9. Since the number of characters that can be used for the SID
(subaddress ID) in the other party’s fax varies depending upon their
facsimile, the SID (subaddress ID) you use must match theirs.
* When registering a SID (subaddress ID) for a Confidential or Relay
box in this facsimile, however, you should only enter a 4-digit ID
(0000 - 9999).
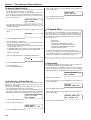
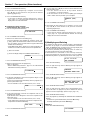
● Selective polling address (SEP)
The SEP (selective polling address) command is used in the same
manner as the SUB (subaddress) to specify the address (box
number) of the desired Confidential or Relay box. In Confidential
polling communication, the registered SUB (subaddress) will be used
as the SEP (selective polling address).
● F-Code password (PWD)
The PWD (F-Code password) command is used in the same manner
as the SID (subaddress ID) to limit the number of people that can use
the F-Code communication function. In Confidential polling
communication, the registered SID (subaddress ID) will be used as
the PWD (F-Code password).
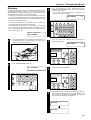
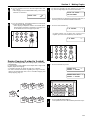
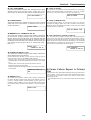
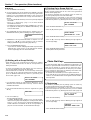
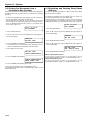
(2) File Number
For every communication which will be initiated by dialling from your
fax, a distinct, 3-digit file number will appear in the message display
at the end of the input procedure. The facsimile uses this file number
for the purpose of managing each communication.
This number must be referred to and must be entered during the
procedure for cancelling communications which use the timer.
In addition to being shown in the message display, the file number
can be verified by printing out and checking the Confirmation report
which contains information on communications which are in memory
awaiting a scheduled start time. (Refer to “Confirmation Report”,
page 8-4.)
$&&(66&2'(
6(7'2&80(17
&20081,&$7,21
6(7'2&80(17
),/(3$*(
6725('
Page is loading ...
Page is loading ...
Page is loading ...
Page is loading ...
Page is loading ...
Page is loading ...
Page is loading ...
Page is loading ...
Page is loading ...
Page is loading ...
Page is loading ...
Page is loading ...
Page is loading ...
Page is loading ...
Page is loading ...
Page is loading ...
Page is loading ...
Page is loading ...
Page is loading ...
Page is loading ...
Page is loading ...
Page is loading ...
Page is loading ...
Page is loading ...
Page is loading ...
Page is loading ...
Page is loading ...
Page is loading ...
Page is loading ...
Page is loading ...
Page is loading ...
Page is loading ...
Page is loading ...
Page is loading ...
Page is loading ...
Page is loading ...
Page is loading ...
Page is loading ...
Page is loading ...
Page is loading ...
Page is loading ...
Page is loading ...
Page is loading ...
Page is loading ...
Page is loading ...
Page is loading ...
Page is loading ...
Page is loading ...
Page is loading ...
Page is loading ...
Page is loading ...
Page is loading ...
Page is loading ...
Page is loading ...
Page is loading ...
Page is loading ...
Page is loading ...
Page is loading ...
Page is loading ...
Page is loading ...
Page is loading ...
Page is loading ...
Page is loading ...
Page is loading ...
Page is loading ...
Page is loading ...
Page is loading ...
Page is loading ...
Page is loading ...
Page is loading ...
Page is loading ...
Page is loading ...
Page is loading ...
Page is loading ...
Page is loading ...
Page is loading ...
Page is loading ...
Page is loading ...
Page is loading ...
Page is loading ...
Page is loading ...
Page is loading ...
Page is loading ...
Page is loading ...
Page is loading ...
Page is loading ...
Page is loading ...
Page is loading ...
Page is loading ...
Page is loading ...
Page is loading ...
Page is loading ...
Page is loading ...
Page is loading ...
Page is loading ...
Page is loading ...
Page is loading ...
Page is loading ...
Page is loading ...
Page is loading ...
Page is loading ...
Page is loading ...
Page is loading ...
Page is loading ...
Page is loading ...
Page is loading ...
Page is loading ...
Page is loading ...
Page is loading ...
Page is loading ...
Page is loading ...
Page is loading ...
Page is loading ...
Page is loading ...
Page is loading ...
Page is loading ...
Page is loading ...
Page is loading ...
Page is loading ...
Page is loading ...
Page is loading ...
Page is loading ...
Page is loading ...
Page is loading ...
Page is loading ...
Page is loading ...
Page is loading ...
Page is loading ...
Page is loading ...
Page is loading ...
Page is loading ...
Page is loading ...
Page is loading ...
Page is loading ...
Page is loading ...
-
 1
1
-
 2
2
-
 3
3
-
 4
4
-
 5
5
-
 6
6
-
 7
7
-
 8
8
-
 9
9
-
 10
10
-
 11
11
-
 12
12
-
 13
13
-
 14
14
-
 15
15
-
 16
16
-
 17
17
-
 18
18
-
 19
19
-
 20
20
-
 21
21
-
 22
22
-
 23
23
-
 24
24
-
 25
25
-
 26
26
-
 27
27
-
 28
28
-
 29
29
-
 30
30
-
 31
31
-
 32
32
-
 33
33
-
 34
34
-
 35
35
-
 36
36
-
 37
37
-
 38
38
-
 39
39
-
 40
40
-
 41
41
-
 42
42
-
 43
43
-
 44
44
-
 45
45
-
 46
46
-
 47
47
-
 48
48
-
 49
49
-
 50
50
-
 51
51
-
 52
52
-
 53
53
-
 54
54
-
 55
55
-
 56
56
-
 57
57
-
 58
58
-
 59
59
-
 60
60
-
 61
61
-
 62
62
-
 63
63
-
 64
64
-
 65
65
-
 66
66
-
 67
67
-
 68
68
-
 69
69
-
 70
70
-
 71
71
-
 72
72
-
 73
73
-
 74
74
-
 75
75
-
 76
76
-
 77
77
-
 78
78
-
 79
79
-
 80
80
-
 81
81
-
 82
82
-
 83
83
-
 84
84
-
 85
85
-
 86
86
-
 87
87
-
 88
88
-
 89
89
-
 90
90
-
 91
91
-
 92
92
-
 93
93
-
 94
94
-
 95
95
-
 96
96
-
 97
97
-
 98
98
-
 99
99
-
 100
100
-
 101
101
-
 102
102
-
 103
103
-
 104
104
-
 105
105
-
 106
106
-
 107
107
-
 108
108
-
 109
109
-
 110
110
-
 111
111
-
 112
112
-
 113
113
-
 114
114
-
 115
115
-
 116
116
-
 117
117
-
 118
118
-
 119
119
-
 120
120
-
 121
121
-
 122
122
-
 123
123
-
 124
124
-
 125
125
-
 126
126
-
 127
127
-
 128
128
-
 129
129
-
 130
130
-
 131
131
-
 132
132
-
 133
133
-
 134
134
-
 135
135
-
 136
136
-
 137
137
-
 138
138
-
 139
139
-
 140
140
-
 141
141
-
 142
142
-
 143
143
-
 144
144
-
 145
145
-
 146
146
-
 147
147
-
 148
148
-
 149
149
-
 150
150
-
 151
151
-
 152
152
-
 153
153
-
 154
154
-
 155
155


Triumph Adler fax 950 Operating instructions
- Category
- Multifunctionals
- Type
- Operating instructions
- This manual is also suitable for
Ask a question and I''ll find the answer in the document
Finding information in a document is now easier with AI
Other documents
-
KYOCERA KM-C830 Operating instructions
-
Utax CD 1020 Operating instructions
-
KYOCERA KM-2530 User manual
-
-
-
KYOCERA CS-C4035E Operating instructions
-
Ricoh FAX4500L User manual
-
KYOCERA KM-C2630D Operating instructions
-
-
Lanier Copier System Edition Operating Instructions Manual