Page is loading ...

Dimensions
Note:
All dimensions are speci!cations are approximate and subject to change without notice.
Your item may appear slightly different from the illustration
©2014 Fresca ™ All rights reserved. This material may not be reproduced, displayed, modi!ed or distributed without the express prior written permission of the copyright holder.
FTL2309
DELPHINUS
INSTALLATION GUIDE
PAGE 1
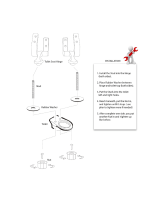
Please unpack and inspect all packages and components carefully,make sure they are complete.
Examine for shipping damage. If some parts are damaged or missing, notify your dealer immediately.
Toilet body
x1
Decoration cap
x2
Plastic cover
x2
Plastic gasket
x2
Bolt
x2
Hinge cover
x2
Expansion rubber
x2
Toilet seat
x1
Tank cover
x1
Flange
x1
Screw
x6
Screw
x2
Plastic bracket
x2
Expansible
plastic plug
x6
A B C D E F HG
I
J
K L M N
Supplied Parts List

TOOLS FOR ASSEMBLY
©2014 Fresca ™ All rights reserved. This material may not be reproduced, displayed, modi•ed or distributed without the express prior written permission of the copyright holder.
PAGE 2
1. Mark installing holes
Mark the installing position for mounting screws and connecting pipe as illustrated(drawing for
distance of installing holes).
Drawing for distance of installing holes
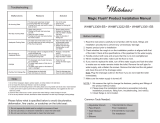
Before Installation
Read the instruction carefully to be familiar with the tools, •ttings and installation procedures to
prevent any unnecessary damage.
Check the •ttings follow the •tting form and check whether there is any damage of the product
Check whether the roughing-in on installing position is aligned with the one of product.Realize all
the stipulates for pipelines preposing for water supply.
Because the ceramics is easy to be damaged, please handle it gently and the nut should not be
overtightened.
The floor of installation position should be flat and hard.
If you want to change the water closet, please turn off water supply and flush the water closet to
make sure no water remains inside the product.Remove the soft pipe for water supply, and unfas-
ten screws. Then remove the water closet and the old gasket and clean the end of the outlet of
drainage.
Note: Please plug the drainage outlet on the floor if you do not install the product at once.
Make sure the water supply has been turned off.
1.
2.
3.
4.
5.
6.
7.
Refer to the newest information of the printed matter. We reserve the rights to change
the features, packing and fittings of the products without notice.
Please keep the installation instruction carefully(including installation procedure, fitting
form, trouble shooting and notice.)
Note: 1.
2.
2″
2″
6 1/4″
1 3/8″~2 3/8″
7 1/8″
7 1/2″
6 1/4″
7 1/2″
1 3/8″~2 3/8″
7 1/8″

©2014 Fresca ™ All rights reserved. This material may not be reproduced, displayed, modi•ed or distributed without the express prior written permission of the copyright holder.
PAGE 3
2. Install the connect pipe
Drill installing holes.
Insert the expansible plastic plugs(H).
b
d
Fix the plastic brackets(G) by screws(E).
e
a
Take off the connecting pipe from the
bottom of toilet body(A).
c
Make the bottom of connecting pipe up
towards,then cover the flange(D) onto water
outlet tightly.Make sure the pipe is not plugged.
c
6
mm Drill
Connecting pipe
Adjust the scre
ws(E
)
to get the fo
ur
s holes on
the back side of connecting pipe
aligned with
e
xp
ansible
plastic plugs on the
floor.Fix the
conne
ct
ing pipe
a
s illustrated.
E
A
H
D
E
G

©2014 Fresca ™ All rights reserved. This material may not be reproduced, displayed, modi•ed or distributed without the express prior written permission of the copyright holder.
PAGE 4
3. Install toilet body
Put up the water closet and make sure the two pieces of mounting screws are all through the
installing holes of water closet.Get the centre line of water closet aligned with the centre line on
the floor and then put down the water closet gently.
Note: Make sure the pipe is through the 4 layers of sealing rubber spacer of connecting pipe
after installing the product.Otherwise it will have bad effect for flushing function.
a
Pipe
Sealing rubber
spacer
Connecting
pipe
Fix the product on the floor with screws (F)and plastic covers(J), then cover the decoration
caps(I).
b
Product
Plastic bracket
4. Connect water supply pipe and check sealing performance
Get the water supply valve and the water inlet with soft connecting pipe. ( If the fitting is
separared filter, please connect filter first) Turn on the water supply valve and make sure there
is no leakage for every joint. Fasten the nuts a little can prevent leakage.
a
Water supply valve
Waterproof spacer
Waterproof spacer
Waterproof spacer
Waterp inlet
Cistern
Filter
Soft pipe nut
Soft pipe
Soft pipe nut
I
F
J

©2014 Fresca ™ All rights reserved. This material may not be reproduced, displayed, modi•ed or distributed without the express prior written permission of the copyright holder.
PAGE 5
Put on the tank cover(C) gently.
a
Test the flush mechanism.
b
5. Put on the tank cover and test the flush mechanism
6. Mount the toilet seat
Replace a new toilet seat please refer to below illustrated.
Insert the expansion rubbers(N) into the
installation hole.
Put the plastic gaskets(L) and bolts(K) onto
the hinge base making them aligned with the
hole of bulgy rubber and fasten it(Do not
over-tighten).
Align the toilet seat(B) with the water closet
pan,then fasten the bolts.
Put on the hinge cover(M).
d
c
b
a
Replace a new toilet seat(B), and repeat the
installation process.
c
Take off the hinge cover(M).
Unscrew the bolts(K)
b
a
C
B
B
N
M
L
L
L
K
K
K
M
M

©2014 Fresca ™ All rights reserved. This material may not be reproduced, displayed, modi•ed or distributed without the express prior written permission of the copyright holder.
PAGE 6
7. Install toilet
Install the water closet seat according to the installation instruction,then daub a layer of silicone
between the product and floor.
Note: Do not use the product immediately after finishing installing.Make sure there is no water
around the product about 24 hours.
SILICONE
/