F& &F
&F
SUBWOOFER
SURROUND
R
R
L
L
F& &F
L
CENTER
IN
LINE
LINE IN
© 2009 Sony Corporation
English
WARNING
To reduce the risk of re or electric shock, do not
expose this apparatus to rain or moisture.
To reduce the risk of re, do not cover the ventilation
opening of the apparatus with newspapers, tablecloths,
curtains, etc.
Do not place the naked ame sources such as lighted
candles on the apparatus.
To reduce the risk of re or electric shock, do not expose
this apparatus to dripping or splashing, and do not place
objects lled with liquids, such as vases, on the
apparatus.
Do not install the appliance in a conned space, such as a
bookcase or built-in cabinet.
As the main plug is used to disconnect the unit from the
mains, connect the unit to an easily accessible AC outlet.
Should you notice an abnormality in the unit, disconnect
the main plug from the AC outlet immediately.
The unit is not disconnected from the mains as long as it
is connected to the AC outlet, even if the unit itself has
been turned o.
For customers in Europe
Disposal of Old Electrical & Electronic
Equipment (Applicable in the
European Union and other European
countries with separate collection
systems)
This symbol on the product or on its packaging indicates
that this product shall not be treated as household waste.
Instead it shall be handed over to the applicable
collection point for the recycling of electrical and
electronic equipment. By ensuring this product is
disposed of correctly, you will help prevent potential
negative consequences for the environment and human
health, which could otherwise be caused by
inappropriate waste handling of this product. The
recycling of materials will help to conserve natural
resources. For more detailed information about recycling
of this product, please contact your local Civic Oce,
your household waste disposal service or the shop where
you purchased the product.
Notice for customers: The following information
is only applicable to equipment sold in countries
applying EU Directives.
The manufacturer of this product is Sony Corporation,
1-7-1 Konan Minato-ku Tokyo, 108-0075 Japan. The
Authorized Representative for EMC and product safety
is Sony Deutschland GmbH, Hedelnger Strasse 61,
70327 Stuttgart, Germany. For any service or guarantee
matters please refer to the addresses given in separate
service or guarantee documents.
Precautions
On safety
t Before operating the subwoofer, be sure that the
operating voltage of the subwoofer is identical with
that of your local power supply.
t Unplug the subwoofer from the wall outlet if it is not to
be used for an extended period of time. To disconnect
the cord, pull the cord by grasping the plug. Never pull
the cord itself.
t Should any liquid or solid object fall into the
subwoofer, unplug the subwoofer and have the
subwoofer checked by qualied personnel before
operating it any further.
t AC power cord must be changed only at the qualied
service shop.
t Install this system so that the power cord can be
unplugged from the wall socket immediately in the
event of trouble.
On operation
t Do not drive the speaker system with a continuous
wattage exceeding the maximum input power of the
system.
t If the polarity of the speaker connections are not
correct, the bass tones will be weak and the position of
the various instruments obscure.
t Contact between bare speaker wires at the speaker
terminals may result in a short-circuit.
t Before connecting, turn o the amplier to avoid
damaging the speaker system.
t The volume level should not be turned up to the point
of distortion.
t Do not attempt to open the enclosure or remove
speaker units and networks.
t Do not press the dust cap intentionally or
unintentionally.
If you encounter color irregularity on a
nearby TV screen
The center speaker is magnetically shielded to allow it to
be installed near a TV set. However, color irregularities
may still be observed on certain types of TV sets. As the
surround speakers are not magnetically shielded, we
recommend that you place them slightly further away
from a TV set.
If color irregularity is observed...
D Turn o the TV set, then turn it on again in 15 to 30
minutes.
If color irregularity is observed again...
D Place the speakers further away from the TV set.
If howling occurs
Reposition the speakers or turn down the volume on the
amplier.
Система говорители
SA-CRW55/SA-CRW33
4-137-595- 22 (1)
#
$
-1
$
-2
%
4.6 mm
10 mm
more than 30 mm
повече от 30 mm
Hole on the back of the surround speaker
Отвор на гърба на говорителя за съраунд звук
7 to 10 mm
от 7 до 10 mm
Hole on the back of the surround speaker
Отвор на гърба на говорителя за съраунд звук
"
$
-3
Български
ПРЕДУПРЕЖДЕНИЕ
За да избегнете риска от пожар или токов удар,
не излагайте устройството на дъжд или влага.
За да предотвратите риска от пожар, не покривайте
вентилационните отвори на устройството с вестници,
покривки, завеси и др.
Не поставяйте върху устройството източници на открит
пламък, като напрмер запалени свещи.
За да предотвратите риска от пожар или токов удар,
не поставяйте устройството на места, където може да
бъде накапано или опръскано и не оставяйте върху
него предмети, пълни с течности, като например вази.
Не инсталирайте устройството в затворено
пространство, като библиотека или вграден шкаф.
Тъй като захранващият кабел се използва за изключване
на устройството от електрическата мрежа, свържете
го към лесно достъпен контакт. Ако забележите
неизправност в устройството, изключете го веднага
от контакта.
Устройството продължава да бъде свързано към
електрическата мрежа, докато захранващият му кабел
е включен в контакта, дори и самото то да е изключено.
За потребители в Европа
Изхвърляне на стари електрически
и електронни уреди (за страните от
Европейския съюз и други европейски
страни със система за разделно
събиране на отпадъците)
Този символ на устройството или опаковката му
показва, че продуктът не се третира като домашен
отпадък. Вместо това, той трябва да бъде предаден
в съответните пунктове за рециклиране на
електрически и електронни уреди. Ако изхвърлите
този продукт на правилното място, вие ще
предотвратите потенциални негативни последици
за околната среда и човешкото здраве, които могат
да бъдат причинени в противен случай.
Рециклирането на материалите ще помогне
за запазването на природните ресурси. За по-подробна
информация относно рециклирането на този продукт,
моля, свържете се с общинската служба във вашия град,
службата за изхвърляне на отпадъци или магазина,
от който сте закупили продукта.
Забележка за потребителите: Следната
информация е приложима само за оборудване,
продавано в страни, прилагащи Европейските
Директиви.
Производителят на този продукт е Sony Corporation,
1-7-1 Konan, Minato-ku, Токио, 108-0075 Япония.
Оторизираният представител за ЕМС и безопасност
на продукта е Sony Deutschland GmbH, Hedelnger
Strasse 61, 70327 Щутгарт, Германия. За въпроси,
касаещи сервиза и гаранцията на устройството,
се обръщайте към адресите, указани в съответните
сервизни книжки и гаранционни карти.
Предпазни мерки
Безопасност
tϛҺүҮҲҺҪҫҸҼҪһӄһһҽҫҽҾүҺҪҹҺҸҬүҺүҼүҮҪҵҲҺҪҫҸҼҷҸҼҸ
напрежение съответства на вашето мрежово захранване.
tόҴҸҷүһҶӉҼҪҼүҮҪҲұҹҸҵұҬҪҼүһҽҫҽҾүҺҪҮӄҵҭҸҬҺүҶү
изключете го от електрическата мрежа. За да изключите
кабела, хванете го за щепсела. Никога не дърпайте
самия кабел.
tόҴҸҼүӁҷҸһҼҲҵҲҹҺүҮҶүҼҹҸҹҪҮҷүҬһҽҫҽҾүҺҪ
изключете от мрежовото захранване и го проверете
при квалифициран персонал, преди да работите
отново с него.
tϓҪҿҺҪҷҬҪӃҲӉҼҴҪҫүҵҼҺӉҫҬҪҮҪҫӄҮүҹҸҮҶүҷӉҷһҪҶҸ
в квалифициран сервиз.
tϔҷһҼҪҵҲҺҪҳҼүһҲһҼүҶҪҼҪҼҪҴҪӁүұҪҿҺҪҷҬҪӃҲӉҼҴҪҫүҵ
да може лесно да бъде изключен от контакта веднага
в случай на проблем.
Работа със системата
tϙүҲұҹҸҵұҬҪҳҼүһҲһҼүҶҪҼҪҭҸҬҸҺҲҼүҵҲҹҺҸҮӄҵҰҲҼүҵҷҸ
време при мощност, надхвърляща максималната й
входна мощност.
tόҴҸҷүүһҹҪұүҷҹҸҵӉҺҲҼүҼӄҼҹҺҲһҬӄҺұҬҪҷүҷҪ
говорителите, ниските честоти ще се чуват слабо,
а позицията на различните инструменти ще бъде трудно
да се определи.
tϖҸҷҼҪҴҼӄҼҶүҰҮҽҸҭҸҵүҷҲҼүҹҺҸҬҸҮҷҲӀҲҹҺҲ
терминалите на говорителя може да предизвика късо
съединение.
tϛҺүҮҲҮҪҷҪҹҺҪҬҲҼүҬҺӄұҴҲҼүҲұҴҵӈӁүҼүҽһҲҵҬҪҼүҵӉ
за да предотвратите повреда на системата говорители.
tϙҲҬҸҼҸҷҪһҲҵҪҼҪҷҪұҬҽҴҪҷүҼҺӉҫҬҪҮҪҫӄҮү
увеличавано до такава степен, че да се получи
изкривяване.
tϙүһүҸҹҲҼҬҪҳҼүҮҪҸҼҬҪҺӉҼүҴҸҺҹҽһҪҲҵҲҮҪ
демонтирате говорителите и окабеляването.
tϙүҷҪҼҲһҴҪҳҼүһӄұҷҪҼүҵҷҸҲҵҲҷүһӄұҷҪҼүҵҷҸ
праховата защита.
Ако се появи смущение в цветовете на
поставения наблизо телевизор
Централният говорител е екраниран, така че той може
да бъде инсталиран в близост до телевизор. Въпреки
това, е възможно да се наблюдават смущения в
цветовете на някои модели телевизори. Тъй като
говорителите за съраунд звук не са екранирани,
ви препоръчваме да ги разположите малко по-далеч
от телевизора.
Ако се появи смущение в цветовете...
D
ϔұҴҵӈӁүҼүҼүҵүҬҲұҸҺҪҲһҵүҮҸҴҸҵҸҮҸ
минути го включете отново.
Ако смущението в цветовете продължи
да се появява...
D
Поставете говорителите по-далеч от телевизора.
Ако се чува виене от говорителите
Разместете говорителите или намалете силата на звука
на усилвателя.
Разполагане
tϙүҲҷһҼҪҵҲҺҪҳҼүҭҸҬҸҺҲҼүҵҲҼүҬӄҺҿҽҷҪҴҵҸҷүҷҪ
повърхност.
tϙүҲҷһҼҪҵҲҺҪҳҼүҭҸҬҸҺҲҼүҵҲҼүҷҪҶүһҼҪҴҸҲҼҸһҪ
— Прекалено горещи или студени
— Прашни или замърсени
— Много влажни
— Подложени на вибрации
ϔұҵҸҰүҷҲҷҪҮҲҺүҴҼҷҪһҵӄҷӁүҬҪһҬүҼҵҲҷҪ
tώҷҲҶҪҬҪҳҼүҴҸҭҪҼҸҹҸһҼҪҬӉҼүҭҸҬҸҺҲҼүҵҲҼүҷҪ
специално третирани повърхности (с парафин, безир,
лак и др.), защото може да остане петно или да се
промени цвета на повърхността.
tϛҸһҼҪҺҪҳҼүһүҮҪҲұҫүҭҷүҼүүҬүҷҼҽҪҵҷҸҷҪҺҪҷӉҬҪҷү
на ъглите на субуфера.
Почистване
Почиствайте корпуса на говорителите с мека кърпа,
леко навлажнена с мек почистващ разтвор или вода.
Не използвайте каквито и да е груби гъбички,
почистващ абразивен прах или разтворител като
алкохол или бензин.
Ако имате какъвто и да е въпрос или проблем относно
вашата система говорители, моля, консултирайте се с
най-близкия доставчик на Sony.
Сглобяване на системата
Закрепване на меките подложки
Закрепете приложените меки подложки към
централния говорител ( ) и към субуфера ( ).
Инсталиране на говорителите
за съраунд звук на стената ( )
1 Подгответе винтове (не са приложени),
които съответстват на отвора на гърба
на говорителите за съраунд звук.
2 Затегнете винтовете към стената.
Винтовете трябва да се показват от 7
до 10 mm от стената.
3 Окачете говорителите за винтовете.
Забележки
tϔұҹҸҵұҬҪҳҼүҬҲҷҼҸҬүҴҸҲҼҸһҪҹҸҮҿҸҮӉӃҲұҪ
материала, от който е направена стената и нейната
здравина. Тъй като стена, направена от гипсокартон
е особено крехка, закрепете винтовете здраво за дървена
ҭҺүҮҪһҵүҮҼҸҬҪҭҲұҪҼүҭҷүҼүҴӄҶһҼүҷҪҼҪϔҷһҼҪҵҲҺҪҳҼү
говорителите на вертикална и гладка стена, която е
допълнително подсилена.
tϖҸҷһҽҵҼҲҺҪҳҼүһүһҰүҵүұҪҺҲӉҲҵҲҶҸҷҼҪҰҷҲҴ
относно материала, от който е направена стената
или винтовете, които можете да използвате.
tϚҼ4POZҷүҷҸһӉҼҸҼҭҸҬҸҺҷҸһҼұҪҲҷӀҲҮүҷҼҲҵҲ
повреда, причинена от неправилна инсталация,
недостатъчна здравина на стената или неправилен
монтаж на винтовете, природни бедствия и т.н.
Инсталиране на говорителите
за съраунд звук с помощта
на допълнителна стойка
за говорителите
(не е приложена)
За по-голяма гъвкавост в разполагането на
говорителите, използвайте допълнителната стойка
за говорители WS-FV11, WS-FV10D (достъпна само
в определени страни).
Преди да инсталирате стойката за говорители, първо
развийте винта А ( ) от говорителя и го използвайте
при инсталацията.
За подробности относно инсталирането на стойката за
говорители, вижте инструкциите за експлоатация,
приложени към стойката.
Забележки
tϖҸҭҪҼҸҲұҹҸҵұҬҪҼүҮҸҹӄҵҷҲҼүҵҷҪҼҪһҼҸҳҴҪұҪ
говорители, не се облягайте и не увисвайте на
говорителите, тъй като е възможно да паднат.
tϛҸһҼҪҬӉҳҼүҭҸҬҸҺҲҼүҵҲҼүҷҪҹҵҸһҴҪҿҸҺҲұҸҷҼҪҵҷҪ
повърхност.
Свързване на системата
ϔұҴҵӈӁүҼүұҪҿҺҪҷҬҪҷүҼҸҷҪҽһҲҵҬҪҼүҵӉҲҷҪһҽҫҽҾүҺҪ
преди да правите каквито и да е връзки.
Свържете централния говорител и говорителите
за съраунд звук към изходните терминали за говорители
на усилвателя и използвайте LINE IN жака на субуфера,
за да го свържете към усилвателя. (
&)
Забележки (')
tϝҬӄҺҰүҼүҼүҺҶҲҷҪҵҲҼүҹҵӈһҲҶҲҷҽһҷҪ
говорителите към съответстващите им терминали
ҹҵӈһҲҶҲҷҽһҷҪҽһҲҵҬҪҼүҵӉ
tϝҬӄҺҰүҼүұҮҺҪҬҸҬһҲӁҴҲҴҪҫүҵҲϖҸҷҼҪҴҼӄҼҶүҰҮҽ
оголените проводници при терминалите на
говорителите може да предизвика късо съединение.
tώҴҵӈӁүҼүұҪҿҺҪҷҬҪӃҲӉҴҪҫүҵҷҪһҽҫҽҾүҺҪҬҴҸҷҼҪҴҼҪ
tϓҪҹҸҮҺҸҫҷҸһҼҲҸҼҷҸһҷҸһҬӄҺұҬҪҷүҼҸҷҪҽһҲҵҬҪҼүҵӉ
вижте неговите инструкции за експлоатация.
Съвет
Черните проводници или проводниците с черни ивици
са с минусов (-) поляритет и трябва да бъдат свързани
към минус (-) терминалите на говорителите.
Screw (not supplied)
Винт (не е приложен)
more than 4 mm
повече от 4 mm
Foot pads (Small)
Меки подложки (Малки)
Foot pads (Big)
Меки подложки (Големи)
Screw A
Винт А
&
Center
Централен говорител
Subwoofer
Субуфер
Surround
(Right)
Говорител за
съраунд звук (десен)
Surround
(Left)
Говорител за
съраунд звук (ляв)
Amplier
Усилвател
short
къс
long
дълъг
long
дълъг
&
F
&
F
'
Foot pads
Меки подложки
)(
100100
Center
Централен
говорител
Subwoofer
Субуфер
Surround (Right)
Съраунд говорител (Десен)
Surround (Left)
Съраунд говорител (Ляв)
On placement
t Do not set the speakers in an inclined position.
t Do not place the speakers in locations that are:
— Extremely hot or cold
— Dusty or dirty
— Very humid
— Subject to vibrations
— Subject to direct sunlight
t Use caution when placing the speaker on a specially
treated (waxed, oiled, polished, etc.) oor, as staining
or discoloration may result.
t Take care to avoid any possible injury on the corners of
the subwoofer.
On cleaning
Clean the speaker cabinets with a soft cloth lightly
moistened with a mild detergent solution or water. Do
not use any type of abrasive pad, scouring powder or
solvent such as alcohol or benzine.
If you have any questions or problems concerning your
speaker system, please consult your nearest Sony dealer.
Assembly
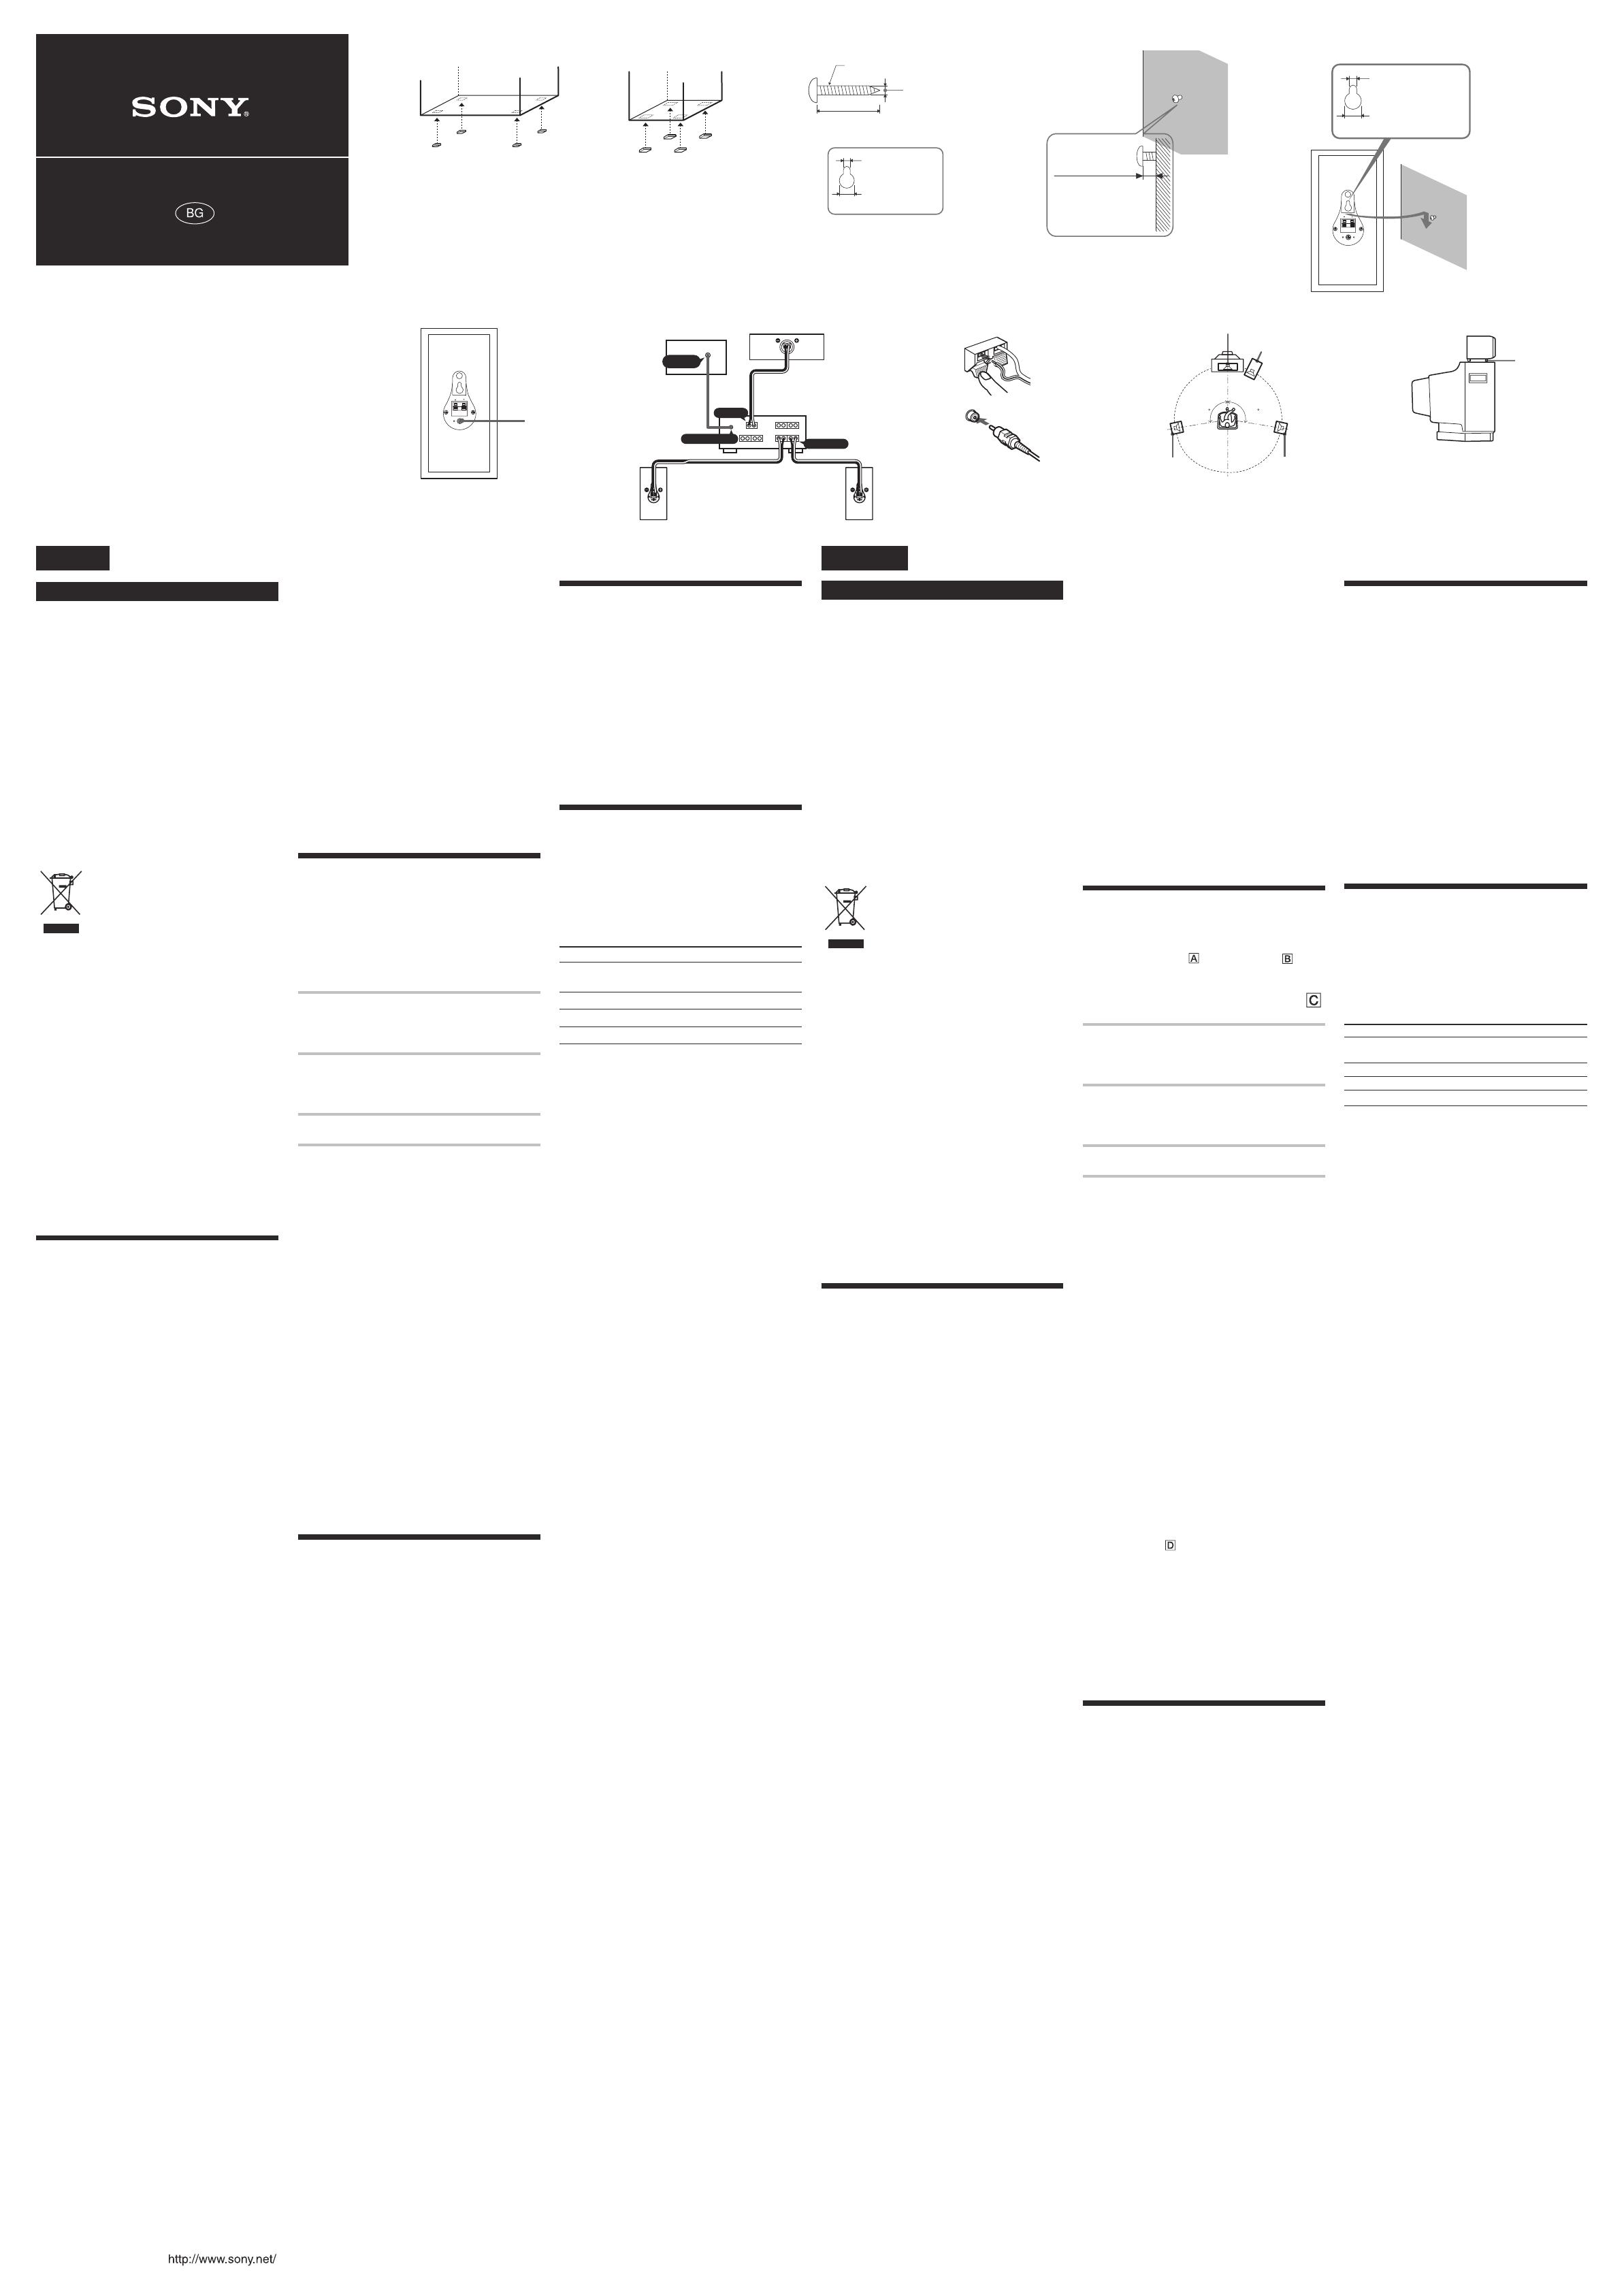
Attaching the foot pads
Be sure to attach the supplied foot pads to the center
speaker (") and the subwoofer (#).
Installing the surround speakers
on the wall ($)
1 Prepare screws (not supplied) that are
suitable for the hole on the back of
surround speakers.
2 Fasten the screws to the wall. The
screws should protrude 7 to 10 mm
(
9
/ 32 to
13
/ 32 in.).
3 Hang the speakers on the screws.
Notes
t Use screws that are suitable for the wall material and
strength. As a plaster board wall is especially fragile,
attach the screws securely to a beam and fasten them to
the wall. Install the speakers on a vertical and at wall
where reinforcement is applied.
t Contact a screw shop or installer regarding the wall
material or screws to be used.
t Sony is not responsible for accident or damage caused
by improper installation, insucient wall strength or
improper screw installation, natural calamity, etc.
Installing the surround speakers
using an optional speaker stand
(not supplied)
For greater exibility in positioning the speakers, use the
optional WS-FV11, WS-FV10D speaker stand (available
only in certain countries).
Before you install the speaker stand, be sure to detach the
screw A ( %) from the speaker and use it during
installation.
For details on the speaker stand installation, refer to the
operating instructions supplied with the speaker stand.
Notes
t When you use the optional speaker stand, do not lean
or hang on the speaker, as the speaker may fell down.
t Be sure to place the speaker in a at, horizontal place.
Hooking up the system
Be sure to turn o the power of the amplier and the
subwoofer before making any connection.
Connect the center and the surround speakers to the
speaker output terminals of an amplier and use the
LINE IN jack of the subwoofer to connect to the
amplier. (&)
Notes ( ')
t Make sure the plus (+) and the minus (–) terminals on
the speakers are matched to the corresponding plus (+)
and minus (–) terminals on the amplier.
t Make sure all connections are rm. Contact between
bare speaker wires at the speaker terminals may cause
a short-circuit.
t Connect the AC power cord from the subwoofer to a
wall outlet.
t For details on the amplier connections, refer to the
operating instructions supplied with the amplier.
Tip
Black or black striped wires are minus (–) in polarity, and
should be connected to the minus (–) speaker terminals.
Positioning the speakers
Location of each speaker (()
Each speaker should face the listening position. Better
surround eect will result if all speakers are set at the
same distance from the listening position.
Place the subwoofer on either side of the television.
Place the center speaker on the top-center of the TV set.
The placement of surround speakers greatly depends on
the conguration of the room. The surround speakers
may be placed slightly behind the listening position.
Setting the center speaker ())
Set the center speaker rmly on top of the TV set, making
sure it is completely level. Be sure to use the supplied
foot pads at the bottom of the speaker.
Setting the amplier
When connecting to an amplier with internal multi
channel decoders, you should use the setup menus for
the amplier to specify the parameters of your speaker
system.
See the table below for the proper settings. For details on
the setting procedure, refer to the operating instructions
supplied with the amplier.
Speaker setup
For Set to
Front speakers SMALL
(not supplied)
Center speaker SMALL
Surround speakers SMALL
Subwoofer ON (or YES)
If you use the amplier with adjustable crossover
frequency, it is recommended to select 150 Hz (or close to
this gure) as the crossover frequency for your center
and surround speakers.
Позициониране
на говорителите
Местоположение на всеки
говорител (
()
Всеки говорител трябва да гледа към позицията за
слушане. За постигане на по-добър съраунд ефект,
разположете всички високоговорители на еднакво
разстояние от позицията за слушане.
Поставете субуфера отстрани на телевизора.
Централният говорител поставете върху телевизора.
Разположението на говорителите за съраунд звук зависи
основно от формата на стаята. Можете да поставите
говорителите за съраунд звук зад позицията за слушане.
Инсталиране на централния говорител ())
Поставете централния говорител здраво върху
телевизора, като се уверите, че се намира в
ҿҸҺҲұҸҷҼҪҵҷҸҹҸҵҸҰүҷҲүϔұҹҸҵұҬҪҳҼүҹҺҲҵҸҰүҷҲҼү
меки подложки, като ги закрепите към дъното
на говорителите.
Настройка на усилвателя
ϖҸҭҪҼҸһҬӄҺұҬҪҼүҽһҲҵҬҪҼүҵһҬӄҼҺүӂҷҲҶҷҸҭҸҴҪҷҪҵҷҲ
декодери, е необходимо да използвате менютата
за настройка на усилвателя, за да определите
параметрите на вашата система говорители.
Вижте таблицата по-долу за правилните настройки.
За подробности относно процедурата по настройка
вижте инструкциите за експлоатация на вашия усилвател.
Настройка на говорителя
За Задайте в положение
Предните високоговорители
(не са приложени)
SMALL
Централния говорител SMALL
Говорителите за съраунд звук SMALL
Субуфера ON (или YES)
Ако използвате усилвател с регулируема пресечна
честота, ви препоръчваме да изберете 150 Hz
(или близка до тази стойност) за пресечна честота на
вашия централен говорител и говорителите
за съраунд звук.
4.6 mm
10 mm
(1)
English
WARNING
To reduce the risk of fire or electric shock, do not
expose this apparatus to rain or moisture.
To reduce the risk of fire, do not cover the ventilation
opening of the apparatus with newspapers, tablecloths,
curtains, etc.
Do not place the naked flame sources such as lighted
candles on the apparatus.
To reduce the risk of fire or electric shock, do not expose
this apparatus to dripping or splashing, and do not place
objects filled with liquids, such as vases, on the
apparatus.
Do not install the appliance in a confined space, such as a
bookcase or built-in cabinet.
As the main plug is used to disconnect the unit from the
mains, connect the unit to an easily accessible AC outlet.
Should you notice an abnormality in the unit, disconnect
the main plug from the AC outlet immediately.
The unit is not disconnected from the mains as long as it
is connected to the AC outlet, even if the unit itself has
been turned off.
For customers in Europe
Disposal of Old Electrical & Electronic
Equipment (Applicable in the
European Union and other European
countries with separate collection
systems)
This symbol on the product or on its packaging indicates
that this product shall not be treated as household waste.
Instead it shall be handed over to the applicable
collection point for the recycling of electrical and
electronic equipment. By ensuring this product is
disposed of correctly, you will help prevent potential
negative consequences for the environment and human
health, which could otherwise be caused by
inappropriate waste handling of this product. The
recycling of materials will help to conserve natural
resources. For more detailed information about recycling
of this product, please contact your local Civic Office,
your household waste disposal service or the shop where
you purchased the product.
Notice for customers: The following information
is only applicable to equipment sold in countries
applying EU Directives.
The manufacturer of this product is Sony Corporation,
1-7-1 Konan Minato-ku Tokyo, 108-0075 Japan. The
Authorized Representative for EMC and product safety
is Sony Deutschland GmbH, Hedelfinger Strasse 61,
70327 Stuttgart, Germany. For any service or guarantee
matters please refer to the addresses given in separate
service or guarantee documents.
Precautions
On safety
• Before operating the subwoofer, be sure that the
operating voltage of the subwoofer is identical with
that of your local power supply.
• Unplug the subwoofer from the wall outlet if it is not to
be used for an extended period of time. To disconnect
the cord, pull the cord by grasping the plug. Never pull
the cord itself.
• Should any liquid or solid object fall into the
subwoofer, unplug the subwoofer and have the
subwoofer checked by qualified personnel before
operating it any further.
• AC power cord must be changed only at the qualified
service shop.
• Install this system so that the power cord can be
unplugged from the wall socket immediately in the
event of trouble.
On operation
• Do not drive the speaker system with a continuous
wattage exceeding the maximum input power of the
system.
• If the polarity of the speaker connections are not
correct, the bass tones will be weak and the position of
the various instruments obscure.
• Contact between bare speaker wires at the speaker
terminals may result in a short-circuit.
• Before connecting, turn off the amplifier to avoid
damaging the speaker system.
• The volume level should not be turned up to the point
of distortion.
• Do not attempt to open the enclosure or remove
speaker units and networks.
• Do not press the dust cap intentionally or
unintentionally.
If you encounter color irregularity on a
nearby TV screen
The center speaker is magnetically shielded to allow it to
be installed near a TV set. However, color irregularities
may still be observed on certain types of TV sets. As the
surround speakers are not magnetically shielded, we
recommend that you place them slightly further away
from a TV set.
If color irregularity is observed...
c Turn off the TV set, then turn it on again in 15 to 30
minutes.
If color irregularity is observed again...
c Place the speakers further away from the TV set.
If howling occurs
Reposition the speakers or turn down the volume on the
amplifier.
On placement
• Do not set the speakers in an inclined position.
• Do not place the speakers in locations that are:
— Extremely hot or cold
— Dusty or dirty
— Very humid
— Subject to vibrations
— Subject to direct sunlight
• Use caution when placing the speaker on a specially
treated (waxed, oiled, polished, etc.) floor, as staining
or discoloration may result.
• Take care to avoid any possible injury on the corners of
the subwoofer.
On cleaning
Clean the speaker cabinets with a soft cloth lightly
moistened with a mild detergent solution or water. Do
not use any type of abrasive pad, scouring powder or
solvent such as alcohol or benzine.
If you have any questions or problems concerning your
speaker system, please consult your nearest Sony dealer.
Assembly
Attaching the foot pads
Be sure to attach the supplied foot pads to the center
speaker (A) and the subwoofer (B).
Installing the surround speakers
on the wall (C)
1 Prepare screws (not supplied) that are
suitable for the hole on the back of
surround speakers.
2 Fasten the screws to the wall. The
screws should protrude 7 to 10 mm
(
9
/32 to
13
/32 in.).
3 Hang the speakers on the screws.
Notes
• Use screws that are suitable for the wall material and
strength. As a plaster board wall is especially fragile,
attach the screws securely to a beam and fasten them to
the wall. Install the speakers on a vertical and flat wall
where reinforcement is applied.
• Contact a screw shop or installer regarding the wall
material or screws to be used.
• Sony is not responsible for accident or damage caused
by improper installation, insufficient wall strength or
improper screw installation, natural calamity, etc.
Installing the surround speakers
using an optional speaker stand
(not supplied)
For greater flexibility in positioning the speakers, use the
optional WS-FV11, WS-FV10D speaker stand (available
only in certain countries).
Before you install the speaker stand, be sure to detach the
screw A (D) from the speaker and use it during
installation.
For details on the speaker stand installation, refer to the
operating instructions supplied with the speaker stand.
Notes
• When you use the optional speaker stand, do not lean
or hang on the speaker, as the speaker may fell down.
• Be sure to place the speaker in a flat, horizontal place.
Hooking up the system
Be sure to turn off the power of the amplifier and the
subwoofer before making any connection.
Connect the center and the surround speakers to the
speaker output terminals of an amplifier and use the
LINE IN jack of the subwoofer to connect to the
amplifier. (E)
Notes (F)
• Make sure the plus (+) and the minus (–) terminals on
the speakers are matched to the corresponding plus (+)
and minus (–) terminals on the amplifier.
• Make sure all connections are firm. Contact between
bare speaker wires at the speaker terminals may cause
a short-circuit.
• Connect the AC power cord from the subwoofer to a
wall outlet.
• For details on the amplifier connections, refer to the
operating instructions supplied with the amplifier.
Tip
Black or black striped wires are minus (–) in polarity, and
should be connected to the minus (–) speaker terminals.
Positioning the speakers
Location of each speaker (G)
Each speaker should face the listening position. Better
surround effect will result if all speakers are set at the
same distance from the listening position.
Place the subwoofer on either side of the television.
Place the center speaker on the top-center of the TV set.
The placement of surround speakers greatly depends on
the configuration of the room. The surround speakers
may be placed slightly behind the listening position.
Setting the center speaker (H)
Set the center speaker firmly on top of the TV set, making
sure it is completely level. Be sure to use the supplied
foot pads at the bottom of the speaker.
Setting the amplifier
When connecting to an amplifier with internal multi
channel decoders, you should use the setup menus for
the amplifier to specify the parameters of your speaker
system.
See the table below for the proper settings. For details on
the setting procedure, refer to the operating instructions
supplied with the amplifier.
Speaker setup
For Set to
Front speakers SMALL
(not supplied)
Center speaker SMALL
Surround speakers SMALL
Subwoofer ON (or YES)
If you use the amplifier with adjustable crossover
frequency, it is recommended to select 150 Hz (or close to
this figure) as the crossover frequency for your center
and surround speakers.


