Page is loading ...

Vermont 48V
User Manual
User Manual

About Daymak
Daymak is one of Canada’s largest Alternative Vehicle providers. We design, engineer, man-
ufacture, import and repair everything from recreational dirt bikes, go-karts and electric
golf cars to alternative transportation solutions such as e-bikes and gas scooters.
Our electric bicycles represent an energy-e cient and eco-friendly alternative for people
who need to get around the city. They greatly increase the practicality of bicycle transpor-
tation in urban centres. Costing only a few cents to charge, an e-bike can make city life
more convenient and much less expensive.
While there are many new Green technologies that are still in their infancy, electric bicycles
have been developing over the last 40 years or more. E-bike technology has been dramat-
ically re ned since the introduction of the rst custom-conversion bicycles. Today, electric
bicycles are a supremely reliable and a ordable means of transportation.
Daymak is constantly developing new eco-friendly alternative transportation strategies,
led by its own Research and Development department in Toronto, Canada. We are always
improving our products. Our innovative in-house engineering and quality testing provide
customers with many new kinds of reliable, eco-friendly vehicles, designed to help change
the lives of our customers and the world.
Daymak warranties, services, and stocks parts for everything it sells. We support our prod-
ucts.
Please feel free to visit our website. You’ll nd the latest in cool transportation solutions,
support for the products you’ve purchased and contact information.

Table of Contents
Introduction......................................................................................................................................................4
Assembly............................................................................................................................................................5
Recharging Your Battery ..............................................................................................................................6
Maintenance........... .........................................................................................................................................7
Technical Specs................................................................................................................................................8
Operating the Vermont.................................................................................................................................9
Repair Schedule............................................................................................................................................12

4
Introduction
By making the decision to use an electric bike you are helping to safeguard our en-
vironment by saving our planets precious and not adding to carbon pollution.
Thank for choosing this electric bicycle.
Our bikes are manufactured under rigorous control to the most stringent European
and UAS safety standards and are constantly spot checked both here and in the
factory. For many years we have been engaged in the research and development of
electric bicycles and cars and this electric bicycle is the culmination of those eff orts.
Before you use it, it is important that you read this manual carefully. If there is any-
thing you do not understand completely please do not hesitate to.
Please observe traffi c regulations, and don’t lend your bicycle to anyone who is
unfamiliar with it. The bicycle can only legally be used on the queen’s highway by a
person aged 14 years or older.
We strongly advise you to always wear a cycle helmet when using your bicycle and
to attend a Cycle profi ciency course prior to using on the open road. It is not a toy
and should be considered as a serious mode of transport.
1. Before you set off
Check handlebars are properly tightened.
Check brake isolator is functioning properly.
Check tire pressures are correct.
Make sure battery is fully charged.
Load battery into bicycle and turn on with power key.
Please read this manual carefully. Only on full understanding of all the func
tions of this electric bicycle should you use the product.
For your safety, pleas turn off the power key when stopped or walking the
bike.
2. Battery care
2.1 Before setting off on any journey it is always better to have a fully charged bat
tery.
2.2 Always remember that you use up to three times more power when setting off
under the twist throttle or riding up steep hills.

5
To preserve the life of each charge always set off and climb hills using 1:1 ped
al assist rather than the twist throttle.
2.3 Do not expose the bicycle or battery package to fi re, extreme heat sources or
alkaline substances.
2.4 When leaving your bicycle during hot weather always try to leave in a shaded
well ventilated area.
2.5 For best results always recharge the battery at room temperature.
2.6 To maximize the life of the battery always leave it fully charged when not in use
and if possible recharge once every 4 weeks.
2.7 Before unloading the battery, fi rst raise the saddle and unload the battery using
its handle.
Important notice
Worn out batteries should be disposed of properly or returned to us for a credit
against the cost of a replacement.
3. Recharging your battery
3.1 First connect the output connector plug with the battery, and then connect
to the mains. A red lamp on the charger indicates the battery is charging, when
this turns green the battery fully charged. Please disconnect from the mains
after charging. Always disconnect the charger from the mains before discon
necting form the battery. It is possible that the battery will take up to 6 hours to
charge on the fi rst three charges.
3.2 When charging the battery always do so in a ventilated area.
3.3 Do not leave the charger connected to the mains when not in use.
4. Water and your electric bicycle
4.1 Your electric bicycle is rain and splash proof and can be used in all weathers.
4.2 The electrical components of the vehicle, such as motor, battery, and controller,
must not be submerged in water.

6
5. Maintenance and adjustments
5.1 Do not attempt to open the casing of the battery, motor, or regulator or all warran-
tees will become void. If you experience a problem contact our service department.
5.2 Wheel spokes should be adjusted after 6 months. Handlebar and saddle tubes
should never be on the nuts positioning the handlebar, handlebar vertical tube, bicy-
cle saddle, saddle tube and front wheels is 18NM. The minimum torque on the nuts
on the pedal bearing axle and rear wheel is 30NM.
5.3 If the chain becomes loose or frequently comes off the front cog, you can easily
adjust the chain tension by loosening the rear axle nuts slightly, and adjusting the
tension bolts. Make sure that the chain runs freely and re tighten the axle nuts.
5.4 The brake leavers should lock the wheels when compressed half way between
their open position and touching the handlebars. When the need adjusting use the
following methods:
Front brake: Loosen the nuts the cable clamp, then tension or release the steel cable,
until the gap between the wheel and brake rubber is 1.5 to 2.0 mm.
Rear brake: Loosen the nuts on the cable clamp, then tension or release the steel
cable until you can feel the brake lever’s motion is fl uid and does not lock the back
wheel until it is the correct position.
Warning: Braking distances increase on wet or icy roads.
5.5 Regularly lubricate the gears and chain with light oil and the brake bushes (not
the rubber brake shoes) with a little grease.

7
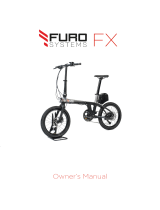
1. Handlebar
2. Display
3. Seat
4. Battery
5. Ignition/Battery Lock
6. Motor
7. Rear Tire
8. Pedal
9. Front Tire
10. Headlight
11. Brakes
12. Front Fender
13. Chain
14. Kickstand
15. Rear Fender

8
7. Technical specifi cations & performance
General specifi cations Battery specifi cations
Type Electric bicycle Cell type Lithium ion
Max speed 32km/h Capacity 12Ah
Net weight 15kgs Rate voltage 48V
Max range 30-40km
Carrying load 120kgs Main Controller specifi cations
Wheel size 26”
Energy consumption per 100km <1.2kw/h
Problem Reasons for problem Trouble shooting
Top speed too slow
1. low battery voltage
2. handlebar control problem
3. damage to motor driveline
1. recharge battery fully
2. call service
3. call service
Power on but motor
not working
1. battery not connected position
2. fused
3. motor connection damaged
4. handlebar control problem
1. reinstall battery
2. replace fuse
3. call service
4. call service
Driving shorter
distance per charge
1. type pressure too low
2. undercharge or charger fault
3. battery capacity loss or damage
4. hill climbing, frequent stop and
start riding against strong wind or
weight overload
1. check pressures, pump
tyres
2. recharge complete or
have charger inspected
3. replace battery
4. use 1:1 power assist
Charger not
working
1. charger fuse blown
2. charger damage
1. replace fuse
2. call service

9
8. Operating the Vermont
8.1 Shifters
The Vermont 48V has quick shift, Shimano shifters. These will increase or decrease the man-
ual diffi culty of the bike. By pressing in the plus (+) button, you will move the chain to a hard-
er gear making it more diffi cult to pedal however increasing the speed and decreasing the
amount of revolutions required to travel. Higher gears are recommended when going down
hills or straight fl ats.
By pushing the Minus ( - ) lever away from you, you will decreased the gear that you are on
making it easier for you to pedal but decreasing maximum speed and increasing how many
cycles you need to pedal to travel. Lower gears are recommended when going up steep hills.

10
8.2 Display
On the left you have 4 buttons:
Plus button: Increase the level of pedal assist. Maximum of 6. The higher level of pedal assist the
less amount of manual energy is required to get to pedal the bike.
Power button: Turns on and off the bike when held for 2 seconds. This only works provided that the
battery is in place and the ignition is set to on. If pressed without being held will turn on and off the
back lit display.
Set Button: Used for diagnostic purposes only
Minus button: Decrease the level of pedal assist. Minimum of 0. If set to 0 the motor will not engage
while pedalling only when using the throttle.
On the display you have the following from top to bottom:
Your current speed
The current level of pedal assist
The battery level
The amount of kilometers you have travelled on the last trip
The total amount of kilometers travelled.

11
8.3 Battery
The battery can be charged both in the Vermont
48V as well as outside of it. The charging port cov-
er needs to be pushed to the side to expose the
port (Circle with 3 Prongs). When putting keys into
the key hole, you must push in and turn clockwise
to engage the battery lock, then once more to turn
on the ignition. Once the ignition is turned on, you
may use the power button on top of the battery to
quickly check the battery life.
To remove the battery from the unit simply turn
counterclockwise once, push in and turn counter-
clockwise a second time and then pull up from the
handle (You may need to remove the seat fi rst to
do this )
8.4 Throttle
On the right handlebar you will fi nd a throt-
tle. By twisting this throttle towards you, you
can have the motor engage without pedal-
ing. The more you twist it the more power
will be given to the motor.
8.5 Kill Switch
The red button on the throttle is the kill
switch. When this is pressed in, the motor
and throttle will provide a boost provided
everything is turned on. When it is out the
motor will not give any power.

12
9. Repair or replacement of components
Only use this product in accordance with this user manual.
We off er a limited warrantee of on the following items.
9.1 Welds on the main frame, front forks, splashboard, or wheel rims.
9.2 Gears, bearings, motor shell, hub motor.
9.3 Handlebar controls, brakes (excluding rubber brake shoes),
controller, charger, or battery capacity.
9.4 Paintwork (excluding deliberate damage or scratching)
9.5 Front and rear axle, fl ywheel, chain wheel, or driveline
9.6 Battery casing, battery leak, battery capacity step-down more
than 40%.
Additional Limited Warrantees
1. If the product has any quality fault within 15 days if sale you may choose to have
the bike repaired or replaced.
2. The period of assurance shall commence from the day the sale was made.
3. Beyond the period of assurance, we off er lifelong repair, but the cost of labor, parts
and delivery will be charged.
Exception to Limited Warrantees
1. Damage resulting from misuse, not maintaining the vehicle or not following the
guidelines within this user guide.
2. Accidental or deliberate damage.
3. Damage due to private repair by user or unauthorized service center.
4. Failure to produce invoice or proof of purchase.
5. Spare parts and components worn in normal use.
/