Page is loading ...

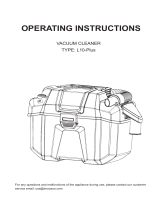
Vacuum Cleaner
(Domestic use)
Thank you for purchasing the vacuum cleaner.
Please read these instructions carefully before using the
appliance and save these instructions for future reference.
Model No. MC-UL742
MC-UL740
Operating Instructions
Contents
Disposal. . . . . . . . . . . . . . . . . . . . . . . . . . . . . . . . . . . . . 2
IMPORTANT SAFETY INSTRUCTIONS . . . . . . . . . . . 3
CAUTION FOR AC MAINS LEAD
(UK and Republic of Ireland only) . . . . . . . . . . . . . . . . . 6
Vacuum Cleaner Parts. . . . . . . . . . . . . . . . . . . . . . . . . . 7
How to use the Vacuum Cleaner . . . . . . . . . . . . . . . . . . 8
Maintenance . . . . . . . . . . . . . . . . . . . . . . . . . . . . . . . . .11
Trouble Shooting . . . . . . . . . . . . . . . . . . . . . . . . . . . . . 14
Specifications . . . . . . . . . . . . . . . . . . . . . . . . . . . . . . . 15
Product Fiche . . . . . . . . . . . . . . . . . . . . . . . . . . . . . . . 16
Vacuum Cleaner Consumables / Accessories
(For UK and Republic of Ireland customers only) . . . . 17
Guarantee . . . . . . . . . . . . . . . . . . . . . . . . . . . . . . . . . . 18
Reminder for Customer . . . . . . . . . . . . . . . . . . . . . . . . 18

Disposal
Disposing the appliance
Before disposing the appliance, remove the
dust bag and all the filters, and then dispose
them with normal household waste.
Information on Disposal for Users of
Waste Electrical & Electronic Equipment
(private households)
This symbol on the appliances and/or
accompanying documents means that
used electrical and electronic appliances
should not be mixed with general household
waste. For proper treatment, recovery and
recycling, please take these appliances
to designated collection points, where
they will be accepted on a free of charge
basis. Alternatively, in some countries you
may be able to return the appliances to
your local retailer upon the purchase of an
equivalent new appliance. Disposing of this
appliance correctly will help to save valuable
resources and prevent any potential
negative effects on human health and the
environment which could otherwise arise
from inappropriate waste handling. Please
contact your local authority for further details
of your nearest designated collection point.
Penalties may be applicable for incorrect
disposal of this waste, in accordance with
national legislation.
Information on Disposal in other
Countries outside the European Union
This symbol is only valid in the European
Union.
If you wish to discard this appliance, please
contact your local authorities or dealer and
ask for the correct method of disposal.
Disposing packaging
Make sure that any package, for example,
plastic bags, are kept out of the reach of
children to avoid risk of suffocation.
The packaging used to protect the appliance
from damage during transportation is all
recyclable. For information on recycling,
contact your local authority.
Disposing dust bags and filters
Dust bags and filters can be disposed of
with the normal household waste.
2
Correct usage
- This appliance is for indoor use with domestic purpose only
and is not specifically designed for allergy sufferers. Use
the appliance only in accordance with the instructions in this
manual. Any other usage or modification is dangerous. The
manufacturer is not liable for damage due to improper use of
the appliance.
WARNING
To reduce the risk of fire, electric shock, or injury
- This appliance can be used by children aged from 8 years and
above and persons with reduced physical, sensory or mental
capabilities or lack of experience and knowledge if they have
been given supervision or instruction concerning use of the
appliance in a safe way and understand the hazards involved.
- Children shall not play with the appliance. Cleaning and
user maintenance shall not be made by children without
supervision.
- Do not use the appliance if the mains lead or plug is damaged
or faulty.
- If the mains lead is damaged, it must be replaced by the
manufacturer, its service agent or similarly qualified persons in
order to avoid a hazard.
- The plug must be removed from
the socket outlet before
cleaning or maintaining the appliance.
- Turn off the appliance before removing the plug. Do not pull on
the mains lead, always pull on the plug body itself.
IMPORTANT SAFETY INSTRUCTIONS
Before using the vacuum cleaner, please observe these
basic safety instructions.
3

- Hold the plug, when rewinding the mains lead.
- Do not handle plug or the appliance with wet hands.
- Do not use the appliance on people or animals.
- Do not use wet filters after washing, make sure they are
completely dry to avoid damaging the appliance.
- Do not vacuum the followings
- Hot ash or embers
- Large and sharp objects
- Water or other liquids
- Explosive materials or gases
- Flammable or combustible materials or gases
- Toner dust, for example, those from printers and
photocopiers
- Conductive dusts from power tool
- Keep the appliance away from heat sources, for example,
radiators, fires, direct sunlight, etc.
- Do not use the appliance in areas where flammable or
combustible materials or gas may be present.
- This appliance is fitted with a thermal cut-out device which
automatically turns off the appliance to prevent overheating
of the motor. When this happens, disconnect the appliance
from the socket outlet and check the dust bin and filters as
they may be full or clogged with fine dust. Check for any
other obstructions in the hose or tube. After removing the
obstruction, leave the appliance to cool down until the thermal
cut-out resets after approximately 60 minutes.
- Do not use or store the appliance or the parts at head level to
avoid the risk of injury.
4

- Do not sit on the appliance.
- Be careful when using the appliance on staircases as the
appliance may fall.
- Use the appliance where the lighting is sufficient to avoid the
risk of tripping.
5
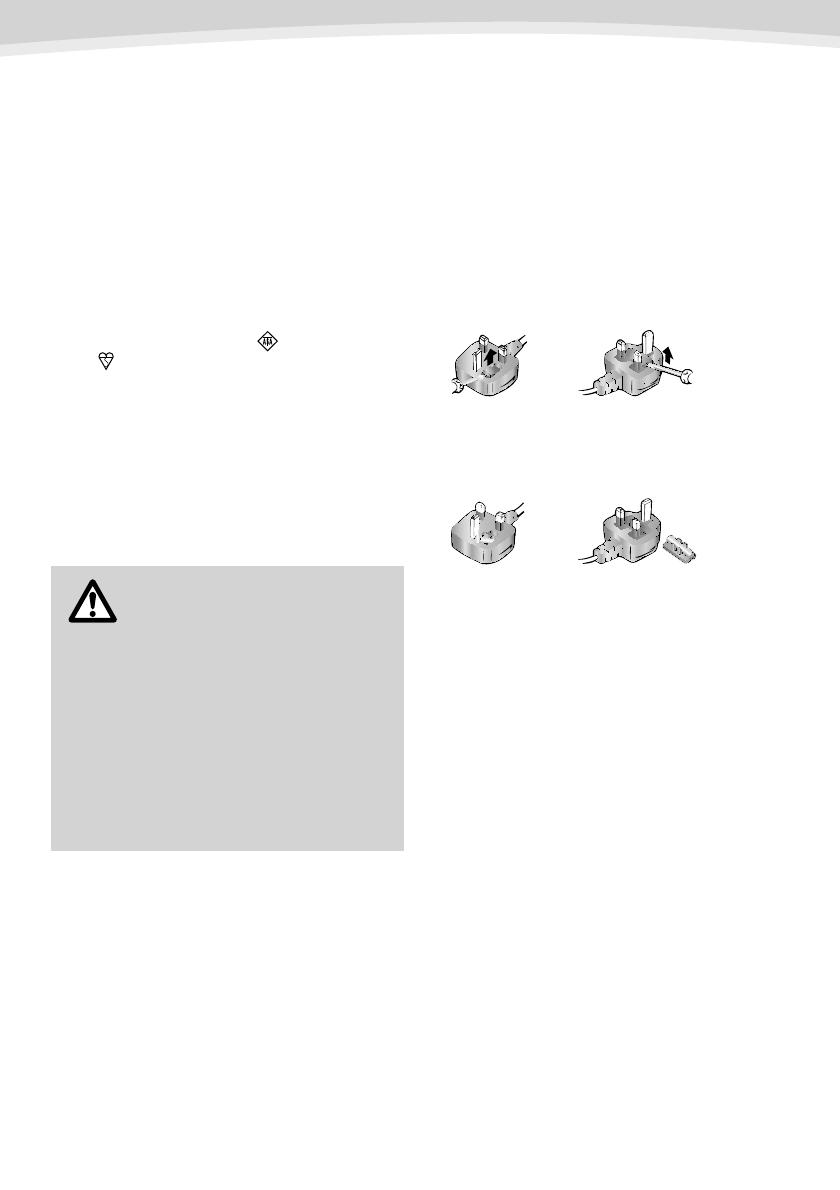
This appliance is supplied with a moulded
three pin plug for your safety and
convenience.
A 13-amp fuse is fitted in this plug.
Should the fuse need to be replaced please
ensure that the replacement fuse has a
rating of 13 amps and that it is approved by
ASTA or BSI to BS1362.
Check for the ASTA mark
or the BSI
mark
on the body of the fuse.
If the plug contains a removable fuse cover,
you must ensure that it is refitted when the
fuse is replaced.
If you lose the fuse cover, the plug must
not be used until a replacement cover is
obtained.
A replacement fuse cover can be purchased
from your local Panasonic Dealer.
WARNING
- IF THE FITTED MOULDED PLUG IS
UNSUITABLE FOR THE SOCKET
OUTLET IN YOUR HOME THEN THE
FUSE SHOULD BE REMOVED AND
THE PLUG CUT OFF AND DISPOSED
OF SAFELY.
THERE IS A DANGER OF SEVERE
ELECTRICAL SHOCK IF THE CUT
OFF PLUG IS INSERTED INTO ANY
13-AMP SOCKET OUTLET.
Replacing the fuse
The location of the fuse differs according to
the type of plug of the supplied mains lead
as follows.
1 Open the fuse cover with a
screwdriver.
2 Replace the fuse and close or attach
the fuse cover.
CAUTION FOR AC MAINS LEAD
(UK and Republic of Ireland only)
FOR YOUR SAFETY PLEASE READ THE FOLLOWING TEXT CAREFULLY.
Type A Type B
Type A Type B
6
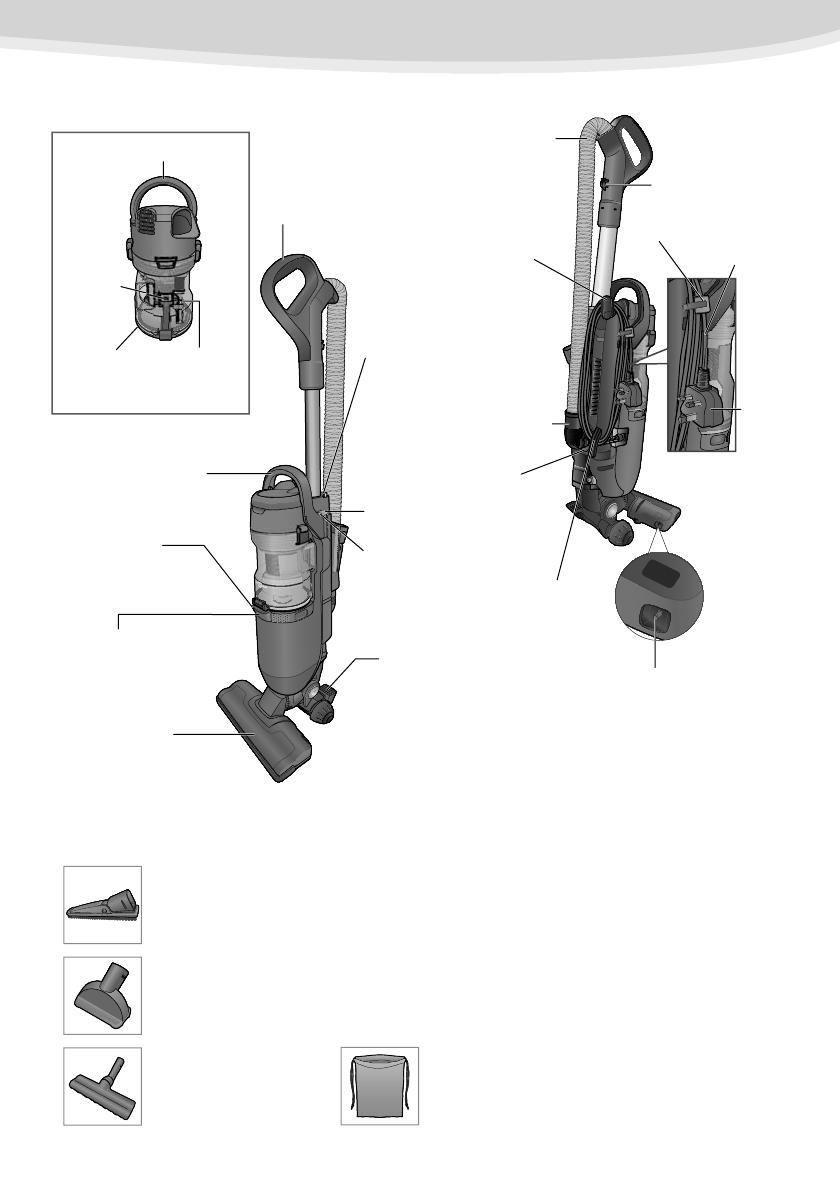
Vacuum Cleaner Parts
Alternative nozzles
Dusting brush
(Blinds brush)
For blinds,
cushions, etc.
Upholstery nozzle
For cushions,
covers, etc.
(MC-UL742 only)
Mattress nozzle
For bed sheet,
cushions, etc.
(MC-UL742 only)
Model: MC-UL742
Tool bag kit
For accessories, etc.
(MC-UL742 only)
The overload protection inside the
nozzle stops the nozzle motor when
the beater bar jams to prevent belt
breakage.
Floor nozzle
Plug
Mains lead
Hose
Mains lead hook
Filter cover
Exhaust filter(inside)
(HEPA filter)
Foot pedal
(Handle release)
Dust bin
Dust bin handle
Latch
Dust bin
plate
Carrying handle
Beater bar switch
ON/OFF switch
Handle release
button
Upper cord
storage hook
Lower cord
storage hook
Connection pipe
Suction inlet
Overload protection
reset button
Overload protection
Cord clip
Handle
(Quick draw handle)
Cleaning
brush
7
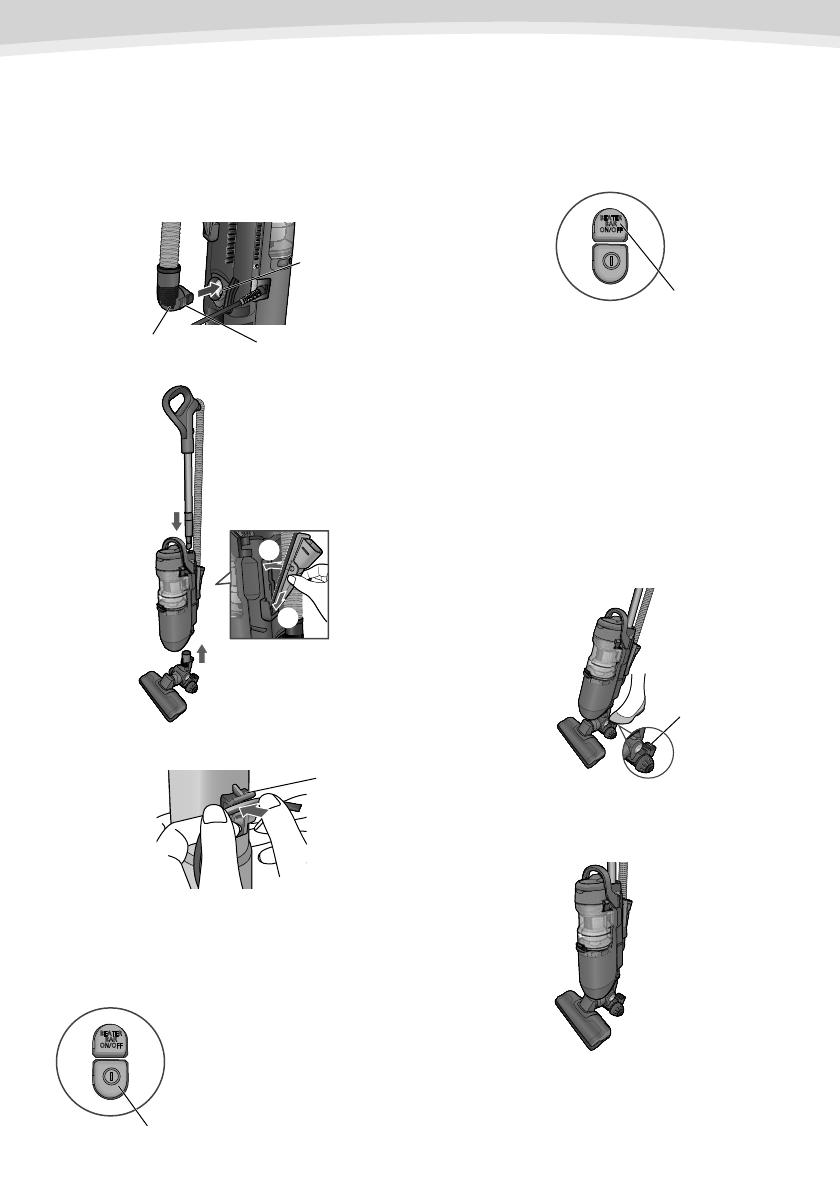
Operating the appliance
1 Insert the connection pipe to suction
inlet. Ensure that the 2 hooks of the
connection pipe are completely fitted
into the suction inlet.
2 Insert the parts into each location as
shown.
ŋ
Ō
3 Fix the mains lead into the cord clip to
secure stability during use.
4 Insert the plug into the socket outlet.
5 Press the ON/OFF switch to turn
on the appliance. Main motor is
operating.
6 Press the beater bar switch to turn it
ON or OFF to suit the flooring being
cleaned.
When the appliance is in the upright
position the beater bar will automatically
stop rotating.
Set the beater bar when using on the
hard floors.
This appliance can not be used Fully Flat.
Please ensure the lower cord storage
hook hood does not to hit the floor.
7 To unlock the handle of the appliance,
step on the foot pedal and the handle
angle can be changed freely. To return
into the upright position, simply put
the handle back until it clicks.
Upright position
The handle has to be in the upright
position whilst in storage or during
cleaning of parts.
Cord clip
ON/OFF switch
Beater bar switch
Connection pipe
Suction inlet
Hook
Foot pedal
NOTE:
When operating the unit in
upright position,
whooshing sound is made,
but it is not malfunction.
How to use the Vacuum Cleaner
8

How to use the alternative
nozzles
When using the handle(quick draw handle),
please place the nozzle as shown.
1) Before pressing the handle release
button, please remove the mains lead
from the cord clip.
2) Attach the alternative nozzles to the
crevice part in accordance with your
needs.
The crevice nozzle part is already
attached to the wand:
Pull the crevice nozzle part until it clicks
when using it in extended condition.
Shorten it to the original position while
pushing the button.
Dusting brush
Upholstery nozzle(MC-UL742only)
Mattress nozzle(MC-UL742only)
Crevice nozzle part: This nozzle is
already attached with the wand.
Storing
Perform the following before storing.
1 Turn off the appliance, and then
remove the plug from the socket
outlet.
2 Turn the upper cord storage hook
in the upright position and wind the
mains lead around the upper and
lower cord storage hooks.
For the proper arrangement of
the mains lead while storing the
appliance, it is advisable to use the
mains lead hook as shown.
Mattress nozzle
Upholstery nozzle
Dusting brush
Crevice nozzle
part
Plug
Mains lead
Mains lead hook
Upper cord
storage hook
Lower cord
storage hook
Button
Pull
Handle
(Quick draw handle)
Handle release
button
9

How to empty the dust bin
Empty the dust bin in the following cases:
- When dust level reached the “MAX”
line.
- When suction power has dropped.
1 Grasp the dust bin handle on the
top of the dust bin. Lift up and out to
remove dust bin from the appliance.
2 Press the latch to open the dust bin
plate and the dust will fall out.
3 Remove rubbish and dust with the
cleaning brush.
4 Close the dust bin plate until it clicks.
5 Put the dust bin back into the
appliance with the dust bin handle in
the upright position.
6 Press down the dust bin handle until it
click into place.
Latch
Cleaning brush
Pre-motor filter
10

Maintenance
WARNING
- The plug must be removed from
the socket outlet before cleaning or
maintaining the appliance.
CAUTION
- Do not use detergent or any other
cleaning liquids.
Cleaning the outside of the
appliance
Clean the outside of the appliance with a
soft cloth.
Replacing the exhaust filter
Replace the exhaust filter once a year.
Pull out the exhaust filter and insert a
new exhaust filter to the main body.
1 Hold the filter cover as shown, and
pull it out.
2 Install a new exhaust filter or the
current one into its original position.
3 Place the filter cover to the body and
press into its original position.
Cleaning the floor nozzle
1 Cut off any carpet pile and lint
entangled around the beater bar
inside of the floor nozzle with a pair of
scissors.
2 Release the lower plate by rotating
the lower plate latches to the UNLOCK
position.
3 Remove the lower plate and remove
any residue that may exist in belt area.
4 Reinstall lower plate by hooking front
end of lower plate into slots on front
of nozzle.
5 Press lower plate onto nozzle and
secure by rotating the lower plate
latches to the LOCK position.
CAUTION
Do not wash the floor nozzle with
water.
Filter cover
Exhaust filter
(HEPA filter)
Latch
11
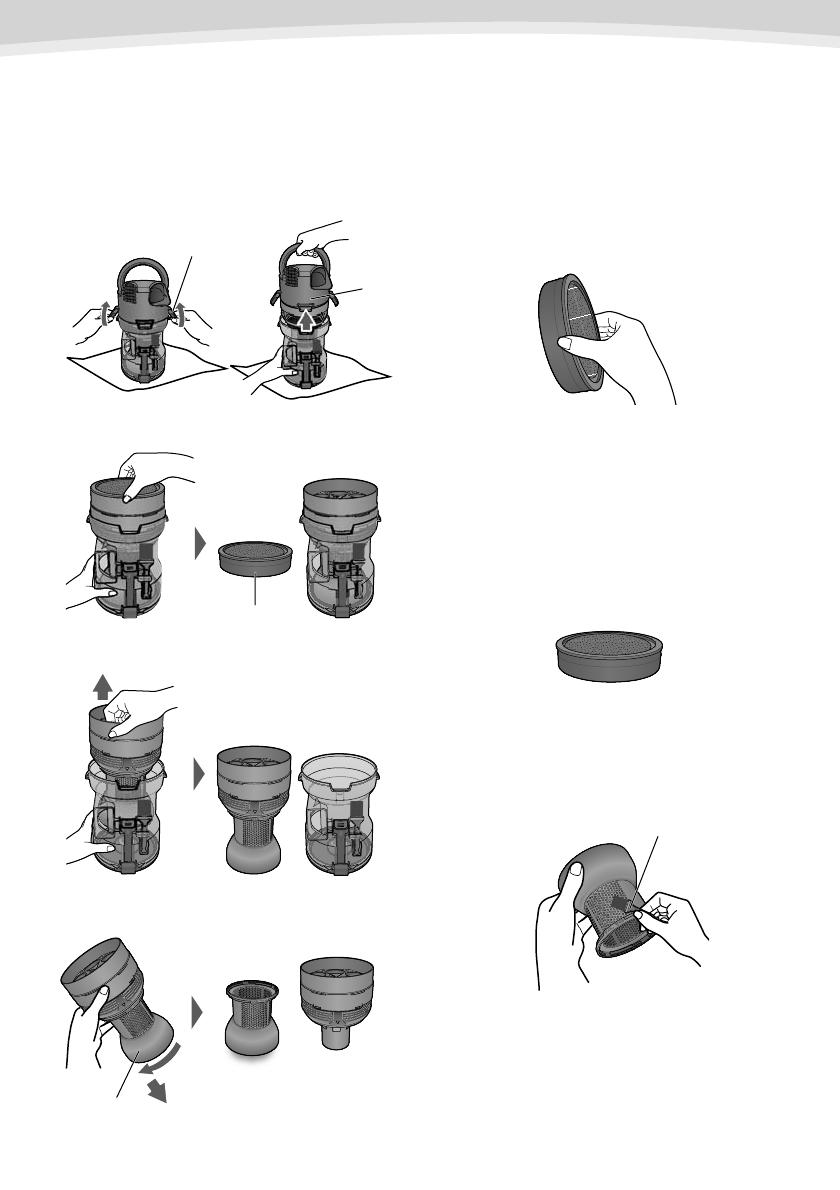
Cleaning the dust bin
Disassembly
1 Pull the buckles and take off the cover
by pulling up the dust bin handle.
2 Remove the filter.
3 Separate parts as shown.
4 Separate the mesh filter by turning
and pulling as shown.
Cleaning
<Light care>
Remove the dust by tapping the filter at
the corner of garbage can.
<Heavy care>
Wash the filter with cold water every 1
month.
Let filter completely dry for 24 hours.
Clean the plastic part with a cleaning
brush.
Buckle
Cleaning brush
Mesh filter
Cover
Filter
12

Assembly
Assemble the dust bin unit in reverse order
of disassembly.
1 Align the marks and turn the mesh
filter as shown.
2 Put the mesh filter into the dust bin
while aligning the mark and 2 ribs
location. It won’t fit unless it is set
correctly.
3 Put the cover back to its original
position.
4 Buckle them as shown.
Removing clogs
When you feel the suction power is not
adequate, check if the dust bin is full of
dust or if the filters or the air passageway is
clogged.
Pull out the nozzle
while pushing the
button.
Mesh filter
Cover
Air passageway
13

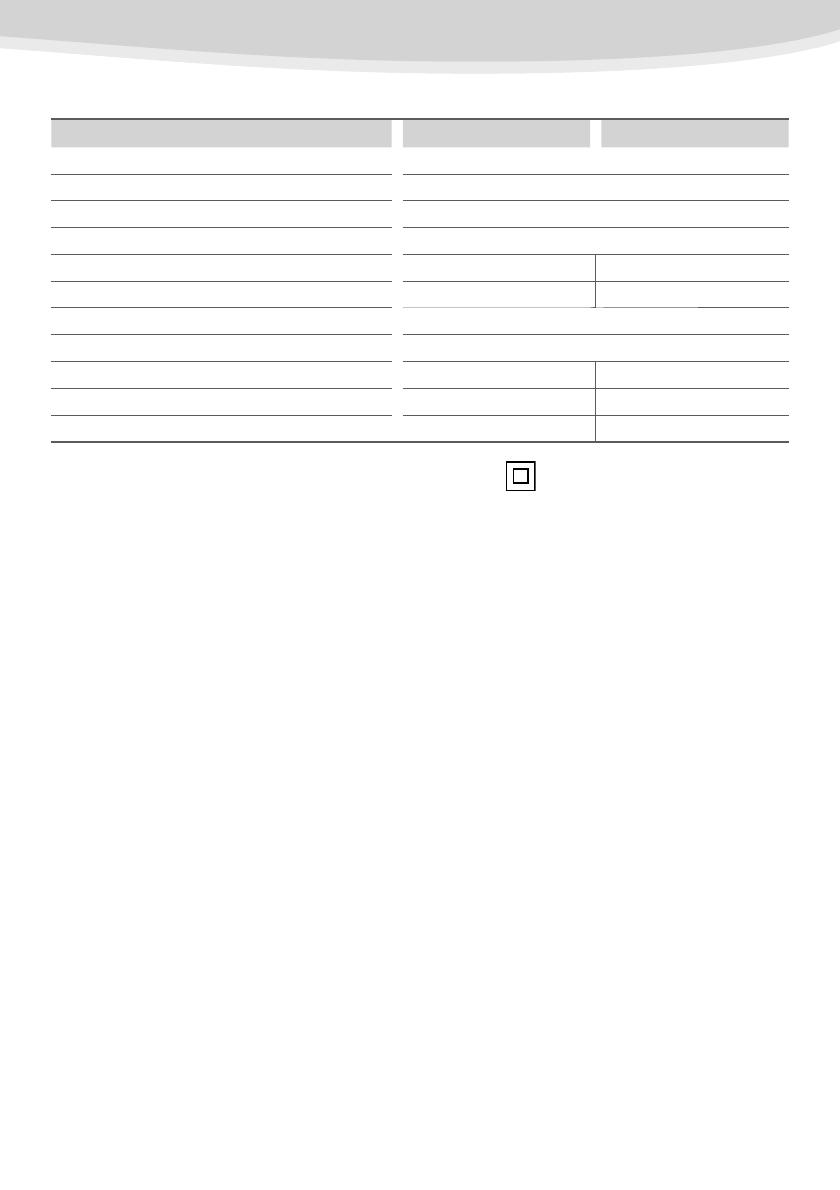
Trouble Shooting
Please check the following first if you have any problems.
Problem Possible cause Solution
Motor fails (no noise
is heard at all).
- Unplugged at socket outlet.
- Mains lead fuse blown.
- Thermal cut-out device has
operated.
- Check if the plug is connected
firmly and ON/OFF switch is
ON.
- Check fuse and replace it if
blown (see page 6).
- Unplug the appliance.
Allow to cool the appliance so
that the thermal cut-out device
will reset itself (see page 4).
- Please empty dust bin and
clean filter in the dust bin
(see page 10 and 12).
The motor runs but
lost suction.
- Full or clogged dust bin
- Worn beater bar
- Clogged nozzle
- Clogged hose or inlet
- Hose not inserted correctly.
- Dirty filters
- Empty the dust bin
(see page 10).
- Replace a new beater bar
(see page 17).
- Check for clogs (see page 13).
- Check for clogs (see page 13).
- Take to your nearest
Panasonic Service Centre.
- Check hose connection
(see page 8).
- Please empty dust bin and
clean filter in the dust bin
(see page 10 and 12).
- Replace a new HEPA filter
(see page 17).
Beater bar does not
rotate.
- Selection beater bar switch
at “OFF” position.
- Overload protection reset
button on the nozzle tripped.
- Move selection beater bar
switch to “ON” position.
- Move selection ON/OFF
switch to “OFF” position.
- Unplug the appliance, remove
the dust from the nozzle
opening (see page 11).
- Push the overload protection
reset button to reset
(see page 7).
If the problem cannot be solved, please contact your local customer service centre.
The contacts can be found in “GUARANTEE” section (see page 18).
14
Specifications
Specifications MC-UL742 MC-UL740
Power source 230 - 240 V ~ 50 Hz
Max. Input 800 W
Nominal input 690 - 750 W
Dimensions (W x L x H) 303 mm x 280 mm x 1090 mm
Net weight 5.8 kg 5.7 kg
Cord length 7.5 m 6.5 m
Floor nozzle √
Dusting brush(Blinds brush) √
Upholstery nozzle √ –
Mattress nozzle √ –
Tool bag kit √ –
* Class with respect to protection against electric shock:
15
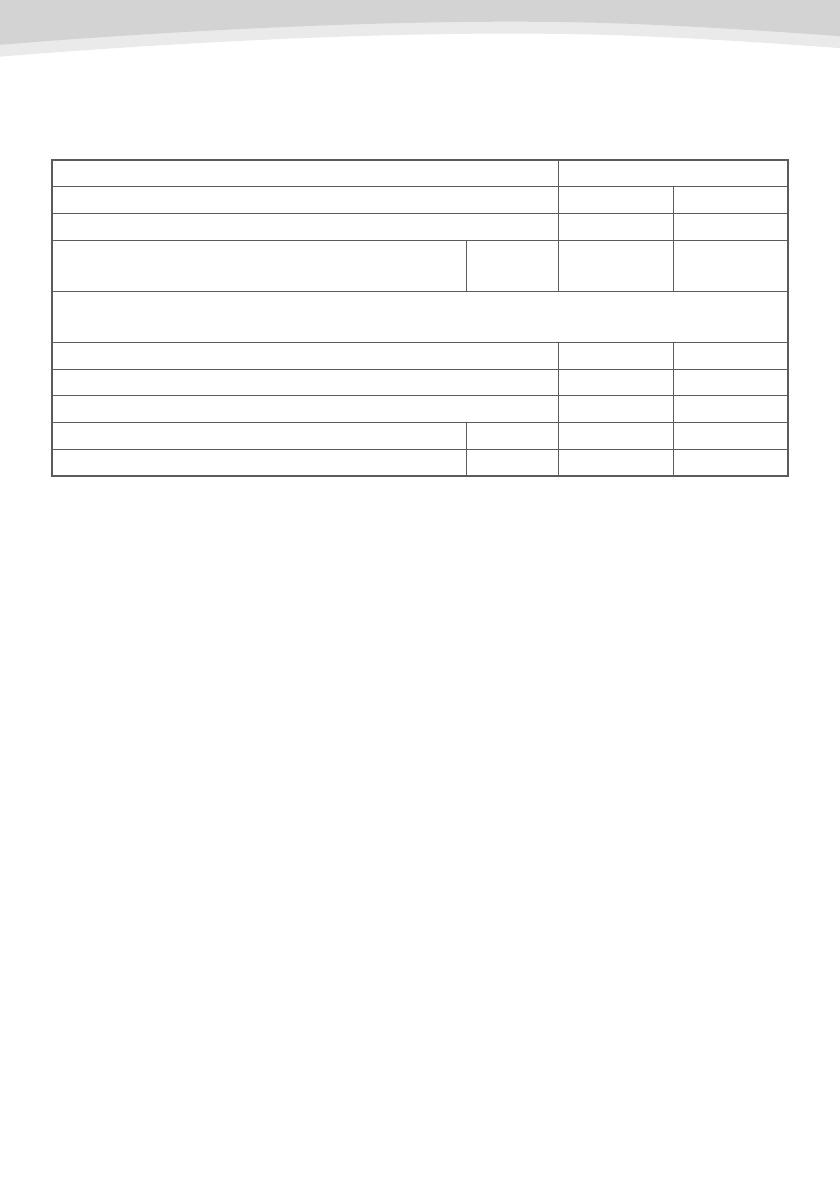
Product Fiche
General Purpose Vacuum Cleaner
(EU)Nr.665/2013
Supplier’s name Panasonic
Supplier’s model identifier MC-UL742 MC-UL740
Energy efficiency class A A
Annual energy consumption
kWh/year 25.4
25.4
Indicative annual energy consumption (kWh per year), based on 50 cleaning tasks.
Actual annual energy consumption will depend on how the appliance is used.
Carpet cleaning performance class D D
Hard floor cleaning performance class D D
Dust re-emission class A A
Sound power level
dB
80 80
Rated input power
W
690-750 690-750
These models comply with the ecodesign requirements in accordance with the latest version
of EN 60312-1.
16
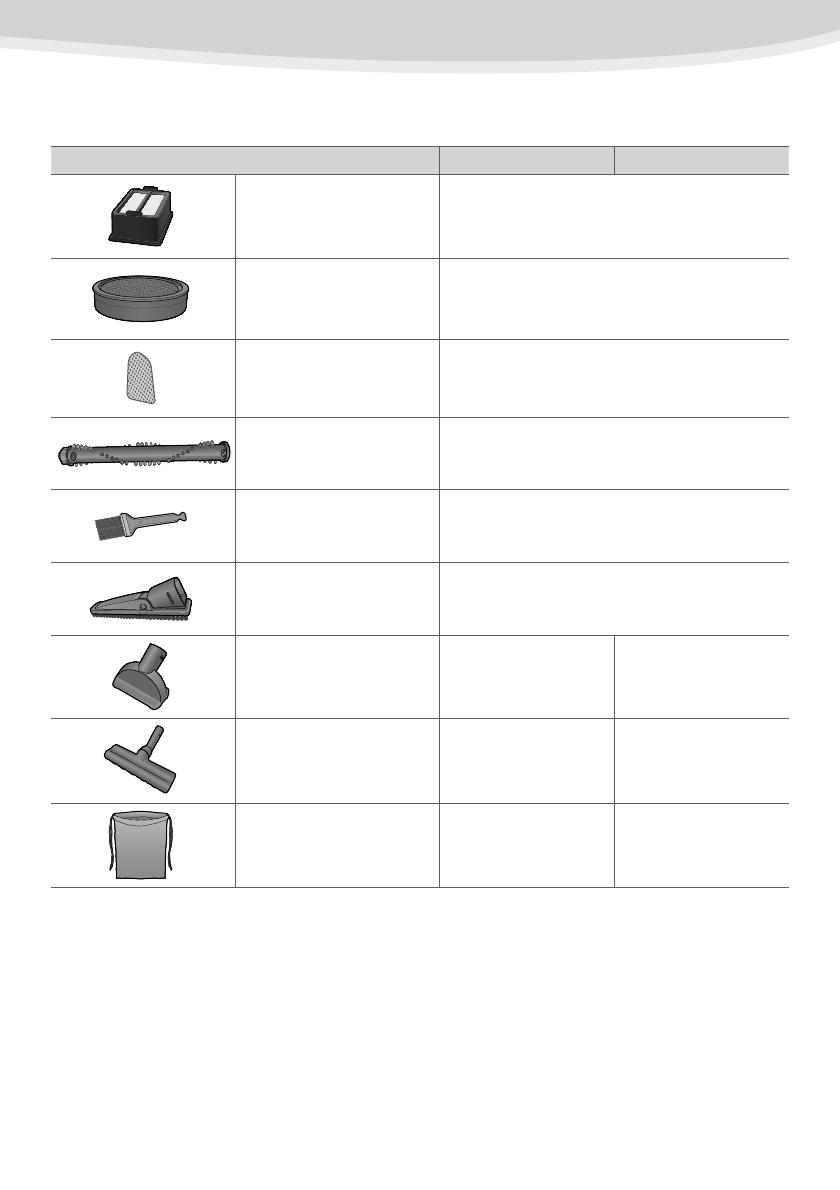
Vacuum Cleaner Consumables / Accessories
(For UK and Republic of Ireland customers only)
DESCRIPTION MC-UL742 MC-UL740
Exhaust filter
(HEAP filter)
AMV72KCV000P
Filter(washable) AMV95KD2100P
Pre-motor filter AMV43KCV000P
Beater bar AMV92RHB0R0P
Cleaning brush AMC36P11020P
Dusting brush
(Blinds brush)
AMV88R5E020P
Upholstery nozzle AMV86RD2020P –
Mattress nozzle AMV89QD2020P –
Tool bag kit AMV75RD2000P –
* Specifications are subject to change without notice.
17
Sales and Support Information
Customer Communications Centre
- For customers within the U.K.:
0844 844 3899
- For customers within Ireland:
01289 8333
- For further support on your product,
please visit our website:
www.panasonic.com/uk
Direct sales at Panasonic U.K.
- Order accessory and consumable
items for your product with ease and
confidence by phoning our Customer
Communications Centre Monday – Friday
9:00am – 5:00pm.
(Excluding public holidays).
- Or go on line through our Internet
Accessory ordering application at
www.pas-europe.com
- Most major credit and debit cards
accepted.
- All enquiries transactions and distribution
facilities are provided directly by
Panasonic U.K.
- It couldn’t be simpler!
- Also available through our Internet is
direct shopping for a wide range of
finished products. Take a browse on our
website for further details.
Guarantee
The guarantee conditions set out by our
representatives in the country of sale is
applied.
Using dust bags which are not those of
Panasonic will make the guarantee invalid.
Repairs should only be done by Panasonic
service persons or technicians. Otherwise
the guarantee will be invalid.
For more information, regarding
“GUARANTEE”, go to www.panasonic.com/
uk/support/warranty-information.
Reminder for Customer
The model and serial numbers of this
appliance can be found on either back or
the bottom of the appliance. Please note
them in the space provided and keep for
future reference.
Model number
Serial number
Date of purchase
Dealer’s name
Dealer’s address
Telephone number
18

19
V01ZHB008
F0414-0
Issued in 04 2014
Printed in China
1006, Oaza Kadoma, Kadoma-shi, Osaka 571-8501, Japan
http://www.panasonic.net/
© Panasonic Corporation 2014
/