Page is loading ...

Instruction
Manual
2-Component Sensor
Fz, Mz
Type 9345B, 9365B
9345B_002-553e-03.23


Foreword
9345B_002-553e-03.23 Page 1
Foreword
Thank you for choosing a Kistler quality product character-
ized by technical innovation, precision and long life.
Information in this document is subject to change without
notice. Kistler reserves the right to change or improve its
products and make changes in the content without obliga-
tion to notify any person or organization of such changes
or improvements.
© 2011 … 2023 Kistler Group. Kistler Group products are
protected by various intellectual property rights. For more
details visit www.kistler.com. The Kistler Group includes
Kistler Holding AG and all its subsidiaries in Europe, Asia,
the Americas and Australia.
Kistler Group
Eulachstraße 22
8408 Winterthur
Switzerland
Tel. +41 52 224 11 11
info@kistler.com
www.kistler.com

2-Component Sensor Fz, Mz, Type 9345B, 9365B
Page 2 9345B_002-553e-03.23
Content
1. Introduction............................................................................................................................... 4
2. Important Notes ........................................................................................................................ 5
2.1 For Your Safety ................................................................................................................ 5
2.2 Unpacking ....................................................................................................................... 6
2.3 Notes on Using the 2-Component Sensor .......................................................................... 6
3. General Description ................................................................................................................... 7
3.1 What is the Purpose of the 2-Component Sensor? ............................................................. 7
3.2 Design and Functional Principle of the 2-Component Sensor Type 9345B and 9365B .......... 8
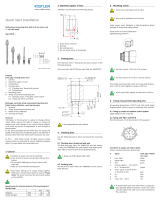
4. Installation and Startup .............................................................................................................. 9
4.1 Important Information ...................................................................................................... 9
4.2 Installation of the 2-Component Sensor ............................................................................ 9
4.3 Overview of Adaptation Possibilities Type 9345B and 9365B............................................ 11
4.3.1 Adaptation A: Installation in Shaft with Adapter for Shaft Journal with Pin............ 14
4.3.2 Adaptation B: Installation in Shaft with Adapter Flange ........................................ 16
4.3.3 Adaptation C: Installation in Shaft with Integrated Flange .................................... 18
4.3.4 Adaptation D: Deep Drawing Tool with Centric Ejection Tool ............................... 20
4.3.5 Adaptation E: Punch with Centric Ejection Bore ................................................... 21
4.3.6 Adaptation F: Riveting Tool ................................................................................ 22
4.3.7 Adaptation G: Adapter Flange for Wrenches with External Square Head ............... 23
4.3.8 Adaptation H: Screw Plate with Spring Assembly ................................................. 24
4.3.9 Adaptation I: Desktop Installation with Mounting Flange .................................... 25
4.4 Basic Circuit and Cabling of the Measuring Chain ............................................................ 27
4.4.1 Notes on Cabling the Measuring Chain ............................................................... 27
5. Operation ................................................................................................................................ 29
5.1 Setting the Charge Amplifier ........................................................................................... 29
5.2 Polarity of the Measuring Signal ...................................................................................... 29
5.3 Resolution of the Measuring Signal ................................................................................. 30
5.4 Quasistatic Measurements .............................................................................................. 30
6. Calibration and Maintenance ................................................................................................... 33
6.1 In-Situ Calibration of Force Sensors ................................................................................. 33
6.1.1 Working Point Calibration by Peak Value Comparison for Fz ................................ 33
6.1.1.1 Test System Requirements ................................................................... 34
6.1.1.2 Reference 2-Component Sensor (2CS) Installation ................................ 34
6.1.1.3 Load Application ................................................................................. 35
6.1.1.4 Calibration Process Worksheet ............................................................. 36
6.1.2 Working Point Calibration by Peak Value Comparison for Mz ............................... 38
6.1.2.1 Test System Requirements ................................................................... 38
6.1.2.2 Reference 2-Component Sensor (2CS) Installation ................................ 39
6.1.2.3 Load Application ................................................................................. 39
6.1.2.4 Calibration Process Worksheet ............................................................. 41
6.2 Kistler Calibration Service ................................................................................................ 44
6.3 Maintenance Work......................................................................................................... 44

Content
9345B_002-553e-03.23 Page 3
7. Troubleshooting ...................................................................................................................... 45
7.1 Fault-Finding and Remedy .............................................................................................. 45
7.2 Repairing the 2-Component Sensor ................................................................................. 46
8. Technical Data ......................................................................................................................... 47
8.1 2-Component Sensor Type 9345B, 9365B ....................................................................... 47
8.2 Dimensions Type 9345B and 9365B ................................................................................ 49
8.3 Dimensions Included Accessories ..................................................................................... 50
8.3.1 Centering Ring for Type 9345B and 9365B ......................................................... 50
8.4 Dimensions of Accessories (Optional) .............................................................................. 51
8.4.1 Flange for Type 9345B and 9365B ...................................................................... 51
8.5 Accessories Included ....................................................................................................... 52
8.6 Accessories (Optional) .................................................................................................... 52
9. Annex...................................................................................................................................... 53
9.1 Glossary ......................................................................................................................... 53
9.2 Measurement Uncertainty .............................................................................................. 56
9.3 Linearity ......................................................................................................................... 57
9.4 Frequency Range............................................................................................................ 59
9.5 Influence of Temperature ................................................................................................ 60
9.6 Index ............................................................................................................................. 62
Total Pages 63

2-Component Sensor Fz, Mz, Type 9345B, 9365B
9345B_002-553e-03.23 Seite 4
1. Introduction
Please take the time to thoroughly read this instruction
manual. It will help you with the installation, maintenance,
and use of this product.
To the extent permitted by law Kistler does not accept any
liability if this instruction manual is not followed or prod-
ucts other than those listed under Accessories are used.
Kistler offers a wide range of products for use in measuring
technology:
Piezoelectric sensors for measuring force, torque, strain,
pressure, acceleration, shock, vibration and acoustic
emission
Strain gage sensor systems for measuring force and
moments
Piezoresistive pressure sensors and transmitters
Signal conditioners, indicators and calibrators
Electronic control and monitoring systems as well as
software for specific measurement applications
Wireless data transmission modules
Kistler also develops and produces measuring solutions for
the application fields of engines, vehicles, manufacturing,
plastics and biomechanics sectors.
Our product and application brochures will provide you
with an overview of our product range. Detailed data
sheets are available for almost all products.
If you need additional help beyond what can be found ei-
ther on-line or in this manual, please contact Kistler's ex-
tensive support organization.

Important Notes
9345B_002-553e-03.23 Page 5
2. Important Notes
It is essential for you to study the following notes, which
are for your personal safety during work, and to ensure
long term, fault-free operation of this product.
2.1 For Your Safety
This product has been thoroughly tested and has left
the factory in a perfectly safe condition. In order to
maintain this condition and ensure safe operation, com-
pliance is required with the instructions and warning
notes in this instruction manual.
The 2-component sensor must be installed, operated
and maintained only by persons who are familiar with
this product and who are adequately qualified for the
work involved.
If it is to be assumed that safe operation is no longer
possible, the equipment must be shut down and made
safe against being accidentally started up.
Safe operation must be assumed to be no longer possi-
ble when
the 2-component sensor shows visible signs of dam-
age,
the 2-component sensor has been overloaded,
the 2-component sensor is no longer operating,
has been in lengthy storage under unsuitable condi-
tions and,
has been subjected to rough transport conditions.
Install the 2-component sensor in position as prescribed.
Details can be found in Section 4.2.
Secure all parts mounted on the 2-component sensor
according to anticipated moments!

2-Component Sensor Fz, Mz, Type 9345B, 9365B
Page 6 9345B_002-553e-03.23
2.2 Unpacking
Check all packaging for transport damage. Report any such
damage to the transporters and to the authorized Kistler
distributor.
Check accessories delivered (see Section 8.5) before first
use of the equipment. Report any missing parts to the au-
thorized Kistler distributor.
2.3 Notes on Using the 2-Component Sensor
The 2-component sensor must be used only under the
environmental and operating conditions specified.
With piezoelectric sensors, insulation resistance is of
crucial importance; it must be approx. 5·1013 Ω (but not
less than 1013 Ω).
In order to preserve this value, all plug-and-socket con-
nections must be kept absolutely clean and dry. The in-
sulation resistance can be measured with the insulation
tester Type 5493.
Protect the connector of the 2-component sensor
against contamination and do not touch it with your
fingers (connector front). Fit the cover supplied over the
connector when it is not in use.
A high-insulation cable is used to connect the
2-component sensor to a charge amplifier. Once at-
tached, it should if possible remain connected to the
sensor. Use only specified connecting cables.
Protect the 2-component sensor when it is not in use by
storing it in its original packaging.

General Description
9345B_002-553e-03.23 Page 7
3. General Description
3.1 What is the Purpose of the 2-Component Sensor?
2-component sensors are used to measure dynamic and
quasistatic torques.
The 2-component sensor measures forces as well as mo-
ments. Therefore it is possible to record a second process
value at the same time or successively.
The main areas of application are:
Calibration
Calibration of manual torque wrenches
Torque setting of pneumatic screwdrivers
Research and Development
Measurement of irregular motion and torsional
vibrations on small servo and stepper motors
Measurements of starting torques on electric motors
Measurements on fluid and slipping clutches
Viscosity measurements
Measuring the coefficient of friction of bearings
Designing torsion springs and damping elements
Development of locks and rotary switches
Lubricant development
Biomechanics and ergonomic measurements
Production Engineering
Monitoring automated screwing processes
Monitoring boring and cutting processes
Quality Control
Testing screw connections
Torsion testing of springs
Testing the torque characteristics of hinges
Testing rotary switches
Testing of screw caps
The hole pattern of the bilaterally integrated flange and the
optional accessories enable Kistler 2-component sensors to
be adapted to almost any task. Bilateral centering seats and
the included centering rings assist in the precise axial appli-
cation of torque. A centric bore can be used for shaft bush-
ing.
Kistler 2-component sensors are distinguished by high
rigidity and a high natural frequency. The effective useful
frequency range is, however, determined by the natural
frequency of the entire test arrangement. The high resolution
enables the tiniest dynamic changes to be measured, even
where large torques are involved.
Kistler 2-component sensors are calibrated prior to
delivery and can be used immediately.

2-Component Sensor Fz, Mz, Type 9345B, 9365B
Page 8 9345B_002-553e-03.23
3.2 Design and Functional Principle of the 2-Component Sensor Type
9345B and 9365B
The special patented design of Kistler 2-component sensors
is characterized in that the sensor is axially preloaded. Par-
ticularly in the case of small forces and moments, this pre-
loading of the sensor is a requirement for good linearity of
the output signal.
The 2-component sensor is rust-resistant, welded seal-tight
and the connection with a cable connected is protected
against the ingress of water spray (Condition: O-ring cor-
rectly located in the cable connector). In addition, the con-
nector is protected against mechanical damage by the con-
nector protector Art. No. 3.414.366 which is included.
Fig. 1: Construction
1 Piezo element
2 Connection
3 Inner centering seat D2
4 Mounting thread K
5 Through-hole D3
The 2-component sensor contains a ring-shaped pair of
quartz crystal plates as an integrated sensor element sensitive
to pressure. The pressure-sensitive direction of the crystal
plates is arranged so that a charge signal proportional to the
magnitude of the compressive force is produced.
In addition there are quartz disks in a circular arrangement
built in. The shear-sensitive direction of the quartz disks is
tangential, so that a charge signal proportional to the
torque is fed out in a parallel circuit.
A negative charge produces a positive voltage at the out-
put of the charge amplifier and vice versa.
Measurement is made practically without displacement as a
result of the piezoelectric measuring principle and the high
rigidity of the 2-component sensor.

Installation and Startup
9345B_002-553e-03.23 Page 9
4. Installation and Startup
4.1 Important Information
The 2-component sensor Types 9345B and 9365B are pre-
cision instruments whose specifications are fully utilized on-
ly when they are correctly employed and only when they
are carefully handled. Please comply with the following:
Never let the 2-component sensor drop or expose it to
hard impacts! The peak force of such a shock can cause
irreparable damage.
Do not use a hammer to position the work pieces, as
impacts of this kind can also cause damage!
The following sections will provide you with information on
how to mount the 2-component sensor and on setting up a
measuring chain.
4.2 Installation of the 2-Component Sensor
Please comply with the following information con-
cerning the correct mounting of the 2-component sensor:
The 2-component sensor must be installed only by per-
sons who are familiar with it and are adequately quali-
fied for this work.
Angular seating will cause unwanted bending moments
which can overload and even destroy the sensor. The
contact surfaces of adapter flanges must be machined
perfectly flat. If the 2-component sensor is used as a
calibration element, the adjoining surfaces must have a
roughness of Ra ≤0,8 µm (N6), otherwise a roughness
of Ra ≤6,3 µm (N9) will suffice. Before mounting, the
contact surfaces must be thoroughly cleaned.
The 2-component sensor is designed for measuring forc-
es in the longitudinal axis as well as Moments on the ax-
is. Although additional bending moments, tensile, com-
pressive and shear forces can be tolerated by the
2-component sensor up to a certain extent, these should
be avoided if possible.

2-Component Sensor Fz, Mz, Type 9345B, 9365B
Page 10 9345B_002-553e-03.23
The force and moment must only be applied by the flange
surfaces at the top and bottom sides of the 2-component
sensor. The force is thereby transferred via the front-side
flanged-on adaptation parts (strength class at least 12.9) or
mounting parts with appropriate contact sur
faces. The
length of the screws must be selected so that the depth of
the blind hole in the 2-component sensor flange is fully
utilized. The screws must not, however, protrude against
the base of the blind hole.
Fig. 2: Mounting Fig. 3: Type 9345B, 9365B

Installation and Startup
9345B_002-553e-03.23 Page 11
When firmly tightening the screw connections, the fork
wrench must only be used to hold the flange on that
side where the screw connections are being tightened!
If the opposite side is held, there is a risk that the screw
connection in the 2-component sensor will loosen caus-
ing
the latter to turn within itself. This will alter the
internal preload resulting in the calibration being lost,
and possibly rendering the 2-component sensor unusa-
ble for precise torque measurement! In this event, the 2-
component sensor must again be properly preloaded and
recalibrated!
Tightening Torques MA for Fillister-Head Screws
Type 9345B M5x12 MA = 4 N·m
Type 9365B M8x20 MA = 21 N·m
We recommend the use of screws from the strength class
12.9 upwards.
The connecting cable must be connected only after the
2-component sensor has been installed. Since contamina-
tion on the connector contacts can lead to sizeable measur-
ing errors (in particular drift), the plastic protective connector
covers on the sensor as well as on the cable should always
remain screwed in position during mounting! In particular,
the greatest care must be exercised in dirty environmental
conditions.
4.3 Overview of Adaptation Possibilities Type 9345B and 9365B
Fig. 4: Overview of mounting possibilities
Press
2-Component
Se
nsor
Fz
Ram
Punch
Table mo
unting
Mz

2-Component Sensor Fz, Mz, Type 9345B, 9365B
Page 12 9345B_002-553e-03.23
Mounting in Press Punch
A
Fig. 5: Mounting in press punch
Mounting in Press Ram
B C
Fig. 6: Mounting in press ram
Shaft Installation
Installation in shaft with
adapter for shaft journal
with pin
Instal
lation in shaft with
adapter flange
Ins
tallation in s
haft with
integrated flange
Adapter for straight
bore recess with pin

Installation and Startup
9345B_002-553e-03.23 Page 13
Table Mounting
D E F
G H I
Fig. 7: Table mounting
These mounting possibilities are described in the following
pages.

2-Component Sensor Fz, Mz, Type 9345B, 9365B
Page 14 9345B_002-553e-03.23
4.3.1 Adaptation A: Installation in Shaft with Adapter for Shaft Journal with Pin
Fig. 8: Mounting example A
Fz = Compressive force [N]
Mz = Torque [N·m]
Applied via shaft with tool shank or cylinder bore
and flange adapter with pin (pinned during installa-
tion).
Fs = Transverse force [N]
This "disturbance force" represents the shear forces
and bending moments acting on the reaction torque
sensor. The maximum permissible values are listed in
the table in the "Technical data" on page 48 (shear
force max. Fx,y).
MA
Fs
Installation
clearance
S
Adapter for shaft journal
with pin
Customized tool
adapter
Centering rings
(included access
ories)
Adapter for cylinder
bore recess with pin
Mz
Pinned during installation
Pinned during installation
Fz
MA

Installation and Startup
9345B_002-553e-03.23 Page 15
Centering rings (Art.-No. 3.420.180/181) on 2-compo-
nent sensor into the centering bores on the reaction
torque sensor up to the mechanical limit stop.
Tightening torques MA for socket head screws
Type 9345B M5x12 MA = 4 N·m
Type 9365B M8x20 MA = 21 N·m
We recommend using screws with at least property
class 12.9, see also Section 4.2.
Clearance S between the end of the mounting screw
and the base of the threaded blind bore in the flange of
the 2-component sensor. The installation clearance
should not be less than 0,5 mm or half a screw turn.
Similarly, the depth of the seating for the centering
rings recess in the adapter must also have a clearance of
at least approx. 0,5 mm.

2-Component Sensor Fz, Mz, Type 9345B, 9365B
Page 16 9345B_002-553e-03.23
4.3.2 Adaptation B: Installation in Shaft with Adapter Flange
Fig. 9: Mounting example B
Fz = Compression force [N]
Mz = Torque [N·m]
Applied via adapter flange for flat mounting in a
shaft.
Fs = Transverse force [N]
This "disturbance force" represents the shear forces
and bending moments acting on the reaction torque
sensor. The maximum permissible values are listed in
the table in the "Technical data" on page 48 (shear
force max. Fx,y).
Adapter flange for
flat m
ounting in
shaft
Customized centering
ring (g6)
Customized center-
ing ring (g6)
M
z
Installation
clearance S
Fs
M
A
Fz
M
A

Installation and Startup
9345B_002-553e-03.23 Page 17
Centering rings (customer specific, fit g6) press into the
centering bores on the 2-component sensor up to the me-
chanical limit stop.
Tightening torques MA for socket head screws
Type 9345B M5x12 MA = 4 N·m
Type 9365B M8x20 MA = 21 N·m
We recommend using screws with at least property
class 12.9, see also Section 4.2.
Clearance S between the end of the mounting screw
and the base of the threaded blind bore in the flange of
the 2-component sensor. The installation clearance
should not be less than 0,5 mm or half a screw turn.
Similarly, the depth of the seating for the centering
rings recess in the adapter must also have a clearance of
at least approx. 0,5 mm.

2-Component Sensor Fz, Mz, Type 9345B, 9365B
Page 18 9345B_002-553e-03.23
4.3.3 Adaptation C: Installation in Shaft with Integrated Flange
Fig. 10: Mounting example C
Fz = Compression force [N]
Mz = Torque [N·m]
Applied via shaft with integrated flange and center-
ing pin.
Fs = Transverse force [N]
This "disturbance force" represents the shear forces
and bending moments acting on the reaction torque
sensor. The maximum permissible values are listed in
the table in the "Technical data" on page 48 (shear
force max. Fx,y).
M
z
Installation
clearance S
Installation
clearance S
Fs
M
A
Centering pin g6 on
customized shaft
Fz
MA
/