Page is loading ...

REPAIR PROCEDURES
MANUAL
PVX Series Vane Pumps
“A” Design Series
Step-by-Step Guide to Troubleshooting and Repairing
PVX Series Vane Pumps
Form No. 264728 Rev. 11/08

Form No. 264728 Rev. 11/08
NOTE: All procedures in this manual are
to be performed on a service bench. Do
not disassemble, or attempt to repair a
pump that is connected to a hydraulic
system.
CAUTION – Before attempting to remove
the PVX Vane Pump, be sure that all
pressure has been relieved from BOTH
SIDES of the system.
CAUTION – Before attempting to remove
the PVX Vane Pump, disconnect or lock off
power supply.
CAUTION – Before manually actuating any
PVX Vane Pump, be sure that any resulting
machine function will not endanger persons
or equipment.
PRODUCT IDENTIFICATION
Each PVX Vane Pump has a Model Code stamped on
its nameplate. See Figure 1 for the location of the
Model Code.
This Repair Manual applies to products with Ordering
Codes like the sample in Figure 2.
Basic Pump
GPM
Pressure
Rotation
Seal Type
Mounting
Shaft
Tandem
Control Option
Voltage
Design Letter
PVX-75B-_ _ _ _-P-_ _ _ _ _ _ _ _ _ _-A
Figure 2
MODEL
CODE: PVX- 75B 00-00-P-00 00 00 00 00-A
DATE:
P/N:
V =
Pmax = 3000 psi, 210 bar
IN3/REV. CM3/U
Model Code
Figure 1
Thank you for choosing Continental
Hydraulics PVX Vane Pumps for your
application.
PVX Pumps are designed to provide reliable
performance, and to be easily repaired
should the need arise. The procedures in
this repair manual will show you how to
repair virtually any part of your pump.
To assure that your repaired PVX Pump
performs reliably, please follow all steps
carefully. It is also very important that your
work area be kept clean to prevent
introducing contaminants into the pump.
In many cases, dirt or contaminants in the
hydraulic system lead to pump wear and
failure. If your PVX pump failed due to dirt or
contamination, be sure to thouroughly clean
and flush all parts of the system, paying
special attention to power unit reservoirs.
You may want to provide additional filtering
to keep your pumps and system operating at
peak performance.
i
Introduction

Form No. 264728 Rev. 11/08 1
Table of Contents
Part Identification
Exploded View Drawing .................. 2
Parts List ......................................... 2
Disassembly Procedures – Pumps
General ............................................ 3
Getting Started ................................ 3
Disassembly Instructions ................ 3-6
Assembly Procedures – Pumps
General ........................................... 7
Getting Started - Kits ...................... 7
Getting Started - Tools ................... 8
Assembly instructions ..................... 8-13
Disassembly Procedure – Two-Stage
Compensator
General ........................................... 14
Disassembly Instructions ................ 14-15
Assembly Procedure – Two-Stage
Compensator
Assembly Instructions .................... 16-18
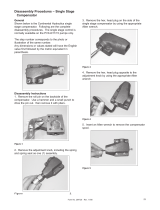
Disassembly Procedure – Single Stage
Compensator
General ........................................... 19
Disassembly Instructions ................ 19
Assembly Procedure – Single Stage
Compensator
General ........................................... 20
Getting Started - Kits ...................... 20
Assembly Instructions .................... 20-21
Proper Setting of the Thrust Screw
Adjustment Instructions .................. 22
Adjustment Procedure – Single Stage
Compensator
General ........................................... 23-24
Adjustment Procedure – Two-Stage
Compensator
General ........................................... 25
Multi-Pressure Compensator
General Information ........................ 26
Solenoid Two-Pressure Control ...... 26
Solenoid Vented ............................. 27
Load Sense .................................... 27-29
Torque Limiter ................................. 29-30
Setting the Maximum Deadhead
Pressure (Second Stage Setting) 31
Setting the Torque Limiter .............. 31
Application Notes ........................... 31
Maximum Flow Limiter ................... 31
Fluids, Filters and System Preparation
General Information ........................ 32
Fluid Recommendations ................. 32
Fluid Temperature .......................... 32
Filtration .......................................... 32
Pump Installation Procedure
Installation Instructions ................... 33
System Start-Up Procedure
Start-Up Instructions ....................... 34
Trouble Shooting
Trouble, Potential Cause, Remedy 35-37
Dimensions for Double Pumps
Dimension Drawing ........................ 38
Possible Size Combinations ........... 38

Form No. 264728 Rev. 11/08
22
4
3
28
9
10
15
14
16
17
6
18
1
21
20
19
PVX-20/36 To rque to 1800 lb/in
(Torque to 204 Nm)
To rque to 850 lb/in
(Torque to 96 Nm)
To rque to 850 lb/in
(Torque to 96 Nm)
To rque to 12 lb/in
(Torque to 1.4 Nm)
724
23
5
13
PVX-46/60/75 To rque to 4970 lb/in
(Torque to 562 Nm)
REFERENCE DESCRIPTION QTY
1 Key 1
2 Rotor shaft 1
3 Vane kit 1
4 Port plate, cover side 1
5 Roll pin 4
6 Thrust block 1
7 Bearing 2
8 Spacer ring 1
9 Pressure ring 1
10 Port plate, body side 1
13 O-ring, ASA-031 / (ASA-035) 2
14 O-ring, ASA-162 / (ASA-265) 1
REFERENCE DESCRIPTION QTY
15 O-ring, ASA-130 / (ASA-229) 1
16 O-ring, ASA-146 / (ASA-146) 1
17 Shaft seal 1
18 O-ring, ASA-332 / (ASA-340) 1
19 O-ring, ASA-110 / (ASA-110) 1
20 O-ring, ASA-111 / (ASA-111) 3
21 O-ring, ASA-143 / (ASA-143) 1
22 O-ring, ASA-157 / (ASA-160) 2
23 Back up ring 2
24 O-ring, ASA-139 / (ASA-152) 1
24 O-ring, ASA-237 / (ASA-237) 1
2
Part Identification
Exploded View Drawing
Parts List

Form No. 264728 Rev. 11/08 3
Disassembly Procedures – Pumps
General
The disassembly procedure shown on the following
pages covers the Continental Hydraulics PVX-8 thru
75 variable volume vane pumps. The complete
disassembly procedures are similar for all pumps.
Any differences between the pump models are
described in additional notes.
The step number corresponds to the photo or
illustration of the same number.
Any dimensions or values stated will have the English
value first followed by the metric equivelent in
parenthesis.
Getting Started - Tools
As an aid for repairing the PVX pump, we recommend
building a wooden fixture. Please see the different
inside diameters for each pump size in the chart
below.
Disassembly Instructions
1. Remove the straight key from the keyway of the
shaft and place the pump side down into the wooden
fixture. See above for details for the fixture.
Figure 1.
2. Remove the four (4) socket hd cap screws on the
cover by using the appropriate size Allen wrench.
Figure 2.
Note: For disassembling the larger pumps, a great
amount of torque will be needed to loosen the cover
bolts. Therefore, we recommend loosening the bolts
before removing the pump from the motor-unit. Use a
socket or extend the length of the allen wrench and
make sure to clamp the pump securely and safely.
Figure 2a.
PVX Model 8 11/15 20/29/36 46/60/75
Cover
Allen Wrench 8 mm 10 mm 14 mm 17mm
4 Soc. Cap Screws
Cover - Removal 2 Flat Blade Screwdrivers
Plates - Removal
Tweezers or
Vanes - Removal Pair of Long Needle Nose Pliers
11 Vanes 22 Vanes
Compensator &
Bias Cover 6 mm 8 mm
Allen Wrench
2 x 4 Soc. Cap Screws
PVX-8/11/15 - 8 mm Allen Wrench
Thrust Screw PVX-20/29/36/46/60/75 -
Non-Slip Spanner Wrench
Thrust Screw Lock Nut Adjustable Face Spanner Wrench
Bearing - Removal Blind Hole Bearing Puller
Shaft Seal - Removal Hammer & Round Head Punch
PVX Model 8 11/15 20/29/36 46/60/75
Diameter 3.38 (86) 4.13 (105) 5.13 (131) 6.13 (156)
Min. Height 2 (51) 2.63 (67) 3 (77) 3.88 (99)
Wooden Fixture.

Form No. 264728 Rev. 11/08
3. Insert flat blade screwdriver into the slots provided
on each side of the cover. Pry the cover assembly
loose using equal force on each screwdriver. After
the cover is loose, carefully remove it by hand and set
aside in a clean area.
Figure 3.
4. In order to remove the port plate from the cover,
insert flat blade screwdriver into the slots between the
port plate and cover and pry the port plate loose.
After the port plate is loose, carefully remove it by
hand.
Figure 4.
NOTE: When disassembling a PVX-20 thru 75 pump,
please pay close attention not to loosen the ratio
valve cartridge that is located in the cover and the
ratio valve sealing assembly that is located on the
back of the cover port plate. The ratio valve cartridge
is as essential part of the pump and is not a wear
item, so it is not part of the repair kit.
Figure 4a.
5. Remove the cover o-ring.
Figure 5.
6. Remove the vanes from the rotor by using a small
pair of tweezers or long needle nose pliers. Caution
should be taken not to nick or score the vanes,
pressure ring and rotor.
Figure 6.
7. Remove the rotor shaft.
Figure 7.
4
Disassembly Instructions – Pumps (continued)

Form No. 264728 Rev. 11/08
8. Remove the four (4) socket head cap screws on
the compensator by using the appropriate Allen
wrench and remove the compensator.
Figure 8.
9. Carefully remove the control piston and spring.
Caution should be taken not to nick or scratch the
piston or the piston bore.
Figure 9.
10. Remove the four (4) socket head cap screws on
the bias cover by using the appropriate Allen wrench
and remove the bias cover. The bias cover is over
the bias piston or the smaller piston opposite the
control piston. Carefully remove the bias piston
ensuring that the bias piston and the piston bore are
not scratched or nicked.
Figure 10.
11. For the PVX-8/11/15 pumps, loosen the locknut
with adjustable wrench (not pictured). For the PVX-
20 thru 75 pumps, loosen the thrust screw lock ring
by using a spanner wrench.
Figure 11.
12. Remove the thrust screw by using the
appropriate spanner socket or Allen wrench.
Figure 12.
NOTE: The PVX-20 thru 75 pumps has a thrust block
in addtion to the thrust screw. Remove the thrust
block also.
Figure 12a.
5
Disassembly Instructions – Pumps (continued)

Form No. 264728 Rev. 11/08
13. Remove the pressure ring.
Figure 13.
14. Remove the spacer ring.
Figure 14.
15. Remove the port plate from the body by carefully
grabbing the port plate at the thru-hole location. After
the plate has been lifed out, set it aside. Be careful
not to scratch or nick the coating on the port plates.
Leave the seals in the port plate.
Figure 15.
16. If the bearings are damaged and need to be
replaced, remove the bearings in the body and the
cover by using a blind hole bearing puller.
Figure 16.
17. To drive out the shaft seal, take a round head
punch and carefully tap out from the cover side of the
pump. Remove the shaft seal.
Figure 17.
18. After the pump has been completely
disassembled, all parts must be thoroughly cleaned
with clean solvent. At this time, inspect and
determine which parts need to be replaced. In a
major overhaul, it is recommended that both bearings
and all seals be replaced regardless of their condition.
Kits containing all seals are available for use in the
repair of this pump.
When ordering repair parts, it is necessary to provide
the alpha-code and appropriate design letter
describing the pump. This information can be found
on the nameplate attached to the rear cover of the
pump body.
6
Disassembly Instructions – Pumps (continued)

General
To guarantee proper operation of your PVX pump,
Continental Hydraulics recommends relacing all
important pump parts by using the CHD Repair Kit
and the CHD Seal Kit. The complete assembly
procedures are similar for all pumps. Any differences
between the pump models are described in additional
notes.
The step number corresponds to the photo or
illustration of the same number.
Any dimensions or values stated will have the English
value first followed by the metric equivelent in
parenthesis.
Getting Started - Kits
MODEL SAE SAE - “P1”
PVX-8 264288 264289
PVX-11/15 264292 264293
PVX-20 264296 264297
PVX-29 264296 264297
PVX-36 264300 264301
PVX-46 264304 264305
PVX-60 264304 264305
PVX-75 264308 264309
MODEL SAE
PVX-8 264275
PVX-11/15 264276
PVX-20/29/36 264277
PVX-46/60/75 264278
Seal Kits
Repair Kits
Form No. 264728 Rev. 11/08 7
Assembly Procedures – Pumps
* See instructions for Single or Two-Stage
Compensators later in this manual.
** Quanities may vary depending on pump
model.
22
4
3
28
9
10
15
14
16
17
6
18
1
21
20
19
PVX-20/36 To rque to 1800 lb/in
(Torque to 204 Nm)
To rque to 850 lb/in
(Torque to 96 Nm)
To rque to 850 lb/in
(Torque to 96 Nm)
To rque to 12 lb/in
(Torque to 1.4 Nm)
724
23
5
13
PVX-46/60/75 To rque to 4970 lb/in
(Torque to 562 Nm)
REF DESCRIPTION QTY
1 Key 1
2 Rotor Shaft 1
3 Vane Kit 1
4 Port Plate - Cover 1
5 Roll Pin 4
6 Thrust Screw Assembly 1
(PVX-8/11/15)
6 Thrust Block Assembly 1
(PVX-20-75)
7 Bearing 2
8 Spacer Ring 1
9 Pressure Ring 1
10 Port Plate - Body 1
REF DESCRIPTION QTY
13 O-Ring - Root Seal 2
14 O-Ring - Cover 1
15 O-Ring - Seconary Inlet 1
(PVX-20-75)
16 O-Ring - Bias Cover 1
17 Shaft Seal 1
18 O-Ring - Thrust Screw 1
19 O-Ring - Check 1
20/21 O-Ring - Compensator * 1
(PVX-20-75)
22/24 O-Ring - Port Plate ** 2
23 Back-Up Ring - Port Plate 2
Repair Kits consists of:
Seal Kits consists of:
* NOTE: On PVX-20 thru 75 pumps, tighten the Thrust Screw Locking
Ring as tight as possible.
PVX in.-lbs. (Nm) 8 11/15 20/29/36 46/60/75
Cover 700 (82) 1200 (140) 1800 (210) 4970 (580)
Bias Cover 350 (41) 350 (41) 680 (80) 680 (80)
Compensator 350 (41) 350 (41) 680 (80) 680 (80)
Thrust Screw Nut 960 (112) 960 (112) * See Note
Overview Torque Rates

Form No. 264728 1/04
8
Getting Started - Tools
Assembly Instructions
1. Before installing the shaft seal, clean the seal bore
and seal O.D. with Loctite 7070 cleaner and place
some hydraulic sealant (Loctite 569) on the O.D.
surface of the shaft seal as shown.
Figure 1.
2. Press the shaft seal into the pump body to the
depths (±0.5 mm tolerance) recommended in the
following chart with the depth being measured from
the pump housing surface. Insure that the shaft seal
is installed properly in the pump body or leakage will
occur.
F i g u r e 2.
3. Replace the bearing for the body and cover. The
bearings for both are identical. Place the bearings
into the bearing bores and thoroughly lubricate the
bearing’s I.D. with clean hydraulic fluid. Pay close
attention to the correct orientation of the bearing
prior to installing the bearings in the pump body
and cover as shown.
Figure 3.
NOTE: It is recommended that a guide tool be used
to properly install the bearings in the bores. After the
bearing is installed, make sure the bearing is flush to
0.020” (0.5 mm) below the machined surface. Using
a new rotor shaft, check the fit of the shaft to the
installed bearings and assure that the shaft enters the
bearing without drag. Replace the bearing if any drag
is noticed.
Figure 3a.
4. Drive the roll pins into the holes on the back side
of each port plate so they protrude .3” (7.6 mm).
Replace the port plates.
Figure 4.
Assembly Procedures – Pumps (continued)
PVX Model 8 11/15 20/29/36 46/60/75
Cover 8 mm 10 mm 14 mm 17mm
Allen Wrench
Installation Pins into Hammer
Port Plates
Compensator &
Bias Cover 6 mm 8 mm
Allen Wrench
Thrust Screw Spanner Socket - 8 mm Allen Wrench
Thrust Screw Lock Nut Adjustable Face Spanner Wrench
Bearing and Shaft Press, Loctite 7070 Cleaner and
Seal Installation Loctite 569 Hydraulic Sealant
Lubrication Clean Hydraulic Oil
PVX Model 8 11/15 20/29/36 46/60/75
Depth (mm) 2.0 mm 4.3 mm 10.0 mm
Shaft Seal Depths (±0.5 mm)

Form No. 264728 1/04 9
Assembly Procedures – Pumps (continued)
5. Replace the seals and back-up rings on the
backside of both port plates. Install seals on each
port plate.
Figure 5.
6. If necessary, use a light grease or petroleum jelly
to help retain the seals during placement of the port
plates into the body. Avoid appling too much grease
on the seals during assembly since this condition can
cause the O-rings to dislodge when the port plates
are installed in the pump.
Figure 6.
7. Place the port plate into the body. Note that the
pins fit in the provided holes. Completely lubricate
the port plate’s wear surface with clean hydraulic
fluid.
Figure 7.
NOTE: Be certain to ensure that the correct port
plates are installed in the body and cover. If unsure,
compare the arrows on the port plates with the arrow
on the pump. The arrow on the pump can be found
below the open segment for the control piston on the
pump body. Both arrows must point in the same
direction. All PVX pumps operate in a clockwise only
direction of rotation as viewed from the shaft end of
the pump.
Figure 7a.
8. Install the spacer ring in the pump body.
Figure 8.
NOTE: On the PVX-8/11/15 pumps, there is no break
in the spacer ring. Align the break with the thrust
screw. On the PVX-20 thru 75 pumps, the open
segment on the spacer ring aligns with the thrust
block bore.
Quantity
8/11/15 20/29/36
Ref. Description 46/60/75
15 Back-up Seal (white) in lg. race track 1 1
15 Back-up Seal (white) in sm. c’bore 0 1
18 O-Ring in large race track 1 1
18 O-Ring in small race track 1 1
19 O-Ring in counterbore 1 1
21 O-Ring in small counterbore 0 1
Quantity
811/15 20/29/36
Ref. Description 46/60/75
15 Back-up Seal (white) in lg. race track 1 1
18 O-Ring in large race track 1 1
18 O-Ring in small race track 1 1
19 O-Ring in counterbore 1 1
Cover Port Plates
Body Port Plates

Form No. 264728 Rev. 11/08
10
Assembly Procedures – Pumps (continued)
9. Assemble the bias piston into the body through the
clearance hole in the spacer ring. Lubricate the
piston with clean hydraulic fluid.
Figure 9.
10. Assemble the control piston and spring through
the clearance hole in the spacer ring. Lubricate the
piston before installing.
Figure 10.
11. Thoroughly lubricate the pressure ring with clean
hydraulic fluid. Place the pressure ring in the pump
body.
Figure 11.
12. For PVX-8/11/15 pumps, install the thrust screw
in the body by using an Allen head wrench. For PVX-
20 thru 75 pumps, prior to installing the thrust screw
assembly, lightly coat the bearing surface on the
thrust block assembly with clean hydraulic fluid.
Figure 12.
12a. For PVX-20 thru 75 pumps, install the thrust
screw with O-ring by using a spanner wrench and
socket. Install the thrust block with plastic pad in the
body. The contoured end has to align with the
pressure ring.
Figure 12a.
For preliminary adjustment of the thrust screw, tighten
it all the way and then turn out a 3/4 turn
counterclockwise. Take care not to over-tighten the
thrust screw as damage to the pump can occur. See
the section “Proper Setting of the Thrust Screw” later
in this manual for further adjustments.

13. For PVX-8/11/15 pumps, use an Allen wrench to
tighten the thrust screw to the torque rates shown.
For PVX-20 thru 75 pumps, install the thrust screw
lock ring and tighten it by using the adjustable face
spanner wrench.
Figure 13.
14. Prior to replacing the rotor shaft, lubricate it with
clean hydraulic fluid. Replace the rotor shaft. Care
must be taken not to damage the shaft seal while
inserting the shaft.
Figure 14.
15. Lubricate the vanes with clean hydraulic fluid and
place the vanes in the rotor vane slots. The rounded
tips of the vanes must contact the I.D. of the pressure
ring.
Figure 15.
15a. Make sure that the direction of the rounded
vane tips matches the direction of pump rotation. The
pump rotation is shown on the pump body and the
port plates. Make sure the vanes slide freely in the
rotor vane slots.
Figure 15a.
16. Prior to mounting the compensator to the pump
body, install all o-rings on the mating surface of the
compensator’s first stage. A mimimum amount of
grease or petroleum jelly may be used to retain the
o-rings during placement. Keep the mating interface
of the compensator and the pump housing free of
grease.
Figure 16.
Figure 17.
Form No. 264728 Rev. 11/08 11
Assembly Procedures – Pumps (continued)
PVX Model 8/11/15 20/29/36/46/60/75
Thrust Screw 960 (112) Tighten with Spanner Wrench
Torque Rates in.-lbs. (Nm)

Form No. 264728 Rev. 11/08
Assembly Procedures – Pumps (continued)
12
17. Mount the compensator to the pump and torque
the four (4) socket head cap screws by using the
appropriate Allen wrench.
Figure 17.
18. Install the O-ring on the mating surface of the
bias cap/volume control. A minimum amount of
grease or petroleum jelly may be used to retain the
O-ring in its groove. Torque the four (4) socket head
cap screws by using the appropriate Allen wrench.
Figure 18.
19. Insert O-ring onto the body pilot bore. A
minimum amount of grease or petroleum jelly may be
used to hold the O-ring in place while installing the
cover.
Figure 19.
19a. For PVX-20 thru 75 pumps, insert a second
O-ring into the secondary inlet.
Assemble the port plate on to the cover. Assure that
the orientation of the port plate is correct on the PVX-
20 thru 75 pumps, such that the secondary inlet
passages in the cover line up with the small O-ring in
the back of the cover port plate.
Figure 19a.
PVX Model 8/11/15 20/29/36/46/60/75
Bias Cover 350 (41) 680 (80)
Torque Rates in.-lbs. (Nm)
PVX Model 8/11/15 20/29/36/46/60/75
Compensator 350 (41) 680 (80)
Torque Rates in.-lbs. (Nm)

Form No. 264728 Rev. 11/08
Assembly Procedures – Pumps (continued)
20. Install the cover by inserting the four (4) socket
head cap screws with the appropriate Allen wrench or
socket. Torque the screws from the chart below.
Keep the mating surfaces of the pump body and
cover free of oil, dirt and/or grease before assembling
the cover.
Figure 20.
21. Insert the straight key into the keyway of the
shaft.
Figure 21.
13

14 Form No. 264728 Rev. 11/08
Disassembly Procedures – Two-Stage
Compensator
General
Shown below are the Continental Hydraulics two-
stagecompensators rated at 3000 psi (210 bar). On
the left is for PVX-8/11/15; on the right, PVX-20 thru
75. Following that are the complete disassembly
procedures. Any differences between the
compensator models are described in additional
notes.
The step number corresponds to the photo or
illustration of the same number.
Any dimensions or values stated will have the English
value first followed by the metric equivelent in
parenthesis.
Left: PVX-8/11/15; Right: PVX-20 thru 75
Disassembly Instructions
1. Remove the two (2) socket head cap screws
attaching the pressure adjustment cap to the body of
the second stage by using the appropriate wrench.
Remove the pressure adjustment cap and the
adjusting screw as one assembly.
Figure 1.
2. Remove the spring and the seat from the second
stage body.
Figure 2.
3. In order to remove the guided poppet, take a large
flat blade screwdriver and unscrew the guided poppet
from the second stage of the compensator.
Figure 3.
4. Remove the plug from the second stage by using
the appropriate Allen wrench.
Figure 4.

Form No. 264728 Rev. 11/08 15
Disassembly Procedures – Two-Stage
Compensator (continued)
5. Remove the three (3) socket head cap screws that
attach the second stage to the first stage body by
using the appropriate Allen wrench.
Figure 5.
6. Remove the plug from the first stage compensator
by using the appropriate Allen wrench.
Figure 6.
6a. The two-stage compensator for the PVX-8/11/15
pumps has a shock clipper which is located on the
side of the first stage body. Remove the plug by
using the appropriate Allen wrench.
Figure 6a.
7. Remove the first stage adjustment screw adapter
by using an adjustable wrench. Remove the
differential spring, spring seat, external washer and
snap ring.
F ig u r e 7.
8. Loosen the locknut on the adjustment housing and
disassemble the adjustment stem with a screwdriver.
Figure 8.
9. Remove the compensator spool. Caution should
be taken not to nick or mar the spool’s surface.
F ig u r e 9.

Form No. 264728 Rev. 11/08
16
Assembly Procedures – Two-Stage
Compensator
Assembly Instructions
1. Thoroughly lubricate the compensator spool with
clean hydraulic fluid. Make sure there are no burrs on
the spool and insure that the spool has no residual
magnetism. Spools that are magnetic will attract
metallic particles and damage the compensator body
or spool. Insert the compensator spool into the
smaller opening of the first stage body by holding the
squared end and inserting the round end first.
Figure 1.
2. Replace the O-ring and the back-up ring on the
adjustment stem.
Figure 2.
2a. Replace the O-ring on the adjustment housing.
Assemble the adjustment stem into the adjustment
housing with a flat blade screwdriver.
Figure 2a.
3. Place the spring seat on the spring, then insert the
spring and spring seat into the adjustment housing.
Figure 3.
4. Install the first stage differential spring adjustment
screw adapter as one (1) assembly into first stage.
Torque to 708-888 in.-lbs. (80-100 Nm).
Figure 4.
5. Replace the back plug with the O-ring and insert it
into the first stage compensator body. Torque to 442-
531 in.-lbs. (50-60 Nm).
Figure 5.

Form No. 264728 Rev. 11/08
Assembly Procedures – Two-Stage Compensator
(continued)
5a. For PVX-8/11/15 pumps, replace the plug with the
O-ring for the shock clipper on the first stage
compensator and torque to 144-180 in.-lbs. (17-21
Nm).
Figure 5a.
6. Replace the plug with the O-ring on the backside
of the second stage compensator. Torque to 150-186
in.-lbs. (17-21 Nm).
Figure 6.
7. Replace the poppet seat with the O-ring and insert
it into the second stage compensator body using a
large screwdriver. Avoid damaging any of the O-ring
sealing surfaces. Torque to 168 in.-lbs. (19 Nm).
Figure 7.
8. You may place the compensator upright to insert
the guided poppet into the second stage
compensator. Make sure that the poppet and poppet
seat are not damaged or nicked or the compensator
will not function properly.
Figure 8.
8a. Place the spring into the second stage
compensator.
Figure 8a.
9. Replace the O-ring and the back-up ring of the
pressure adjustment locknut.
Figure 9.
17

Form No. 264728 Rev. 11/08
18
Assembly Procedures – Two-Stage Compensator
(continued)
9a. Mount the pressure adjustment assembly to the
second stage compensator.
F i g u r e 9a.
10. Torque the two (2) socket head cap screws to
44-62 in.-lbs. (5-7 Nm).
Figure 10.
11. Prior to mounting the second stage to the first
stage body, insure that all O-rings are in place on the
mating surface of the second stage body. A minimum
amount of grease or petroleum jelly may be used to
retain the O-rings during placement.
Figure 11.
11a. Mount the first stage to the second stage body.
Torque the three (3) socket head cap screws to 129-
171 in.-lbs. (15-20 Nm).
Figure 11a.
12. Replace the O-rings on the backside of the
compensator.
Figure 12.
PVX Model
Ref. 8/11/15 20/29/36/46/60/75
4 2 small O-ring 3 small O-ring
5 1 large O-ring 1 large O-ring
O-Ring Quantities
/