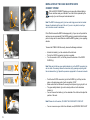
CYBEX Juno-Fix is a booster seat with backrest, headrest, and adjustable safety cushion, designed to provide maximum protection and comfort for children aged approximately 9 months to 4 years, weighing 9 to 18 kg.
CYBEX Juno-Fix is a booster seat with backrest, headrest, and adjustable safety cushion, designed to provide maximum protection and comfort for children aged approximately 9 months to 4 years, weighing 9 to 18 kg.


-
 1
1
-
 2
2
-
 3
3
-
 4
4
-
 5
5
-
 6
6
-
 7
7
-
 8
8
-
 9
9
-
 10
10
-
 11
11
-
 12
12
-
 13
13
-
 14
14
-
 15
15
-
 16
16
-
 17
17
-
 18
18
-
 19
19
-
 20
20
-
 21
21
-
 22
22
-
 23
23
-
 24
24
-
 25
25
-
 26
26
-
 27
27
-
 28
28
-
 29
29
-
 30
30


CYBEX Juno-Fix is a booster seat with backrest, headrest, and adjustable safety cushion, designed to provide maximum protection and comfort for children aged approximately 9 months to 4 years, weighing 9 to 18 kg.
Ask a question and I''ll find the answer in the document
Finding information in a document is now easier with AI
Related papers
Other documents
-
 Crown Automotive SC30121 Installation guide
-
IKEA MATMÄSSIG Important information
-
mothercare iZi Up X3 Fix User manual
-
-
Silver Cross Discover Car Seat User manual
-
BESAFE Download user manual User manual
-
 Yowza JUNO Owner's manual
-
 Hernik IPAI-NXT User manual
-
CONCORD ABSORBER XT Owner's manual
-
CONCORD air.safe Owner's manual


