Page is loading ...

GD02
Grandia series
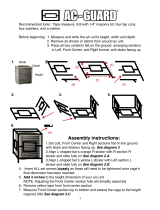
Product Overview
Material
Model
Motherboard
Drive Bay
Cooling System
Expansion Slot
Front I/O Port
Power Supply
Dimension
SST-GD02B(Black)
SST-GD02S(Silver)
Micro ATX, DTX, Mini-ITX
Aluminum front panel & corners, SECC body
5.25” optical drive x 1
3.5” x 2 (vibration dampening)
Rear 2 x 80mm exhaust fan, 2050rpm
4
USB2.0 x 2 ,
IEEE1394 x 1 ,
audio x 1 ,
MIC x 1 ,
Optional Standard PS2(ATX)
430mm(W)x155mm(H)x360mm(D)
External
Internal
Expansion Card
Compatible with expansion card up to 11.5 inch
Specification
1

8025 FAN X2
MICRO-ATX MB (OPTIONAL)
5.25" OPTICAL DRIVE BRACKET
POWER SUPPLY (OPTIONAL)
TOP PANEL
3.5" HDD CAGE
3.5" DEVICE BRACKET
2
PIC ITEM PURPOSE PIC ITEM PURPOSE
SCREWS Secure motherboard
SCREWS Secure power supply
SCREWS Secure slim optical drive
L-SHAPED HEXAGONAL
WRENCH
Secure/release top panel
screws
PC BOARD
ADHESIVE BACKED
SUPPORTS
Secure motherboard
OPTICAL DRIVE
KEY PAD
For attaching optical
drive key
CONVERTING WIRE
3 pin fan connector convert
into 4 pin
SCREWS
For tying cables
INSTALLATION
GUIDE
System installation guide
CABLE TIE
Secure hard drive

USB
USB
MIC
SPK
1394
RESET
POWER
HDD
IR
1
2
3
7
56
4
1.5.25" OPTICAL CRIVE
2.SW
3.USB2.0 x 2 / MIC/ SPK / 1394
4.POWER SW
5.HDD LED
6.3.5” BAY COVER
3

Remove main optical drive bracket
Entnehmen Sie den Hauptrahmen für
die optischen Laufwerke.
Retirez le casier principal du lecteur
optique
Saque la abrazadera principal de la
unidad óptica
Rimuovere il supporto principale
dell’unitá ottica
Снимите кронштейн главного
оптического диска.
請取出光碟機架
メインの光学ドライブブラケットを取り外します。
4
Remove 4 screws from the top
panel to uninstall it
1.
2.
Lösen Sie die 4 Schrauben des
Deckels um diesen abzunehmen.
Retirez les 4 vis du panneau
supérieur pour le démonter
Desatornille 4 tornillos del panel
superior para quitarlo
Rimuovere 4 viti dal pannello
superiore per disinstallarlo
Открутите 4 шурупа с верхней панели,
чтобы снять ее.
請依照圖示卸下頂部上蓋的四顆螺絲
上部パネルからネジ4本を外し、パネルを取
り外します。
상부패널
상부패널
제거를
제거를
위해
위해
패널
패널
위쪽에
위쪽에
있는
있는
4
개의
개의
나사를
나사를
푸십시오
푸십시오
.
.
메인
메인 광
드라이브의
드라이브의
브라켓을
브라켓을
제거하십시오
제거하십시오
.
.

8
8
9.
Remove 3.5” bay cover to
install 3.5” device
Entfernen Sie die 3,5“ Laufwerksblende
um ein 3,5“ Laufwerk zu installieren.
Retirez le cache de la baie 3.5” pour
installer un appareil 3.5”
Saque la tapa de la bahía de 3.5” para
instalar la unidad de 3.5”
Rimuovere la mascherina dell’alloggiamento
da 3.5” per installare l’unitá da 3.5”
Снимите крышку отсека для дисковода,
чтобы установить отсек для устройства
форм-фактора 3,5 дюйма.
請拆下3.5吋裝置檔板以安裝3.5吋裝置
3.5”デバイスのインストール用に3.5”
ドライブベイのカバーを外します。
3.5”
3.5”
드라이브베이
드라이브베이
덮개를
덮개를
제거해
제거해
3.5”
3.5”
장치를
장치를
설치하십시오
설치하십시오.
Install 3.5” bay device from the
front panel as shown
Installieren Sie das 3,5” Laufwerk, wie
auf dem Bild gezeigt, in der Frontblende.
Installez l’appareil 3.5” dans la baie par
le panneau frontal comme montré
Instale la unidad de 3.5” insertandola
del panel frontal como se muestra.
Installare l’unitá da 3.5” dalla parte del
pannello frontale come mostrato
Установите отсек для устройства
форм-фактора 3,5 дюйма с передней
панели, как показано на рисунке.
請依圖示從面板前安裝3.5吋裝置
デバイスは図のようにフロントパネル側
から3.5”ドライブベイに入れます。
3.5인치 드라이브 베이를 그림에서와
3.5인치 드라이브 베이를 그림에서와
같이 전면패널로부터 설치하십시오.
같이 전면패널로부터 설치하십시오.
A
A
LOCK
OPEN

9
9.1
10.
A
A
LOCK
OPEN
1
2
Lock the 3.5” bay by pushing the
clip toward locking position as shown
Sichern Sie das 3,5“ Laufwerk,
wie auf dem Bild gezeigt, durch
verschieben des Verschlusses.
Verrouillez l’appareil 3.5” en
poussant le vers la position de
vérouillage comme montré
Sujete la unidad de 3.5” empujando
los clips en la posición de cierre
come se muestra
Fissare l’unitá da 3.5” spingendo i clip
fino a farli scattare come mostrato.
Закрепите устройство форм-фактора
3,5 дюйма, приведя зажим в
положение фиксации.
請依圖示將安全扣具推至鎖固位置以鎖固
3.5吋裝置
3.5”デバイスは図のようにクリップをロック位置
にして固定します。
그림에서와
그림에서와
같이
같이
클립을
클립을
잠금
잠금
위치로
위치로
밀어
밀어
3.5"
3.5"
디바이스를
디바이스를
고정시키십시오
고정시키십시오
.
.
Insert hard drive cage back into
the chassis
Setzen Sie den Festplattenkäfig
wieder in das Gehäuse ein.
Remettez le casier à disques durs
dans le boîtier
Reinserte la abrazadera del disco
duro en el chasis
Reinserire il supporto dell’hard disk
nel chassis
Вставьте кронштейн жесткого диска
обратно в корпус.
請將硬碟架安裝至機箱內
ハードディスクドライブブラケットをシャーシに
戻します。
케이스에
케이스에
하드디스크
하드디스크
브라켓을
브라켓을
다시
다시
끼우십시오
끼우십시오.

10
11.
12.
Secure hard drive cage with screw
removed in step 3
Sichern Sie den Festplattenkäfig mit
den Schrauben, die Sie im Schritt 3
gelöst haben.
Fixez le casier à disques durs avec
les vis retirées lors de l’étape 3
Sujete la abrazadera con los tornillos
sacados en el paso 3
Fissare il supporto con le viti rimosse
in precendenza
Закрепите кронштейна жесткого диска
шурупами, вынутыми на этапе 3.
請使用步驟三所卸下的螺絲鎖固硬碟架
ステップ3で外したネジでハードディスクドラ
イブブラケットを固定します。
3
번에
번에
제거한
제거한
하드디스크
하드디스크
브라켓의
브라켓의
나사로
나사로
브라켓을
브라켓을
고정시키십시오
고정시키십시오
.
.
Install motherboard
Installieren Sie das Motherboard ins
Gehäuse.
Installez la carte mère
Instale la placa madre
Installare la scheda madre
Установите материнскую плату.
請安裝您的主機板
マザーボードを取り付けます。
메인보드를
메인보드를
장착하십시오
장착하십시오
.
.

To add expansion cards, remove
expansion slot cover
Um Erweiterungskarten zu
installieren, entfernen Sie bitte die
Erweiterungsslotblenden.
Pour ajouter des cartes d’extension,
retirez les équerres nécessaires
Para adjuntar las tarjetas de
expansión, quite la tapa del slot de
expansión
Per aggiungere le card d’espansione,
rimuovere le mascherine degli slot
d’espansione
Чтобы установить карты расширения,
снимите крышку слота расширения.
11
13.
14.
請拆下擴充槽檔板以安裝擴充卡
拡張カードを装着するには、
拡張スロットカバーを外します。
확장카드를
확장카드를
추가하려면
추가하려면
,
,
확장카드
확장카드
슬롯
슬롯
커버를
커버를
제거하십시오
제거하십시오.
Install expansion cards
Installieren Sie die
Erweiterungskarten.
Installez les cartes d’extension
Instale las tarjetas de expansión
Installare le card d’espansione
Установите карты расширения.
請安裝擴充卡
拡張カードをインストールします。
확장카드를
확장카드를
설치하십시오
설치하십시오
.
.

12
15.
16.
A
BB
A
Install optical drive
Installieren Sie die optische Laufwerk
Installez le lecteur optique
Instale la óptica en la abrazadera
Installare l’unitá ottica
установки оптического накопителя
請安裝光碟機
光学式ドライブを安装してください
광
드라이브를
드라이브를
설치하십시오
설치하십시오
Make sure all necessary cables and
wires are connected, then install
completed optical drive bracket back
into the chassis to complete system
integration
Vergewissern Sie sich, dass alle
nötigen Anschlüsse und Stecker
verbunden sind, und fügen Sie den
optischen Laufwerkskäfig wieder in
das Gehäuse ein, um die
Systeminstallation abzuschließen.
Vérifiez que tous les câbles
nécessaires sont correctement
branchés, puis remettez le casier
principal dans le boîtier pour achever
l’intégration de votre système
19. Asegurese de que todo los cables
estén conectados y luego reinstale la
abrazadera en el chasis para completar
la integración del sistema
Assicurarsi che tutti i cavi necessari siano
connessi ed installare il supporto dell’unitá
ottica completa nel chassis per completare
l’integrazione del sistema
Убедитесь, что все необходимые
провода и кабели подключены и
установите кронштейн главного
оптического диска в корпус.
請確認所有必須的線材與線路都已連
接後,將光碟機架安裝回機箱中
必要なケーブルとリード線を全て接続
したことを確認してから、完成した光学
ドライブブラケットをシャーシに戻して本体
のインストールを完了させます。
필요한 모든 케이블과 선들이 연결이
필요한 모든 케이블과 선들이 연결이
되었는지 확인하고, 완성된 광
되었는지 확인하고, 완성된 광
드라이브 브라켓을 케이스에 설치하여
드라이브 브라켓을 케이스에 설치하여
시스템 설치를 완성하십시오.
시스템 설치를 완성하십시오.

13
17.
18.
Reinstall the top panel and secure
with screws
Schrauben Sie den Deckel wieder
auf das Gehäuse.
Remettez le panneau supérieur et
fixez le avec des vis
Reinstale el panel superior y sujete
con los tornillos
Reinstallare il pannello superiore e
fissare con le viti
Установите на место и закрепите
шурупами верхнюю панель.
請將上蓋頂板裝回並以螺絲鎖固
上部パネルを戻し、ネジ止めします。
상부패널을
상부패널을
다시
다시
설치하고
설치하고
나사로
나사로
고정하십시오
고정하십시오
.
.
Installation complete
Installation abgeschlossen.
Installation finie
Instalación terminada
Installazione completata.
安裝完成
Сборка завершена.
インストール完了
설치 완료
설치 완료
/