Philips DVDR3595H/05 User manual
- Category
- DVD players
- Type
- User manual
This manual is also suitable for

1
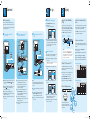
Connect
Before connecting
Select the most suitable connection (A or B or C)
based on the type of device you have and your home set
up.
You can also refer to the accompanying User Manual for
other possible connections.
A
Connecting Recorder and TV
with antenna only
A Unplug the existing antenna cable from your TV and
connect it to the ANTENNA IN socket on this
recorder.
B Connect an RF antenna cable (supplied) from the
TV-OUT socket on this recorder to the
Antenna In socket on the TV.
C Connect a scart cable (supplied) from the
EXT1-TO TV scart socket on this recorder to the
SCART socket on your TV.
D Plug in the power cable from the recorder to an AC
power outlet
ANTENNA-IN
TV-OUT
TO TV
EXT1 TO VCR/SAT
EXT2
HDMI
OUT
CVBS OUT
S-VIDEO OUT
VIDEO OUT
COAXIAL
DIGITAL OUT
AUDIO OUT
AUDIO
RL
TO
VCR
TO
TV
A Keep the existing scart connection between the
Cable Box/Satellite Receiver and your TV.
z
If your TV only has one Scart connector, then
replace the scart connection with antenna
connections (see option B).
B Connect a scart cable (not supplied) from the
EXT2-TO VCR/SAT scart socket on this
recorder to the SCART (TO VCR) socket on the
Cable Box/Satellite Receiver.
C Connect a scart cable (supplied) from the
EXT1-TO TV scart socket on this recorder to the
SCART socket on your TV.
D Plug in the power cable from the recorder to an AC
power outlet
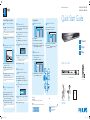
2
Set up
ANTENNA-IN
TV-OUT
TO TV
EXT1 TO VCR/SAT
EXT2
HDMI
OUT
CVBS OUT
S-VIDEO OUT
VIDEO OUT
COAXIAL
DIGITAL OUT
AUDIO OUT
AUDIO
RL
SCART
SCART
Note:
Your new Philips Recorder replaces the VCR for your
recording needs. First, unplug all the connections from
your VCR.
A Follow A connection before you proceed to step 2
below.
B Connect a scart cable (not supplied) from the
EXT2-TO VCR/SAT scart socket on this
recorder to the SCART socket on the VCR.
C Plug in the power cable from the recorder to an AC
power outlet
B
Connecting Recorder and TV
with Cable TV or Satellite Receiver
C
Connecting Recorder, TV and
VCR
ANTENNA-IN
TV-OUT
TO TV
EXT1 TO VCR/SAT
EXT2
HDMI
OUT
CVBS OUT
S-VIDEO OUT
VIDEO OUT
COAXIAL
DIGITAL OUT
AUDIO OUT
AUDIO
RL
Antenna
Television ( rear)
Television
(rear)
Philips Recorder (rear)
Philips Recorder (rear)
Television
( rear)
Philips Recorder (rear)
A
Finding the viewing channel
A Press STANDBY-ON on the recorder.
B Turn on the TV.
You should see the installation menu.
Dansk
Français
Italiano
Nederlands
Norsk
Español
Deutsch
Menu Language
English
Please select your language.
Denes the languages of all
on-screen menu displays.
C In case you don’t see the recorder’s setting menu,
press the Channel Down button on the TVs remote
control repeatedly (or AV, SELECT,
°
button) until
you see the menu. This is the correct viewing
channel for the recorder.
B
Start initial installation
Use the recorder’s remote control and follow the on-
screen instructions to complete the installation.
A Select the desired menu language, your country and
the TV shape.
Note Press OK or the Green button on the remote
control to go to the next screen.
B Press OK to start automatic analogue channel
search.
Channel search
Start Auto search
C Once complete, press the Green button to
continue.
Time setting is required for
making recordings. Time
format is 24h (hh:mm)
Time
00 00
:
D Enter the correct time in the entry field, press OK
followed by the Green button to continue.
Proceed the same for date entry.
E The installation is completed now, press the Green
button to close the menu.
3
Enjoy
About the Time Shift Buffer
(TSB)
Once you turn on the recorder, the selected TV
programme will be stored in a temporary hard disk
storage called Time Shift Buffer ‘TSB’. The ‘TSB’ can
store up to 6 hours of programmes temporarily.
Press INFO to display the Time Shift video bar.
Now
22:04:30
Notes:
- The contents in the time shift video bar will be
cleared when you press STANDBY ON (2).
- The blue LED on the recorder will be lit up when the
Time Shift Buffer is active or when you playback a
recording from the hard disk drive.
Watch TV – Pause live TV
Your Philips Recorder allows you to control the TV
programme. You can PAUSE it as if you were in control
of the live broadcast.
A Turn on your recorder to the live TV mode and
press P +/- to select a TV programme.
B Press PAUSE LIVE TV to suspend it.
C Press PAUSE LIVE TV
again to continue.
D To return to live broadcast, press LIVE TV.
Colour Softkeys function
Repeat Repeat A-B
The colour functions shown on the
menu can be accessed by pressing the
matching colour coded buttons on the
remote control.
Current time
of playback
Selected clips for
recording
Programmes
stored in the ‘TSB’
Start time of the
programme
Present time
Satellite dish/
Cable TV wall outlet
(option B)
Antenna
VCR (rear)
About the internal hard disk
drive
This recorder’s hard disk drive can be used as a Media
Jukebox, allowing you to store and playback your TV
programmes, videos, music and photos les.
Press HOME on the remote control to access your
contents stored in the { Hard Disk }.
Select a record mode
Select an appropriate recording mode is important as it
determines the picture quality and recording time to the
hard disk.
A Before recording, press OPTIONS on the
remote control.
B Select { Settings } in the menu and press OK.
C Move to { Recording } and press right.
D Move to { Record mode } and press right.
E Select a record mode and press OK to confirm.
DVDR3575H / DVDR3577H
Record Mode
HQ (high quality)
SP (standard play)
SPP (standard play plus)
LP (long play)
EP (extended play)
SLP (super long play)
SEP (super extended play)
1
2
2.5
3
4
6
8
23
45
56
68
90
135
180
1 hr 55 mins
3 hrs 40 mins
4 hrs 35 mins
5 hrs 30 mins
7 hrs 20 mins
11 hrs 5 mins
14 hrs 45 mins
DVDR3595H / DVDR3597H
Record Mode
HQ (high quality)
SP (standard play)
SPP (standard play plus)
LP (long play)
EP (extended play)
SLP (super long play)
SEP (super extended play)
1
2
2.5
3
4
6
8
40
77
96
115
153
230
300
1 hr 55 mins
3 hrs 40 mins
4 hrs 35 mins
5 hrs 30 mins
7 hrs 20 mins
11 hrs 5 mins
14 hrs 45 mins
(250GB)
INFO
HOME
LIVE TV
OPTIONS
PAUSE LIVE TV
dvdr357xh-359xh_58qsg_eng_28451.1 1dvdr357xh-359xh_58qsg_eng_28451.1 1 2007-06-15 11:19:08 AM2007-06-15 11:19:08 AM

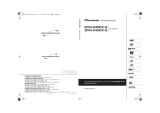
3
Enjoy
Need help?
User Manual
See the user manual that came with your Philips Recorder
Online
Register your product and get support at www.philips.com/welcome
Start playback
A
Playback from hard disk
Disc Tray
USB
Recordings
Video les
Music
Photo
Source Content
Hard Disk
A Press HOME.
B Select { Hard Disk } and press right.
C Select the contents type and press right.
D Use keys to reach the title/file you want
to play and press u to start playback.
B
Playback from disc
A Hold down STOP until the disc tray opens. Load a
disc and close the disc tray.
B Press HOME and select { Disc Tray }.
Hard Disk
USB
Title 01
Title 02
Title 03
Title 04
Title 05
Title 06
Title 07
Title n
Disc Tray
Source Titles
C Use keys to reach the title/file you want
to play and press u to start playback.
2007 © Koninklijke Philips N.V.
All rights reserved.
12 NC 3139 245 28451
www.philips.com
Hard Disk / DVD Recorder
DVDR3575H / DVDR3577H
DVDR3595H / DVDR3597H
Quick Start Guide
Connect
Set up
Enjoy
1
2
3
What’s in the box?
Hard Disk/ DVD Recorder
RF antenna cable
(connect between
recorder and TV)
Remote Control
and 2 batteries
User
Manual
Scart cable
SUBTITLE
INFO SELECT EDIT SCART
AUDIO
PAUSE LIVE TV
Record/Copy to hard disk
A
Record current TV programme
A Press REC to start recording. It can record up to
6 hours.
Note To set the recording time length, press REC
repeatedly to extend the recording time in 30-minute
increments, up to 6 hours.
B To stop the recording before the scheduled time,
press STOP.
B
Mark a speci c content in the Time
Shift Buffer for recording
23:30
22:13
21:00
Cancel Rec.
Prog Info
A Press left or right to search for the scene
where you want to record.
B Press REC
to start recording from here.
Note Pressing the Red button will cancel the
recording.
C Press right to search for the scene to end the
recording, then press STOP.
Note The title will be marked in red and the
recording will only take effect when you turn off the
recorder.
C
Copy TV programmes from hard
disk
A Insert a recordable DVD into the recorder.
B Press HDD LIST on the remote control.
C Select a title to copy and press the Green button
on the remote control for { Copy }.
D The making disc copy information appears. Press
the Green button again to start copying.
Note It is not possible to copy the TV recordings to
USB device.
D
Copy les from USB
You can only copy the data les (MP3, WMA, DivX and
JPEG) from your USB device to the recorder’s hard disk
drive or recordable DVD.
A Insert your USB device to the USB port at the front
panel of the recorder.
B Press USB on the remote control to view the
content menu.
C Use keys to reach the file you want to
copy.
D Press the Green button on the remote control for
{ Copy }.
Target for copy.
Choose destination for copy.
To Disc
To Hard Disk
E Select the destination for copying and press OK to
confirm.
Note If select { To Disc }, insert an empty
recordable DVD into the recorder.
F Press OK again to start copying.
E
Copy les from Disc
Copy prohibited contents cannot be copied to this
recorder.
A Insert a CD/DVD into the recorder.
B Press HOME and select { Disc Tray }.
C Use keys to reach the title/file you want
to copy.
D Press the Green button on the remote control for
{ Copy }.
Target for copy.
Choose destination for copy.
To USB
To Hard Disk
E Select the destination for copying and press OK to
confirm.
Note Only data les are able to copy to USB device.
F Press OK again to start copying.
C
Playback from USB device
A Insert the USB device to the USB socket.
B Press USB to show the contents list.
Folder 01
Folder 02
Root
Video
Photo
Music
Content
C Select the contents type and press right.
D Select a data file
(MP3, WMA, DivX and JPEG)
and
press u to start playback.
HDD LIST
USB
REC
STOP
HOME
dvdr357xh-359xh_58qsg_eng_28451.2 2dvdr357xh-359xh_58qsg_eng_28451.2 2 2007-06-15 11:19:10 AM2007-06-15 11:19:10 AM
-
 1
1
-
 2
2


Philips DVDR3595H/05 User manual
- Category
- DVD players
- Type
- User manual
- This manual is also suitable for
Ask a question and I''ll find the answer in the document
Finding information in a document is now easier with AI
Related papers
-
Philips DVDR7300H/75 Quick start guide
-
Philips DVDR3577H User manual
-
-
Philips DVDR5570H/05B User manual
-
-
Philips DVDR3360H User manual
-
-
-
-
Other documents
-
 PYLE Audio DVDR5520H User manual
-
 PYLE Audio DVR-940HX-S User manual
-
Pioneer DVR-545H-S User manual
-
-
-
-
-
-
-

