1
Connect
A Unplug the existing antenna cable from your TV and
connect it to the DIGITAL ANTENNA INPUT
socket on this recorder.
B Connect the Tuner interlink cable (supplied)
between DIGITAL ANTENNA LOOP
THROUGH and ANALOG ANTENNA INPUT
sockets on this recorder.
C Connect the RF antenna cable (supplied) from the
TO TV ANTENNA INPUT
socket on this
recorder to the Antenna In socket on the TV.
D Connect a scart cable (supplied) from the
EXT1-TO TV scart socket on this recorder to the
SCART socket on your TV.
E Plug in the power cable from the recorder to an AC
power outlet.
2
Set up
HDMI
OUT
S-VIDEO
OUT
AUDIO
OUT
COAXIAL
DIGITAL OUT
COMPONENT
VIDEO OUT
COAXIAL
DIGITAL
IN
CVBS-OUT
P
B
P
R
Y
R
L
TO VCR/SAT
EXT2
TO TV
EXT1
ANALOG
ANTENNA INPUT
TO TV ANTENNA
INPUT
DIGITAL
ANTENNA INPUT
DIGITAL ANTENNA
LOOP THROUGH
ANTENNA INTERCONNECT CABLE
(OPTIONAL, REFER TO MANUAL)
G-LINK
B
D
C
E
TO VCR
TO T V
COAXIAL
DIGITAL OUT
OPTICAL
OUT
B
Connecting Recorder and TV
with Cable TV and Digital TV antenna (optional)
C
Connecting Recorder, TV and
Cable Box/Satellite Receiver
HDMI
OUT
S-VIDEO
OUT
AUDIO
OUT
COAXIAL
DIGITAL OUT
COMPONENT
VIDEO OUT
COAXIAL
DIGITAL
IN
CVBS-OUT
P
B
P
R
Y
R
L
TO VCR/SAT
EXT2
TO TV
EXT1
ANALOG
ANTENNA INPUT
TO TV ANTENNA
INPUT
DIGITAL
ANTENNA INPUT
DIGITAL ANTENNA
LOOP THROUGH
ANTENNA INTERCONNECT CABLE
(OPTIONAL, REFER TO MANUAL)
G-LINK
Antenna
Philips Recorder (rear)
A
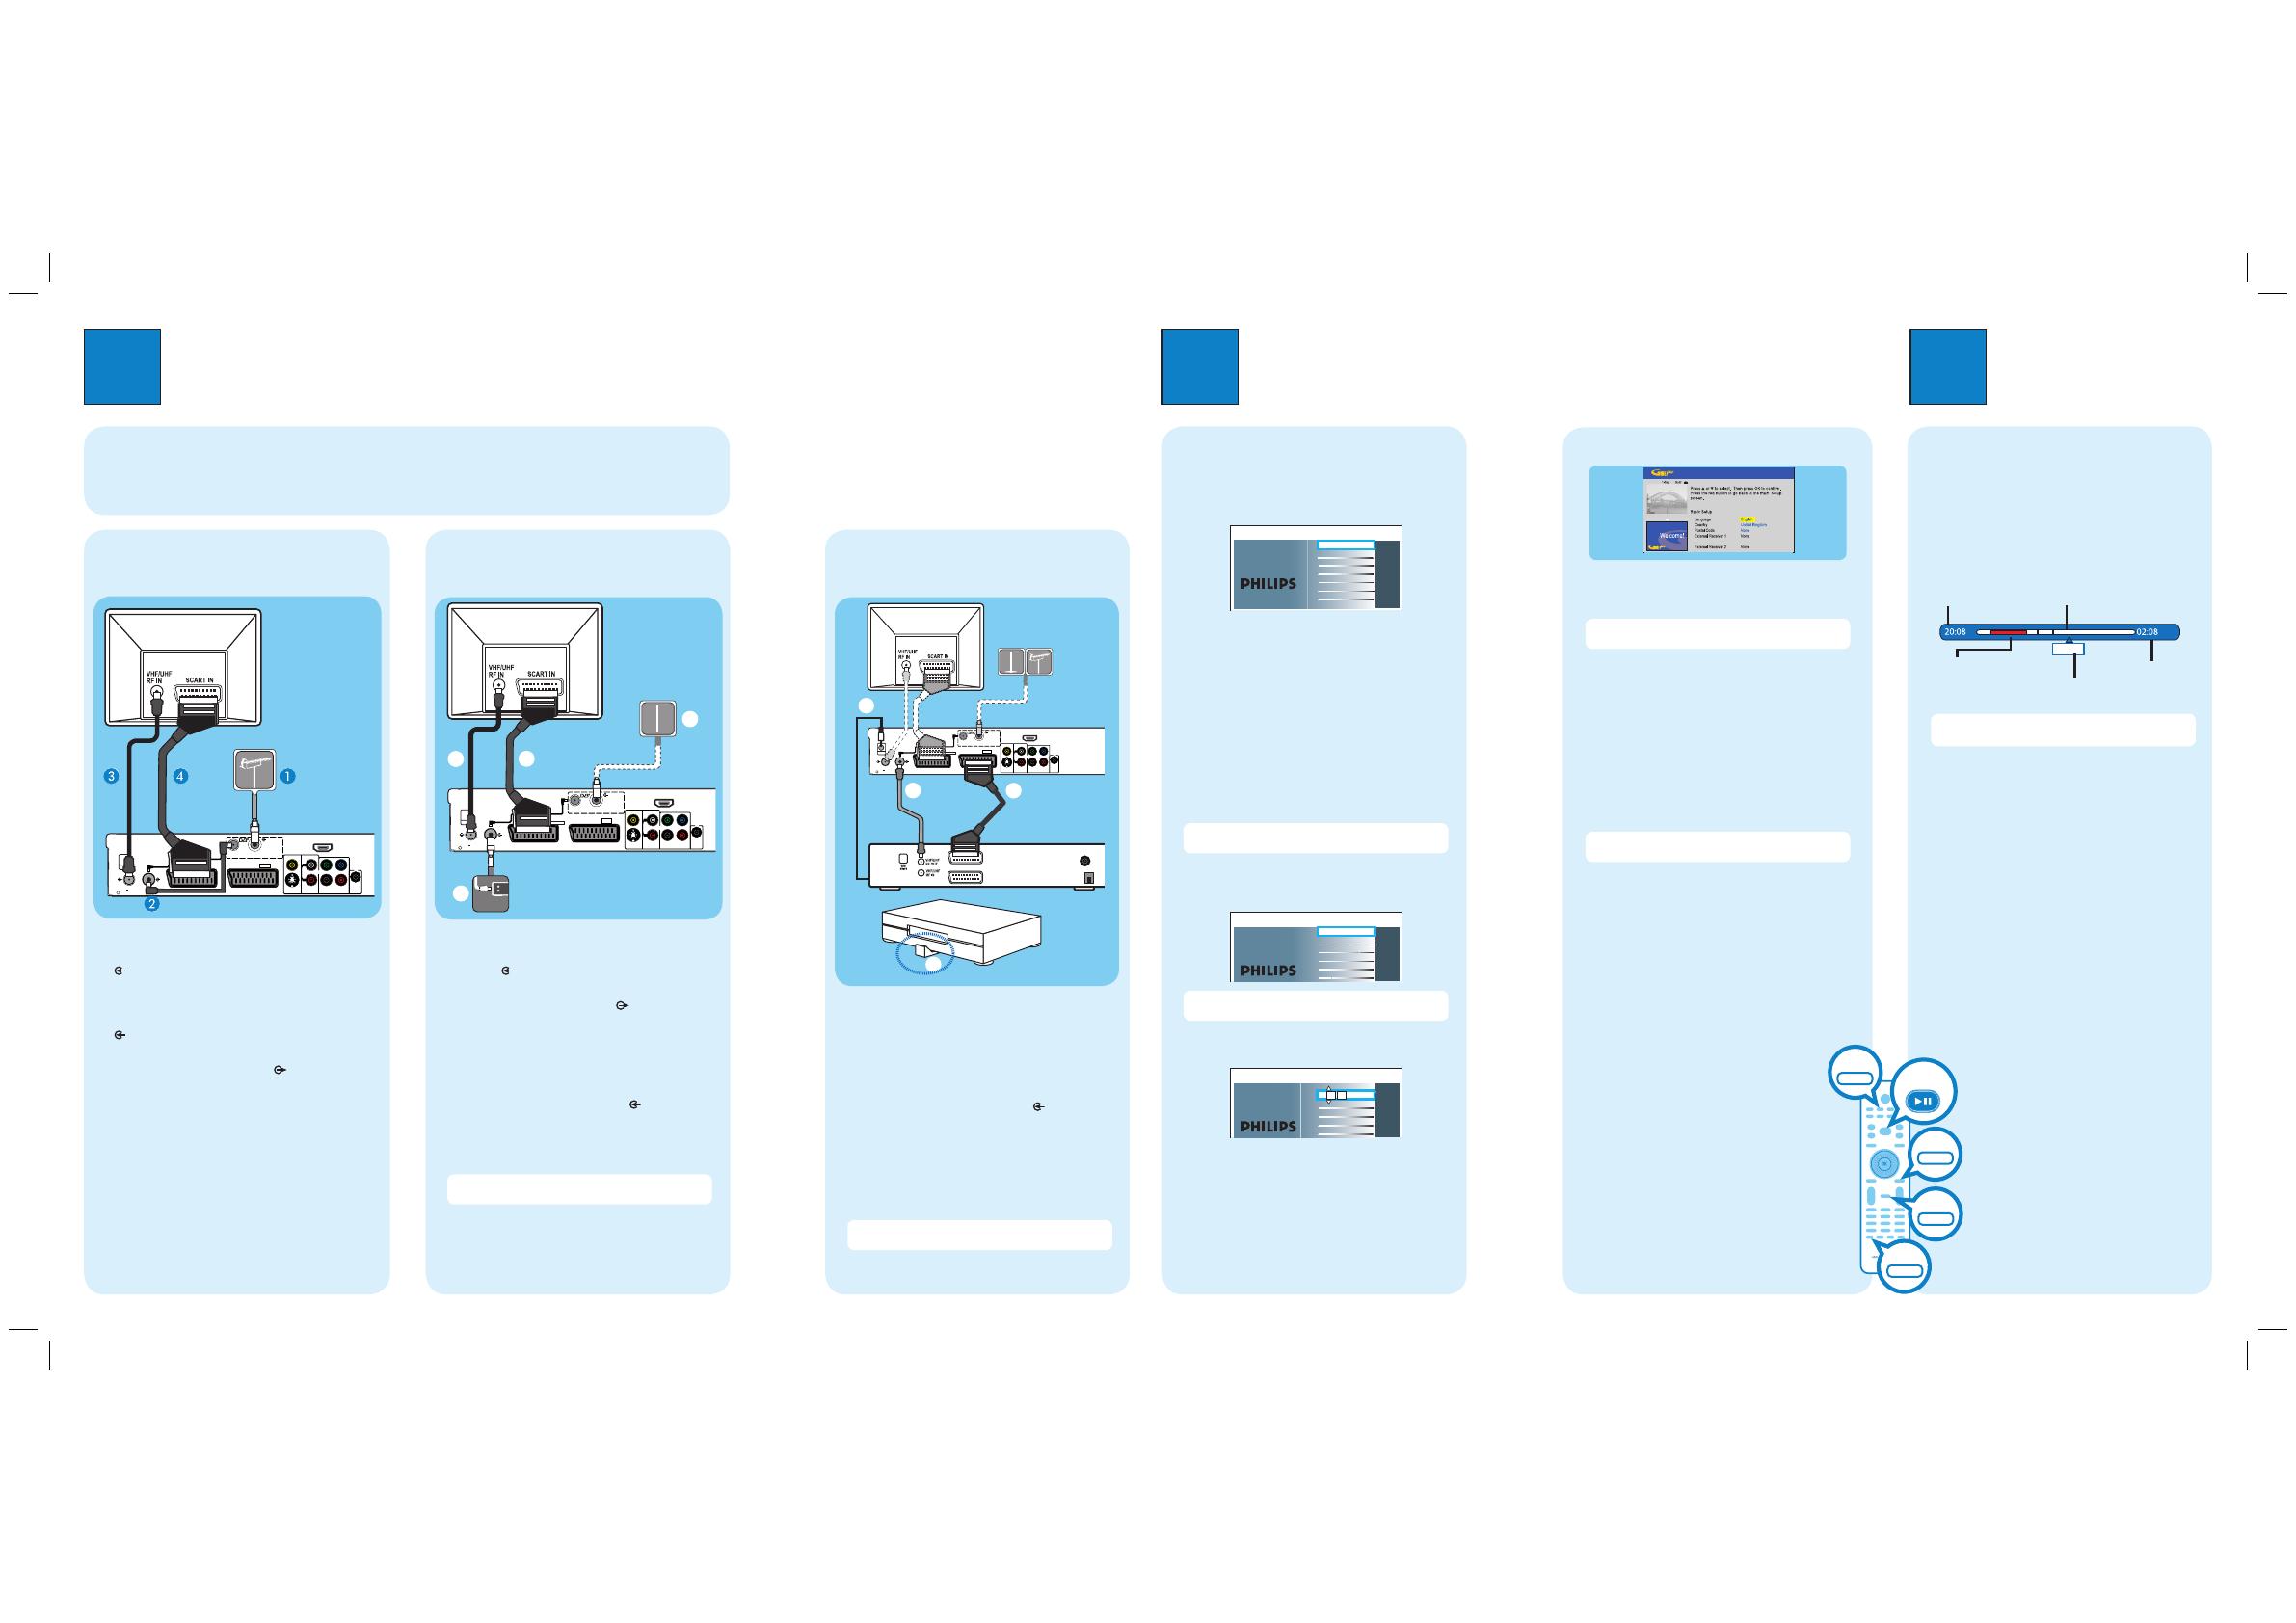
Finding the viewing channel
A Press STANDBY-ON on the recorder.
B Turn on the TV.
You should see the installation menu.
Dansk
Français
Italiano
Nederlands
Norsk
Español
Deutsch
Menu Language
English
Please select your language.
Denes the languages of all
on-screen menu displays.
C In case you don’t see the recorder’s setting menu,
press the Channel Down button on the TVs remote
control repeatedly (or AV, SELECT,
°
button) until
you see the menu. This is the correct viewing
channel for the recorder.
B
Start initial installation
Use the recorder’s remote control and follow the on-
screen instructions to complete the installation.
A Select the desired menu language, your country and
the TV shape.
Note Press OK or the Green button on the remote
control to go to the next screen.
B When the { Channel Search } menu appears, select
the type of tuner to install and press the Green
button.
Channel search
Full installation
Channel search installs Analogue
and Digital TV channels.
Antenna needs to be connected.
Only Analogue TV
Only Digital TV
No TV install
Note If { No TV install } is selected, only recordings
from external sources will be possible.
C Once complete, press the Green button to
continue.
Time setting is required for
making recordings. Time
format is 24h (hh:mm)
Time
00 00
:
D Enter the correct time in the entry field, press the
Green button to continue. Proceed the same for
date entry.
E To continue with the GUIDE Plus+ installation,
press the Green button.
z
Otherwise, press the Red button to skip.
3
Enjoy
About the Time Shift Buffer
(TSB)
Once you turn on the recorder, the selected TV
programme will be stored in a temporary hard disk
storage called Time Shift Buffer ‘TSB’. The ‘TSB’ can
store up to 6 hours of programmes temporarily.
Press INFO to display the Time Shift video bar.
Now
22:04:30
Note The contents in the time shift video bar will be
cleared when you press STANDBY ON (2).
Watch TV – Pause live TV
Your Philips Recorder allows you to control the TV
programme. You can PAUSE it as if you were in control
of the live broadcast.
A Turn on your recorder to the live TV mode and
press P +/- to select a TV programme.
B Press PAUSE LIVE TV to suspend it.
C Press PAUSE LIVE TV
again to continue.
D To return to live broadcast, press LIVE TV.
About the internal hard disk
drive
This recorder’s hard disk drive can be used as
a Media Jukebox, allowing you to store and
playback your TV programmes, videos, music
and photos les.
Press HOME on the remote control to
access your contents stored in the { Hard
Disk }.
Current time
of playback
Selected clips for
recording
Programmes
stored in the ‘TSB’
Start time of the
programme
Present time
Antenna (or Digital
TV antenna)
A Unplug the existing cable TV antenna from your TV
and connect it to the ANALOG ANTENNA
INPUT
socket on this recorder.
B Connect the RF antenna cable (supplied) from the
TO TV ANTENNA INPUT socket on this
recorder to the Antenna In socket on the TV.
C Connect a scart cable (supplied) from the
EXT1-TO TV scart socket on this recorder to the
SCART socket on your TV.
D If you have a Digital TV antenna, connect it to the
DIGITAL ANTENNA INPUT socket on this
recorder (optional).
E Plug in the power cable from the recorder to an AC
power outlet.
Note No digital channels will be found if the digital
antenna is not connected to this recorder.
HDMI
OUT
S-VIDEO
OUT
AUDIO
OUT
COAXIAL
DIGITAL OUT
COMPONENT
VIDEO OUT
COAXIAL
DIGITAL
IN
CVBS-OUT
P
B
P
R
Y
R
L
TO VCR/SAT
EXT2
TO TV
EXT1
ANALOG
ANTENNA INPUT
TO TV ANTENNA
INPUT
DIGITAL
ANTENNA INPUT
DIGITAL ANTENNA
LOOP THROUGH
ANTENNA INTERCONNECT CABLE
(OPTIONAL, REFER TO MANUAL)
G-LINK
B
C
D
A
Digital TV
antenna
Cable TV
Philips Recorder (rear)
Philips Recorder (rear)
Cable Box /
Satellite Receiver
(front)
A Follow steps 2~4 from type B connection.
B Connect another scart cable (not supplied) to the
EXT2-TO VCR/SAT scart socket on this
recorder to the SCART (TO TV) socket on your
Cable Box/Satellite Receiver.
C Connect an antenna cable (not supplied) from the
ANALOG ANTENNA INPUT socket on this
recorder to the Antenna Output socket on the
Cable Box/Satellite Receiver.
D Connect the G-LINK cable to the G-LINK socket
on this recorder.
E Place the G-LINK transmitter in front of your Cable
Box/Satellite Receiver near to its IR sensor.
Note No digital channels will be found if the digital
antenna is not connected to this recorder.
Cable Box /
Satellite Receiver (rear)
C
Install the GUIDE Plus+ system
z
Follow the on-screen instructions to select your
language, country and enter the postal code of your
area.
Note If no or wrong postal code is entered, it will
cause no GUIDE Plus+ (EPG) service information.
D
Install the external receiver
If you do not have an external receiver connected to the
recorder, skip ‘D’ and go to ‘E’.
A Select ‘External Receiver 1’ and press OK.
B Select the type of reception, service provider and
brand name of the external receiver, followed by the
recorder socket used to connect the external
receiver (e.g. ‘EXT2’ for ‘EXT2-TO VCR/SAT’).
Note Press OK to go to the next screen.
Select { None } if none of the entries are applicable.
C Once complete, turn on your external receiver and
select channel number 02 on the external receiver.
D Read the instructions on the TV and press OK.
E If the external receiver has switched to the same
programme number as displayed on the TV, select
{ Yes } in the menu and press OK. Otherwise, select
{ No } and press OK to try a different code.
F Your external receiver is now installed. Press the
Green button to continue.
G Go to { Host Channel Setup } to select the host
channel for your external receiver.
E
Load the TV listing data
A Press TIMER (GUIDE Plus+)
to exit GUIDE
Plus+ system.
Leave the recorder in ‘standby’ mode and turn
‘on’ the external receiver overnight to collect
the TV listing data, this may take up to 24
hours.
B Check the { Editor } screen the next day to
ensure the source and programme numbers
are matching for all channels.
G-LINK
transmitter
INFO
HOME
LIVE TV
PAUSE LIVE TV
TIMER
GUIDE Plus+
Before connecting
Select the most suitable connection (A or B or C) based on the type of device you have and your home set up.
You can also refer to the accompanying User Manual for other possible connections.
A
Connecting Recorder and TV
with antenna only
Television
(rear)
Television
(rear)


