RCA SpeedTouch 580 User manual
- Category
- Recording Equipment
- Type
- User manual
This manual is also suitable for

SpeedTouch™580
Wireless Multi-User ADSL Gateway
Setup and User’s Guide
Release R1.0 (R4.2.7)


SpeedTouch™
580
Setup and User’s Guide
Release R1.0 (R4.2.7)

Status v3.0
Reference E-DOC-CTC-20040123-0001
Short Title Setup and User's Guide ST580(i) R1.0 (R4.2.7) (en)
Copyright
© 2004 THOMSON. All rights reserved. Passing on, and copying of this document, use and
communication of its contents is not permitted without written authorization from
THOMSON. The content of this document is furnished for informational use only, may be
subject to change without notice, and should not be construed as a commitment by
THOMSON. THOMSON assumes no responsibility or liability for any errors or inaccuracies
that may appear in this document.

E-DOC-CTC-20040123-0001 v3.0
3
Contents
1 SpeedTouch™ Installation ............................................ 5
1.1 Getting Acquainted with the SpeedTouch™.................................................... 6
1.2 Setting Up the SpeedTouch™............................................................................ 9
2 SpeedTouch™ Local Networking Setup.................... 11
2.1 Ethernet Connection Setup .............................................................................. 12
2.2 USB Connection Setup for Microsoft Windows............................................. 13
2.3 Wireless Connection Setup .............................................................................. 16
2.3.1 First-time Wireless Client Association...................................................................................... 19
2.3.2 Connecting Wireless Clients .......................................................................................................21
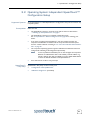
3 SpeedTouch™ Configuration Setup........................... 23
3.1 Microsoft Windows SpeedTouch™ Configuration Setup.............................. 24
3.2 Operating System Independent SpeedTouch™ Configuration Setup......... 31
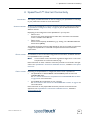
4 SpeedTouch™ Internet Connectivity ........................ 35
4.1 Internet Connections via SpeedTouch™’s Embedded PPP Dial-in Client .. 36
4.1.1 Using the MS Windows XP Internet Gateway Device Control Agent..............................37
4.1.2 Using the SpeedTouch™ Web Pages ........................................................................................39

E-DOC-CTC-20040123-0001 v3.0
4
4.2 Connect to the Internet via a Host PPPoE Dial-in Client ............................. 41
4.2.1 Using an MS Windows XP BroadBand Connection...............................................................42
4.2.2 Using the Mac OS X PPPoE Dial-in Client ...............................................................................46
5 SpeedTouch™ Web Interface..................................... 49
5.1 Basic Task Links ................................................................................................. 53
5.2 Advanced Topics Menu Links ........................................................................... 65
6 SpeedTouch™ NAPT Manager .................................. 77
7 Support.......................................................................... 83
7.1 SpeedTouch™ Wall Mount............................................................................... 84
7.2 SpeedTouch™ System Software Upgrade...................................................... 85
7.2.1 Upgrade via the SpeedTouch™ Upgrade Wizard ..................................................................86
7.2.2 Manual System Software Management via BOOTP Server ..................................................93
7.3 SpeedTouch™ Default Configuration.............................................................. 95
7.4 UPnP™ on Windows XP Systems ................................................................... 96
7.5 Troubleshooting ................................................................................................. 98

1 SpeedTouch™ Installation
E-DOC-CTC-20040123-0001 v3.0
5
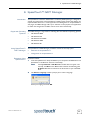
1 SpeedTouch™ Installation
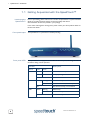
Introduction Thank you for purchasing a SpeedTouch™ Wireless Multi-User ADSL Gateway!
With the SpeedTouch™580 Wireless Multi-User ADSL Gateway two cutting-edge
technologies are combined: ADSL and Wireless LAN (WLAN).
With this answer to the increasing popularity of both technologies, users can build a
home or small office (Wireless) LAN without any need for network wiring and surf the
Internet at high speed; all combined in one device.
Contents This Setup and User’s Guide will assist you in getting acquainted with the Speed-
Touch™580 Wireless Multi-User ADSL Gateway and in getting connected quickly to
the Internet.
Terminology Generally, the SpeedTouch™580(i) will be referred to as SpeedTouch™ in this Setup
and User’s Guide unless specifically indicated.
Safety instructions Before connecting the SpeedTouch™, please read the SpeedTouch™ Quick Installation
Guide and Safety Instructions.
UPnP™ The SpeedTouch™ is a UPnP™ certified product. This feature enables your computer
to discover and control UPnP™ devices on the network.
If you are running Microsoft Windows XP, it is strongly recommended to add the
UPnP™ software component to your system.
For more information see MS Windows XP Help and “7.4 UPnP™ on Windows XP
Systems” on page 96.
Documentation and
software updates
The SpeedTouch™ products continue to evolve as extra and new functionalities are
made available.
For more information on the latest technological innovations, software upgrades, and
documents, please visit the SpeedTouch™ web site at:
www.speedtouch.com

1 SpeedTouch™ Installation
E-DOC-CTC-20040123-0001 v3.0
6
1.1 Getting Acquainted with the SpeedTouch™
Introducing the
SpeedTouch™
Prior to proceeding, please make sure to read first the SpeedTouch™ Quick Installation
Guide. It provides important package content and safety information.
Check whether all items are present in your package.
In the event of damaged or missing items, please contact your local product dealer for
further information.
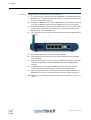
Front panel layout The SpeedTouch™ is presented in a desktop housing:
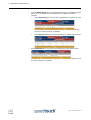
Front panel LEDs The SpeedTouch™ is equipped with six LEDs on its front panel, indicating the state of
the device during normal operation:
Indicator Description
Name Color State
Power Green On Power On, normal operation
Red On Startup pending
Off Power Off
Ethernet Green Flashing Ethernet activity
On Ethernet connection, no activity
Off No ethernet activity, no connection
USB Green Flashing USB activity
On No USB activity, USB connection
Off No USB activity, no USB connection

1 SpeedTouch™ Installation
E-DOC-CTC-20040123-0001 v3.0
7
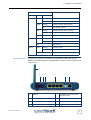
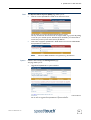
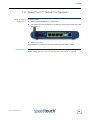
Back panel layout The following connectors are available on the SpeedTouch™580: a four port 10/
100Base-T Half-/Full-duplex auto-sensing MDI/MDI-X Ethernet switch, a USB port and
a DSL line port.
WLAN Green Flashing Wireless activity, security level 2
On No Wireless activity
Amber Flashing Wireless activity, security level 1
On No Wireless activity
Red Flashing Wireless activity, security level 0
On No Wireless activity
Off No Wireless connection
DSL Green Flashing Pending DSL line synchronization
On DSL line synchronized
Off No DSL line
Internet Green Flashing Internet activity
On Internet Connection
Off No Internet Connection
Indicator Description
Name Color State
A Antenna E 10/100Base T Ethernet switch
(marked yellow)
B Power button (On/Off) F USB port (marked blue)
C Power inlet (15VAC) G DSL line port (marked grey)
D Recessed Reset button
E FB
A
DC G

1 SpeedTouch™ Installation
E-DOC-CTC-20040123-0001 v3.0
8
Ethernet port LEDs Each of the yellow marked Ethernet ports on the rear panel has one LED (B) to indicate
the connection integrity (activity). Depending on the SpeedTouch™ product you are
using, a second LED (A) may be provided to indicate the 10/100Base-T selection:
Indicator Description
Name LED Status
A
(Optional)
10/100Base-T Off 10Base-T Ethernet connection.
On 100Base-T Ethernet connection.
B Integrity
(Activity)
Off No connection on this port.
On Ethernet link up.
Flashing Data is flowing from/to this port.
BA

1 SpeedTouch™ Installation
E-DOC-CTC-20040123-0001 v3.0
9
1.2 Setting Up the SpeedTouch™
Wall mounting
assembly
The SpeedTouch™580 can be mounted on a wall using the two mounting brackets at
the bottom or can setup in an upright position using a stand or the standard desktop
'mount'. For more information please see “7.1 SpeedTouch™ Wall Mount” on page 84.
SpeedTouch™ variants Two ADSL variants of the SpeedTouch™ exist:
• The ADSL/POTS variant (SpeedTouch™580) connecting to an analog Plain Old
Telephone Service (POTS) line.
• The ADSL/ISDN variant (SpeedTouch™580i) connecting to a digital Integrated
Services Digital Network (ISDN) line.
You can easily identify your variant by checking the identification label located on the
bottom of your SpeedTouch™.
Use only the SpeedTouch™ variant which is appropriate for the DSL service provided
to your premises. Check with your Service Provider to determine whether your Speed-
Touch™ is adapted to ADSL service requirements.

1 SpeedTouch™ Installation
E-DOC-CTC-20040123-0001 v3.0
10
ADSL service The appropriate DSL service must be available at your premises:
• ADSL service must be enabled on your telephone line.
• If both telephone and ADSL service are simultaneously available from the same
copper pair, you will need a central splitter or distributed filters for decoupling
ADSL and telephone signals.
Always contact your Service Provider when installing splitters/filters!
Public telephone lines carry voltages that can cause electric shock. Only install splitter/
filters yourself if these are qualified for that purpose.
Connect the DSL line The grey DSL port on the SpeedTouch™ is marked: .
Use the grey DSL cable provided to wire the SpeedTouch™ DSL port to your tele-
phone wall outlet or distributed filter.
Connect the power
supply
Always check first whether the power supply adapter provided is suitable for the local
power specifications. Contact your Service Provider in case of any doubt.
The power inlet on the SpeedTouch™ is marked “15VAC”.
Plug the adapter's coaxial jack into the SpeedTouch™'s power inlet and plug the power
supply into a power socket outlet.
Turn on the
SpeedTouch™
Once all previous steps are completed, you can turn the SpeedTouch™ on with the
power button located on the SpeedTouch™580 rear panel.
• Push in the button to switch on the SpeedTouch™580.
• Push to release the button to switch off the SpeedTouch™580.
The SpeedTouch™ is ready for service as soon as the start-up procedures are
completed, the Power On Self Test (POST) is passed and the Power LED on the front
panel is constantly lit green.
For troubleshooting startup failures, see “7.5 Troubleshooting” on page 98.
Connecting your
computer(s)
The SpeedTouch™ offers you various possibilities to connect your computer(s) to the
device. Proceed with “2 SpeedTouch™ Local Networking Setup” on page 11 to set up
your local network.

2 SpeedTouch™ Local Networking Setup
E-DOC-CTC-20040123-0001 v3.0
11
2 SpeedTouch™ Local Networking Setup
Introduction The SpeedTouch™ offers three local networking solutions:
• Wired Ethernet
• Wireless Ethernet
• USB (1.1)
By introducing the SpeedTouch™ into your local network, local hosts using one of the
solutions above are able to share a local network (i.e. one computer over USB, multiple
computers over wired Ethernet and multiple wireless clients over wireless networking).
Wired Ethernet The SpeedTouch™ managed four-port 10/100Base-T Half-/Full-duplex auto-sensing
MDI/MDI-X Ethernet switch allows you to create a local Ethernet network of up to
four devices, without needing extra networking devices or to expand an existing 10 or
100Base-T Ethernet network.
Note If an external hub or switch is used for wired Ethernet networking, please
follow the installation instructions supplied with the hub for connections and
Ethernet cabling.
Proceed with “2.1 Ethernet Connection Setup” on page 12.
USB If your computer is not equipped with an Ethernet port, you may want to connect the
computer to the SpeedTouch™ using the USB port on the back panel of the Speed-
Touch™.
USB connectivity is supported by Microsoft for following Operating Systems:
• Microsoft Windows OSs
• MS Windows 98SE
• MS Windows Millennium
• MS Windows 2000
• MS Windows XP
You must install the USB drivers, if you want to connect your pc to the Speed-
Touch™580 over USB. Proceed with “2.2 USB Connection Setup for Microsoft
Windows” on page 13.
Wireless Ethernet The SpeedTouch™ Wi-Fi™ certified IEEE 802.11g compliant wireless access point
allows multiple computers to connect wirelessly to your local network over the Speed-
Touch™ Wireless LAN environment. The SpeedTouch™580 is backward compatible
with IEEE802.11b. This means that IEEE802.11b and IEEE802.11g devices can coexist in
the same wireless network.
To be able to connect the computers, make sure that a Wireless client adapter (WLAN
client) is installed on each computer you want to connect via the WLAN.
Proceed with “2.3 Wireless Connection Setup” on page 16.

2 SpeedTouch™ Local Networking Setup
E-DOC-CTC-20040123-0001 v3.0
12
2.1 Ethernet Connection Setup
Local network The SpeedTouch™ Ethernet ports on the back panel allow you to connect the Speed-
Touch™ to an existing 10 or 100Base-T Ethernet network or one (or more)
computer(s) with installed Ethernet card.
Using the SpeedTouch™ Ethernet switch, you can create a local Ethernet network of up
to four devices, without needing extra networking devices.
Note In the SpeedTouch™ package, a yellow full-wired straight-through RJ45/RJ45
Ethernet cable is included to connect a single computer to your Speed-
Touch™.
Standard wiring
procedure
Use the Ethernet cable provided to wire your computer's Ethernet port to one of the
SpeedTouch™'s Ethernet ports.
If you intend to extend an existing local network, you can use the yellow Ethernet cable
included to wire any Ethernet port of an external Ethernet hub or switch to one of the
SpeedTouch™’s Ethernet ports.
Note If an external hub or switch is used for Ethernet networking, please follow
the installation instructions supplied with the hub or switch for connections
and Ethernet cabling.
Ethernet link check The SpeedTouch™ LED indicators allow you to check your Ethernet.
See “1.1 Getting Acquainted with the SpeedTouch™” on page 6 for more information.
Internet connection
setup
To continue with preparing the SpeedTouch™ for internet connectivity, see
“3 SpeedTouch™ Configuration Setup” on page 23.

2 SpeedTouch™ Local Networking Setup
E-DOC-CTC-20040123-0001 v3.0
13
2.2 USB Connection Setup for Microsoft Windows
Supported Operating
Systems
Installing and using the SpeedTouch™ USB connection is supported by Microsoft for
following Microsoft Operating Systems:
• MS Windows 98SE
• MS Windows Millennium
• MS Windows 2000
• MS Windows XP
You may need the Windows installation CD-ROM during installation.
Note The installation procedures might be slightly different depending on the MS
Windows OS you are using:
System requirements • For Windows 98SE/ME:
• Pentium processor 166 MHz or compatible
• 32 megabytes (MB) of memory
• For Windows 2000/XP:
• Pentium II processor or compatible
• 64 MB of memory
• 30 MB of free disk space
Prerequisites It is strongly advised to remove any SpeedTouch™ USB driver installation that may
reside on your PC before you install the USB drivers from the SpeedTouch™ Setup
CD-ROM delivered with your SpeedTouch™580(i) product.
Make sure both your PC and SpeedTouch™ are turned on and operational.
Note In the SpeedTouch™ package, a blue USB cable is included to connect a
single computer to your SpeedTouch™.
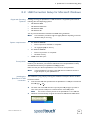
Installing the
SpeedTouch™ USB
connection
The installation is plug and play, meaning that installation will require almost no effort.
Proceed as follows:
1 Insert the blue USB cable provided into the SpeedTouch™ USB port marked with
the USB logo: .
2 The other end of the USB cable fits in (one of) the USB port(s) of your PC. In
most cases your PC's USB port is marked with the same USB symbol.
Note You can also connect your PC to the SpeedTouch™ via a USB hub.
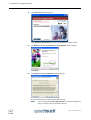
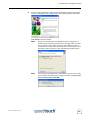
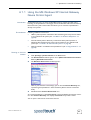
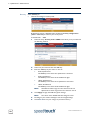
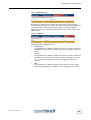
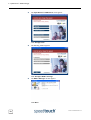
3 Windows will automatically recognize the Thomson USB Remote NDIS device:

2 SpeedTouch™ Local Networking Setup
E-DOC-CTC-20040123-0001 v3.0
14
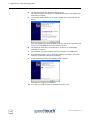
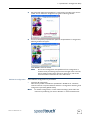
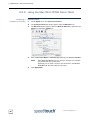
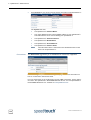
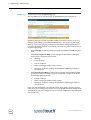
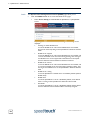
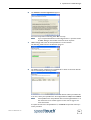
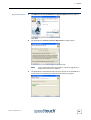
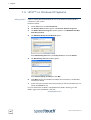
4 The Windows Found New Hardware Wizard appears:
This wizard will guide you through the installation procedure of the USB drivers.
Click Next to continue.
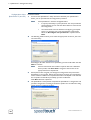
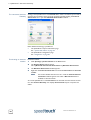
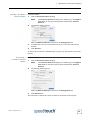
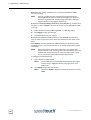
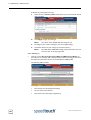
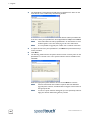
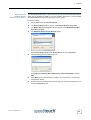
5 The following window allows you to select locations where it should search for
drivers:
Insert the SpeedTouch™ Setup CD-ROM, make sure that the wizard looks for the
drivers on the CD-ROM drive and click Next to continue.
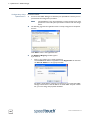
6 The wizard will notify that it found drivers for the device on the CD-ROM.
Click Next to continue.
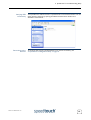
7 The installation procedure continues with the installation of the USB drivers.
8 In the following windows you can follow the installation procedure. Click Next
whenever requested to continue the installation.
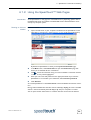
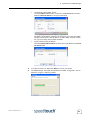
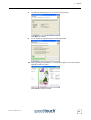
9 At the end of the procedure, the following window appears:
Click Finish to complete the installation.
10 As a result your USB connection is installed and ready for use.

2 SpeedTouch™ Local Networking Setup
E-DOC-CTC-20040123-0001 v3.0
15
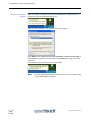
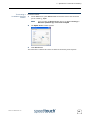
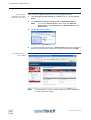
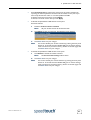
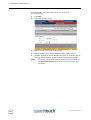
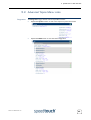
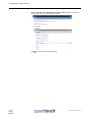
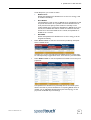
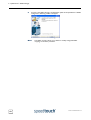
Verifying USB
connectivity
The SpeedTouch™ USB connection is represented as a local network interface. You can
easily check this interface by opening the Network Connections window from
Windows’ Control Panel:
Connecting to the
Internet
To continue with preparing the SpeedTouch™ for internet connectivity, see
“3 SpeedTouch™ Configuration Setup” on page 23.

2 SpeedTouch™ Local Networking Setup
E-DOC-CTC-20040123-0001 v3.0
16
2.3 Wireless Connection Setup
Introduction The SpeedTouch™580 features a Wireless LAN Access Point (AP) which behaves as a
networking hub allowing to wirelessly interconnect several devices to the local (W)LAN
and provide - via the SpeedTouch™ DSL router - access to the public network, e.g. the
Internet.
IEEE802.11g Wireless technology enables these devices to communicate with each
other in a locally mobile fashion, without the need for a wired environment. The Speed-
Touch™580 is backward compatible with IEEE802.11b. This means that IEEE802.11b
and IEEE802.11g devices can coexist in the same wireless network.
Wireless basics The WLAN's 'radio' link is a shared medium. As no physical connection exists between
the SpeedTouch™ and wireless clients, a name must be given to allow unique identifica-
tion of your WLAN radio link. This is done by the Service Set ID (SSID), also referred
to as Network Name. Wireless clients must be part of this SSID environment in order
to be able to communicate with other clients on the (W)LAN - including the Speed-
Touch™.
The IEEE802.11g standard for WLANs allows several WLAN networks using different
radio channels to be co-located. The SpeedTouch™ supports multiple radio channels
and is able to select the best radio channel at each start-up.
Note The different channels are overlapping. To avoid interference with another
WLAN make sure that the separation (in terms of frequency, i.e. channel
number) is as high as possible. It’s recommended to keep at least 3 channels
between 2 different WLAN’s. E.g. if there is an access point at channel 5 and
an access point at channel 11, then the SpeedTouch™580 will select
channel 1.
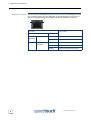
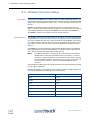
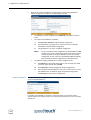
The SpeedTouch™580 supports all channels allowed for wireless networking according
to your region’s regulations.
However, depending on local regulations, the number of channels actually allowed to be
used may be additionally restricted. As shown in table below:
Regulatory Domain Allowed Radio Channels
China 1 to 13
Europe 1 to 13
Israel 5 to 7
Japan 1 to 14
Jordan 10 to 13
Thailand 1 to 14
USA 1 to 11

2 SpeedTouch™ Local Networking Setup
E-DOC-CTC-20040123-0001 v3.0
17
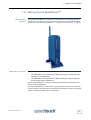
Antennas The SpeedTouch™580 features two antennas: one internal and one external. For trans-
mission of data, the external antenna is always used; whereas for reception of data, the
SpeedTouch™580 automatically selects the antenna which receives the optimal signal.
The external antenna can be directed to allow for the optimization of the wireless link.
The antenna characteristics are such that wireless links perpendicular to the antenna
are favoured. I.e. when the antenna is erect, wireless links in the horizontal plane are
favoured. Please note that the antenna characteristics are influenced by the environ-
ment, i.e. by reflections of the radio signal against walls or ceilings. It is advised to use
the received signal strength as indicated by the wireless client manager to optimize the
antenna position for the link to a given client.
Wireless security Since the SpeedTouch™ wireless environment is a radio environment, precautions must
be taken to ensure that your wireless network is safe from malicious intruders. In addi-
tion to providing the possibility of giving a personalized Network Name (SSID) to the
wireless network, the SpeedTouch™ features a physical registration mechanism, a
managed Access Control List (ACL) and the possibility to select different levels of secu-
rity:
• Level 0 (The default): No security i.e. the data will not be encrypted, no authenti-
cation process will be used.
• Level 1: Backwards compatible security with any Wi-Fi certified client (WEP), i.e.
encrypting the traffic between the SpeedTouch™ and the clients by sharing a pre-
defined 64-bit or a 128-bit Network key.
Note The default 64 bits hexadecimal WEP key is for your convenience
printed on the identification label located at the bottom of the Speed-
Touch™580 and is unique for each device.
• Level 2: WPA-PSK is the highest form of security available but make sure that your
wireless client and client manager are compatible with it.
Note The default WPA-Personal passphrase is for your convenience printed
on the identification label located at the bottom of the Speed-
Touch™580 and is unique for each device.
Level 1 This level uses Wired Equivalent Protocol (WEP) to provide wireless security that is
compatible with any Wi-Fi certified client.
WEP relies on a secret key that is shared between the wireless client (e.g. a laptop with
a wireless client and the SpeedTouch™580). The fixed secret key is used to encrypt
data before they are transmitted. I.e. during transmission between client and access
point (“in the air”) the information in the packets is encrypted.

2 SpeedTouch™ Local Networking Setup
E-DOC-CTC-20040123-0001 v3.0
18
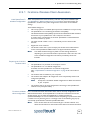
Level 2 This level uses Wi-Fi Protected Access (WPA) to provide state of the art security. This
also means that only recent wireless clients will have implemented WPA, and that older
wireless clients (without WPA) will not interoperate with the SpeedTouch™580 at this
security level.
The WPA standard specifies two modes of operation:
• WPA Personal also know as WPA-PSK (Pre-Shared Key), for residential use.
• WPA Enterprise for business use. In this mode, authentication is done by a dedi-
cated authentication server, which is normally not available for residential use.
Therefore, the SpeedTouch™580 does not feature WPA Enterprise.
WPA Personal features 3 basic improvements over WEP (security level 1).
1 Mutual authentication of access point and client via a 4-way handshake. In this
handshake, both client and access point check whether they share the same Pre-
Shared Key (without sending the PSK “in the clear”).
2 Stronger encryption, using the Temporal Key Integrity Protocol (TKIP). In stead of
using a fixed WEP key, TKIP uses in pairs temporary session keys which are
derived from the PSK during the 4-way handshake.
3 Message Integrity Check (MIC), a strong mathematical function in which the recip-
ient and transmitter each compute and compare the MIC. Non-matching MICs
reveal that a third party has been tampering the data to try and hack the system.
Wireless client
requirements
Only wireless client adapters compliant to IEEE802.11g and/or IEEE802.11b, will be able
to communicate with the SpeedTouch™ and other members of the SpeedTouch™
(W)LAN environment. However, be aware that only IEEE802.11g compliant wireless
clients are able to gain full profit of the 54 Mbps (Max) bandwidth delivered by the
SpeedTouch™580.
It is highly recommended that wireless client adapters are Wi-Fi™ certified to ensure
smooth interoperability with the SpeedTouch™580’s WLAN.
Page is loading ...
Page is loading ...
Page is loading ...
Page is loading ...
Page is loading ...
Page is loading ...
Page is loading ...
Page is loading ...
Page is loading ...
Page is loading ...
Page is loading ...
Page is loading ...
Page is loading ...
Page is loading ...
Page is loading ...
Page is loading ...
Page is loading ...
Page is loading ...
Page is loading ...
Page is loading ...
Page is loading ...
Page is loading ...
Page is loading ...
Page is loading ...
Page is loading ...
Page is loading ...
Page is loading ...
Page is loading ...
Page is loading ...
Page is loading ...
Page is loading ...
Page is loading ...
Page is loading ...
Page is loading ...
Page is loading ...
Page is loading ...
Page is loading ...
Page is loading ...
Page is loading ...
Page is loading ...
Page is loading ...
Page is loading ...
Page is loading ...
Page is loading ...
Page is loading ...
Page is loading ...
Page is loading ...
Page is loading ...
Page is loading ...
Page is loading ...
Page is loading ...
Page is loading ...
Page is loading ...
Page is loading ...
Page is loading ...
Page is loading ...
Page is loading ...
Page is loading ...
Page is loading ...
Page is loading ...
Page is loading ...
Page is loading ...
Page is loading ...
Page is loading ...
Page is loading ...
Page is loading ...
Page is loading ...
Page is loading ...
Page is loading ...
Page is loading ...
Page is loading ...
Page is loading ...
Page is loading ...
Page is loading ...
Page is loading ...
Page is loading ...
Page is loading ...
Page is loading ...
Page is loading ...
Page is loading ...
Page is loading ...
Page is loading ...
Page is loading ...
Page is loading ...
-
 1
1
-
 2
2
-
 3
3
-
 4
4
-
 5
5
-
 6
6
-
 7
7
-
 8
8
-
 9
9
-
 10
10
-
 11
11
-
 12
12
-
 13
13
-
 14
14
-
 15
15
-
 16
16
-
 17
17
-
 18
18
-
 19
19
-
 20
20
-
 21
21
-
 22
22
-
 23
23
-
 24
24
-
 25
25
-
 26
26
-
 27
27
-
 28
28
-
 29
29
-
 30
30
-
 31
31
-
 32
32
-
 33
33
-
 34
34
-
 35
35
-
 36
36
-
 37
37
-
 38
38
-
 39
39
-
 40
40
-
 41
41
-
 42
42
-
 43
43
-
 44
44
-
 45
45
-
 46
46
-
 47
47
-
 48
48
-
 49
49
-
 50
50
-
 51
51
-
 52
52
-
 53
53
-
 54
54
-
 55
55
-
 56
56
-
 57
57
-
 58
58
-
 59
59
-
 60
60
-
 61
61
-
 62
62
-
 63
63
-
 64
64
-
 65
65
-
 66
66
-
 67
67
-
 68
68
-
 69
69
-
 70
70
-
 71
71
-
 72
72
-
 73
73
-
 74
74
-
 75
75
-
 76
76
-
 77
77
-
 78
78
-
 79
79
-
 80
80
-
 81
81
-
 82
82
-
 83
83
-
 84
84
-
 85
85
-
 86
86
-
 87
87
-
 88
88
-
 89
89
-
 90
90
-
 91
91
-
 92
92
-
 93
93
-
 94
94
-
 95
95
-
 96
96
-
 97
97
-
 98
98
-
 99
99
-
 100
100
-
 101
101
-
 102
102
-
 103
103
-
 104
104


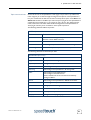
RCA SpeedTouch 580 User manual
- Category
- Recording Equipment
- Type
- User manual
- This manual is also suitable for
Ask a question and I''ll find the answer in the document
Finding information in a document is now easier with AI
Related papers
-
RCA SPEEDTOUCH 716 V5 User manual
-
-
-
Thomson SpeedTouch 580 User manual
-
-
-
-
-
-
Other documents
-
Technicolor - Thomson 545/570 User manual
-
Technicolor - Thomson SPEED TOUCH 580 User manual
-
 Bright Star Engineering TE4MPOD2-C User manual
-
-
Nortel Networks 608(WL) User manual
-
-
Alcatel Carrier Internetworking Solutions 350i User manual
-
-
Siemens SL2-141 User manual
-
