Page is loading ...

© 2014 HeathCo LLC 207350-01A
Wireless Door
Sensor Chime
1. Plug in wireless chime. IMPORTANT:
To avoid resetting chime memory,
wait 30 seconds before pressing the
“TEST” button inside the sensor. See
Troubleshooting, Problem 3 if chime
memory was accidentally reset.
Figure 1
WARNING: To prevent possible
SERIOUS INJURY or DEATH:
• NEVER allow small children near
batteries.
• If battery is swallowed, immediately
notify doctor.
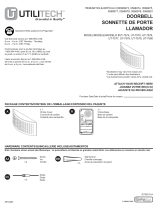
Model 7368
Wireless
plug-in
chime
Door sensor with battery,
Door magnet, Magnet spacer
Hardware
pack
✔ ✔ ✔
Important considerations: The sensor must be mounted to the door jamb. The
magnet should be attached to the door. Sensor is for indoor use only.
This package includes (Style of door sensor and chime may vary from illustration):
Chime Volume Control
Access Door (See Tune
Settings or Troubleshooting)
C
H
I
M
E
V
O
L
U
M
E

Helpful Videos – www.hzsupport.com Helpful Answers – 1-800-858-8501
2
2. Remove orange battery tab from sensor.
Remove back of case by pushing in tab on
bottom with a small screwdriver (see Figure
2). Remove orange battery tab.
3.
Test range. Before mounting, hold sensor and
magnet in selected location and verify opera-
tion. While holding the sensor still, move the
magnet away from the sensor to simulate door
being opened. Verify red LED on sensor flashes
momentarily and chime sounds. Note: If sensor
does not operate correctly, see Troubleshooting.
4. Adjust volume control. Unplug chime and
adjust volume control to desired volume (see
Figure 1). Plug chime back into wall outlet.
5. Mount sensor. Use either screws or
double sided tape to mount push button.
IMPORTANT: The maximum gap between
sensor and magnet is 1/2" (13 mm) (see
Figure 3). The arrows located on the face of
each component must be aligned and facing
toward each other (see Figure 4). The magnet
must be beside the sensor. Note: If the magnet
is recessed, use spacer to ensure proper
alignment (see Figure 4).
Alignment Arrows
1/2" Maximum
Use Optional Spacer if
Needed
Figure 2
Figure 3
Figure 4

3
Helpful Videos – www.hzsupport.com Helpful Answers – 1-800-858-8501
• Screw Mounting: Remove back of case
by pushing in tab on bottom with a small
screwdriver (see Figure 2). Note: Remove
material in screw holes (if needed) before
mounting with screws. Attach sensor back
cover to wall using two short screws (see
Figure 5). Snap sensor onto back cover.
• Tape Mounting: Apply foam tape to the
sensor back cover. Stick sensor back cover
to frame of door in desired position. Snap
sensor onto back cover.
6. Mount magnet. Repeat step 5 to attach
magnet (and spacer if needed) to door using
two screws (provided). Note: If using spacer,
use the two long screws (provided).
Figure 5
Use Optional
Spacer if Needed

Helpful Videos – www.hzsupport.com Helpful Answers – 1-800-858-8501
4
WARNING: Disconnect chime unit from power source before
opening chime access door. Close door and replace screw before
reconnecting to power.
Tune Settings
Sensor Chime Tune
Switch 2 - ON Switch 2 - ON Ding
Switch 2 - OFF Switch 2 - ON Ding-Dong
Switch 2 - OFF Switch 2 - OFF Ding-Dong
Switch 2 - ON Switch 2 - OFF Westminster
Tune Setting Table
The chime has different selectable tunes: Ding (one note tune), Ding-Dong
(two note tune), or Westminster (eight note tune). The factory setting is for the
Westminster tune. This tune can be changed by following the instructions in the
Tune Setting Table. Note: Only use switch 2 when changing the chime tune.
Note: All chime models are designed to work with up to 5 sensors (sold sepa-
rately). All chimes are designed to play only two different tunes no matter how
many sensors are used.
ON
1 2
ON
1 2
1 – MODE
2 – TUNE
Inside Chime Access DoorInside Sensor

5
Helpful Videos – www.hzsupport.com Helpful Answers – 1-800-858-8501
Continued
Troubleshooting
WARNING: Disconnect chime unit from power source before
opening chime access door. Close door and replace screw before
reconnecting to power.
1. PROBLEM: Chime does not sound or rang one time and quit.
A. POSSIBLE CAUSE: Sensor battery is not installed correctly.
A. CORRECTIVE ACTION: Make sure battery is installed according to the
diagram inside the sensor.
B. POSSIBLE CAUSE: Sensor battery is dead.
B. CORRECTIVE ACTION: Check charge of sensor battery and replace if
necessary.
C. POSSIBLE CAUSE: Chime is not receiving power.
C. CORRECTIVE ACTION: Make sure the plug-in chime has power.
D. POSSIBLE CAUSE: Sensor and chime are not synced.
D. CORRECTIVE ACTION: Sync the sensor and chime.
• Unplug chime.
• Ensure switch 1 on both the chime and sensor is set to OFF.
• Wait 30 seconds.
• Press and hold the “TEST” button inside the sensor within 20 seconds
after plugging in chime. When the “Ding-Dong” tune is played, the sen-
sor is synced with the chime.
2. PROBLEM: Sensor battery seems okay, but the chime does not work after
installation.
A. POSSIBLE CAUSE: Chime or sensor is mounted on metal or near metal
studs. Note: Metal reduces transmission range.
A. CORRECTIVE ACTION: Use 1/4 in. to 1/2 in. (6 to 13 mm) wood shims
to move sensor away from metal surface. Move chime to a different wall
outlet.
B. POSSIBLE CAUSE: Chime is mounted near concrete floor or wall. Note:
Concrete may reduce range.
B. CORRECTIVE ACTION: Move chime away from concrete surface.
C. POSSIBLE CAUSE: Chime and sensor are installed too far apart.
C. CORRECTIVE ACTION: Locate chime closer to sensor.

Helpful Videos – www.hzsupport.com Helpful Answers – 1-800-858-8501
6
3. PROBLEM: Chime sounds when not intended (false triggers).
POSSIBLE CAUSE: Chime is receiving interference from another wire-
less device.
CORRECTIVE ACTION: Reset chime.
• Unplug chime.
• Ensure switch 1 on both the chime and sensor is set to OFF.
• Wait 30 seconds.
• Press and hold the “TEST” button inside the sensor within 20 seconds
after plugging in chime. When the “Ding” tune is played, the chime
memory has been erased.
• To re-sync the sensor and chime, unplug chime. Wait 30 seconds.
• Press and hold the “TEST” button inside the sensor within 20 seconds
after plugging in chime. When the “Ding-Dong” tune is played, the sen-
sor is synced with the chime.
Note: The sensor and chime come synced from the factory. The range of the
wireless chime can vary with location, temperature, and battery condition.

7
Helpful Videos – www.hzsupport.com Helpful Answers – 1-800-858-8501
Please contact us for assistance
before returning product to the
store or to HeathCo LLC.
If you experience a problem, follow
this guide. You may also contact us be-
tween 8:00 AM to 5:00 PM CST (M-F).
When contacting Technical Service,
please include the following informa-
tion: Name, Street Address, Daytime
Phone Number, Email Address, Model
Number, Date of Purchase, Place of
Purchase, Product Issue, and DATED
SALES RECEIPT FOR WARRANTY
REQUESTS.
Technical Service
No Service Parts Available for this
Product
HeathCo LLC
2445 Nashville Road
Bowling Green, KY 42101, USA
ATTN: Technical Service
Internet: www.hzsupport.com
Phone: 1-800-858-8501 (English Only)
Fax: 1-800-846-8500
Regulatory Information
This device complies with Part 15 of the FCC Rules and RSS-210 of Industry
Canada. Operation is subject to the following two conditions: (1) this device may
not cause harmful interference, and (2) this device must accept any interference
received, including interference that may cause undesired operation.
The user is cautioned that changes or modifications not expressly approved by
the party responsible for regulatory compliance could void the user's authority
to operate the equipment.

Helpful Videos – www.hzsupport.com Helpful Answers – 1-800-858-8501
8
ONE YEAR LIMITED WARRANTY
This is a “Limited Warranty” which gives you specific legal rights. You may also have
other rights which vary from state to state or province to province.
For a period of one year from the date of purchase, any malfunction caused by factory
defective parts or workmanship will be corrected at no charge to you.
Not Covered - Repair service, adjustment and calibration due to misuse, abuse or
negligence, light bulbs, batteries, and other expendable items are not covered by
this warranty. Unauthorized service or modification of the product or of any furnished
component will void this warranty in its entirety. This warranty does not include
reimbursement for inconvenience, installation, setup time, loss of use, unauthorized
service, or return shipping charges.
This warranty covers only HeathCo LLC assembled products and is not extended to other
equipment and components that a customer uses in conjunction with our products.
THIS WARRANTY IS EXPRESSLY IN LIEU OF ALL OTHER WARRANTIES,
EXPRESS OR IMPLIED, INCLUDING ANY WARRANTY, REPRESENTATION OR
CONDITION OF MERCHANT ABILITY OR THAT THE PRODUCTS ARE FIT FOR ANY
PARTICULAR PURPOSE OR USE, AND SPECIFICALLY IN LIEU OF ALL SPECIAL,
INDIRECT, INCIDENTAL, OR CONSEQUENTIAL DAMAGES.
REPAIR OR REPLACEMENT SHALL BE THE SOLE REMEDY OF THE CUSTOMER
AND THERE SHALL BE NO LIABILITY ON THE PART OF HEATHCO LLC FOR ANY
SPECIAL, INDIRECT, INCIDENTAL, OR CONSEQUENTIAL DAMAGES, INCLUD-
ING BUT NOT LIMITED TO ANY LOSS OF BUSINESS OR PROFITS, WHETHER
OR NOT FORESEEABLE. Some states or provinces do not allow the exclusion or
limitation of incidental or consequential damages, so the above limitation or exclusion
may not apply to you.
Please keep your dated sales receipt, it is required for all warranty requests.
HeathCo LLC reserves the right to discontinue and to change specifications
at any time without notice without incurring any obligation to incorporate new
features in previously sold products.

Vidéos pratiques – www.hzsupport.com Réponses pratiques – 1-800-858-8501
24
HeathCo LLC se réserve le droit de mettre fin à la production de ses produits
ou d’en modifier les spécifications à tout moment, et elle n’est pas tenue d’in-
corporer les nouvelles caractéristiques de ses produits aux produits vendus
antérieurement.
GARANTIE LIMITÉE DE 1 AN
Il s’agit d’une « Garantie limitée » qui vous confère des droits juridiques
spécifiques. Vous pouvez également jouir d’autres droits, variables d’une
province à l’autre.
Pendant une période de 1 an à compter de la date d’achat, toute anomalie
de fonctionnement imputable à un vice de matériau ou de main-d’oeuvre
sera corrigée gratuitement.
Exclusions de la garantie - Réparations, réglage et calibrage dus à une
mauvaise utilisation, un mauvais traitement ou à la négligence. Les am-
poules, les piles et des autres articles non durables ne sont pas couverts
par cette garantie. Le service non autorisé ou la modification du produit
ou d’un ou l’autre de ses composants fournis invalidera totalement la
présente garantie. Cette garantie n’inclut pas le remboursement pour le
dérangement, l’installation, le réglage, la perte d’utilisation, le service non
autorisé ou les frais d’expédition pour le renvoi de la marchandise.
La garantie ne couvre que les produits assemblés HeathCo LLC et ne
s’étend pas aux autres équipements et composants que le client pourrait
utiliser conjointement avec nos produits.
CETTE GARANTIE TIENT EXPRESSÉMENT LIEU DE TOUTES
AUTRES GARANTIES, EXPLICITES OU IMPLICITES, Y COMPRIS DE
TOUTE GARANTIE DE REPRÉSENTATION OU DE CONDITION DE
CONVENANCE À LA COMMERCIALISATION OU À L’EFFET QUE LES
PRODUITS CONVIENNENT À UN BUT OU À UNE UTILISATION PAR-
TICULIÈRE, ET SPÉCIFIQUEMENT DE TOUS DOMMAGES SPÉCIAUX,
DIRECTS, INDIRECTS OU SECONDAIRES.
LE REMPLACEMENT OU LA RÉPARATION CONSTITUENT LE SEUL
RECOURS DU CLIENT ET HEATHCO LLC NE POURRA ÊTRE TENUE
RESPONSABLE DE TOUS DOMMAGES SPÉCIAUX, DIRECTS, INDI-
RECTS OU SECONDAIRES, Y COMPRIS, SANS S’Y LIMITER, LES
PERTES COMMERCIALES ET PERTES DE PROFIT, QU’ELLES SOIENT
PRÉVISIBLES OU NON. Certaines provinces n’autorisent pas l’exclusion
ou la limitation des dommages indirects ou secondaires, et la limitation
ou l’exclusion ci-dessus pourrait ne pas s’appliquer à vous.
Veuillez conserver le reçu portant la date d'achat; vous en aurez
besoin pour toutes vos demandes liées à la garantie.
/