
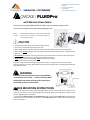
with Wireless Power Meter
Thank you for purchasing the CASCADE FLUIDPro trainer and wireless power meter.
Please read the following directions thoroughly before use.
Model: 37320 CASCADE FLUIDPro trainer with wireless power meter
Contents: 1 pc trainer, 1 pc riser block, 1 pc quick release skewer and
1 pc wireless power meter.
CAUTION
1.
Please read and follow all instructions before using the trainer.
2.
This trainer is intended for single-rider bicycles only.
3.
Before riding make sure that both legs of the trainer are fully extended away from the frame assembly.
4.
Before riding, be sure the bicycle is correctly installed and securely locked into the trainer as explained in the
instructions.
5.
Do not touch the resistance unit during use and for a period of time after use until it has had sufficient time
to cool down. The resistance unit can become hot enough to cause burns.
6.
Keep children, pets and all items safely away from the trainer during use.
7.
Always use the trainer on a flat surface.
8.
Always consult a doctor before beginning any exercise routine or using any exercise or fitness product.
Should you become ill, feel dizzy, light-headed or nauseous while riding the trainer, stop riding immediately and
seek medical attention.
WARNING
Read and follow all instructions concerning installation
of the bicycle on the trainer. Failure to securely attach
the bicycle to the trainer could result in serious injury
to the rider or those near the trainer.
BIKE MOUNTING INSTRUCTIONS
1.
Replace the bicycle’s rear wheel quick release (QR) skewer with the one provided. See the bicycle owner’s
manual for instructions on how to properly adjust the QR skewer. Make sure the QR skewer is tight and your
wheel is aligned properly on the bicycle.
2.
Rotate both the Release Clamp and Adjustment Knob (with the associated locking rings) counterclockwise,
moving them away from the center of the trainer. The release clamp should remain in the locked position as
shown in the Figure 1.
17280 Woodinville-Redmond RD NE
Suite 800
Woodinville WA 98072
425.402.4062
cascadehealthandfitness.com

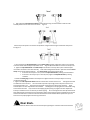
3.
Next rotate the roller adjustment knob and associated lock ring counterclockwise so that the roller
assembly allows room for the rear tire to mount. Figure 2.
Lift the bicycle into position so that the rear QR skewer is aligned with the right and left axle clamp cones.
See Figure 3.
a.
By turning both the adjustment knob and the release clamp clockwise, tighten the clamp cones until they
come into contact with the bicycle’s QR skewer ends. Align the QR skewer with the notch in the clamp cone.
b.
Tighten the adjustment knob and release clamp until the bike is securely held in place and the bicycle’s
rear wheel is centered on the roller assembly. Now while holding the bike frame in place test that the release
clamp
can be opened and closed firmly. The
release clamp
should close firmly by hand.
•
if the lever will not open or close, loosen the
adjustment knob
by rotating counterclockwise.
•
If the lever is too easy to open or close by hand, tighten the
adjustment knob
by rotating
clockwise.
c.
Rotate the
locking rings
clockwise until they are firm against the frame. Verify the bicycle is securely
mounted to the trainer.
5. Tighten the
roller adjustment knob
clockwise until the roller contacts the rear tire. Then tighten the knob
an additional 1½ to 2 full turns. The roller needs to provide only enough pressure to prevent the rear tire
from slipping while in use. Test tire friction by quickly moving the tire a 1/4 turn back and forth. Apply
another 1/4 turn on roller adjustment knob if needed. Allowing the tire to slip against the roller while riding
will accelerate tire wear. If you notice the tire slipping regularly during use, tighten the roller adjustment
knob by an additional ¼ turn as necessary to reduce slipping. Do not over-tighten the roller adjustment knob.
Over-tightening will cause both tire and unit damage. Tighten only enough to avoid tire slippage. Use a smooth
tread tire at least 23mm in width and maintain the maximum recommended inflation pressure for your tire.
Once this is set properly tighten the lock ring to the frame.
Riser block.
Use the included riser block to raise the front of the bicycle by putting the riser block under the front wheel.

USING YOUR TRAINER
1.
To minimize the noise from your trainer during your workout, set the trainer on a floor mat or small section
of carpet and use a rear tire with a smooth tread pattern.
2.
The fluid resistance unit provides smooth, naturally progressive resistance that varies based on your wheel
speed. Use your bicycle’s gearing to vary the level of resistance.
BIKE REMOVAL
1.
Loosen the
roller adjustment knob
so the roller no longer touches the tire. Allowing more space between
the roller and tire can make removing the bike easier.
2.
Firmly grasp your bicycle and open the
release clamp
. Carefully, remove the QR skewer side from the
clamp cone first and then remove the bike.
3.
The QR skewer provided with the trainer can be used when riding the bicycle off the trainer as well. If you
choose to reinstall your bicycle’s original skewer, refer to your bicycle owner’s manual for instructions on
properly adjusting the skewer. Before riding, ensure the quick release skewer is tight.
4.
To store or transport your trainer, grab the trainer frame by the adjustment knob, lift and fold the legs in
towards the frame.

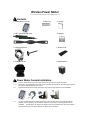
Wireless Power Meter
For use with the Cascade Health and Fitness FLUIDPRO Trainer only
Contents.
1. Power Meter console 2.Cable Ties 3. Sponge
4. HR Transmitter and strap 5. Magnet
6. Clamp bracket set 7. Rubber strip
8. Cadence sensor 9. AAA batteries
Power Meter Console Installation:
1-1. Insert 2 * AAA batteries in to the console and then mount onto your bicycle handlebars.
1-2. Attach the Clamp bracket(6) to the back of the console(1) by inserting the provided mounting screw
through the clamp bracket into the console.
1-3. Spread the bottom of the console clamp apart, than clamp it back together over the handlebar.
1-4. Turn the screw bar downward, slightly tighten the screw and adjust the console angle for optimal
visibility. Once the position is set, continue to tighten the screw until it is securely attached to the
handlebar. If the bracket is too large to fully tighten around the handlebar then insert the provided
sponge to fill the space so that the bracket can tighten to the handlebar.

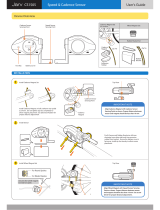
Cadence Sensor Installation
1.
Mount the cadence sensor onto the top of non-drive side chainstay of your bicycle with the facing
outward(battery cover towards the inside), using the zip ties supplied.
2.
Mount the cadence magnet to the inside of the non-drive side crank of your bike, using the zip tie supplied.
The magnet should line up with the line on the cadence sensor and should pass at a distance of 1-2mm.
Use the rubber strip to keep the zip tie and magnet from moving on the crank.
Final Setup
1.
Insert 2 * AAA batteries into the speed sensor (located on the FluidPro trainer below the resistance
unit).
2.
To monitor your heart rate you will need to wear the provided Heart rate monitor and strap. Make
sure the strap is securely placed around your chest to remain on your body during exercise. If a HR
signal does not display on the computer try to wet your skin a little underneath the heart rate
monitor.
3.
You are now ready to ride. As the trainer is calibrated to the resistance unit there is no need to set
your wheel size into the console. To set the time press and hold the set key for 3 seconds while in
the time mode. Then use the mode button to toggle the time to the desired number and the press
the set key again to set.
RPM
AVG rpm, MAX rpm 0~199
Speed
AVG Speed, MAX Speed
0~99.9 KM/H or HL/H(MPH)
Heat Rate
AVG HR, MAX HR 30~240bpm
WATT
AVG WATT, MAX WATT
0~999
MODE KEY
Mode Key Set Key
DIST 0.00~999.9KM or ML
TIME 0:00~99:59
CLOCK 00:00~23.59 24H OR 12H
KCAL
Press Mode Key to cycle through the following displays:
-
Current RPM/ Current Speed / Current Heart Rate / Current Watt
-
Average RPM/ Average Speed / Average Heart Rate / Average Watt
-
Maximum RPM/ Maximum Speed / Maximum Heart Rate / Maximum Watt
Press and Hold Mode Key for
2 seconds
to activate or deactivate the alarm for heart rate target zone
While in the SETTING MODE(Press and hold Set Key for 3 seconds to enter SETTING MODE)
Press Mode key to switch the item to be set, i.e. timer, heart rate Hi / Low limit, Clock, Km/Mile unit.
Press and Hold Mode Key for
3 seconds
to exit SETTING MODE.
SET KEY
Press Set Key to activate the Backlight for
5 seconds
.
Press Set Key to cycle through following displays: Distance / Time / Clock / KCAL
Press and Hold Set Key for
3 seconds
to enter SETTING MODE while allows changes to be made to - timer, heart
rate Hi / Low limit, Clock, Km/Mile unit. In SETTING MODE, Press Set Key to change the desired units/digits.

MODE & SET KEY
Press and Hold both Mode and Set Key for
2 seconds
to clear ALL Average and Maximum Speed, Heart Rate,
Watt record, as well as Distance and Time.
PAIRING SPEED AND CADENCE SENSORS
Speed Sensor Pairing.
Press and Hold both Mode and Set Key for
5 seconds
to synchronize speed sensor pair
up process. When the 3 dots/lines flash on the screen hold down the blue button on the speed
sensor(located below the resistance unit). Once 0 comes up on the screen you can release the blue button.
To confirm the speed sensor is paired spin the roller and confirm speed shows up on the console.
Cadence Sensor Pairing.
Press and Hold Mode Key for
5 seconds
to synchronize cadence sensor pair up
process. When the 2 dots/lines flash on the screen hold down the blue button on the cadence sensor. Once
0 comes up on the screen you can release the blue button. To confirm the cadence sensor is paired pedal the
bike and confirm cadence shows up on the console.
The Specifications for the power meter console are:
-
Wireless 2.4 GHz Speed and Cadence
-
Wireless 5 KHz Heart Rate
-
The head Unit will enter into sleep mode once no signal is detected after
5 minutes
.
-
 1
1
-
 2
2
-
 3
3
-
 4
4
-
 5
5
-
 6
6


Ask a question and I''ll find the answer in the document
Finding information in a document is now easier with AI
Related papers
Other documents
-
 Active Intent GB1876 Owner's manual
-
BBB Cycling BCP-55 DigiSpeed Owner's manual
-
 Jarv CS1505 User manual
-
Giant Cyclotron Owner's manual
-
MINOURA FG540 Instructions Manual
-
-
Elite Real AXIOM User manual
-
CycleOps ERUTT3 User manual
-
-
Polar Electro S710 Owner's manual

