Page is loading ...

A: 9300 S.W. Gemini Drive Beaverton, OR 97008 USA W: www.biamp.com
IV6-GP-AF
for Indoor
IV6 Modular Vertical Arrays
IV6 Glidepoint™ Array Frame
The IV6 Rigging Frames, Accessories and Safety Guide
(a complete set of instructions including all of the IV6
indoor rigging frames, accessories and information)
is available on the Biamp website <here>
I M P O RTA NT: The Instructions, and
illustrations in this manual are to be used
with INDOOR IV6 cabinets/models only.
and mounting points and will NOT
array frame. Contact Biamp's Loudspeaker
Support Group for information regarding
mounting options for WR (outdoor) IV6
loudspeakers.
COMMUNITY
I SERIES

Page 2 IV6-GP-AF Instructions I SERIES
IMPORTANT SAFETY INSTRUCTIONS
Always follow these basic safety precautions when using or installing I SERIES
loudspeakers and accessories:
• Read these instructions prior to assembly, and keep for reference.
• Heed all warnings.
• Follow all instructions, particularly those pertaining to rigging, mounting, hanging and electrical connections.
• Do not use this apparatus near water (indoor models only).
• Clean only with dry cloth.
• Do not block any ventilation openings. Install in accordance with the manufacturer’s instruction.
• Do not install near any heat sources such as radiators, heat registers, stoves, or other apparatus (including
ampliers) that produce heat.
• Only use attachments and accessories that are specied and approved by the manufacturer.
Refer all servicing to qualied service personnel. Servicing is required when the
apparatus has been damaged in any way, does not operate normally, or has been
dropped.
The terms caution, warning, and danger may be used in this manual to alert the reader
to important safety considerations. If you have any questions or do not understand the
meaning of these terms, do not proceed with installation. Contact your local dealer,
distributor, or call Biamp directly for assistance. These terms are dened as:
CAUTION: describes an operating condition or user action that may expose
the equipment or user to potential damage or danger.
WARNING: describes an operating condition or user action that will likely
cause damage to the equipment or injury to the user or to others in the vicinity.
DANGER: describes an operating condition or user action that will immediately
damage the equipment and/or be extremely dangerous or life threatening to
the user or to others in the vicinity.
CAUTION: Installation of I SERIES loudspeakers should only be performed
by trained and qualied personnel. It is strongly recommended that a licensed
and certied professional structural engineer approve the mounting. Severe
injury and/or loss of life may occur if this product is improperly installed.
UNPACKING / INSPECTION
Community I SERIES rigging accessories
are engineered and manufactured
to be rugged and they are carefully
packed in sturdy cartons. However, it is
recommended to thoroughly inspect each
unit after it has been removed from the
packaging, as damage could occur during
shipping.
Please note that once the shipment has
left your dealer or the Biamp factory, the
responsibility for damage is always borne
by the freight company. If damage has
occurred during shipping, you must le a
claim directly with the freight company.
It’s very important to contact the freight
company as soon as possible after
receiving your shipment, as most freight
companies have a short time limit within
which they will investigate claims. Make
sure to save the carton and the packing
material, as most claims will be denied
if these materials are not retained. Your
Biamp dealer and the factory will try to
help in any way they can, but it is the
responsibility of the party receiving the
shipment to le the damage claim.
It is always a good idea to retain the carton
and packing materials, if possible, in the
event that the unit may need to be returned
to your dealer or distributor for repair in the
future.
WARNING: I SERIES rigging
ttings are rated at Working Load
Limits (WLL) with a 10:1 safety
margin. All mounting provisions on the IV6
cabinets meet or exceed the 10:1 safety
margin to support the cabinet when used
with the specied mounting brackets,
either from Biamp or designated 3rd party
vendors.
Disregarding and/or exceeding the safe
working load limits could result in injury or
death!
RIGGING and ELECTRICAL SAFETY
IMPORTANT: IV6 loudspeakers are designed and intended to be mounted to
diering indoor building surfaces using a variety of rigging hardware, means
and methods. Installation of loudspeakers should only be performed by trained
and qualied personnel. It is strongly recommended that a licensed and certied
professional structural engineer approve the mounting plan. Severe injury and/or loss of
life, and property damage may occur if these products are improperly installed.
DANGER: All rigging ttings must be fully tightened and secured. Any missing
fasteners will compromise the structural integrity of the enclosure and
constitute a safety hazard. Do not suspend any loudspeakers unless all
fasteners are securely in place!
. DANGER: It is possible to experience severe electrical shock from a power
amplier. Always make sure that all power ampliers are in the “OFF” position
and unplugged from an AC Mains supply before performing electrical work.
TOOLS NEEDED FOR
ASSEMBLY:
• Metric socket and ratchet set
• Metric wrench set
• Phillips screwdriver

I SERIES IV6-GP-AF Instructions Page 3
IMPO RTANT: The hex head Grade 10.9 rigging bolts that are used to secure
the splay brackets must also ll any unused holes (at the bottom of a own
array or at the top and bottom of a ground stack) to seal the enclosure from air
leaks. If those threaded holes are not sealed, air leaks will occur in the enclosure that
will compromise the low-frequency performance with distortion, reduced output, and
premature driver failure.
INSTALLATION AND ASSEMBLY TIPS
• Test all cabinets before hanging
• Arrange cabinets in the order that they will hang, and loosely attach
appropriate splay brackets to the top of each cabinet
• Preset attenuation settings per the EASE® Focus 3 model on each cabinet
• If using the IV6-GP-AF, adjust the carriage on the array frame to the
suggested pin setting before attaching the loudspeakers
• Orient cabinets so the horns align along the length of the array - this also
aligns the input panels for easy wiring
• Leave splay bracket connections slightly loose until all cabinet connections
are made, then tighten evenly
SYSTEM DESIGN
All system designers incorporating IV6 arrays are encouraged to use EASE®
Focus 3 (EF3) from AFMG to model the array(s). A link to the latest version is
available on our website. Download the latest IV6 GLL le to utilize our customized
VenuePolar™ module. Our exclusive VenuePolar module makes building the
array, optimizing the coverage, and determining the loads and load safety factor
easy. Once built, the system report option creates a convenient PDF printout
documenting the array components, the optimization/attenuation settings for the
loudspeakers and simplies ordering.
The custom Rigging Safety Calculator (RiSC) (located in the VenuePolar module
"Loads" tab) automatically populates and updates in real-time as an array is
built and aimed. Refer to the "IV6 System Design and Installation Manual" for
instructions and explanations about system design with our custom VenuePolar
module in EASE® Focus 3 and array assembly.
EASE® and AFMG® are registered trademarks of AFMG Technologies GmbH.
ACCEPTABLE MOUNTING POINT LOADING
Use the “Loads” tab to ensure the rigging’s Safe Working Load (SWL) and
required Safety Factor are not exceeded. Additional RiSC information is available
in the “IV6 Rigging Frames, Accessories and Safety Guide”. The system should
be modeled in EF3 prior to ordering, and the system design report generated
should also be utilized when installing / assembling the array. The software and
system information is available on the website (search for IV6). Use the QR code
in the upper right corner of this page for a link to the IV6 downloads page.
For sub-behind applications use the “IV6 Sub Behind Hang Point Calculator" to
ensure proper deployment of the IV6-SB-AF bracket. It is available from the IV6
"Accessories" section on the website.
Safety Cable
The safety cable and associated
hardware are not included.
Consult all applicable codes for
your application. Confer with
a structural engineer for the
appropriate cable/hardware for
the load, application and locale.
If required, the safety cable must be
secured to a suitable load-bearing
point separate from the array
mounting point, with as little slack
as possible, so as not to develop
undue kinetic force if the primary
array mount were to fail.
Light Array Frame
(IV6-LAF-PBB)
When required, a secondary safety
cable can be attached to an unused
hole(s) on the LAF.
GlidePoint™ Array
Frame (IV6-GP-AF)
A secondary safety cable mounting
point is available from PolarFocus.
Part number: RLP-X2-1800
Sub Behind Array
Frame (IV6-SB-AF)
Contact PolarFocus, for a quote for
a custom secondary attachment
point(s) required for your particular
application.
bia.mp/IV6_pubs

Page 4 IV6-GP-AF Instructions I SERIES
Hardware
(hex nuts, at washers)
Designed to suspend a maximum* of sixteen (16) IV6 -1122 or nine (9) subwoofers
in a single indoor array with a 10:1 safety factor. (Note in the grey box below)
APPLICATION: Suspend and aim a loudspeaker array from a single point.
Before assembly: Retrieve rigging and Pin# (pinpoint) information from the
system design / model or report in EASE® Focus 3 (EF3).
The Pin# information from the rigging section of EF3 represents the distance (cm)
from the back of the front logo plate to the designated lifting point. Pins 1-6 do not
exist due to the oset of the front lift point on the carriage.
GP-1. Loosen carriage hardware, move the
carriage to suggested pin# position, and
re-secure hardware
1
GLIDEPOINT™ ARRAY FRAME
ASSEM BLY
1. Move the carriage to the pin setting suggested by the Rigging panel following
the system design in EF3. Loosen the nuts on the rods enough to slide the
carriage to the pin# line and then tighten the nuts on both sides to secure it.
Follow instructions on the frame label regarding carriage alignment and which lift
hole to use:
• Pin# 7-11 align front of carriage with pin # line, and use front lift hole
• Pin# 12-59, align rear of carriage with the pin# line and use rear lift hole
IV6-GP-AF carriage placement label
Parts:
GP-AF
IV6-GP-AF
GP-AF: Glidepoint™ Array Frame (1)
S1 with Logo: Splay brackets w/logo (2)
Hardware:
Qty
Code Description
4 HHB-F
Grade 10.9 Flanged
Hex Head Bolts
4
HN-F Flanged Nuts
1 C-HB Carriage Hex Bolt
1 C-HN Carriage Hex Nut
1 LR Locking Ring
Kit Weight: 76 lbs (34.5 kg)
Working Load Limit: 1300 lbs (589.7 kg)
(10:1 safety factor)
S1 with Logo
INSTALLER'S HINT: With most small to medium-size arrays, the carriage location can
be changed while under load (with the array attached and in the air). This is helpful,
when the recommended pinpoint is farther back on the frame. The carriage can be
started toward the front to keep the array relatively level as it is being built, and then
moved back as the array gets longer.
• Loosen the nuts on the side of the carriage in the direction it should be moved.
• The carriage can be moved by hand if there isn't too much weight on the frame, or
"tighten" the nuts (with a wrench) on the other side of the carriage to move it along the
threaded rods.
• After the carriage is in its nal position (and the system is aimed), one at a time, loosen
each hex nut a few threads, apply a drop of red thread-locking compound, and re-
tighten the nut. This will help prevent movement of the carriage over time.
*NOTE: Additional loudspeakers
above the suggested maximum
may be added to the array when
using an IV6-LAF-PBB (pull back
bar) to share the load. Please refer
to the "Loads" tab in EF3 to ensure
that the desired safety factor is not
exceeded.

I SERIES IV6-GP-AF Instructions Page 5
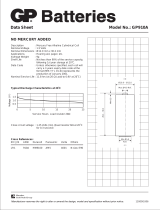
TECHNICAL DRAWING
3.00" [76.2]
9.78" [248.4]
.38" [9.5]
3.00" [76.2]
.25" [6.3]
26.70" [678.1]
13.13" [333.4]
2.50" [63.5]
2.50" [63.5]
28.45" [722.6]
2.50" [63.5]
7.28" [184.9]
1.25" [31.7]
1.50" [38.1]
2.00" [50.8]
11.12" [282.3]
1.00" [25.5]
Ø.47" [Ø12.0]
1.25" [31.8]
R.24" [R6.0]
.66" [16.8]
.25" [6.3]
13.13" [333.4]
11.12" [282.3]
3.19" [81.0]
5.00" [127.0]
.47" [11.9]
.44" [11.1]
(TYP SLOT)
(TYP SLOT)
RIGGING CONNECTOR PLATE-2 PCS
17.23" [437.7]
3.33" [84.7]
2.50" [63.5]
GLIDEPOINT™ ARRAY FRAME (CONTINUED)
2
GP-2. Attach the lift point to the carriage using the designated
lift hole (PY1-EN750-1550 shown)
GP-3. Loosely connect the splay brackets to the frame
with "Community" facing out
HN-F
HHB-F
ASSEM BLY
2. Attach the lift point to the appropriate
hole in the carriage with the included
carriage hex bolt and secure with a hex
nut and locking ring.
3. Using the anged Grade 10.9 bolts
and nuts, loosely attach the S1 brackets
to the array frame with the Community
name facing out.
LR
C-HN
C- H B
IMPORTANT: Leave bracket
hardware slightly loose until
the cabinet is attached to the
brackets. This allows cabinet to t
between the brackets easily. Then
fully tighten all bolts. Do not place
under load until connections are
tight!
3
IV6-GP-AF

Page 6 IV6-GP-AF Instructions I SERIES
ACCESSORY BRACKET REFERENCE
Available from Polar Focus
Polar Focus oers additional brackets for other mounting applications. The
mounting options listed below can be used with the IV6 Glidepoint™ array frame
(IV6-GP-AF).
Go to Polar Focus (linearrayframes.com) for more information.
OFF THE SHELF
IV6-ZB-TCK Z-Beam and Tilt Cable Kit (for use with IV6-LAF-PBB)
IV6-ZB-DHB Z-Beam “Dead Hang” Bracket (for use with IV6-LAF-PBB)
1 PY1-ZBH-1550 Two Point Permanent Install Mount with Center Service Pick Point
2 PY1-ZBR-1550 Self-Leveling Dual Hoist Mount
3 PY1-SLH Self-Leveling Two Point Bridle Mount (1200lbs. WLL)
4 PY1-RBC-1-1100 Level, Steel I-Beam Mount
5 PY1-BTP1212-1550 12” x 12” Box Truss Plate Mount
6 RLP-X2-1800 Redundant Load Point
7 PY0-WMV-2226-250 Wall Mount (250lbs. WLL)
8 PY0-STEM Hidden Two Point Permanent Install Through-Ceiling Mount (300lbs. WLL)
9 PY0-ZBH-300 Two Point Permanent Install Mount with Center Service Pick Point (300lbs. WLL)
SEMI-CUSTOM
10 PY1-UJEXT-POST Custom Length Ceiling Extension Post (available from 2ft. to 16ft.)
11 PY1-CBA-3 Custom Sized Mount for Level or Sloped Wood-Based Beams (500lbs. WLL)
12 PY1-CBA-4 Custom Sized Mount for Rolled Wood-Based Beams (450lbs. WLL)
2 43
5 6 7
9 11 12
10
Rear cable
channel
On the IV6-GP-AF
1
8

I SERIES IV6-GP-AF Instructions Page 7
WEIGHTS
LOUDSPEAKERS
(includes 1 pair splay brackets) Indoor [lbs (kg)] Outdoor / WR [lbs (kg)]
IV6 -112 2 /05 77.3 (35.1) 62.5 (28.3)
IV6 -112 2 /15 73.5 (33.3) 59.1 (26.8)
IV6 -118S 132.9 (60.3) 99.3 (45.0)
ACCESSORIES
(available from Biamp)
Weight
Indoor [lbs (kg)]
Working Load Limit
[lbs (kg)]
IV6-GP-AF 76 lbs (34.5kg) 1300 lbs (589.7 kg)
IV6-LAF-PBB 23 lbs (10.4kg) 850 lbs (385.6 kg)
IV6-SB-AF 108.0 (49.0) 2000 lbs (907.2 kg)
IV6-LAU 13.5 lbs (6.1 kg) 500 lbs (226.8 kg)
PY1-EN750-1550 6 lbs (2.7 kg) 1550 lbs (703.1 kg)

A: 9300 S.W. Gemini Drive Beaverton, OR 97008 USA W: www.biamp.com
CONTACT US
Email: suppor[email protected] or CommunitySuppor[email protected]
Web: support.biamp.com
Warranty: biamp.com/legal/warranty-information
Note: Every eort has been made to
insure that the information contained in this
manual was complete and accurate when
printed. However, due to ongoing technical
advances, changes or modications may
have occurred that are not covered in this
manual. The latest version is available at on
the Biamp website <here>
IV6-GP-AF Installation 03MAY2021
Caution:
structural engineer approve the mounting design.
/