Page is loading ...

20041 / 100304•CABLELINK
ALL RIGHTS RESERVED
2004
ABLELINK7
OWNER’S MANUAL 3
BETRIEBSANLEITUNG 17
GUIDE UTILISATEUR 32
GEBRUIKSAANWIJZING 46
CABLELINK75

1. READ THIS FIRST !
Caution: to reduce risk of electric shock, do not disassemble any part of the videosender
system. No user-serviceable parts are inside. If you spill liquid on it, disconnect the unit from
the AC outlet to prevent possible fire or shock hazard and consult authorized service
personnel.
Use only the supplied powersupplies. Defective parts must be replaced by original spareparts
only.
Powerline operated equipment or accessories connected to the unit should bear the CE
certification mark and should not be modified in any way that might defeat the safety
features.
Your CableLink meets all European standards for EMC, Safety and Radio Frequency, however
inteference from other RF transmitters may occur. The range of the CableLink is at least 30
meters in an open air situation, however indoor the range is highly influenced by construction
materials applied within the house.
Warning: to prevent electric shock hazard, do not expose any part of the CableLink to rain or
moisture. Do not use near a bath tub, swimmingpool, etc. Disconnect the unit during
thunderstorms from mains, areal socket and other connected equipment to avoid damage.
No guarantee or liability will be accepted for any damage caused due to incorrect use of the
equipment supplied, other than indicated in this owner’s manual.
2. The CableLink 75 system.
The CableLink system includes a transmitter and a reciever for antenna signals.
With the CableLink 75 system you can transmit audio and video signals throughout your
house to a remote TV or VCR, without additional coaxial cables.
The CableLink Transmitter can be connected directly to your antenna wall socket. The
Transmitter is equiped with a built in TV Tuner. This tuner can be programmed and operated
remotely with the Remote Control supplied. This tuner converts the antenna signal into an
audio/video signal. This A/V signal is transmitted by the unit on a 2,4 GHz frequency. The
receiver is connected to your remote Television or VCR on the Scart input.
Multisource.
Additional other video equipment can be connected to the transmitter as well (e.g. VCR, DVD
player or satellite receiver) .
The source required can be selected by the Remote Control supplied, even from another
room.
The CableLink has a built in IR (infrared) extender to be used with your original remotes
You can also use the supplied 5in1 universal remote both locally (for your connected TV) as
well as the for various equipment (e.g. DVD, VCR.etc.). connected to the Transmitter. This
supplied remote is also used to select channels on the CableLink.
3CABLELINK

3. CableLink 75 Transmitter.
To operate the transmitter please use following items supplied:
1 CableLink 75 VideoTransmitter
1 Powersupply
1 RCA/RCA cable
1 Scart adaptor indicated "transmitter"
1 Infrared extender with 3 IR LED’s
1 Coaxial splitter
1 Coaxial cable
3.1 Control Elements, Transmitter.
1. 433MHz antenna: Receives the RF signals from the IR extender built in the CableLink
receiver. This allows you to operate your equipment (VCR, DVD player, etc) with your
original remote or supplied remote from the location where the CableLink Receiver is
used (e.g. at your remote TV). The antenna must be placed in an upward position.
2. Input jack: for the infrared extender IR LED’s. Please note 5.2 for more information)
3. Antenna Input (Cable In): To connect the CableLink transmitter to the Antenna wall
output (antenna of cable signal). Use antenna cable provided.
4. Audio/Video input: Input for Audio and Video signals from your DVD player, VCR, etc.
5. Audio/Video output: Signal available at the output is either the antenna signal
transmitted (if transmitter is in "Cable" mode) or signal connected to the Audio/Video
input [4]. (mode selected by the remote control: "CATV/AV")
6. Power input: The supplied mains adaptor is connected to this input jack.
7. Power ON/OFF: This is for switching the transmitter on and off. When switched on the
LED [13] will light up.
8. 2,4 GHz Antenna. Transmits the audio/video signals to the Receiver.
9. Channel Selector: To set the 2,4GHz channel. Setting of Transmitter and Receiver should
be same (A,B,C or D)
10. Source: To select between Antenna input [3] or external connected equipment [4]
11. Cable Channel Down: Channel selection of the programmed TV Channels.
12. Cable Channel Up: Channel selection of the programmed TV Channels.
13. LED Indicator: lights when unit is switched on [7].
4. CableLink 75 Receiver
To operate the Receiver please use following items supplied:
1 CableLink Receiver
1 Powersupply
1 RCA/RCA cable
1 Scart adaptor indicated "Receiver"
4.1 Control Elements Receiver.
1. 433MHz antenna: Sends the RF signals from the IR extender built in the CableLink
4 MARMITEK

receiver. This allows you to operate your equipment (VCR, DVD player, etc) with your
original remote or the remote supplied from the location where the CableLink Receiver is
used (e.g. at your remote TV). The antenna must be placed in an upward position.
2. A/V Output: Connect this output with your remote TV (or VCR) by means the supplied
RCA cable and the scart adaptor.
3. Channel Selector: Channel Selector: To set the 2,4GHz channel. Setting of Transmitter
and Receiver should be same (A,B,C or D).
4. Power input: The supplied mains adaptor is connected to this input jack.
5. Power switch: This is for switching the receiver on and off. When switched on, no
indicator lights up.
6. 2,4 GHz Antenna. Receives the audio/video signals from the transmitter.
7. IR Window: Point your remote to this window to transmit IR commands to the
equipment connected to your CableLink Receiver.
5. Installation of the system.
Attention: Because of technical reasons, you need to place the CableLink
transmitter and receiver together when installing the system. After finishing
the installation you can move the receiver to wherever you wish to connect
your TV. During the installation the receiver needs to be connected to a
(random) TV.
You can connect the CableLink in two different ways. Do you own a satellite receiver, VCR or
DVD player? In that case, use method 5.2 to connect your CableLink. Do you not have this
type of equipment? Then use method 5.1 to connect your CableLink.
5CABLELINK
TV
SCART
RADIO TV
3
C
A

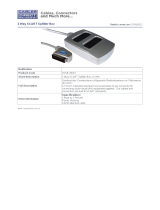
5.1 Installation of the transmitter without extra equipment (such as satellite
receiver, VCR or DVD player).
1. Connect the coaxial cable supplied [C] to your antenna wall socket.
2. Connect the coaxial cable to the Antenna Input [] of your CableLink Transmitter.
3. Select a channel with the Channel Selector [9] e.g. C.
4. Connect the powersupply [6]
5. Switch on the power [7]
6. Make sure the CableLink 75 transmitter is placed some distance away from other items.
Do not place the transmitter on top of your audio and/or video equipment. Direct the flat
2,4 GHz antenna [K] in the direction of the Receiver.
6 MARMITEK
TV
SCART
RADIO TV
G
IN
OUT
IN
OUT
F
VCR
SAT DVD
3AD
I
2
C
5
4

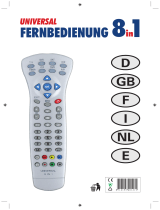
5.2 Installation of the transmitter with extra equipment (such as satellite
receiver, VCR or DVD player).
This hook up scheme allows you to watch all sources both in the main room and the second
room.
1. Connect the antenna splitter [A] to the aerial connection of your TV
2. Connect the supplied coaxial cable [C] to one side of the antenna splitter [A]
3. Connect the other end of the coaxial cable [C] to the antenna input [3] of the CableLink
75 transmitter
4. Connect the existing coaxial cable (from your Satellite receiver or VCR) to the other end
of the splitter.
5. Connect the audio/video output [F] from your DVD player to the audio/video input [4] of
the CableLink 75 transmitter [MultiSource function]. A RCA/RCA cable [G] is supplied.
6. Connect the audio/video output [5] of the CableLink 75 transmitter to the audio/video
input (SCART) [I] of your TV. To make this connection, you can use the cable you used for
connecting your DVD to your TV originally.
7. Insert the plug of the infrared extender cable to output [2] on the CableLink 75
transmitter.
8. Locate the small IR LED’s on the IR sensors of the equipment connected. The IR emitters
have an adhesive tape on the back side. Remove the paper protective label and affix the
emitter lightly on the facia of your equipment. It may take some adjustments to find the
right location.
9. Select a channel with the Channel Selector [9].
10. Connect the power supply [6]
11. Switch on the unit with the ON/OFF switch [7].
12. Make sure the CableLink 75 transmitter is placed some distance away from other items.
Do not place the transmitter on top of your audio and/or video equipment. Direct the flat
2,4 GHz antenna [K] in the direction of the Receiver.
5.3 Installation of the Receiver.
Attention: Because of technical reasons, you need to place the CableLink
transmitter and receiver together when installing the system. After finishing
the installation you can move the receiver to wherever you wish to connect
your TV. During the installation the receiver needs to be connected to a
(random) TV.
1. Connect the RCA cable with the A/V output on the CableLink receiver [2]. Take care to
match the color of the plugs with the color code on the jacks of the receiver.
2. Connect the cable with your television set, use the Scart adaptor marked "Receiver" if
connected on the scart input.
3. Select the corresponding channel [3] with your transmitter (set both units on e.g. "C").
4. Connect the powersupply [4]
5. Switch on the unit with the ON/OFF switch [5].
6. Direct the flat 2,4 GHz antenna [K] in the direction of the Transmitter.
7CABLELINK

Note: To receive the signals from your CableLink, switch the TV connected to your CableLink
receiver (remote TV) on the A/V channel (on some TV’s use channel "0"). If connected a blue
screen appears if no channel is programmed on your CableLink.
5.4. 5in1 Remote Control
1. Open the battery compartment on the reverse of the remote.
2. Place 2 batteries (AAA size, not included). Note the correct polarity/position.
3. Close the battery compartment.
CableLink 75 function keys on your 5in1 Remote:
0-9 Channel selection.
CHAN+ Next Channel
CHAN- Previous Channel
PREV.CH Return to previous selected channel
CATV/AV Select between CableLink internal tuner or external connected
A/V equipment (e.g. DVD player)
DISP On screen channel indication of the set CableLink channel.
NOTE: The CableLink channels are dedicated channels for the CableLink system and mostly
not identical to the channels you are used to by your cable provider!
SCAN Automatic search for channels (6.2).
CHAN ADD/DEL Add or delete CableLink channels. To delete a stored CableLink channel
(e.g. channel 30), select this channel and then press CHAN ADD/DEL.
On screen the text "CATV 30 DELETED" appears.
Next time you step through the channels, channel 30 will not appear.
To add a new channel; press the desired channel number (e.g. 40) as
4+0
on the 0-9 keypad. Then press CHAN ADD/DEL. On screen the text
"CATV 40 ADDED" appears.
SET To add a security code (=individual code unique to your remote), if
more than one CableLink systems are used within one house (read 6.4.)
For a more detailed instruction on the remote: look at Chapter 7.
6. CableLink 75 channel set up
You can program the CableLink 75 in three different ways.
Method A
By searching the entire frequency band. This is the best way to program your CableLink 75 if the
TV stations are on so-called +/- channels. Also if you do not know how the TV stations in your area
are transmitted, it is best to use this method. More information can be found in chapter 6.1.
8 MARMITEK

Method B
By searching whole channel numbers. If you know that all stations in your area are on whole
channels, you can find the quickest method in chapter 6.2.
Method C
By keying in the channel numbers. To use this method, you need a list of channels from you
cable supplier. More information can be found in chapter 6.3.
6.1 Method A: scanning the complete frequency band:
NOTE: searching the complete frequency band by using method A will take about 20 minutes.
1. Press and hold the FINE TUNE + key until text on the TV screen changes to "Fine Tune +"
2. Wait until the system stops searching and displays the found TV channel
3. Press the CBL ADD/DEL key to store the found TV channel in the memory (when you
press the CBL ADD/DEL key for a second time, you will delete the TV channel from the
memory again).
4. Repeat steps 1 to 3 until you found all TV channels.
Note: When the TV channel you found is not tuned precisely enough, you can use the FINE
TUNE – and FINE TUNE + keys to fine tune the channel by using short key presses. Press CBL
ADD/DEL to store the TV channel to memory.
6.2 Method B: Automatic channel search (round channel numbers)
If you search via this method, the so-called + and - channels will be skipped.
1. Turn on the TV where the CableLink 75 receiver is connected to and select the SCART or
Video input
2. Press the button labelled CBL on your remote control
3. Switch on the CableLink 75 receiver and the CableLink 75 transmitter.
4. The TV connected to the CableLink 75 receiver will (for about 20 seconds) display a blue
screen with the text ‘HANDSET CODE 636’. While this text is displayed, you need to press
a random button on your remote (not the SET button). Aim the remote control at the
front display of the CableLink 75 receiver.
5. Press SCAN
6. The TV displays "Press again to confirm"
7. Press the SCAN button again to start the automatic search. On the TV screen the text
"Scanning, please wait" will appear. An upwards arrow will blink every half second. The
automatic scan process will take about 1 minute.
8. As soon as the scanning is completed, the text "Scanning complete – found XYZ
channels" will be displayed. The system will switch automatically to the first found TV
channel.
9.
With the CHAN+ and CHAN- keys, you will be able to browse through the found TV channels
10. If you want to remove a TV channel from the memory or to restore the channel into the
memory again, press CBL ADD/DEL (Play key).
9CABLELINK

6.3 Method C: scanning the frequency band with the use of the CableLink 75
channel numbers
NOTE: The CableLink 75 system uses it’s own channel numbering. The numbers used by the
CableLink system will therefore NOT correspond directly with the channel numbers on the
channel overview of your Cable TV provider or the channel numbering you used with your TV
or VCR.
1. Take the channel overview chart of your Cable TV provider or the terrestrial channel
overview for your region with an overview of both TV channels and frequencies [MHz].
2. In the back of this owner’s manual you will find a table that contains the following
columns:
• Frequency: Frequencies belonging to the TV channel
• CableLink 75 channel nr.: CableLink 75 own channel number which will
be linked to the TV channel on a certain frequency
• Channel Name: Here you can fill in the name of the TV channel
3. Search for the frequency of the TV channel you are looking for (e.g. 471,25 MHz) on the
channel overview chart of your Cable TV provider.
4. Look for the CableLink 75 channel number with a frequency which is near to the
frequency you are looking for (chart in the back of this manual)
5. Look in the column CableLink 75 channel nr. Enter this number via the numeric (0..9)
keyboard of the remote control.
6. Press FINE TUNE + when you search for a higher frequency. Hold the key until the text
changes to "Fine tune +"
OR
Press FINE TUNE – when you search for a lower frequency. Hold the key until the text
changes to "Fine tune –"
7. After a short time the TV channel will appear. Press the CBL ADD/DEL key to store the TV
channel you found into the memory (press CBL ADD/DEL again if you want to remove
the TV channel from the memory again).
8. Repeat steps 3 to 7 to add all TV channels to the memory of the CableLink 75
6.4. Clearing the memory (master reset)
1. Switch the CableLink 75 transmitter off and on again (by using the ON/OFF switch (7)).
2. Press the SOURCE and CHAN DOWN key (middle key) at the front of the transmitter at
the same time
3. On screen the text "DELETED" will appear
7. Universal remote 5in1
The provided 5in1 remote does not only contain keys for your CableLink 75 system
(read 5.4), you are also able to control your TV, VCR, DVD player and Satellite receiver
with it! The remote is pre-programmed at the factory for most brands and models of
equipment.
10 MARMITEK

7.1. Infrared extender
Your CableLink 75 system has a build in infrared extender. This infrared extender lets you
control your VCR, DVD player and Satellite receiver, which are set up at the transmitter side,
through walls and floors.
To use the infrared extender, point your remote at the infrared receiver which is located
behind the window at the front of the CableLink 75 receiver. The infrared extender will also
work with the original remotes of your equipment (except 400kHz infrared systems like B&O).
To use the infrared extender you must have the infrared extension cable connected to the
CableLink 75 transmitter. Please see 5.2 for more details.
7.2. Button descriptions
LED indicator light
The indicator light flashes when the remote is operating
POWER
Switches your equipment ON and OFF
TV, VCR, DVD, SAT
Used to select the device to control
SET UP
Used for programming the remote
CHAN + and CHAN -
To select channels
VOL +/-
To control the volume
M
Mute key. To switch off the sound
0-9
To select channels and numbers. Also to enter device codes.
ENTER
Works as acceptance button for menu functions of your
equipment
A/V
Toggles between TV and Video mode
MENU
Access the menu function of the device you are controlling (if
available)
EXIT
Used to exit menu functions
Cursor keys
Used to navigate and adjust Menu items of the device you are
controlling
OK
Select menu items of the device you are controlling
11CABLELINK

Fast text ON / Fast text OFF / Fast text HOLD.
INFO
Access to the on screen information of the device you are controlling
PLAY, REW, FF, STOP, PAUSE, REC
Works the same as your original remote. You must press the REC button twice to begin recording.
7.3. Set the remote control for your TV, VCR, DVD player and satellite
receiver.
There are 2 ways to program the remote control for your existing devices (such as TV or DVD
player).
Method A: Setting the remote control by entering the code given in the code book
(supplied).
Method B: Setting the remote control by manually searching the codes.
Method A
1. Turn on the device you want to control (TV, VCR, etc.).
2. Press and hold SETUP until the LED indicator comes lights steadily. Release the SETUP
button.
3. Press and release the mode for the device you want to control. The LED blinks once (TV,
VCR, DVD or SAT).
4. Search for the brand of your device in the code book and enter the corresponding code.
The LED turns off after the last digit entered.
5. Point the remote at the device and press the POWER button. Your device should turn off.
6. Turn your device on and press CHAN+. If the device responds, setup is complete.
Notes:
The TV key can only be used to store TV codes, but you can store a code for ANY device
under either the VCR, SAT or DVD key. E.G. program your first SAT receiver under the SAT
key, and your second SAT receiver under the DVD key.
If your TV, VCR or Satellite receiver does not respond, try the other codes for your brand. If it
still does not respond, try the method B.
If the LED blinked rapidly when you entered the code, you may have entered an invalid code.
Recheck the code in the code list and try again.
Method B
When you cannot find your device in the code list or your device does not respond after you entered
the codes for your brand, you can try to find the right code by using the manual code search:
1. Turn on the device you want to control.
2. Press and hold SETUP until the LED indicator lights steadily. Release the SETUP button.
3. Press the mode button (TV, VCR, etc.) that matches the equipment you want to control.
The LED blinks once.
12 MARMITEK

4. Shortly press CHAN+ repeatedly until the device to be controlled changes channel. If you
accidentally go past the code press CHAN – repeatedly until the channel changes again.
5. Press and release the ENTER button to complete the setup.
Note:
- In some cases you will have to press the CHAN+ button a lot (more than 50x).
- If your device does not have a Channel +/- function, you can use the POWER button. Use
the PLAY button for the VCR.
7.4 Identifying codes found using the search procedure
1. Press and hold the SETUP until the LED lights steadily. Release the SETUP button.
2. Press the mode button that matches the equipment you want to identify TV, VCR, etc.).
The LED blinks once.
3. Press and release SETUP. The LED blinks once.
4. To find the first digit press each number button from 0 to 9 until the LED blinks. The
number you pressed is the first digit of the code
5. Press each number button from 0 to 9 again as above to find the second digit.
6. Press each number in turn to find the third digit. When the third digit has been found,
the LED goes out.
7.5 Switch between antenna signal and audio/video source
You can connect not only an antenna signal to the CableLink transmitter but also an external
audio/video source (for example a DVD player, a video recorder or a satellite receiver). You can
then use the CableLink remote control to switch between the antenna signal and the external
source. You do this by pressing the [A/V] key on the remote.
7.6 Changing the code of the 5in1 remote for use with the CableLink 75
Remark: It is only necessary to change the code of the 5in1 remote if another CableLink 75
system is used in your immediate neighbourhood (within 100 meters).
The default setting of the remote is "636"
To change the code of both the 5in1 remote and your CableLink 75 system:
1. Press and hold SETUP until the LED stays on
2. Press CBL
3. Enter one of the following codes:
639
638
637
636 (default)
4.
Switch the CableLink 75 transmitter off and then on again (by using the ON/OFF switch (7))
5. The following on screen text will appear: "HANDSET CODE ABC PRESS "SET" TO
CHANGE OR ANY OTHER KEY TO CONTINUE"
6. Press "SET". The following on screen text will appear: "PRESS AGAIN TO CONFIRM"
13CABLELINK

7. Press "SET" again
8. The screen shows the following text: "CODE XYZ ACCEPTED" (e.g. code 638 accepted)
9. Test the connection by pressing CHAN+ or CHAN-
7.7 Resetting the configuration of the remote control
You can reset the remote control to its original configuration, as follows:
1. Press the SETUP button until the LED remains on.
2. Press the STOP button twice and then press the MUTE button once.
3. The LED will go out.
8. Troubleshooting
Poor quality of all TV channels
1. Obstructions of the signal can sometimes affect the transmission quality. Move the
CableLink 75 transmitter or receiver a few centimetres to solve the problem.
2. Change the channel settings (A .. D) at both the transmitter as the receiver. The channel
setting on the transmitter must match the setting on the receiver (e.g. both set to B)
Poor quality of some of the TV channels
1. Check the antenna connection of the CableLink 75 transmitter. You can check the signal
at the transmitter side by connecting a TV to the antenna connection directly. It is
especially important to check your antenna system if high frequency channels contain
more noise that lower frequency channels.
2. If the found TV channel is not tuned exact enough, use the FINE TUNE + and FINE TUNE
– buttons to fine tune the TV channel. Press CBL ADD/DEL to store the new settings.
The infrared extender does not work
1. Is the infrared extension cable connected to the CabeLink 75 transmitter? Are the
infrared eyes attached to your equipment at the right position? Try to experiment with
their location if you are not convinced of the right position on your device.
2. If you use a wireless headphone, wireless speakers or other equipment using 433,92 MHz
transmission, this could affect the range of the infrared extender function dramatically.
Switch of these devices to improve the range.
The remote won’t control you’re A/V equipment or doesn’t work at all
1. Use manual controls or the original remote to confirm the equipment is working properly
2. Be sure you pressed the device key for the device you want to control
3. Re-enter the code for you’re A/V product form the code listing
4. Try searching for codes by using the Manual or Automatic code search
5. Check the polarity of the batteries
6. Exchange the batteries
14 MARMITEK

The remote won’t work with the CableLink 75
1. The code of the remote is not matching the code setup in the CableLink system.
2. To operate the CableLink with the remote provided, you need to point it at the CableLink
receiver.
3. To operate the CableLink with the remote provided, it has to be set to the CableLink
mode. To set it to the CableLink mode, press the [CBL] key.
4. Using a wireless baby monitor, wireless headphones or wireless speakers that operate on
the same frequency as the infrared extender of your CableLink 75 (433 MHz) will
significantly decrease the range.
5. After the CableLink transmitter has been turned on, you will get a blue screen showing
the text "HANDSET CODE 636 etc.". If you wait too long to confirm, the set will not
automatically switch to installation mode. To access the installation mode, you will then
need to turn the CableLink transmitter off and on again.
My CableLink 75 cannot find any channels
1. The automatic search method only finds what are known as "whole" channels. However,
some cable networks only use + and – channels. You can find these by searching for
them manually.
I do not get the blue screen on my TV
1. The CableLink receiver is attached to the Scart input on your TV. This means that the TV
always has to be set to "external channel" or "audio/video" channel. The instructions for
your TV will tell you how to do this.
I’ve programmed the channels on the CableLink but I can't switch channels
1. Read "The remote won't work with the CableLink 75"
2. The CableLink has stored the channels in the transmitter. You therefore cannot switch
channels on the TV; you have to do so on the CableLink transmitter itself. The TV
therefore has to always be set to the "external" or "audio/video" channel. By setting the
remote to CableLink mode (using the [CBL] key), you can change the channels on the
CableLink transmitter. When doing so, it is important to aim at the CableLink receiver.
I can't change the order of the channels
1. The CableLink uses a standard order for the channel numbers. You cannot change that
order yourself.
I can hear the sound of the first TV on the second TV via the CableLink.
You probably connected the cable with the Scart adapter TRANSMITTER to the audio/video
OUT of the CableLink transmitter. You need to use OUTPUT with the Scart adapter RECEIVER
or INPUT with the Scart adapter TRANSMITTER.
15CABLELINK

61CABLELINK

62 MARMITEK
Frequency CableLink 75 Channel
MHz Channel Nr. Name
48,25______________________________1 __________________________________________________________________________________
55,25 ________________2 _____________________________________________
62,25 ________________3 _____________________________________________
69,25 ________________4 _____________________________________________
76,25 ________________5 _____________________________________________
83,25 ________________6 _____________________________________________
90,25 ________________7 _____________________________________________
97,25 ________________8 _____________________________________________
105,25 ________________9 _____________________________________________
112,25________________10_____________________________________________
119,25________________11_____________________________________________
126,25________________12_____________________________________________
133,25________________13_____________________________________________
140,25________________14_____________________________________________
147,25________________15_____________________________________________
154,25________________16_____________________________________________
161,25________________17_____________________________________________
168,25________________18_____________________________________________
175,25________________19_____________________________________________
182,25________________20_____________________________________________
189,25________________21_____________________________________________
196,25________________22_____________________________________________
203,25________________23_____________________________________________
210,25________________24_____________________________________________
217,25________________25_____________________________________________
224,25________________26_____________________________________________
231,25________________27_____________________________________________
238,25________________28_____________________________________________
245,25________________29_____________________________________________
252,25________________30_____________________________________________
259,25________________31_____________________________________________
266,25________________32_____________________________________________
273,25________________33_____________________________________________
280,25________________34_____________________________________________
287,25________________35_____________________________________________
294,25________________36_____________________________________________

63CABLELINK
Frequency CableLink 75 Channel
MHz Channel Nr. Name
303,25________________37_____________________________________________
311,25________________38_____________________________________________
319,25________________39_____________________________________________
327,25________________40_____________________________________________
335,25________________41_____________________________________________
343,25________________42_____________________________________________
351,25________________43_____________________________________________
359,25________________44_____________________________________________
367,25________________45_____________________________________________
375,25________________46_____________________________________________
383,25________________47_____________________________________________
391,25________________48_____________________________________________
399,25________________49_____________________________________________
407,25________________50_____________________________________________
415,25________________51_____________________________________________
423,25________________52_____________________________________________
431,25________________53_____________________________________________
439,25________________54_____________________________________________
447,25________________55_____________________________________________
455,25________________56_____________________________________________
463,25________________57_____________________________________________
471,25________________58_____________________________________________
479,25________________59_____________________________________________
487,25________________60_____________________________________________
495,25________________61_____________________________________________
503,25________________62_____________________________________________
511,25________________63_____________________________________________
519,25________________64_____________________________________________
527,25________________65_____________________________________________
535,25________________66_____________________________________________
543,25________________67_____________________________________________
551,25________________68_____________________________________________
559,25________________69_____________________________________________
567,25________________70_____________________________________________
575,25________________71_____________________________________________
583,25________________72_____________________________________________

64 MARMITEK
Frequency CableLink 75 Channel
MHz Channel Nr. Name
591,25________________73_____________________________________________
599,25________________74_____________________________________________
607,25________________75_____________________________________________
615,25________________76_____________________________________________
623,25________________77_____________________________________________
631,25________________78_____________________________________________
639,25________________79_____________________________________________
647,25________________80_____________________________________________
655,25________________81_____________________________________________
663,25________________82_____________________________________________
671,25________________83_____________________________________________
679,25________________84_____________________________________________
687,25________________85_____________________________________________
695,25________________86_____________________________________________
703,25________________87_____________________________________________
711,25________________88_____________________________________________
719,25________________89_____________________________________________
727,25________________90_____________________________________________
735,25________________91_____________________________________________
743,25________________92_____________________________________________
751,25________________93_____________________________________________
759,25________________94_____________________________________________
767,25________________95_____________________________________________
775,25________________96_____________________________________________
783,25________________97_____________________________________________
791,25________________98_____________________________________________
799,25________________99_____________________________________________
807,25 _______________100 ____________________________________________
815,25 _______________101 ____________________________________________
823,25 _______________102 ____________________________________________
831,25 _______________103 ____________________________________________
839,25 _______________104 ____________________________________________
847,25 _______________105 ____________________________________________
855,25 _______________106 ____________________________________________

65CABLELINK
TECHNICAL DATA
Operating range: 100m open field, 15 - 30 m through walls and floors
Power: 230 VAC / 50Hz, 12 VDC, 500 mA
built in cable tuner: VHF low, VHF high, UHF
Standard: PAL (B/G or I, depending on model)
Compatibility:
+/- channel compatible for use in all countries using PAL
Memory: 60 channel
Transmitter: 2,4 GHz, 4 channels (A,B,C,D)
Infrared extender: built in 433,92 MHz transmitter and receiver
Universal Remote: Cablelink75, TV, VCR, SAT, DVD
TECHNISCHEN DATEN
Reichweite: 100 m im Freien, 15 - 30 m durch Decken und
Wände
Spannung: 230VAC/50 Hz, 12 VDC, 500 mA
Eingebauter Tuner: VHF niedrig, VHF hoch, UHF
Standard: PAL (B/G oder I, je nach Modell)
Kompatibel:
+/- Kanal kompatibel zur Verwendung in allen PAL-Gebieten
Speicher: 60 Kanäle
Sender: 2,4GHz, 4 Kanäle (A,B,C,D)
Infrarot Extender: Eingebauter 433,92 mHz Sender und Empfänger
Universele Fernbedienung: Cablelink75, TV, VCR, SAT, DVD
CARACTÉRISIQUES TECHNIQUES
Distance de fonctionnement: 100m en champ libre, 15 à 30m dans une maison
Alimentation: 230VAC / 50Hz, 12VDC, 500mA
Tuner: VHF bande basse, VHF bande haute, UHF
Standard: PAL (B/G ou I suivant modèle)
Compatibilité: compatible avec les chaînes transmises sur une
fréquence non normalisée
Mémoire: 60 chaînes
Transmetteur: 2,4 GHz, 4 canaux (A, B, C, D)
Extension infrarouge: transmetteur et récepteur 433,92 MHz intégrés
Télécommande universelle: CableLink75, TV, VCR, SAT, DVD
TECHNISCHE GEGEVENS
Bereik: 100m vrije veld, 15 - 30m door vloeren en muren
Voeding: 230 VAC/50 Hz, 12 VDC, 500 mA
Ingebouwde tuner: VHF laag, VHF hoog, UHF
Standaard: PAL (B/G of I, afhankelijk van het model)
Compatibiliteit:
+/- kanaal compatibel voor gebruik in alle PAL gebieden
Geheugen: 60 kanalen
Zender: 2,4GHz, 4 kanalen (A,B,C,D)
Infrarood extender: Ingebouwde 433,92 MHz zender en ontvanger
Universele Afstandsbed.: Cablelink75, TV, VCR, SAT, DVD
/