PT-55
®
Electronic Labeling System
®
LN3375001
Printed in China
Impreso en China
Before using the P-touch Labeler, read this instruction leaflet, and
then keep it in a handy place for future reference. With this
machine, use only tape cassettes bearing the logo. For a
list of the tape cassettes that can be used with this machine, refer
to Accessories at the bottom of this page.
Care and precautions
• Clean the machine using only a soft, dry cloth.
• Use only AAA-size (LR03) batteries.
• Do not expose the machine or the tape cassettes to high tem-
peratures, high humidity, or excessive dust.
• If you do not intend to use the
machine for an extended period of
time, remove the batteries.
• Do not touch the tape cutter button
while printing.
• Do not touch the cutter blade.
• Do not block the tape exit slot. (Fig. 1)
Installing/replacing
batteries
1) Remove the back cover by pressing in the rough area at the
top end of the machine and pulling off the cover. (Fig. 2)
2) If a tape cassette is already installed, remove it.
For details on removing the tape cassette, refer to Installing/
changing the tape cassette.
3) If batteries are already installed, remove them.
4) Insert four new AAA-size (LR03) batteries as shown below. (Fig. 3)
Be sure that the two batteries on the left side of the P-touch
are inserted with their positive poles pointing toward the bot-
tom end of the machine and that the two batteries on the
right side of the P-touch are inserted with their positive
poles pointing to the top end of the machine.
Always replace all four batteries at the same time using
brand new ones.
5) Insert the tape cassette.
For details on inserting the tape cassette, refer to Installing/
changing the tape cassette.
6) Attach the back cover by inserting the two hooks on the bot-
tom end of the cover into the matching slots on the bottom
end of the machine, then pushing down firmly on the cover
until it snaps into place.
Installing/changing the tape cassette
1) Remove the back cover by pressing in the rough area at the
top end of the machine and pulling off the cover.
2) If a tape cassette is already installed, remove it by pulling it
straight out.
3) Make sure that the end of the tape feeds under the tape
guides as shown. (Fig. 4)
If you are installing a new tape cassette, be sure to remove
the paper tab.
4) Insert the tape cassette, making sure that it snaps into place.
Make sure that the tape cassette fits properly around the two
guides in the cassette compartment. (Fig. 5)
5) Attach the back cover by inserting the two hooks on the bot-
tom end of the cover into the matching slots on the bottom
end of the machine, then pushing down firmly on the cover
until it snaps into place. (Fig. 6)
The amount of tape remaining in the cassette is
visible
through the window on the back of the machine.
When green tape is fed out, the tape cassette is empty.
Cleaning the Thermal print head
When dust accumulates on the print head, blank horizontal lines
appear through the printed label. If this occurs, clean the print
head.
1) Turn off the machine.
2) Remove the back cover by pressing in the rough area at the
top end of the machine and pulling off the cover, and then
remove the tape cassette.
3) Use a dry cotton swab to gently wipe the thermal print head
and the rubber pinch roller with an up-and-down motion.
(Fig. 7)
4) Insert the tape cassette, and then attach the back cover by
inserting the two hooks on the bottom end of the cover into
the matching slots on the bottom end of the machine, then
pushing down firmly on the cover until it snaps into place.
5) Turn on the machine, enter some text, and then press
R.
6) If blank lines still appear in the printed label, repeat steps 1
through 4 using a cotton swab dipped in isopropyl (rubbing)
alcohol.
Accessories
The following accessories are available for the PT-55.
Tapes supplies may differ by country.
The stylish and portable PT-55 allows you to quickly and
easily print labels anywhere you go. Simply switch on the
machine, enter the text and print out your label. You can also
choose from various character sizes, styles, and framing/
background patterns, in addition to underlining. You can
also specify the length of the label. The text can be printed
on either one or two lines and can include special symbols
and accented characters. PT-55 uses 1/2" (12 mm) size tape
in a variety of tape colors for creating personalized labels.
FCC NOTICE
■ This device complies with Part 15 of the FCC Rules. Oper-
ation is subject to the following two conditions:
(1) this device may not cause harmful interference, and (2)
this device must accept any interference received, includ-
ing interference that may cause undesired operation.
■ This equipment has been tested and found to comply with
the limits for a Class B digital device, pursuant to Part 15 of
the FCC Rules. These limits are designed to provide rea-
sonable protection against harmful interference in a resi-
dential installation. This equipment generates, uses, and
can radiate radio frequency energy and, if not installed
and used in accordance with the instructions, may cause
harmful interference to radio communications. However,
there is no guarantee that interference will not occur in a
particular installation. If this equipment does cause harm-
ful interference to radio or television reception, which can
be determined by turning the equipment off and on, the
user is encouraged to try to correct the interference by one
or more of the following measures:
- Reorient or relocate the receiving antenna.
- Increase the separation between the equipment and
receiver.
- Connect the equipment to an outlet on a circuit different
from that to which the receiver is connected.
- Consult the dealer or an experienced radio/TV techni-
cian for help.
- Changes or modifications not expressly approved by
Brother Industries, Ltd. could void the user’s authority to
operate the equipment.
■ Patent numbers and patent publication numbers which are
related to this product are as below:
USP4839742 USP4927278 USP4976558
USP4983058 USP5009530 USP5069557
USP5120147 USP5314256
TAPE
Fig. 1
Back cover
Tapa trasera
Right side
Lado derecho
Left side
Lado izquierdo
Fig. 2
Fig. 3
Tape guides
Guías de cinta
Guides
Guías
Tape cutter button
Botón cortacinta
Fig. 4
Fig. 5
Fig. 6
Cassettes with 26.2 ft. (8 m) long tape
1/2" (12 mm)
Black characters on white adhesive
Red characters on white adhesive
Blue characters on white adhesive
Black characters on yellow adhesive
M-231
MK-232
MK-233
MK-631
CAUTION
• The following tape cassettes CANNOT be used with the PT-55:
M-531, M-731, M-831, M-931, M-E31, M-521, M-721, M-821, M-921
and M-E21
Thermal print head
Cabezal de impresión térmico
Rubber pinch roller
Rodillo compresor de caucho
Fig. 7
General description
Basic operations
• Turning the P-touch labeler on/off
To turn the labeler on or off, press P.
The P-touch labeler conserves battery power by automati-
cally switching itself off if a key is not pressed within five min-
utes.When the batteries are low, the message "BATT"
appears in the display. When the batteries are empty, the
machine turns itself off and the display stays blank.
• Selecting the input mode
An indicator on the left side of the display shows the current input
mode. If there is no indicator, lowercase letters can be typed in
when a character key is pressed. If the indicator appears beside
a, uppercase letters can be typed in, and if the indicator
appears beside n, numerals will be typed in. To switch to the
uppercase or lowercase input modes, press A until the
desired input mode is indicated. To enter the numerals input
mode, press 1 once. When the P-touch is turned on, the input
mode is automatically reset to uppercase letters.
• Entering characters
To enter lowercase and uppercase letters, continue pressing the
key for the desired letter until the letter is displayed, and then
press L, l or r. To enter numerals, press the key for the
desired number.
If the input of a letter is not finalized, for example by pressing
L
,
l
or
r
, the label cannot be printed, the text cannot be
formatted or a symbol cannot be added.
The symbols shown below are available in the following order:
• Entering a space
To add a space to your text, make sure that the indicator does not
appear beside n
(numerals), and then press 0.
• Adding a second line of text
To end the first line of text and start the second, press L. The
marker appears to the left of the cursor. Two-line text is always
printed with the SIZE1 text size and the NORM (normal) style.
To change a message back to a single line, delete the marker .
(For details on deleting the marker, refer to Deleting a character.)
• Moving the cursor
You can move the cursor (_) to view or edit parts of the text to the
left or right of the 6 characters shown in the display.
To move the cursor to the left, press l; to move the cursor to the
right, press r. Move the cursor several characters in a row by
holding down the key for the desired direction.
• Deleting a character
To delete a character, press C. The character to the left of the
cursor is deleted. To continue deleting characters, hold down C
until all of the desired characters are deleted. To delete a character
in the middle of the text, move the cursor below the character to
the right of the one to be deleted before pressing C.
• Clearing all text and formats
To clear the current text and selected formats, press F,
press l or r until "CLEAR" is displayed, and then press
L. All text is erased, and the text size, style, underline/frame
and label length return to their default settings, and the input
mode is reset to uppercase letters.
• Entering a symbol
To enter a symbol, press @. The first row of symbols appears.
Continue pressing @ until the row containing the desired sym-
bol is displayed, pressl or r until the cursor is positioned
under the desired symbol, and then press L. Your text reap-
pears in the display with the selected symbol added to it.
To return to the current text without adding a symbol, press C.
The symbols shown below are available in the following order:
• Printing
To print out the entered text, press R. The message "PRINT"
appears while printing.
Do not press the tape cutter button while printing, as this will
cause the tape to jam.
• Cutting off labels
Cut off the label that is fed from the tape exit slot by pressing in
the tape cutter button.
Formatting the text
To format the text by changing the text size or style, adding
underlining/framing/shading or specifying the label length,
press F, press l
or r until the desired function (SIZE,
STYLE, FRAME or LENGTH) is displayed, and then press
L. Next, press l, r, or F until the desired setting is dis-
played, and then press L. The selected formatting is
applied to the entire text. For more details about each function,
refer to the appropriate section below.
To return to the current text without changing the formatting,
press C.
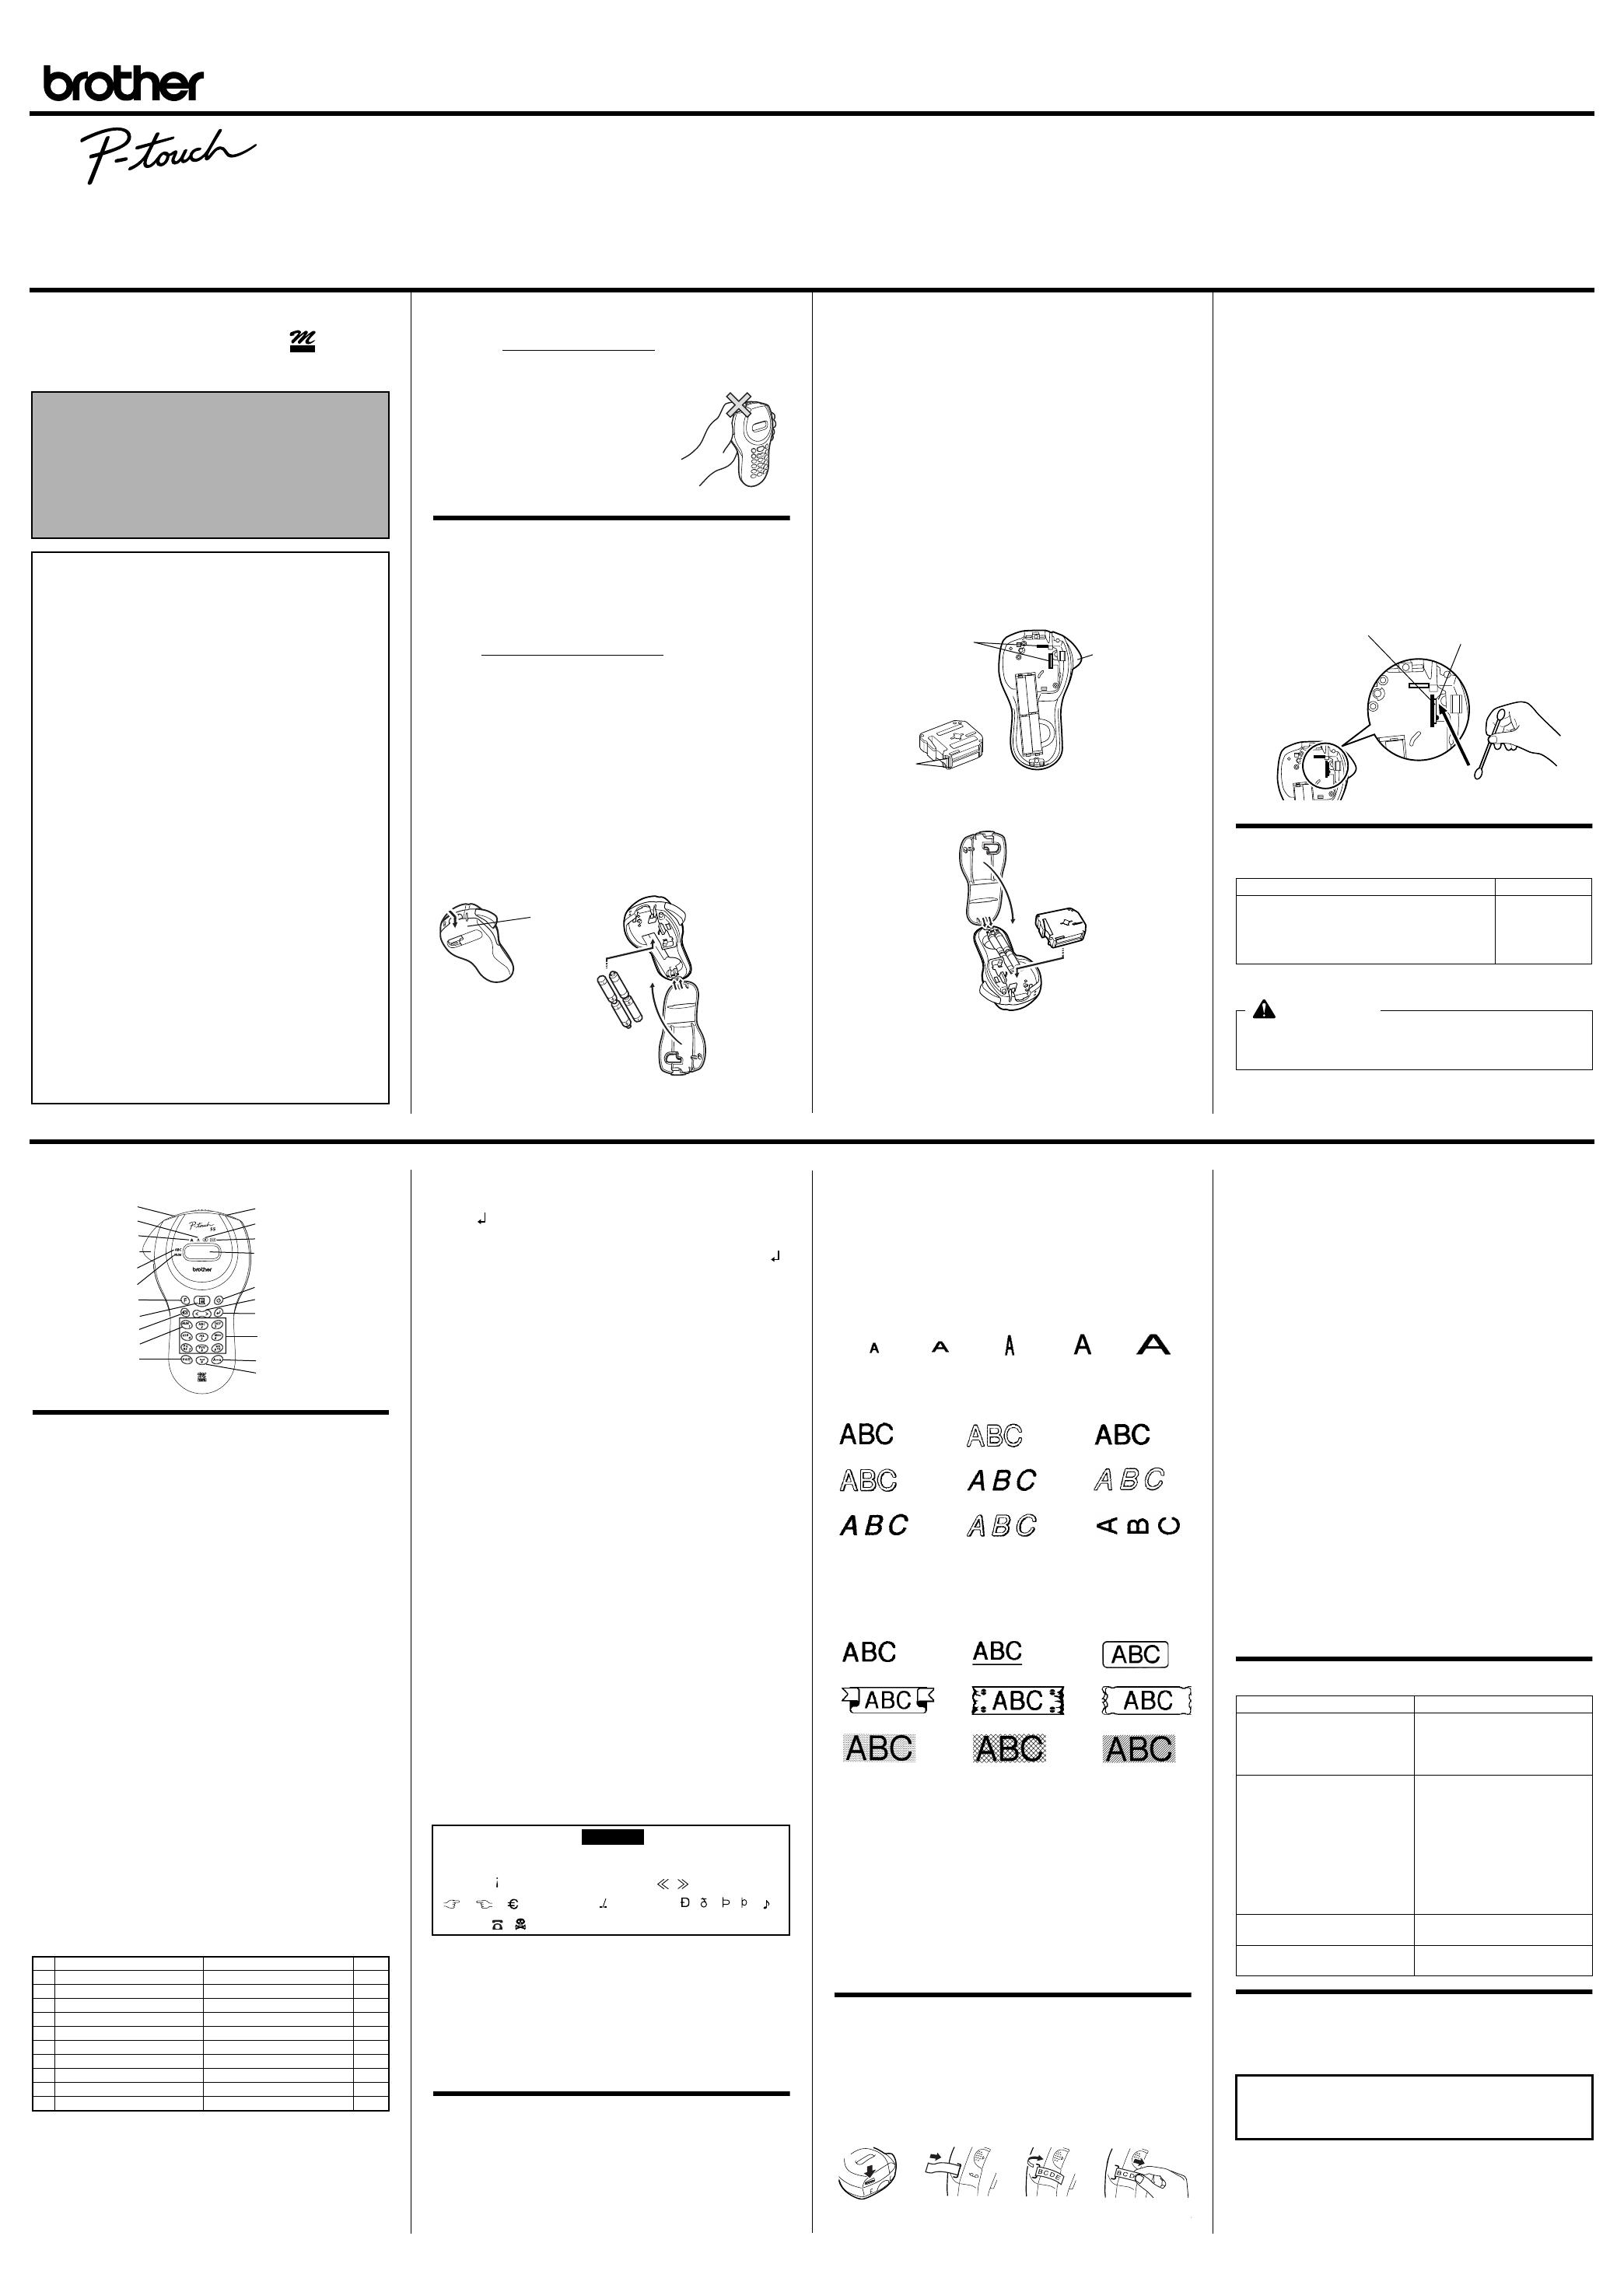
• Text size
The following five text sizes are available:
• Text style
The following nine text styles are available:
When a text style other than NORM (normal) is selected, the indi-
cator below b comes on.
• Underlining/framing/shading
The following frame settings are available:
When UNDL is selected, the indicator belowc comes on. When
a setting other than TEXT or UNDL is selected, the indicator
below
dcomes on. The underlining/framing/shading is not
printed if the VERT (vertical) style is selected.
• Label length
If L OFF was selected, the length of the label will adjust automati-
cally according to the length of the entered text. If L ON was
selected, the current label length setting in millimeters appears.
Press l
or r or use the character keys to enter the desired
length between (1.9" (50 mm) and 11.8" (300 mm)) and then press
L. When L ON is selected, the indicator below scomes on.
Removing the label backing
The PT-55 is equipped with a peeler that allows you to easily
remove the backing from labels. (Fig. 8)
1) Insert the label, with the printed surface facing down, as far
as possible into the built-in peeler. (Fig. 9)
2) Fold back the label to the right 180˚. (Fig. 10)
3) Quickly pull the label out to the right. The end of the backing
is separated from the label. (Fig. 11)
Function key operations
Press F, press l or r to select one of the following, and
then press L.
SIZE Press l, r, or F
to select a text size, and
then
press L.
STYLE Press l, r, or F to select one of the following,
and then press L.
NORM (normal) SHAD (shadow) IT+B (italic + bold)
OUTL (outline) ITAL (italic) IT+S (italic + shadow)
BOLD IT+O (italic + outline) VERT (vertical)
FRAME Press l, r, or F to select one of the following,
and then press L.
TEXT BOX2 BOX5
UNDL (underline) BOX3 BOX6
BOX1 BOX4 BOX7
LENGTH
Press l, r, or F to select one of the following, and
then press L.
L OFF
L ON
Press l, r, or F or use the charac-
ter key to enter the desired label length,
and then press L.
CLEAR (All text and formats are cleared.)
Troubleshooting
IMPORTANT WARRANTY INFORMATION
Thank you for purchasing this Brother Product. We hope that
you will enjoy using it. We suggest that you keep all packing
and other materials.
After referring to the instruction manual, if you still need
assistance, call Brother’s “Help” line at:
1-877-478-6824
Key
Lowercase letters Uppercase letters
Numerals
1
1
2
abcäáàâãåæçABCÄÁÀÂÃÅÆÇ 2
3
defëéèê DEFËÉÈÊ 3
4
ghiïíìî GHIÏÍÌÎ 4
5
jkl JKL 5
6
mnoñöóòôõøœMNOÑÖÓÒÔÕØŒ 6
7
pqr s PQRS 7
8
tuvüúùû TUVÜÚÙÛ 8
9
wxyzÿ WXYZ 9
0
Space Space 0
Tape exit slot
Built-in label-backing peeler
Underline indicator
Frame indicator
Style indicator
Label length indicator
Tape cutter button
Display
Uppercase indicator
Power key
Numerals indicator
Left/right arrow key
Function key
Enter key
Print key
Character keys
Back space key
Uppercase/lowercase mode key
Numeral mode/1 key
Space/0 key
Symbol key
– _ / \ : ; . , ' " ! ? @ & # ∗ % • + × ÷
± = § ¿ ij ∼
( )
[ ]
< >
← → ↑ ↓
° $ £
Fr
ª
º
ß µ
♥
Chart 1
✏
SIZE5SIZE4 (default)SIZE3SIZE2SIZE1
NORM (normal-default)
SHAD (shadow)
IT+B (italic + bold)
OUTL (outline)
ITAL (italic)
IT+S (italic + shadow)
BOLD
IT+O (italic + outline)
VERT
TEXT (default) UNDL (underline) BOX1
BOX2 BOX3 BOX4
BOX5 BOX6 BOX7
Fig. 8 Fig. 9 Fig. 10
Fig. 11
Problem Solution
1. The display stays blank after
you have turned on the
machine.
• Check that the batteries are
correctly inserted.
• The batteries may be weak,
please replace the batteries.
2. The machine does not print,
or the printed characters are
blurred.
• Check that tape cassette
has been inserted correctly.
• Verify that the tape cassette
is not empty and if so
replace the tape cassette.
• Check that the character
size is appropriate for the
width of the tape that is
used.
3. The printed characters are
not formed properly.
• The batteries may be weak,
please replace the batteries.
4. The memory has cleared on
its own.
• The batteries may be weak,
please replace the batteries.
SHOULD YOU ENCOUNTER ANY PROBLEMS WITH YOUR PRODUCT,
PLEASE DO NOT RETURN YOUR
PRODUCT TO THE STORE!
