Page is loading ...

OWNER’S MANUAL

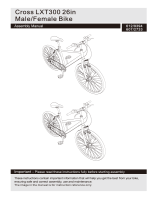
Wheel1.
Rear Derailleur2.
Chain3.
Crank Set4.
Pedal5.
Seat Post6.
Saddle7.
Bolts for Bottle Cage8.
Frame9.
Head Set10.
Handlepost11.
Handlebars12.
Brake Lever13.
Fork14.
Brakes15.
NOTE: This manual is not intended as a comprehensive
use, service, repair or mainten ance manual. Please see
your dealer for all service, repairs or maintenance.
2

Contents
First ................................................................................... 4
Bike Fit ......................................................................................4
Safety First ................................................................................4
This Manual ...............................................................................4
Safety ................................................................................ 5
The Basics .................................................................................5
Riding Safety .............................................................................5
Wet Weather Riding ..................................................................5
Night Riding ...............................................................................6
Fit ...................................................................................... 7
Saddle Position .........................................................................7
Handlebar Height and Angle .....................................................7
Tech .................................................................................. 8
Wheels ......................................................................................8
Installing A Quick Release Front Wheel ................................8
Installing A Quick Release Rear Wheel .................................8
Brakes: Rim Brakes & Disc Brakes ...........................................9
Brake Controls and Features ................................................9
How Brakes Work ..................................................................9
Shifting Gears ..........................................................................10
How a Derailleur Drive Train Works ....................................10
Shifting Gears ......................................................................10
Shifting the Rear Derailleur .................................................10
Shifting the Front Derailleur .................................................10
What Gear Should I Be In? ................................................. 11
How an Internal Gear Hub Drive Train Works ......................... 11
Shifting Internal Hub Gears ................................................. 11
What Gear Should I Be In? ................................................. 11
Chains .....................................................................................12
Pedals .....................................................................................12
Transporting Your Bike ............................................................13
Service ............................................................................ 14
Service Intervals ......................................................................14
Break-in Period ....................................................................14
After Every Long Hard Ride ................................................14
After Every Long Hard Ride or After 10 to 20 Hours of Riding . 14
Warranty ......................................................................... 16
Torque Values ................................................................ 17
3

All folding bicycles and P.A.Q. mini-bikes are
intended for use on paved roads only. P.A.Q.
mountain bikes are intended for use on hard-
packed trails only, and are not intended for
jumps, stunts or other extreme sports.
Make sure your bicycle is used for its intended
purpose as the misuse may lead to the failure
of some component or part.
Bike Fit
Is your bike the right size? If your bicycle is •
too large or too small for you, you may lose
control and fall. If your new bike is not the
right size, ask your dealer to exchange it
before you ride it.
Is the saddle at the right height? To check, •
see Section 3.A. If you adjust your saddle
height, follow the Minimum Insertion instruc-
tions in Section 3.A.
Are the saddle and seat post securely •
clamped? A correctly tightened saddle will
allow no saddle movement in any direction.
See Section 3.A.
Are the stem and handlebars at the right •
height for you? If not, see Section 3.B. Can
you comfortably operate the brakes? If not,
you may be able to adjust their angle and
reach.
Do you fully understand how to operate your •
newbicycle?Ifnot,beforeyourrstride,
have your dealer explain any functions or
features that you do not understand.
Safety First
Always wear an approved helmet when rid-•
ing your bike, and follow the helmet manu-
facturer’sinstructionsfort,useandcare.
Do you have all the other required and •
recommended safety equipment? It’s your
responsibility to familiarize yourself with
the laws of the area where you ride, and to
comply with all applicable laws.
Rider’s weight and luggage should not ex-•
ceed 105kg (230lbs).
Do you know how to correctly operate your •
wheel quick releases? Check Section 4.A.1
and 4.A.2 to make sure. Riding with an
improperly adjusted wheel quick release can
cause the wheel to wobble or disengage
from the bicycle, and cause serious injury
or death.
Are your wheel rims clean and undamaged? •
Make sure the rims are clean and undam-
aged along the braking surface, and check
for excess rim wear. Periodically inspect
your rims for excessive wear and if you
have any question on whether or not your
rims are safe, have them inspected by a
bicycle dealer.
Handlebar and Saddle Alignment: Make •
sure the saddle and handlebar stem are
parallel to the bike’s centerline and clamped
tight enough so that you can’t twist them out
of alignment.
Handlebar Ends: Make sure the handlebar •
grips are secure and in good condition. If
not, have your dealer replace them. Make
sure the handlebar ends and extensions
are plugged. If not, have your dealer plug
them before you ride. If the handlebars
have bar-end extensions, make sure they
are clamped tight enough so you can’t twist
them. Please note that with the installa-
tion of some TT bars, criterium, aero bars,
bar ends or a triathlon style clip-on, your
response time for braking and steering may
have been adversely affected.
This Manual
This manual is not intended as a comprehen-
sive guide to bicycling and maintenance. It
cannot teach you all the mechanical skills you
need to repair a bicycle nor can it teach you all
the skills you will need to ride a bicycle. This
manual has a great number of tips and advice
forthespecicbikesitcomeswith.Ifyouare
ever unsure of how to maintain your bike, visit
a dealer and ask for advice.
First
4

The Basics
WARNING: It is your responsibility to
familiarize yourself with the laws
where you ride and to comply with all
applicable laws, including properly
equipping yourself and your bike as the law
requires.
Observe all local bicycle laws and regulations.
Observe regulations about bicycle lighting,
licensing of bicycles, riding on sidewalks, laws
regulating bike path and trail use, helmet laws,
childcarrierlaws,andspecialbicycletrafc
laws. It’s your responsibility to know and obey
your country’s laws.
Always do check the safety of your bike •
before you ride it.
Be thoroughly familiar with the controls of •
your bicycle: brakes (Section 4.B); pedals
(Section G); shifting (Section 4.C).
Be careful to keep body parts and other •
objects away from the sharp teeth of chain
rings, the moving chain, the turning pedals
and cranks, and the spinning wheels of your
bicycle.
Riding Safety
You are sharing the road or the path with •
others — motorists, pedestrians and other
cyclists. Respect their rights.
Ride defensively. Always assume that others •
do not see you.
Look ahead, and be ready to avoid: •
Vehicles slowing or turning, entering the »
road or your lane ahead of you, or com-
ing up behind you.
Parked car doors opening. »
Pedestrians stepping out. »
Children or pets playing near the road. »
Potholes, sewer grating, railroad tracks, »
expansion joints, road or sidewalk con-
struction, debris and other.
The many other hazards and distractions »
which can occur on a bicycle ride.
Ride in designated bike lanes, on desig-•
nated bike paths or as close to the edge of
the road as possible, in the direction of the
trafcoworasdirectedbylocalgoverning
laws.
Stopatstopsignsandtrafclights;slow•
down and look both ways at street intersec-
tions. Remember that a bicycle always loses
in a collision with a motor vehicle.
Use approved hand signals for turning and •
stopping.
Never ride with headphones. •
Never carry a passenger. •
Never hitch a ride by holding on to another •
vehicle.
Don’tweavethroughtrafcormakeunex-•
pected moves.
Observe and yield the right of way.•
Neverrideyourbicyclewhileundertheinu-•
ence of alcohol or drugs.
If possible, avoid riding in bad weather, •
when visibility is obscured, at dawn, dusk or
in the dark, or when extremely tired. Each
of these conditions increases the risk of
accident.
Wet Weather Riding
WARNING: Wet weather impairs
traction, braking and visibility, both
for the bicyclist and for other vehicles
sharing the road. The risk of an accident is
dramatically increased in wet conditions.
Under wet conditions, the stopping power of
your brakes (as well as the brakes of other ve-
hicles sharing the road) is dramatically reduced
and your tires don’t grip nearly as well. This
makes it harder to control speed and easier to
lose control. To make sure that you can slow
down and stop safely in wet conditions, ride
more slowly and apply your brakes earlier and
more gradually than you would under normal,
dry conditions. See also Section 4.B.
Safety
5

Night Riding
Riding a bicycle at night is many times more
dangerous than riding during the day. A bicy-
clistisverydifcultformotoristsandpedestri-
ans to see. Therefore, children should never
ride at dawn, at dusk or at night. Adults who
choose to accept the greatly increased risk of
riding at dawn, at dusk or at night need to take
extra care both riding and choosing special-
ized equipment that helps reduce that risk.
Consult your dealer about night riding safety
equipment.
WARNING: Reectors are not a
substitute for required lights. Riding
at dawn, at dusk, at night or at other times
of poor visibility without an adequate
bicycle lighting system and without
reectors is dangerous and may result in
serious injury or death.
Bicyclereectorsaredesignedtopickupand
reectcarlightsandstreetlightsinawaythat
may help you to be seen and recognized as a
moving bicyclist.
CAUTION: Check reectors and their
mounting brackets regularly to make
sure that they are clean, straight, unbroken
and securely mounted. Have your dealer
replace damaged reectors and straighten
or tighten any that are bent or loose.
If you choose to ride under conditions of poor
visibility, check and be sure you comply with
all local laws about night riding, and take the
following strongly recommended additional
precautions:
Purchase and install a generator or battery •
powered head and taillight that meet all
local regulatory requirements and provide
adequate visibility.
Wearlight-colored,reectiveclothingand•
accessories,suchasareectivevest,re-
ectivearmandlegbands,reectivestripes
onyourhelmet,ashinglightsattachedto
your body and/or your bicycle.
Make sure your clothing or anything you •
may be carrying on the bicycle does not
obstructareectororlightandsecurely
mountedreectors.
Make sure that your bicycle is equipped cor-•
rectlywithreectors.
While riding at dawn, at dusk or at night:
Ride slowly.•
Avoid dark areas and areas of heavy or fast-•
movingtrafc.
Avoid road hazards. •
Ifridingintrafc:
Be predictable. Ride so that drivers can see •
you and predict your movements.
Be alert. Ride defensively and expect the •
unexpected.
Askyourdealerabouttrafcsafetyclasses•
oragoodbookonbicycletrafcsafety.
6

Saddle Position
Correct saddle adjustment is an important fac-
tor in getting the most performance and comfort
from your bicycle. If the saddle position is not
comfortable for you, see your dealer.
The saddle can be adjusted in three directions:
Up and down adjustment. To check for cor-•
rect saddle height:
Sit on the saddle. »
Place one heel on a pedal. »
Rotate the crank until the pedal with your »
heel on it is in the down position and the
crank arm is parallel to the seat tube.
If your leg is not completely straight, your
saddle height needs to be adjusted. If your
hips must rock for the heel to reach the
pedal, the saddle is too high. If your leg is
bent at the knee with your heel on the pedal,
the saddle is too low.
Once the saddle is at the correct height,
make sure that the seat post does not
project from the frame beyond its “Minimum
Insertion” or “Maximum Extension” mark.
WARNING: If your seat post projects
from the frame beyond the Minimum
Insertion or Maximum Extension mark, the
seat post may break, which could cause
you to lose control and fall.
Front and back adjustment. The saddle can •
be adjusted forward or backward to help
you get the optimal position on the bike.
Ask your dealer to set the saddle for your
optimal riding.
Saddle angle adjustment. Most people •
prefer a horizontal saddle; but some riders
like the saddle nose angled up or down just
a little. Your dealer can adjust the saddle
angle.
NOTE: If your bicycle has a suspension seat
post, periodically ask your dealer to check it.
Small changes in saddle position can have a
substantial effect on performance and comfort.
Tondyourbestsaddleposition,makeonly
one adjustment at a time.
WARNING: After any saddle adjust-
ment, be sure that the saddle
adjusting mechanism is properly tightened
before riding. A loose saddle clamp or seat
post binder can cause damage to the seat
post, or can cause you to lose control and
fall. A correctly tightened saddle adjusting
mechanism will allow no saddle movement
in any direction. Periodically check to make
sure that the saddle adjusting mechanism is
properly tightened.
Handlebar Height and Angle
WARNING: The stem’s Minimum
Insertion Mark must not be visible
above the top of the headset. If the stem is
extended beyond the Minimum Insertion
Mark, the stem may break or damage the
fork’s steerer tube, which could cause you
to lose control and fall.
Your dealer can also change the angle of the
handlebar or bar-end extensions.
WARNING: An insufciently tightened
stem binder bolt, handlebar binder
bolt or bar-end extension clamping bolt may
compromise steering action, which could
cause you to lose control and fall. Place the
front wheel of the bicycle between your legs
and attempt to twist the handlebar/stem
assembly. If you can twist the stem in
relation to the front wheel, turn the handle-
bars in relation to the stem, or turn the
bar-end extensions in relation to the
handlebar, the bolts are insufciently
tightened.
Fit
7

Wheels
Installing a Quick Release Front Wheel
CAUTION: If your bike is equipped
with disk brakes, be careful not to
damage the disk, caliper or brake pads
when re-inserting the disk into the caliper.
Never activate a disk brake’s control lever
unless the disk is correctly inserted in the
caliper. See also Section 4.B.
Move the quick-release lever so that it •
curves away from the wheel. This is the
OPEN position.
With the steering fork facing forward, insert •
the wheel between the fork blades so that
theaxleseatsrmlyatthetopoftheslots
that are at the tips of the fork blades —
the fork dropouts. The quick-release lever
should be on the left side of the bicycle.
Holding the quick-release lever in the OPEN •
position with your right hand, tighten the
tension-adjusting nut with your left hand un-
til it is tight against the fork dropout.
Whilepushingthewheelrmlytothetop•
of the slots in the fork dropouts, and at the
same time centering the wheel rim in the
fork, move the quick-release lever upwards
and swing it into the CLOSED position.
The lever should now be parallel to the fork
blade and curved toward the wheel. With
the right amount of force, the lever should
make a clear embossed mark on the sur-
face of the fork.
WARNING: Securely clamping the
front and rear wheels takes consider-
able force. If you can fully close the quick
release without wrapping your ngers
around the fork blade for leverage, and the
lever does not leave a clear embossed mark
in the surface of your fork, the tension is
insufcient. Open the lever; turn the
tension-adjusting nut clockwise a quarter
turn; then try again.
If the lever cannot be pushed all the way to •
a position parallel to the fork blade, return
the lever to the OPEN position. Then turn
the tension-adjusting nut counterclockwise
one-quarter turn and try tightening the lever
again.
Re-engage the brake quick-release mecha-•
nism to restore correct brake pad-to-rim
clearance; spin the wheel to make sure that
it is centered in the frame and clears the
brake pads; then squeeze the brake levers
and make sure that they work.
Installing a Quick Release Rear Wheel
Make sure that the rear derailleur is still in •
its outermost, high-gear position.
Pull the derailleur body back with your right •
hand.
Move the quick-release lever to the OPEN •
position. The lever should be on the side of
the wheel opposite the derailleur and free-
wheel sprockets.
Put the chain on top of the smallest free-•
wheel sprocket. Then, insert the wheel up
and back into the frame dropouts and pull it
all the way in to the dropouts.
Tighten the quick-release adjusting nut until •
itisngertightagainsttheframedropout;
then swing the lever toward the front of the
bike until it is parallel to the frame’s chain
stay or seat stay and is curved toward the
wheel. To apply enough clamping force, you
shouldhavetowrapyourngersaround
a frame tube for leverage, and the lever
should leave a clear embossed mark in the
surface of your frame.
Tech
8

Brakes – Rim Brakes & Disc
Brakes
Riding with improperly adjusted brakes or worn
brake pads is dangerous and can result in seri-
ous injury or death.
Applying brakes too hard or too suddenly can
lock up a wheel, which could cause you to lose
control and fall. Sudden or excessive applica-
tion of the front brake may pitch the rider over
the handlebars, which may result in injury or
death.
Some bicycle brakes, such as disc brakes and
linear-pull brakes, are extremely powerful. Ex-
ercise particular care when using them.
Disc brakes can get extremely hot with extend-
ed use. Be careful not to touch a disc brake
until it has had plenty of time to cool.
See the manufacturer’s instructions for opera-
tion and care of your brakes. If you do not have
manufacturer instructions, call your dealer or
the brake manufacturer.
Brake Controls and Features
It’s very important to learn and remember
which brake lever controls what brake. Your
bike will come already set and adjusted so that
the right brake lever controls the rear brake.
The left lever controls the front brake. Make
sure your hands can reach and squeeze the
brake levers.
NOTE: In the UK and Japan, the right lever
controls the front brake while the left lever
controls the rear brake. All brakes should be
adjusted according to local regulations.
How Brakes Work
The action of a rim-actuated brake on a bi-
cycle is a function of the friction between the
brake surfaces — usually the brake pads and
the wheel rim. To make sure that you have
maximum friction available, keep your wheel
rims and brake pads clean and free of dirt,
lubricants, waxes or polishes. Another impor-
tant bicycle brake is a disc brake. To install
disc brakes, special disc brake mounts on the
frame and fork and special hubs are necessary.
These brakes are small and rely on brake pads
that squeeze both sides of a small disc rotor
that is mounted on each wheel. Disc brakes
are quite resistant to weather and provide very
strong stopping power on steep hills or on wet
terrain and are well suited for heavy riders.
Brakes are designed to control your speed, not
just to stop the bike. Maximum braking force for
each wheel occurs at the point just before the
wheel “locks up” (stops rotating) and starts to
skid. Once the tire skids, you actually lose most
of your stopping force and completely lose
directional control.
NOTE: Make sure that no oil or lubrication
touches your brake pads or the bicycles rims’
braking surfaces. Please replace worn brake
shoes only with factory authorized brake
replacements.
9

Shifting Gears
Your multi-speed bicycle will have a derailleur
drive train, an internal gear hub drive train or, in
some special cases, a combination of the two.
How a Derailleur Drive Train Works
If your bicycle has a derailleur drive train, the
gear-changing mechanism will have:
A rear cassette or freewheel sprocket »
cluster.
A rear derailleur. »
Usually a front derailleur. »
One or two shifters. »
One, two or three front sprockets called »
chain rings.
A drive chain. »
Shifting Gears
There are several different types and styles of
shifting controls: levers, twist grips, triggers,
combination shift/brake controls and push
buttons. Ask your dealer to explain the type of
shifting controls that are on your bike, and to
show you how they work.
A downshift is a shift to a “lower” or “slower”
gear, one that is easier to pedal. An upshift is
a shift to a “higher” or “faster”, harder to pedal
gear. To select a gear that will make pedaling
easier on a hill, make a downshift in one of two
ways: shift the chain down (the gear “steps” to
a smaller gear at the front) or shift the chain up
(the gear “steps” to a larger gear at the rear.)
So, at the rear gear cluster, what is called a
downshift actually moves the chain up to a
larger gear. The way to keep things straight is
to remember that shifting the chain in towards
the centerline of the bike is for accelerating and
climbing and is called a downshift. Moving the
chain out or away from the centerline of the
bike is for speed and is called an upshift.
Whether upshifting or downshifting, the bicycle
derailleur system design requires that the drive
chain be moving forward and be under at least
some tension. A derailleur will shift only if you
are pedaling forward.
Shifting the Rear Derailleur
The right shifter controls the rear derailleur.
The function of the rear derailleur is to move
the drive chain from one gear sprocket to an-
other. The smaller sprockets on the rear wheel
gear cluster produce higher gear ratios. Pedal-
ing in the higher gears requires greater pedal-
ing effort, but takes you a greater distance with
each revolution of the pedal cranks. The larger
sprockets produce lower gear ratios. Using
them requires less pedaling effort, but takes
you a shorter distance with each pedal crank
revolution. There are two set screws or limit
screws on the rear derailleur body that limit the
travel of the rear derailleur. Tightening the rear
derailleur high gear adjustment screw keeps
the chain from shifting off the small (high) gear
that is on the rear axle. Tightening the rear
derailleur low gear adjustment screw keeps the
chain from shifting off the large (low) gear into
the rear wheel. Moving the chain from a smaller
sprocket of the gear cluster to a larger sprocket
results in a downshift. Moving the chain from
the smaller sprocket on the chain rings to a
larger sprocket results in what is called an
“upshift.” In order for the derailleur to move the
chain from one sprocket to another, the rider
must be pedaling forward.
Shifting the Front Derailleur
The front derailleur, which is controlled by the
left shifter, shifts the chain between the larger
and smaller chain rings. Shifting the chain onto
a smaller chain ring makes pedaling easier (a
downshift). Shifting to a larger chain ring makes
pedaling harder (an upshift). There are 2 (two)
adjustment screws on the front derailleur: one
is to limit the travel of the front derailleur so
that the chain can be shifted upwards towards
the larger, higher or harder to pedal gears but
will not allow the chain to “overshift.” The other
screw limits the travel of the front derailleur
towards the smaller or easier-to-pedal chain-
wheel. By limiting travel, it prevents the chain
from “undershifting” and keeps the chain from
falling off the chainwheel onto the frame.
10

WARNING: Never shift a derailleur
onto the largest or the smallest
sprocket if the derailleur is not shifting
smoothly. The derailleur may be out of
adjustment and the chain could jam,
causing you to lose control and fall.
Which Gear Should I Be In?
The combination of largest rear and smallest
front gears is for the steepest hills. The small-
est rear and largest front combination is for
the greatest speed. It is not necessary to shift
gearsinsequence.Instead,ndthe“starting
gear” which is right for your level of ability — a
gear which is hard enough for quick accelera-
tion but easy enough to let you start from a
stop without wobbling — and experiment with
upshifting and downshifting to get a feel for the
differentgearcombinations.Atrst,practice
shifting where there are no obstacles, hazards
orothertrafc,untilyou’vebuiltupyourcon-
dence.Learntoanticipatetheneedtoshift,
and shift to a lower gear before the hill gets too
steep.Ifyouhavedifcultieswithshifting,the
problem could be mechanical adjustment. See
your dealer for help.
How an Internal Gear Hub
Drive Train Works
If your bicycle has an internal gear hub drive
train, the gear changing mechanism will consist
of:
A 3, 5, 7, 8 or possibly 12-speed internal »
gear hub.
One, or sometimes two shifters. »
One or two control cables. »
One front sprocket called a chain ring. »
A drive chain. »
Shifting Internal Gear Hub Gears
Shifting with an internal gear hub drive train
is simply a matter of moving the shifter to the
indicated position for the desired gear. After
you have moved the shifter to the gear position
of your choice, ease the pressure on the ped-
als for an instant to allow the hub to complete
the shift.
Which Gear Should I Be In?
The numerically lowest gear (1) is for the
steepest hills. The numerically largest gear (3,
5, 7 or 12, depending on the number of speeds
of your hub) is for the greatest speed.
11

Chains
Single-speed and three-speed bicycles as well
as many IGH (Internal Geared Hubs) equipped
bicycles use a “1/2 x 1/8” chain that has a
master link.
To reinstall the “1/2 x 1/8” chain, turn the bi-
cycle upside down, and after reinstalling the
chain, pull the rear wheel axle in a rearward
direction. With rotation of the chain, any “tight
spot” and a “loose spot” are due to inconsistent
chain wheel roundness. Adjust the chain so
there is no looseness when the chain is in one
of its “tight spots.”
Derailleur equipped bicycles use a narrower
“1/2 x 3/32” chain that has no master link. With
a “1/2 x 3/32” chain, it is necessary most of the
time to use a special tool to push a link pin out
of a chain to separate and remove it. There are
many methods of measuring the chain to deter-
mine if it is too worn. There are some excellent
chain wear indicators for sale at bike shops.
Since the chain rotates a lot more on the rear
wheel than the front, please note that replacing
any already badly worn chain may mean that
you might also need to replace the rear wheel
cassette or freewheel as well.
Pedals
Toe clips and straps are a means to keep •
your feet correctly positioned and engaged
with the pedals. The toe clip positions the
ball of the foot over the pedal spindle,
which gives maximum pedaling power. The
toe strap, when tightened, keeps the foot
engaged throughout the rotation cycle of
the pedal. Toe clips and straps work most
effectively with cycling shoes designed for
use with toe clips. Care should be taken to
become accustomed to the use of toe clips
beforeridingintrafc.
Clipless pedals (sometimes called “step-in •
pedals”) are another means to keep feet
securely in the correct position for maximum
pedalingefciency.Theyhaveaplate,
called a “cleat,” on the sole of the shoe,
whichclicksintoamatingspring-loadedx-
ture on the pedal. They only engage or dis-
engagewithaveryspecicmotionthatmust
be practiced until it becomes instinctive.
12

Transporting Your Bike
All 16- and 20-inch wheeled folding bicycles
can be transported by the methods described
in sections a, b, c, and d below. Bikes with
24- and 26-inch wheels, as well as road bikes
with 700c wheels, have limited carrying ability
andwillnottinpublicconveyanceoverhead
compartments. Of course, using the methods
described in sections c and d below are no
problem. Our suggestion for commuting and
medium distance travel is that it is best to use
a nylon bag carry bag. For long distance travel,
the 24- and 26-inch wheeled bikes, and 700c
road bicycles, should be packed in a sturdy
travel case.
Carrying
Carrying a 16- to 20-inch wheeled folded
bicycle is quite easy for extra short to me-
dium distances. For Jetstream full suspen-
sion bicycles, make sure you have the black
nylon strap that came with your bike to bind
the wheels together. Simply grab the bicycle
and carry by the saddles edge. When cross-
ing a threshold, boarding a bus, train or
airplane or stowing the bike in an overhead
compartment, you will need to pick your bi-
cycle up. When the occasion arises that you
need to travel or commute and want your
bicyclewithyou,feelcondentknowingyour
bike is ready when you are.
Rolling
Amucheasierandmoreefcientmethod
to transport your 16 to 20-inch wheeled
bicycles is to roll them on their wheels. Re-
member that the Jetstream fork and frame
must be bound together so the wheels will
roll. Raise the folded bikes seatpost and
saddle approximately 305 mm (12 inches)
and tilt or angle the folded bike towards you.
Then simply push the bicycle forward. This
conveyance method is perfect for travel
from parking lots to a bus, train or airplane
terminal and transition from rough tarmac or
drivewaystosmoothgraniteortileoors.
Bag
Thisisacleanandefcientmethodofpack-
ing and carrying any of the many Dahon
bicycles. Simply place the folded, collapsed
or packed-away bicycle on the opened bag
thatislyingontheoor.Therearespacious
internal pockets for any parts that must be
removed such as pedals and any tools that
you might need later. A nice neat package is
visible when the sides of the bag are pulled
up tight and the handle/shoulder strap is
fastened. The entire operation takes only a
few seconds. It is perfect to carry your bike
on any sort of public conveyance or to carry
in a car. However, the bag is not approved
for airline check in.
Travel Case
A semi-hard travel case is a perfect long
distance transportation solution for many
folding bicycles. They work well on any pub-
lic transportation system. Many travel cases
are safe enough to withstand the most
difcultluggagesafetychallenge,whichis
checking luggage in at the airport. You can
ndtravelcaseslargeenoughformost16-,
20-, and 24-inch wheeled bicycles. Howev-
er, when carrying bikes with 26-inch wheels,
the wheels must be removed.
13

WARNING: Technological advances
have made bicycles and bicycle
components more complex, and the pace of
innovation is increasing. It is impossible for
this manual to provide all the information
required to properly repair and/or maintain
your bicycle. In order to help minimize the
chances of an accident and possible injury,
it is critical that you have any repair or
maintenance that is not specically
described in this manual performed by your
dealer. Equally important is that your
individual maintenance requirements will be
determined by everything from your riding
style to geographic location. Consult your
dealer for help in determining your mainte-
nance requirements.
WARNING: Many bicycle service and
repair tasks require special knowl-
edge and tools. Do not begin any adjust-
ments or service on your bicycle until you
have learned from your dealer how to
properly complete them. Improper adjust-
ment or service may result in damage to the
bicycle or in an accident that can cause
serious injury or death.
Service Intervals
Some service and maintenance can and should
be performed by the owner, and requires no
special tools or knowledge beyond what is pre-
sented in this manual.
The following are examples of the type of
service you should perform yourself. All other
service, maintenance and repair should be per-
formed in a properly equipped facility by a qual-
iedbicyclemechanic,usingthecorrecttools
andproceduresspeciedbythemanufacturer.
Break-in Period
Your bike will last longer and work better if
you break it in before riding it hard. Control
cables and wheel spokes may stretch or “seat”
whenanewbikeisrstusedandmayrequire
readjustment by your dealer. Your Mechanical
Safety Check will help you identify some things
that need readjustment. But even if every-
thingseemsnetoyou,itisbesttotakeyour
bike back to the dealer for a checkup. Dealers
typically suggest you bring the bike in for a
30-day checkup. Another way to judge when it
istimefortherstcheckupistobringthebike
inafterthreetovehoursofhardoff-roaduse,
or about 10 to 15 hours of on-road or more
casual off-road use. But if you think something
is wrong with the bike, take it to your dealer
before riding it again.
After Every Long or Hard Ride
If the bike has been exposed to water or grit,
or at least every 100 miles, clean it by wiping it
cleanandlightlyoilthechainwithadryTeon
lubrication or a synthetic based chain lube.
Then, very importantly, wipe off excess oil.
Long lasting lubrication is a function of climate.
(Hot or cold, wet or dry.) For general cycle
lubrication, Dahon suggests using lightweight
mineral based oil that is commonly available
in most bike shops or hardware stores. If you
have any questions, please talk to your dealer
as an incorrect lubricant can damage the
painted surfaces.
After Every Long or Hard Ride or After
Every 10 to 20 Hours of Riding
Squeeze the front brake and rock the bike
forward and back. If you feel a clunk with each
forward or backward movement of the bike,
you probably have a loose headset. Have your
dealer check it.
Lift the front wheel off the ground and swing
it from side to side. If you feel any binding or
roughness in the steering, you may have a tight
headset. Have your dealer check it.
Grab one pedal and rock it toward and away
from the centerline of the bike; then do the
same with the other pedal. Anything feel loose?
If so, have your dealer check it.
Service
14

Take a look at the brake pads. Starting to look
worn or not hitting the wheel rim squarely?
Time to have the dealer adjust or replace them.
Carefully check the control cables and cable
housings. Any rust? Kinks? Fraying? If so, have
your dealer replace them.
Squeeze each adjoining pair of spokes on
either side of each wheel between your thumb
andindexnger.Dotheyallfeelaboutthe
same? If any feel loose, have your dealer
check the wheel.
Check to make sure that all parts and acces-
sories are still secure, and tighten any that are
not. When replacement parts are necessary,
be sure to use factory authorized replacement
parts from your local authorized Dahon dealer.
Check the frame, particularly in the area
around all tube joints; the handlebars; the
stem; and the seatpost for any deep scratches,
cracks or discoloration. These are signs of
stress-caused fatigue and indicate that a part
is at the end of its useful life and needs to be
replaced.
WARNING: Like any mechanical
device, a bicycle and its components
are subject to wear and stress. Different
materials and mechanisms wear or fatigue
from stress at different rates and have
different life cycles. If a component’s life
cycle is exceeded, the component can
suddenly and catastrophically fail, causing
serious injury or death to the rider. Scratch-
es, cracks, fraying and discoloration are
signs of stress-caused fatigue and indicate
that a part is at the end of its useful life and
needs to be replaced. While the materials
and workmanship of your bicycle or of
individual components may be covered by a
warranty for a specied period of time by
the manufacturer, this is no guarantee that
the product will last the term of the
warranty. Product life is often related to the
kind of riding you do and to the treatment to
which you submit the bicycle. The bicycle’s
warranty is not meant to suggest that the
bicycle cannot be broken or will last forever.
It only means that the bicycle is covered
subject to the terms of the warranty.
15

Dahon Five-Year Limited
Warranty
Dahon warrants its bicycle frames, handle-
posts, and rigid forks to be free from defects in
materialsandworkmanshipforaperiodofve
years. In addition, Dahon warrants all original
parts on the bicycle, excluding suspension
forks and rear shocks, for a period of one year
from the date of purchase. Suspension forks
and rear shocks shall be covered by the war-
ranty of their original manufacturers.
This warranty is limited to the repair or replace-
ment of a defective frame, fork, or defective
part and is the sole remedy of the warranty.
This warranty applies only to the original owner
and is not transferable. This warranty only
covers bicycles and components purchased
through an authorized Dahon dealer and
are only valid within the country in which the
bicycle was purchased. The warranty does
not cover normal wear and tear, improper as-
sembly or follow-up maintenance, installation
of parts or accessories not originally intended
or compatible with the bicycle as sold, damage
or failure due to accident, misuse or neglect, or
modicationoftheframe,forkorcomponents.
Lifetime Warranty Upgrade
The warranty on the frame, handlepost and
rigid fork may be upgraded to a lifetime war-
rantyiftheoriginalownerllsouttheonline
registration card. The warranty is activated
when the bicycle is tuned and adjusted by a
professionalmechanicbeforetheowner’srst
ride. To activate your Dahon warranty and Life-
time Frame Warranty, please visit our On-line
Warranty Registration page. Go to www.dahon.
com/registration.htm. Registering your Dahon
serves as proof of original ownership for future
warranty issues.
*Exclusions from the Dahon Five-Year Lim-
ited Warranty also apply to the lifetime frame
warranty.
Exclusions
For all city, road or trekking bikes, damage •
resulting from commercial use, accident,
misuse, abuse, neglect or from anything
other than normal and ordinary use of the
product.
For all mountain bikes, damage result-•
ing from uses beyond cross-country and
marathon riding or from anything other than
normal and ordinary use of the product.
Making a Warranty Claim
You must at your own expense, deliver, mail
or ship the damaged part, a photo of the de-
fective part, and a description of the defect,
together with both the original bill of sale and
this limited warranty statement as proof of war-
ranty coverage, to your place of purchase. A
warranty registration card must be completed
and received by Dahon before a warranty claim
can be processed. The retailer from whom
you bought your bicycle will contact Dahon to
determine if the necessary repairs are covered
by the warranty.
NOTE: This warranty does not affect the statu-
tory rights of the consumer. Where applicable,
local laws will take precedent over this contract.
Warranty
16

Handlebar, Headset, Saddle, and Seat Post
Component
in•lbs
Newton Meters (Nm)
kgf•cm
Dahon large hex key headset screw (10mm) 52~87 6.8~11.3 60~100
Dahon handlepost clamp screw (6mm) 87 11.3 100
Stem steer tube binder bolts; threadless headset 115~145 13~16.4 132~167
Dahonthreadlessinniteadjustablestemh/barclamp 44~53 5~6 51~61
Dahonthreadlessinniteadjustablestemrearstemclamp 62~71 7~8 71~82
Stem handlebar clamp 1 or 2 binder bolts 175~260 19.8~29.4 201~299
Stem handlebar clamp 4 binder bolts 120~145 13.6~16.4 138~167
MTB bar ends, alloy 144 16.3 164
MTB bar ends, magnesium 70 7.9 81
Seat rail binder 35~60 4~6.8 40~69
Kore I-beam rail clamp 85 9.6 98
Torque Values
17

Brake-Rim and Disc and Brake Lever
Component in•lbs Newton Meters (Nm) kgf•cm
Brake lever - MTB type 53~60 6~6.8 61~69
Brake lever - drop bar type (including STI & ERO types) 55~80 6.2~9 63~92
Disc rotor to hub (M5 bolts) 18~35 2~4 21~40
Disc rotor to hub (M965 rotor lockring) 350 39.5 402.5~
Disc rotor to hub (Avid) 55 6.2 63
Caliper mount 55~70 6.2~7.9 63~81
Crankset, Bottom Bracket and Pedal Area
Component in•lbs Newton Meters (Nm) kgf•cm
Pedal into crank 307 34.7 353
Crank bolt - including spline and square type spindles 300~395 33.9~44.6 345~454
Crank bolt - one key release 44~60 5~6.8 51~69
Crank bolt - one key release (Truvativ) 107~125 12.1~14.1 123~144
Bottom bracket adjustable type 610~700 68.9~79.1 702~805
Bottom bracket cartridge type 435~610 49.1~68.9 500~702
18

Front and Rear Hubs; QR and Nutted Axles
Component in•lbs Newton Meters (Nm) kgf•cm
Freehub body 305~434 34.5~49 35~499
Cassette sprocket lockring; disc brake lockring 260~434 29.4~49 299~499
Front axle nuts 180 20.3 207
Rear axle nuts to frame (non-quick release type wheels) 260~390 29.4~44.1 299~449
Frame and Fork
Component in•lbs Newton Meters (Nm) kgf•cm
BAB lower frame coupling 35 4 40
BAB upper seat binder bolt 35~55 4~6.2 40~63
BB mid seat mast binder bolt 35~55 4~6.2 40~63
Kickstand mounting bolt 60 6.8 69
H2O cage mounting screw 25~35 2.8~4 29~40
Frame front or rear rack braze-on bolt torque 25~35 2.8~4 29~40
Fender to frame mounting bolt torque 50~60 5.6~6.8 58~69
Formulas for converting to other torque designations:
in•lb=ft•lbx12
in•lb=Nmx8.851
in•lb=kgf•cm/1.15
19

© 2009 DAHON, BPSA
2009.09.EN
Dahon California INC.
833 Meridian Street
Duarte CA 91010
1-800-442-3511
www.dahon.com
Dahon TW
8F-8, #6, Lane 609, Chung Hsin RD., Sec 5
San Chung, Taipei Hsien ROC 241, Taiwan
+886-2-2999-5623
/