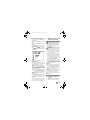
Silvercrest SKMK 1200 D4 Operating Instructions Manual
- Category
- Blenders
- Type
- Operating Instructions Manual
This manual is also suitable for

HOYER Handel GmbH
Tasköprüstraße 3
DE-22761 Hamburg
GERMANY
Status of information · Ημερομηνία έκδοσης πληροφοριών · Stand der Informationen:
MONSIEUR CUISINE ÉDITION PLUS SKMK 1200 D4
05/2019 ID: SKMK 1200 D4_19_V1.2
MONSIEUR CUISINE ÉDITION PLUS
Bedienungsanleitung
DE
GB
GR
CY
DE
MONSIEUR CUISINE ÉDITION PLUS
δηγία χρήσης
GR
CY
IAN 317553_1901 IAN 317553_1901
GR
CY
MONSIEUR CUISINE ÉDITION PLUS
Operating instructions
GB
CY
_317553_MC_plus_GR_CY_U1U4.fm Seite 1 Mittwoch, 15. Mai 2019 9:46 09

English..................................................................................... 2
Ελληνικά ............................................................................... 40
Deutsch.................................................................................. 80
__317553_MC_plus_GR_CY.book Seite 2 Freitag, 12. April 2019 10:00 10

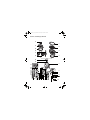
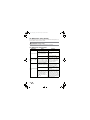
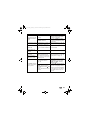
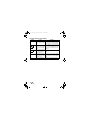
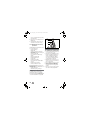
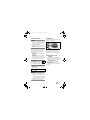
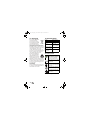
Overview /
Επισκόπηση
/
Übersicht
1213
35
9
4
32
29
2
34
1
30
3
6
31
14
33
5
11
28
18
7
8
23
24
25
27
17
26
19
20
21
22
16
15
A
36
10
10
__317553_MC_plus_GR_CY.book Seite 3 Freitag, 12. April 2019 10:00 10

2
GB
Contents
1. Overview ........................................................................................ 4
2. Display screens ................................................................................ 5
3. Functions in an overview ................................................................. 6
4. Intended purpose ............................................................................ 7
5. Safety instructions ........................................................................... 8
6. Items supplied ............................................................................... 12
7. Unpacking und setting up .............................................................. 12
8. Scale ............................................................................................. 13
9. Operating the device ..................................................................... 14
9.1 Automatic lock.................................................................................... 14
9.2 Power supply...................................................................................... 14
9.3 Switching the device on and off............................................................ 14
9.4 Display.............................................................................................. 14
9.5 Operating the buttons.......................................................................... 15
9.6 Setting the time................................................................................... 16
9.7 Setting the temperature ........................................................................ 16
9.8 Setting the speed ................................................................................ 17
9.9 Anti-clockwise rotation
................................................................. 17
9.10 Turbo function .................................................................................... 18
9.11 Overflow ........................................................................................... 18
9.12 Starting and stopping the device........................................................... 18
10. Using the blender jug ..................................................................... 19
10.1 Removing the blender jug .................................................................... 19
10.2 Markings inside the blender jug............................................................ 19
10.3 Using and removing the blade assembly................................................ 19
10.4 Insert blender jug ................................................................................ 20
10.5 Insert and remove the mixer attachment ................................................. 21
10.6 Put on the lid of the blender jug ............................................................ 21
10.7 Use the lid for the filler opening ............................................................ 22
10.8 Cooking and steaming with the cooking pot........................................... 22
10.9 Using the spatula ................................................................................ 23
11. Steaming
............................................................................. 23
11.1 General programme information........................................................... 23
11.2 Preparation of the steamer inserts.......................................................... 24
11.3 Starting the steaming process ............................................................... 24
11.4 Checking the doneness........................................................................ 25
11.5 Steaming with the cooking pot.............................................................. 25
11.6 Overheating protection........................................................................ 26
__317553_MC_plus_GR_CY.book Seite 2 Freitag, 12. April 2019 10:00 10

3
GB
12. Tips on steaming ........................................................................... 26
12.1 Using steamer inserts ........................................................................... 26
12.2 Preparing menus ................................................................................. 26
13. Kneading
.............................................................................26
13.1 General programme information ........................................................... 26
13.2 Starting the program............................................................................ 26
14. Browning
.............................................................................27
14.1 General programme information ........................................................... 27
14.2 Starting the program............................................................................ 27
15. Cleaning and servicing the device .................................................. 28
15.1 Cleaning the base unit ......................................................................... 28
15.2 Cleaning in the dishwasher .................................................................. 28
15.3 Cleaning the accessories...................................................................... 29
15.4 Cleaning, checking and replacing seals................................................. 29
15.5 Cleaning, checking and replacing the spatula......................................... 30
15.6 Descaling ........................................................................................... 30
15.7 Storage.............................................................................................. 30
15.8 Replacing the blade socket................................................................... 31
16. Malfunctions, Cause, Remedy ........................................................ 32
16.1 Malfunctions during operation .............................................................. 32
16.2 Error messages on the display............................................................... 34
17. Disposal ........................................................................................ 35
18. Technical specifications .................................................................. 35
19. How to order accessories ............................................................... 36
20. Website ......................................................................................... 36
21. Warranty of the HOYER Handel GmbH .......................................... 36
__317553_MC_plus_GR_CY.book Seite 3 Freitag, 12. April 2019 10:00 10

4
GB
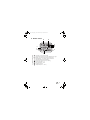
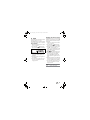
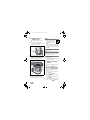
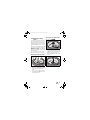
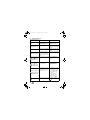
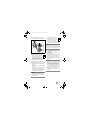
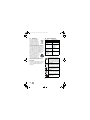
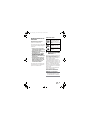
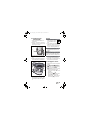
1. Overview
1 Lid for the steamer baskets
2 Steamer basket, shallow
3 Steamer basket, deep
4 Seal of the deep steamer basket (ensure the correct position)
5 Blender jug
60/I Main switch
7 Power cable with mains plug
8 Mains power socket
9 Socket for the blender jug
10 Blade socket
11 Overflow hole
12 Locking system
13 Base unit
14 Suction feet
15 LED for the automatic lock
16 Scale
17 Temperature controller
18 Speed controller
19 START/STOP Starting and stopping the device
20 TURBO Pulse button
21 Changing the direction of rotation
22 Browning program
23 Steaming program
24 Dough kneading program
25 Starting the scale / activate tare function
26 Timer
27 Display
28 Seal for blade assembly (ensure the correct position)
29 Blade assembly (with flower-shaped hub)
30 Cooking pot
31 Mixer attachment
32 Spatula
33 Seal for the lid of the blender jug (ensure the correct position)
34 Lid for the blender jug
35 Measuring beaker
Figure A: accessories: spare blade socket
36 Silicone cover
not shown:
37 Unlocking lever
__317553_MC_plus_GR_CY.book Seite 4 Freitag, 12. April 2019 10:00 10

5
GB
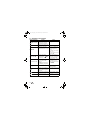
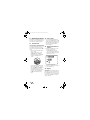
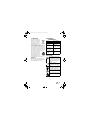
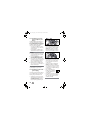
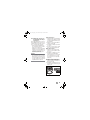
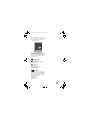
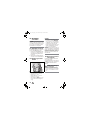
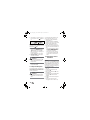
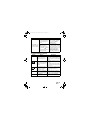
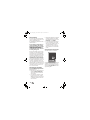
2. Display screens
A
C
D
E
F
G
H
I
J
A Time display (1 second to 90 minutes)
B Turbo function cannot be used, since the temperature is too high
C Blender jug has not been positioned or closed correctly
D Selected speed (1 - 4) is suited for the mixer attachment
E Temperature of the food in the blender jug
F Display of the weight in grams up to 5,000 g
G Display of the speed 1 - 10
H Set to anti-clockwise / active
I Symbol for the speed
J set temperature (37 °C - 130 °C)
B
__317553_MC_plus_GR_CY.book Seite 5 Freitag, 12. April 2019 10:00 10

6
GB
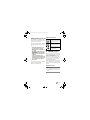
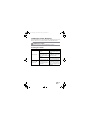
3. Functions in an overview
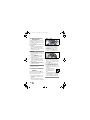
Button/Component Function Notes
25 / Scale16
Weighing accurately to the gram
with tare function (set to 0 to
weigh additional ingredients)
up to 5 kg
21
Gentle mixing of food not to be
chopped
TURBO20
Briefly switch to the highest
speed, e.g. to chop nuts and
small amounts of herbs or onions
- Function is blocked if the
food temperature in the
blender jug exceeds
60 °C.
- For liquids: up to no more
than 1 litre
- Do not use with a mixer at-
tachment31
Blade assembly29
- To crush, chop, mash
- For the programme
- With the function for
gentle mixing
- Must always be used to
seal the blender jug5
- If necessary, cut food first
in pieces with an edge
length of approx. 3 - 4 cm
Mixer attachment31
For fluid food
- To whip cream (at least
200 ml)
- To whip egg white (at least
2eggs)
- To emulsify (e.g. mayonnaise)
- must only be used with
speed settings 1 to 4
- Must not be used with func-
tion TURBO
Cooking pot30
To cook and stew Fill the blender jug5 with at
least 500 ml of water
23
Programme for the gentle steam-
ing with steamer baskets2
and3, especially for vegetables,
fish and meat
Also possible with the cooking
pot30
24
To knead doughs with the blade
assembly29
A maximum of 500 g of flour
can be processed
22
For lightly browning food, e.g.
meat or onions
Small quantities, cut in pieces
__317553_MC_plus_GR_CY.book Seite 6 Freitag, 12. April 2019 10:00 10

7
GB
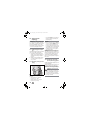
Thank you for your trust!
Congratulations on the purchase of your
new “Monsieur Cuisine Édition Plus” food
processor with cooking function.
For a safe handling of the product and in or-
der to get to know the entire scope of fea-
tures:
• Thoroughly read these user in-
structions prior to initial use.
• Above all, observe the safety in-
structions!
• The device should only be used
as described in these operating
instructions.
• Keep these user instructions for
reference.
• If you pass the device on to
someone else, please include this
copy of the user instructions. The
user instructions are a part of
the product.
We wish you a lot of joy with your new food
processor with cooking function
“Monsieur Cuisine Édition Plus”!
Symbol on your device
4. Intended purpose
Monsieur Cuisine is used to mix, whisk, beat,
stir, chop, mash, emulsify, steam, stew, knead,
brown, cook and weigh food.
These user instructions describe the basic
functions such as mixing, chopping and
steaming. For information on the prepara-
tion of special dishes, refer to the recipe
book included in the delivery.
The device is designed for private, domestic
use. The device must only be used indoors.
This device must not be used for commercial
purposes.
Foreseeable misuse
WARNING! Risk of material damage!
~ Do not use the device to chop particu-
larly hard food such as bones or nut-
megs.
The food-safe material of de-
vices with this symbol will not
change the taste or smell of
food.
This symbol warns you against
touching the hot surface.
This symbol warns against
coming into contact with the
hot water steam.
__317553_MC_plus_GR_CY.book Seite 7 Freitag, 12. April 2019 10:00 10

8
GB
5. Safety instructions
Warnings
If necessary, the following warnings will be used in these user instructions:
DANGER! High risk: failure to observe this warning may result in injury to life and
limb.
WARNING! Moderate risk: failure to observe this warning may result in injury or serious
material damage.
CAUTION: low risk: failure to observe this warning may result in minor injury or material
damage.
NOTE: circumstances and specifics that must be observed when handling the device.
Instructions for safe operation
~
Children must be prevented from using this device.
~
This device with its power cable must be stored out of the reach of
children.
~
Cleaning and user maintenance must not be performed by children.
~ Children must not play with the device.
~
This device can be used by people with restricted physical, sensory
or intellectual abilities or people without adequate experience
and/or understanding if they are supervised or instructed on how
to use this device safely and if they are aware of the resulting risks.
~
The appliance must not be immersed in water.
~
The surfaces of the device become very hot during opera-
tion. During operation, only grip the following parts of the
device using potholders or oven gloves:
- the steamer attachments,
- the lid for the steamer attachments,
- the blender jug,
- the lid for the blender jug and
- the measuring beaker.
~
The device must be disconnected from the mains if left unattended
and prior to assembly, disassembly or cleaning.
~
Please remember that the blades of the blade assembly
are very
sharp:
- Never touch the blades with your bare hands, to avoid cuts.
- When washing manually, the water should be sufficiently clear
so that you can see the blade assembly easily to avoid injuries
caused by the very sharp blades.
__317553_MC_plus_GR_CY.book Seite 8 Freitag, 12. April 2019 10:00 10

9
GB
- When emptying the blender jug, ensure not to touch the blades
of the blade assembly.
- When removing and inserting the blade assembly ensure not to
touch the blades.
~
During the turbo function, ensure that no hot ingredients are in the
blender jug. These could be ejected and may cause scalding.
~
After being switched off, the blade assembly and the mixer attach-
ment will continue to rotate for a while. Therefore, the automatic
lock provides protection against the opening of the lid prior to the
standstill. Especially liquid food may move even after the standstill
of the blade assembly. Do not open the lid until the food is at a
standstill.
~
This device is not intended to be operated using an external timer
clock or a separate remote control system.
~
If the power cable of this device should become damaged, it must
be replaced by the manufacturer, the manufacturer's customer ser-
vice department or a similarly qualified specialist, in order to avoid
any hazards.
~
Prior to replacement of parts or attachments which move when in
operation, the device must be switched off and disconnected from
the mains.
~
Make sure that no liquid overflows onto the plug connections of the
device.
~
Remember that the surface of the heating element remains hot after
use.
~
This device is equally intended for use in the home and in applica-
tions similar to the home, such as for example...
… in kitchens for staff in shops, offices and other commercial set-
tings;
… on agricultural properties;
… by customers in hotels, motels and other residential facilities;
… in bed-and-breakfast establishments.
~
Please take note of the chapter on cleaning (see “Cleaning and ser-
vicing the device” on page 28).
__317553_MC_plus_GR_CY.book Seite 9 Freitag, 12. April 2019 10:00 10

10
GB
DANGER for children
~ Children must not play with packing ma-
terial. Do not allow children to play with
plastic bags. There is a risk of suffoca-
tion.
DANGER to and from pets
and livestock
~ Electrical devices can represent a haz-
ard to pets and livestock. In addition,
animals can also cause damage to the
device. For this reason you should keep
animals away from electrical devices at
all times.
DANGER! Risk of electric
shock due to moisture
~ The device must never be operated in
the vicinity of a bathtub, a shower, a
filled hand basin or similar.
~ The base unit, the power cable and the
mains plug must not be immersed in wa-
ter or other liquids.
~ Protect the base unit against moisture,
water drips and splashes.
~ Should liquids enter the base unit, pull
out the mains plug immediately. Have
the device checked before reusing.
~ Never touch the device with wet hands.
~ If the device falls into water, disconnect
the mains plug immediately. Only then
is it safe to retrieve the device.
DANGER! Risk of electric
shock
~ Only plug the mains plug into the wall
socket after the device has been com-
pletely assembled.
~ Only connect the mains plug to a prop-
erly installed and easily accessible
grounded wall socket whose voltage
corresponds to the specifications on the
rating plate. The wall socket must contin-
ue to be easily accessible after the de-
vice is plugged in.
~ Ensure that the power cable cannot be
damaged by sharp edges or hot points.
Do not wrap the power cable around
the device.
~ Even after it has been switched off, the
device has not been completely discon-
nected from the mains. In order to fully
disconnect it, pull out the mains plug.
~ Ensure that the power cable never de-
velops into a trip hazard, and that no-
body can get caught in or stand on it.
~ Keep the power cable away from hot
surfaces (e.g. hot plate).
~ When using the device, ensure that the
power cable cannot be trapped or
crushed.
~ When removing the mains plug from the
wall socket, always pull the plug and
never the cable.
~ Disconnect the mains plug from the wall
socket …
…if there is a fault,
… while you do not use the Monsieur
Cuisine,
… before you assemble or disassemble
the Monsieur Cuisine,
… before you clean the Monsieur
Cuisine and
… during thunderstorms.
~
Do not use the device if there is visible
damage to the device or the power cable.
~ To avoid any risk, do not make modifi-
cations to the product.
__317553_MC_plus_GR_CY.book Seite 10 Freitag, 12. April 2019 10:00 10

11
GB
DANGER! Risk of injury
from cutting
~ The device must never be operated with-
out the container.
~ Never reach into the rotating blades.
Do not touch rotating parts with spoons
or similar utensils. Keep long hair or
loose clothing away from rotating parts
as well.
Single exception: the spatula included
in the delivery is designed so that when
stirring clockwise it does not come into
contact with the blade assembly. The
spatula must not be used with the mixer
attachment.
FIRE HAZARD
~ Before turning the device on, place it on
a level, stable, dry, heat-resistant sur-
face.
~ It is not necessary to constantly super-
vise during operation, but just to check
regularly. This applies in particular
when very long cooking times are set.
DANGER! Risk of injury
through burning
~ The surfaces of the device become very
hot during operation. During opera-
tion, always use potholders or oven
gloves when touching the steamer bas-
kets or the lids for the steamer baskets.
~ Only transport the device when it has
cooled down.
~ Wait for the device to cool down before
cleaning.
DANGER! Risk of injury
through scalding
~ Avoid opening the lids for the steamer
baskets during the cooking process,
since hot steam will escape.
~ Ensure that hot steam escapes through
the steam vents of the lid for the steamer
inserts. Never cover these openings,
since otherwise steam might have
backed up in the device escaping
abruptly when the lid is opened.
~ If you want to open the lids for the
steamer baskets, lift the lid first at the
rear so that the escaping surge of steam
is guided away from you.
WARNING! Risk of material
damage
~ Place the device exclusively on a level,
dry, non-slip and waterproof surface, so
that it can neither fall nor slip off.
~ Never place the device on a hot sur-
face, e.g. hot plate.
~ The mixer attachment must only be used
with speed settings 1 to 4.
~ The button TURBO must not be used
when using the mixer attachment.
~ Use the blender jug exclusively with the
lid in place, otherwise liquid might be
ejected.
~ Do not change the position of the de-
vice, as long as there is still food or
dough in the device.
~ Never overfill the blender jug, since oth-
erwise the contents might be ejected.
Overflowing liquid would flow onto the
surface. You should therefore place the
device on a waterproof surface.
~ Ensure that during steaming, there is
never too much or too little water in the
device.
~ Never place the device directly under a
wall-mounted cupboard, as steam
comes out from the top and could dam-
age the furniture.
~ Only ever use clean drinking water for
producing steam.
~
Do not operate the device when it is emp-
ty, as this causes the motor to overheat
and may result in it being damaged.
~ Only use the original accessories.
~ Do not use any astringent or abrasive
cleaning agents.
~ The device is equipped with non-slip
synthetic suction feet. As furniture is
coated with a wide array of varnishes
__317553_MC_plus_GR_CY.book Seite 11 Freitag, 12. April 2019 10:00 10

12
GB
and synthetics, and is also treated with
different care products, it cannot be fully
ruled out that some of these materials
contain ingredients that could attack
and soften the non-slip plastic bases. If
necessary, place a non-slip mat under
the device.
6. Items supplied
1 food processor with cooking function
“Monsieur Cuisine Édition Plus“,
baseunit13
1power cable7
1 blender jug5 with:
- Blade assembly29
- Lid for the blender jug34
- Measuring beaker35
1 cooking pot30
1 mixer attachment31
1spatula32
1 steamer attachment, comprising:
- Steamer basket, deep3
- Steamer basket, shallow2
- Lid for the steamer baskets1
1 spare part: blade socket10 including sil-
icone cover36
1 copy of the user instructions
7. Unpacking und
setting up
During production, a thin film of oil is ap-
plied to protect many components. Prior to
the first use, operate the device only with
water so that any residues can evaporate.
NOTE: when in operation for the first time,
some odour may be generated by the de-
vice. This is harmless. Please ensure ade-
quate ventilation.
1. Remove all packing material.
2. Check to ensure that all parts are pres-
ent and undamaged.
3. Clean the device prior to its first
use! (see “Cleaning and servicing the
device” on page 28).
4. Use the blender jug5 to bring 2.2 litres
of water to a boil once, pouring it away
afterwards (see “Setting the tempera-
ture” on page 16).
5. Place the base unit13 on a level, dry,
non-slip and waterproof surface, so that
it can neither fall nor slip off.
CAUTION:
~ Overflowing liquid would flow onto the
surface. You should therefore place the
device on a waterproof surface.
__317553_MC_plus_GR_CY.book Seite 12 Freitag, 12. April 2019 10:00 10

13
GB
8. Scale
The installed kitchen scales allows accurate
weighing to the gram up to 5 kg.
The scale16 is easy to operate and ready
for use unless another cycle is in operation.
Easy weighing
1. The device is switched on but no other
cycle is in operation.
2. Press the button 25. The button
lights up. The display27 shows 0000 g.
3. Place the object to be weighed on the
scale16. On the display27, the
weight will be shown in grams up to
5kilograms.
4. Remove the object to be weighed from
the scale16.
5. Press one of the program buttons or se-
lect a time or temperature to end the
weighing function.
Weighing with the tare function
Apply the tare function, if you want to set the
weight of an object placed on the scale16
to 0 grams and then add another object to
be weighed.
1. The device is switched on but no other
cycle is in operation.
2. Press the button 25. The button
lights up. The display27 shows 0000 g.
3. Place the object to be weighed on the
scale16. This may also be, for in-
stance, an empty or filled bowl. On the
display27, the weight will be shown in
grams up to 5 kilograms.
4. Press 25 to set the weight indica-
tor to 0.
5. Add the new object to be weighed to
the existing object to be weighed.
On the display27 the weight of the
added object to be weighed is shown in
grams.
6. Repeat the procedure with an additional
object to be weighed or remove the ob-
ject to be weighed from the scale16.
7. Press one of the program buttons or se-
lect a time or temperature to end the
weighing function.
NOTE: if too much weight is put on the
scale, - - - - appears on the display.
__317553_MC_plus_GR_CY.book Seite 13 Freitag, 12. April 2019 10:00 10

14
GB
9. Operating the device
For safety reasons, the settings described in
this chapter, can only be selected when the
device has been assembled completely.
9.1 Automatic lock
This food processor is provided with an elec-
tronic lock of the lid for the blender jug34
or the deep steamer basket3. This is a pro-
tective function so the device cannot be
opened as long as the blade assembly29 is
turning.
- This lock is always activated when the
device is started.
-The LED 15 is lit as long as the
lid34 or the steamer basket3 is
locked. During this time, the lid34 or
the steamer basket3 cannot be
opened.
- After the appliance stops, the lock still
remains activated for several seconds.
Then, the LED 15 goes out and an
audio signal sounds. The lid34 or the
steamer basket3 can be opened.
- The higher the speed the longer the lock
stays active, since the blade assem-
bly29 and the food keep turning
longer.
9.2 Power supply
• First, connect the power cable
7
to the
mains power socket
8
of the base unit
13
and then plug the mains plug
7
into a suit-
able wall socket. The wall socket must con-
tinue to be easily accessible after the
device is plugged in.
9.3 Switching the device on
and off
• Set the main switch6 on the rear to I:
- All buttons light up briefly.
-The display27 is lit and briefly
shows a control display. Then the con-
trol symbols are displayed. All adjust-
able values are set to 0.
- An acoustic signal sounds.
• Set the main switch6 on the rear to 0
to switch the device off.
9.4 Display
The display27 shows all settings and oper-
ating values.
After approx. 5 minutes, the illumination of
the display27 goes off. As soon as any but-
ton is pressed or a control is turned, the illu-
mination of the display27 is switched on
again for 5 minutes.
__317553_MC_plus_GR_CY.book Seite 14 Freitag, 12. April 2019 10:00 10

15
GB
9.5 Operating the buttons
Illumination/Flashing of
the button(s)
Situation Function of the button
START/STOP19 flashes.
Settings were performed,
and a cycle can be started.
Press the button to start a cy-
cle.
START/STOP19 lights up.
The cycle is in operation. Press the button to stop a cy-
cle.
TURBO20 lit white.
Turbo function can be acti-
vated.
Keep the button pressed as
long as the function is need-
ed.
TURBO20 lit red.
The function is blocked (e.g.
because the food tempera-
ture inside the blender jug
exceeds 60 °C).
The button is blocked.
Program button ( 24,
23, 22) lights
up and START/STOP19
flashes.
The programme is selected
but not yet started.
Press START/STOP19 to
start the function.
Program button ( 24,
23, 22) lights
up and START/STOP19
lights up.
The programme is selected
and started.
In order to abort the pro-
gramme early, press
START/STOP19.
Program button 23
flashes and START/
STOP19 lights up.
The programme is selected
and started. However, the
heat-up time of 10 minutes is
still ongoing.
The programme starts auto-
matically.
- The timer26 can be
used to change the pre-
set time.
- In order to start the pro-
gramme before the
10minutes e
xpired,
press 23.
25 lights up.
The scale is activated. In order to set the weight in-
dicator to 0, press 25.
__317553_MC_plus_GR_CY.book Seite 15 Freitag, 12. April 2019 10:00 10

16
GB
9.6 Setting the time
Turn the timer 26 to set the time of the
cooking process or the processing:
• Turn the timer26 in the direction “-”:
reduce time
• Turn the timer26 in the direction “+”:
increase time
- The adjustable time ranges from
1 second to 90 minutes.
- The adjustment takes place via the fol-
lowing steps:
- up to 1 minute in intervals of seconds,
- as of 1 minute in 30-second intervals,
- as of 10 minutes in intervals of min-
utes.
- The time set is shown on the dis-
play27.
- After the function is started, the time is
counted down.
- If no time and no temperature are speci-
fied, the time display will show the time
from 0 seconds (00:00) up to 90 min-
utes (90:00). Then, the device will be
stopped automatically.
- During operation, the time can be
changed.
- Once the time set has elapsed, the de-
vice stops.
- After several seconds, the LED 15
goes out and an audio signal sounds.
The device can be opened.
NOTE: if the speed setting is higher than 6
and you set a time exceeding 15 minutes,
the time will automatically be decreased to
15 minutes when starting.
9.7 Setting the temperature
Turn the temperature controller 17 to set
the cooking temperature:
- The adjustable temperature ranges from
37 °C to 130 °C
(37, 45, 50, 55, 60,
65, 70, 75, 80, 85, 90, 95, 100, 105,
110, 115, 120, 125, 130°C)
.
- The temperature set is shown on the dis-
play27.
- In order to start the heat-up process, a
speed setting must be selected and a
time setting must be entered.
- During the heating process, the indica-
tion of the food temperature may vary
substantially.
- As soon as the selected temperature has
been reached, an acoustic signal is is-
sued and the temperature of the food is
shown behind the symbol .
- During operation, the temperature can
be changed.
NOTE: If a speed is set exceeding 3, the
heating function is blocked and no tempera-
ture can be set.
__317553_MC_plus_GR_CY.book Seite 16 Freitag, 12. April 2019 10:00 10

17
GB
9.8 Setting the speed
Turn the speed controller 18 to set the
speed:
- The speed can be adjusted in 10 incre-
ments:
- Speed 1 - 4: for the mixer attach-
ment31;
- Speed 1 - 10: for the blade assem-
bly29.
CAUTION:
~
The mixer attachment
31
must
only be used with speed settings
1 to 4. On the display
27
, a re-
spective indication appears.
~ When mixing liquids at speed 10, the
blender jug5 must not contain more
than 1 litre, since otherwise liquid might
be ejected (see “Using the blender jug”
on page 19). For speed settings of less
than 10, the blender jug5 may only be
filled up to a maximum of 2.2 litres.
- For further notes: see “Functions in an
overview” on page 6.
- The speed set is shown on the dis-
play27.
- During operation, the speed setting can
be changed.
- The speed cannot be set in the pro-
gram .
- If during operation you change the
speed to 0, the device will stop. To con-
tinue working, select a speed and press
the button START/STOP19.
- If a temperature has been selected, only
the speed settings 1 - 3 are available.
Soft start
In order to avoid that during sudden acceler-
ation of hot food liquid is ejected from the
blender jug5 or the device starts wobbling,
a soft start is provided for all settings except
for the turbo function:
- Soft start for food temperatures exceed-
ing 60 °C.
9.9 Anti-clockwise
rotation
The anti-clockwise rotation is used for gentle
stirring of food not to be chopped.
- By pressing button 21 the direc-
tion of rotation of the blade assem-
bly29 can be changed in standard
operation at any time.
- The anti-clockwise rotation can only be
applied at low speed settings 1 to 3.
- For programmes and ,
the anti-clockwise rotation is controlled
by the programme.
• Press 21 to activate the anti-clock-
wise rotation.
• Press 21 again to deactivate the
anti-clockwise rotation.
__317553_MC_plus_GR_CY.book Seite 17 Freitag, 12. April 2019 10:00 10

18
GB
9.10 Turbo function
CAUTION:
~ When mixing liquids, the blender jug5
must not contain more than 1 litre, since
otherwise liquid might be ejected.
~ Never use this function when the mixer
attachment31 is used.
With the turbo function you can briefly select
speed setting 10 (maximum). This, for exam-
ple, is used to quickly chop nuts, small
amounts of herbs or onions.
- TURBO20 lit white: the function is
possible.
- TURBO20 lit red: the button is
blocked, the function is disabled (e.g.
because the food temperature inside the
blender jug exceeds 60 °C).
NOTE: if you nevertheless press
the button TURBO20, a signal
will sound and the display27
will show the symbol on the right.
• Press and keep button TURBO20
pressed for as long as you need the
function.
NOTES:
• The turbo function will only work
- if the blade assembly29 is not turn-
ing.
- if the food temperature in the blender
jug5 is less than 60 °C.
• The speed is promptly increased to set-
ting 10 (maximum).
9.11 Overflow
In the holder of the blender jug9 there is an
overflow hole11.
Should liquid escape from the blender
jug5, this will not collect in the base
unit13, but can escape via the overflow
hole11 onto the surface.
9.12 Starting and stopping
the device
• After setting one or more values or a
programme, start the device by pressing
button START/STOP19.
• By pressing button START/STOP19
again, you abort an ongoing cooking
or processing process.
11
__317553_MC_plus_GR_CY.book Seite 18 Freitag, 12. April 2019 10:00 10
Page is loading ...
Page is loading ...
Page is loading ...
Page is loading ...
Page is loading ...
Page is loading ...
Page is loading ...
Page is loading ...
Page is loading ...
Page is loading ...
Page is loading ...
Page is loading ...
Page is loading ...
Page is loading ...
Page is loading ...
Page is loading ...
Page is loading ...
Page is loading ...
Page is loading ...
Page is loading ...
Page is loading ...
Page is loading ...
Page is loading ...
Page is loading ...
Page is loading ...
Page is loading ...
Page is loading ...
Page is loading ...
Page is loading ...
Page is loading ...
Page is loading ...
Page is loading ...
Page is loading ...
Page is loading ...
Page is loading ...
Page is loading ...
Page is loading ...
Page is loading ...
Page is loading ...
Page is loading ...
Page is loading ...
Page is loading ...
Page is loading ...
Page is loading ...
Page is loading ...
Page is loading ...
Page is loading ...
Page is loading ...
Page is loading ...
Page is loading ...
Page is loading ...
Page is loading ...
Page is loading ...
Page is loading ...
Page is loading ...
Page is loading ...
Page is loading ...
Page is loading ...
Page is loading ...
Page is loading ...
Page is loading ...
Page is loading ...
Page is loading ...
Page is loading ...
Page is loading ...
Page is loading ...
Page is loading ...
Page is loading ...
Page is loading ...
Page is loading ...
Page is loading ...
Page is loading ...
Page is loading ...
Page is loading ...
Page is loading ...
Page is loading ...
Page is loading ...
Page is loading ...
Page is loading ...
Page is loading ...
Page is loading ...
Page is loading ...
Page is loading ...
Page is loading ...
Page is loading ...
Page is loading ...
Page is loading ...
Page is loading ...
Page is loading ...
Page is loading ...
Page is loading ...
Page is loading ...
Page is loading ...
Page is loading ...
Page is loading ...
Page is loading ...
Page is loading ...
Page is loading ...
Page is loading ...
-
 1
1
-
 2
2
-
 3
3
-
 4
4
-
 5
5
-
 6
6
-
 7
7
-
 8
8
-
 9
9
-
 10
10
-
 11
11
-
 12
12
-
 13
13
-
 14
14
-
 15
15
-
 16
16
-
 17
17
-
 18
18
-
 19
19
-
 20
20
-
 21
21
-
 22
22
-
 23
23
-
 24
24
-
 25
25
-
 26
26
-
 27
27
-
 28
28
-
 29
29
-
 30
30
-
 31
31
-
 32
32
-
 33
33
-
 34
34
-
 35
35
-
 36
36
-
 37
37
-
 38
38
-
 39
39
-
 40
40
-
 41
41
-
 42
42
-
 43
43
-
 44
44
-
 45
45
-
 46
46
-
 47
47
-
 48
48
-
 49
49
-
 50
50
-
 51
51
-
 52
52
-
 53
53
-
 54
54
-
 55
55
-
 56
56
-
 57
57
-
 58
58
-
 59
59
-
 60
60
-
 61
61
-
 62
62
-
 63
63
-
 64
64
-
 65
65
-
 66
66
-
 67
67
-
 68
68
-
 69
69
-
 70
70
-
 71
71
-
 72
72
-
 73
73
-
 74
74
-
 75
75
-
 76
76
-
 77
77
-
 78
78
-
 79
79
-
 80
80
-
 81
81
-
 82
82
-
 83
83
-
 84
84
-
 85
85
-
 86
86
-
 87
87
-
 88
88
-
 89
89
-
 90
90
-
 91
91
-
 92
92
-
 93
93
-
 94
94
-
 95
95
-
 96
96
-
 97
97
-
 98
98
-
 99
99
-
 100
100
-
 101
101
-
 102
102
-
 103
103
-
 104
104
-
 105
105
-
 106
106
-
 107
107
-
 108
108
-
 109
109
-
 110
110
-
 111
111
-
 112
112
-
 113
113
-
 114
114
-
 115
115
-
 116
116
-
 117
117
-
 118
118
-
 119
119


Silvercrest SKMK 1200 D4 Operating Instructions Manual
- Category
- Blenders
- Type
- Operating Instructions Manual
- This manual is also suitable for
Ask a question and I''ll find the answer in the document
Finding information in a document is now easier with AI
in other languages
- Deutsch: Silvercrest SKMK 1200 D4
Related papers
-
Silvercrest SKMK 1200 A1 Operating Instructions Manual
-
-
-
-
-
-
Silvercrest SSDMD 600 A1 Operating Instructions Manual
-
-
-